Debian, a cornerstone of the Linux ecosystem, is renowned for its stability, security, and commitment to free and open-source software. Whether you’re a seasoned Linux user looking to deploy a robust server, a developer seeking a reliable workstation, or a privacy-conscious individual wanting a secure operating system, understanding how to install Debian is a fundamental skill. This guide will walk you through the entire process, from preparation to post-installation, ensuring a smooth and successful setup.
While the core installation process of Debian is relatively straightforward, its versatility means there are various paths you can take. We’ll focus on the most common installation method for desktops and servers, utilizing the official Debian installer. This comprehensive approach will cover everything you need to know, demystifying the process and empowering you to confidently install and configure your Debian system.

Preparing for Your Debian Installation
Before embarking on the installation journey, a bit of preparation goes a long way. This phase is crucial for a seamless experience and to avoid potential pitfalls. It involves ensuring you have the necessary hardware, the correct installation media, and a clear understanding of your system’s configuration.
System Requirements and Hardware Considerations
Debian is remarkably flexible and can run on a wide range of hardware, from older machines to the latest high-performance systems. However, it’s always good practice to be aware of the minimum recommended specifications to ensure optimal performance.
- Processor: A modern 64-bit processor is recommended for most use cases. While Debian can run on 32-bit systems, most current software is compiled for 64-bit architectures.
- RAM: For a desktop environment, at least 2GB of RAM is advisable for a comfortable experience. For server installations or minimal command-line setups, 1GB might suffice, but more is always better for multitasking and demanding applications.
- Storage: You’ll need at least 10GB of free disk space for a basic installation. However, for a fully functional desktop with applications and data, 20GB or more is recommended. Consider the size of your existing partitions if you plan to dual-boot.
- Bootable Media: You will need a USB drive (at least 4GB) or a DVD to create your bootable Debian installation media.
- Internet Connection: A stable internet connection is highly recommended during installation. This allows the installer to download the latest package updates and additional software, ensuring your system is up-to-date from the start.
Downloading the Debian Installation Image
The first concrete step is to obtain the Debian installation image. Debian offers several types of installation images, each suited for different needs.
- Netinst (Network Install) Image: This is the smallest image and contains only the basic installer and a minimal set of packages. It relies heavily on an internet connection to download the rest of the required software during installation. This is often the preferred choice for users with reliable internet access as it ensures you get the latest software versions.
- DVD/CD Images: These larger images contain a more comprehensive set of software, allowing for installations with less reliance on an internet connection. They are useful if your internet connectivity is intermittent or slow.
- Live Images: These images allow you to boot Debian directly from the installation media without installing it to your hard drive. This is an excellent way to try out Debian, test hardware compatibility, and even perform some basic tasks before committing to an installation.
You can download these images from the official Debian website (https://www.debian.org/download). Navigate to the “Download installers” section and choose the appropriate image for your architecture (e.g., amd64 for 64-bit Intel/AMD processors).
Creating Bootable Installation Media
Once you’ve downloaded the ISO image, you need to write it to a USB drive or burn it to a DVD to create bootable installation media.
For USB Drives:
- Linux: Use tools like
dd(command-line) or graphical tools like Etcher or UNetbootin.- Using
dd(advanced):- Identify your USB drive (e.g.,
/dev/sdX, be very careful to select the correct device, as this command will erase all data on it). You can usually find this usinglsblk. - Unmount any partitions on the USB drive:
sudo umount /dev/sdX1(replace X1 with your partition) - Write the ISO to the USB:
sudo dd if=/path/to/debian.iso of=/dev/sdX bs=4M status=progress
- Identify your USB drive (e.g.,
- Using
- Windows: Use tools like Rufus, Etcher, or UNetbootin. Rufus is a popular and reliable choice.
- macOS: Use Etcher or
ddin the Terminal (similar to Linux, but device names might differ, e.g.,/dev/diskX).
For DVDs:
- Use your operating system’s built-in disc burning utility or third-party software to burn the ISO image to a DVD-R. Ensure you select the option to “burn image” or “burn disc from ISO,” not just copy the file.
Backing Up Your Data
This is a critical step that cannot be stressed enough. Installing a new operating system often involves partitioning your hard drive, which can lead to data loss if not done correctly. Before proceeding, back up all important files, documents, photos, and any other data you cannot afford to lose to an external hard drive, cloud storage, or another safe location.
The Debian Installation Process: Step-by-Step
With your bootable media ready and your data backed up, you’re prepared to begin the actual installation. The Debian installer is designed to be user-friendly, guiding you through each stage.
Booting from Installation Media
- Insert the bootable media (USB drive or DVD) into your computer.
- Restart your computer.
- Access the BIOS/UEFI settings: As your computer starts, you’ll need to press a specific key to enter the BIOS or UEFI setup. Common keys include
Del,F2,F10,F12, orEsc. The key is usually displayed on the screen during the initial boot-up. - Change the boot order: Within the BIOS/UEFI settings, find the “Boot Order” or “Boot Priority” option. You need to set your USB drive or DVD drive as the primary boot device.
- Save changes and exit: Once you’ve adjusted the boot order, save your changes and exit the BIOS/UEFI setup. Your computer will then restart and should boot from your Debian installation media.
The Debian Installer Menu
Upon booting from the installation media, you’ll be presented with the Debian installer’s boot menu. You’ll typically have options like:
- Graphical Install: This provides a more visually intuitive, mouse-driven interface.
- Install: This uses the text-based installer, which is highly efficient and works well even on low-resource systems.
- Advanced options: For more experienced users, this might include options for expert installation or specific hardware support.
- Rescue mode: To recover a non-booting system.
- Memory test: To check your system’s RAM.
For most users, “Graphical Install” or “Install” is the recommended choice. Let’s proceed with the assumption of using the “Graphical Install” for clarity.
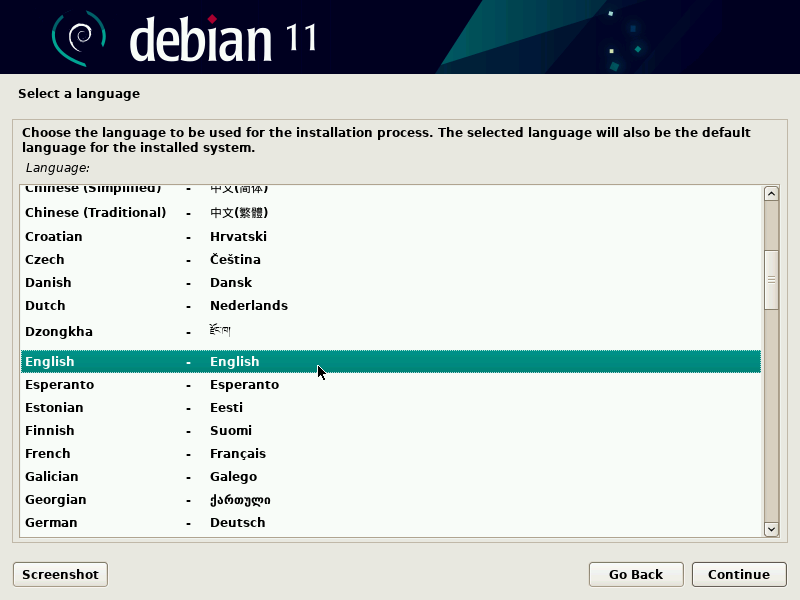
Language, Location, and Keyboard Layout
The installer will first prompt you to select:
- Language: Choose your preferred language for the installation process and the installed system.
- Location: Select your country or region. This helps set up time zones, currency, and other locale-specific settings.
- Keyboard Layout: Choose the keyboard layout that matches your physical keyboard.
Network Configuration
The installer will attempt to configure your network connection automatically using DHCP.
- Hostname: Enter a name for your computer. This is how it will be identified on the network.
- Domain Name: If you are on a network with a domain, you can enter it here. For a home network, you can often leave this blank or enter “localdomain.”
If DHCP fails, you’ll have the option to configure your network settings manually.
Setting Up User Accounts and Passwords
This is a crucial part of securing your system.
- Root Password: You’ll be asked to set a password for the “root” user. The root user has administrative privileges and can make system-wide changes. It’s highly recommended to set a strong, unique password for root.
- Create a New User: You’ll then be prompted to create a regular user account.
- Full Name: Enter your full name.
- Username: Choose a short, lowercase username for your account (e.g., “john,” “alex”).
- Password: Set a strong, unique password for your user account. This is the password you’ll use for everyday logins and for administrative tasks using
sudo.
Partitioning Your Hard Drive
This is perhaps the most critical step, as it determines how your disk space will be organized. You’ll have several options:
- Guided – Use entire disk: This is the simplest option, where Debian will automatically partition the selected disk for you. This is suitable if you’re installing Debian on a dedicated drive and don’t need to preserve existing data or operating systems.
- Guided – Use entire disk and set up LVM (Logical Volume Management): LVM provides more flexibility in managing disk space, allowing you to resize partitions more easily later. It’s a good option for more advanced users.
- Guided – Use entire disk and set up encrypted LVM: This encrypts your entire disk for enhanced security.
- Manual: This option gives you complete control over your disk partitioning. You’ll create and manage partitions (e.g.,
/,/home,swap) yourself. This is the most flexible but requires a good understanding of partitioning schemes.
For most users, especially those new to Linux, “Guided – Use entire disk” is the recommended starting point. If you intend to dual-boot with another operating system (like Windows), you’ll need to shrink its partition beforehand and then select “Manual” partitioning to create new partitions for Debian within the unallocated space.
A common partitioning scheme for a desktop installation includes:
- / (root): This is where the operating system files will be installed. A minimum of 15-20GB is recommended.
- /home: This partition stores your personal files and user settings. It’s good practice to have a separate
/homepartition so that you can reinstall or upgrade Debian without affecting your personal data. Allocate the remaining space here. - swap: This is used as virtual memory when your RAM is full. The size of the swap partition typically depends on your RAM. A common recommendation is to have swap equal to your RAM size, or up to 4GB for systems with abundant RAM.
Installing the Base System
Once partitioning is complete, the installer will begin copying the base system files to your hard drive. This process can take some time.
Package Manager Configuration
The installer will configure the apt package manager, which is Debian’s primary tool for installing, updating, and removing software.
- Select and scan additional media: If you used a DVD or a full CD image, you might be asked if you want to scan for additional installation media.
- Network mirror: You’ll be prompted to select a Debian archive mirror. This is a server from which your system will download software packages. Choosing a mirror geographically close to you can improve download speeds.
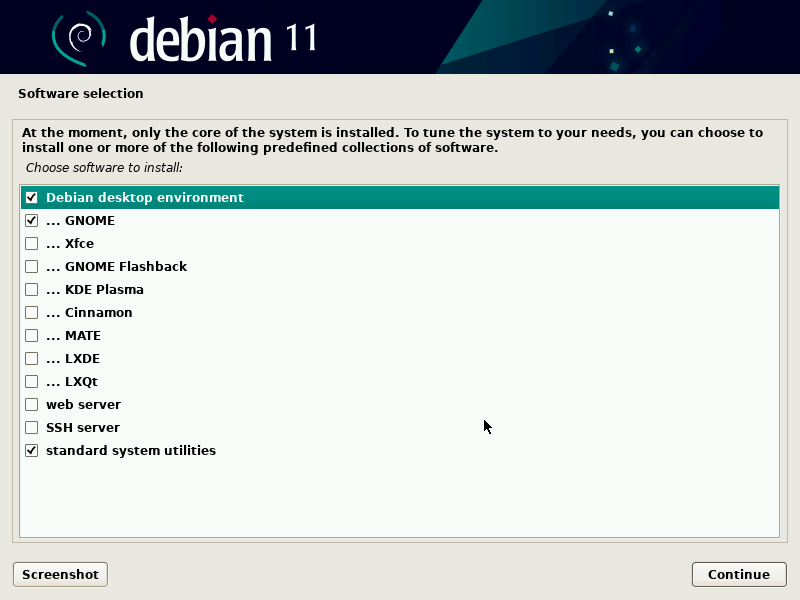
Popular Software Selection
This is where you choose the software that will be installed by default.
- Desktop environment: You’ll be asked to choose a desktop environment. Popular choices include GNOME, KDE Plasma, XFCE, LXQt, MATE, and Cinnamon. Each offers a different look and feel and resource utilization. If you’re unsure, GNOME or XFCE are good starting points.
- Standard system utilities: This option should generally be kept checked, as it includes essential command-line tools.
GRUB Boot Loader Installation
The GRUB (GRand Unified Bootloader) is essential for booting your operating system. It’s what allows you to choose between Debian and other operating systems if you have them installed.
- Install the GRUB boot loader to the master boot record (MBR) or EFI System Partition: The installer will detect your system’s boot mode (BIOS or UEFI) and guide you to install GRUB to the appropriate location. Ensure you select the correct disk (usually your primary hard drive, e.g.,
/dev/sda).
Completing the Installation
After the GRUB installation, the installer will perform some final configuration steps and then prompt you to restart your computer.
Post-Installation Steps and System Configuration
Congratulations! You’ve successfully installed Debian. However, the journey doesn’t end here. There are a few essential post-installation steps to ensure your system is fully functional, secure, and tailored to your needs.
First Boot and Login
Remove the installation media (USB drive or DVD) and restart your computer. You should be greeted by the GRUB boot loader menu, allowing you to select Debian. Once Debian boots, you’ll see the login screen for your chosen desktop environment. Log in with the username and password you created during installation.
Updating Your System
It’s crucial to update your system to ensure you have the latest security patches and software versions.
- Open a terminal: You can usually find the terminal application in your desktop environment’s application menu.
- Run the update commands:
sudo apt update: This command fetches the latest package information from the repositories.sudo apt upgrade: This command downloads and installs available updates.
You might be prompted to enter your password for sudo commands.
Installing Additional Software
Debian’s vast software repositories offer thousands of applications. You can install software using the apt command in the terminal or through graphical software centers provided by your desktop environment (e.g., GNOME Software, Discover for KDE).
- Example: Installing VLC Media Player:
sudo apt install vlc - Example: Installing the GIMP image editor:
sudo apt install gimp
You can search for available packages using:
apt search <software_name>
Configuring Your Desktop Environment
Explore your chosen desktop environment’s settings to customize its appearance and behavior. This includes changing wallpapers, themes, panel layouts, and configuring shortcuts.
Digital Security Best Practices
- Regular Updates: Keep your system updated with the latest security patches by regularly running
sudo apt update && sudo apt upgrade. - Strong Passwords: Use strong, unique passwords for all your accounts.
- Firewall: Debian comes with
ufw(Uncomplicated Firewall), which is easy to configure. You can enable it with:
sudo ufw enable
And check its status with:
sudo ufw status - Minimize Software Installation: Only install software you actually need to reduce the attack surface.
- Be Cautious with
sudo: Only usesudowhen necessary and understand the commands you are executing.
Exploring Advanced Options (Optional)
- Customizing GRUB: You can modify GRUB’s appearance and boot order.
- Dual-Booting: If you installed Debian alongside another OS, you might want to fine-tune GRUB’s configuration to manage boot entries effectively.
- Server Configuration: For server installations, further steps involve configuring services like SSH, web servers (Apache, Nginx), and databases.
Conclusion
Installing Debian is a rewarding experience that opens the door to a stable, secure, and highly customizable operating system. By following these steps, you’ll have a solid foundation for leveraging the power of Debian for your personal, professional, or development needs. As you become more comfortable, you can delve deeper into its vast capabilities, from command-line administration to server deployments and custom software development. Debian’s flexibility and strong community support ensure that your journey with this powerful Linux distribution will be both educational and empowering.
aViewFromTheCave is a participant in the Amazon Services LLC Associates Program, an affiliate advertising program designed to provide a means for sites to earn advertising fees by advertising and linking to Amazon.com. Amazon, the Amazon logo, AmazonSupply, and the AmazonSupply logo are trademarks of Amazon.com, Inc. or its affiliates. As an Amazon Associate we earn affiliate commissions from qualifying purchases.