In an increasingly connected world, smart home technology has transcended mere convenience to become an integral part of our daily lives, particularly when it comes to security. Among the myriad of smart gadgets, the Ring Doorbell stands out as a flagship innovation, redefining how we monitor our homes and interact with visitors. No longer just a simple chime, a Ring Doorbell offers a sophisticated blend of video surveillance, two-way communication, and motion detection, all accessible from the palm of your hand. This guide provides a detailed, step-by-step tutorial on installing your Ring Doorbell, empowering you to enhance your home’s security and integrate seamlessly into the smart home ecosystem. Whether you’re a tech enthusiast eager to embrace the latest in digital security or a homeowner looking for peace of mind, understanding the installation process is the first crucial step towards a smarter, safer living environment.
The Rise of Smart Home Security: Why a Ring Doorbell Matters
The landscape of home security has undergone a radical transformation, moving from static alarm systems to dynamic, interactive platforms. At the forefront of this evolution is the smart video doorbell, a gadget that epitomizes modern Technology Trends and Digital Security. The Ring Doorbell, a prominent player in this category, offers compelling benefits that justify its widespread adoption and position as a smart home essential.
Firstly, the most immediate advantage is enhanced security and surveillance. With a Ring Doorbell, you gain a constant watchful eye over your front door. High-definition video recording, often with night vision capabilities, captures every visitor, delivery person, or suspicious activity. This visual evidence is invaluable, not only as a deterrent to potential intruders but also as crucial evidence in the event of package theft – a growing concern in the age of e-commerce. The ability to monitor your doorstep remotely via the Ring app, regardless of your physical location, provides an unparalleled sense of security and control. For instance, if you’re at work, you can see who’s at your door and decide whether to engage with them, preventing unwanted solicitations or confirming legitimate visitors.
Secondly, the Ring Doorbell significantly boosts convenience and connectivity. Beyond security, it simplifies daily interactions. Its two-way talk feature allows you to communicate with anyone at your door from your smartphone, even if you’re miles away. This means you can instruct a delivery driver where to leave a package, greet friends who arrive early, or politely deter solicitors without ever having to open your door. This level of interaction is a hallmark of modern AI Tools and smart Apps that integrate seamlessly into a broader Smart Home Ecosystem.
From a Brand perspective, Ring has cultivated a strong reputation for reliability and user-friendliness, making its products a trusted choice for consumers. Their consistent innovation and integration with other smart home devices, particularly Amazon Alexa, further solidifies their market position. This robust brand strategy has made “Ring” almost synonymous with video doorbells, establishing consumer trust and loyalty.
Finally, while often seen as an investment, a Ring Doorbell can also contribute to your Money management in subtle ways. Enhanced home security can sometimes lead to reduced home insurance premiums, offering a tangible financial benefit. More importantly, the peace of mind derived from knowing your home is secure, and the potential prevention of costly incidents like burglaries or package thefts, represents a significant return on investment. The convenience it offers can also save time and reduce stress, indirectly contributing to overall well-being and productivity. Integrating such a device is not just about adopting new tech; it’s about making a strategic decision for a more secure, convenient, and potentially more financially sound household.
Understanding Different Ring Doorbell Models
Before embarking on the installation process, it’s crucial to understand that Ring offers various doorbell models, each designed to cater to different needs and existing home setups. The primary distinction lies in their power source: battery-powered or hardwired.
Battery-Powered Models (e.g., Ring Video Doorbell, Ring Video Doorbell 3, 4, 2nd Gen, Battery Video Doorbell Pro): These models are ideal for homes without existing doorbell wiring or for those who prefer a simpler, wireless installation. They come with a rechargeable battery pack that needs to be charged periodically (typically every 1-6 months, depending on usage). While offering maximum flexibility in placement, they might have slightly slower response times compared to hardwired versions and may require more frequent charging in high-traffic areas. Some battery models also offer an option to connect to existing doorbell wiring for trickle charging, eliminating the need to remove the battery for charging.
Hardwired Models (e.g., Ring Video Doorbell Wired, Ring Video Doorbell Pro 2, Ring Video Doorbell Elite): These doorbells connect directly to your home’s existing doorbell wiring, drawing continuous power. This eliminates the need for battery charging and often provides more advanced features like pre-roll video (recording a few seconds before motion is detected) and more robust Wi-Fi connectivity. Hardwired installation typically requires a transformer that meets specific voltage requirements (usually 8-24 VAC), and turning off power at the breaker box is essential for safety. These models are perfect for those replacing an existing doorbell and seeking uninterrupted power and maximum performance. The Ring Video Doorbell Wired is a particularly cost-effective hardwired option, though it typically bypasses your existing indoor chime, relying solely on app notifications or an optional Ring Chime.
Choosing the right model depends on your home’s existing infrastructure, your comfort level with wiring, and your preferences for features and maintenance. Regardless of the model, the core benefit of enhanced security and convenience remains central to the Ring experience.
Preparing for Your Ring Doorbell Installation: Tools and Prerequisites
A smooth and successful Ring Doorbell installation begins long before you pick up a drill. Proper preparation, including gathering the right tools and understanding the necessary prerequisites, is paramount. This foundational step not only streamlines the process but also ensures safety and optimal performance of your new smart gadget. This section aligns with the Tutorials aspect of the “Tech” category, providing practical advice for a DIY-friendly setup.
Essential Tools and Supplies
While Ring doorbells typically come with most of the specialized hardware you’ll need, having a few common household tools on hand will make the installation much easier:
- Power Drill: Essential for drilling pilot holes for the mounting bracket. A cordless drill offers greater flexibility.
- Drill Bits: Usually included with your Ring doorbell kit, but having a set on hand is useful.
- Screwdriver: A Phillips head screwdriver is almost always required for securing screws. Some Ring models might use a Torx bit (often included) for the security screws.
- Pencil: For marking drill hole locations.
- Level: To ensure your doorbell is mounted perfectly straight.
- Stepladder or Stool: If your existing doorbell or preferred mounting location is high.
- Safety Glasses: Always recommended when drilling or working with electrical components.
- Utility Knife or Wire Strippers: Only if you need to strip existing doorbell wires (rarely required, but good to have if dealing with older, frayed wiring).
- Wi-Fi Router and Credentials: Your Ring Doorbell requires a stable 2.4 GHz Wi-Fi connection (some Pro models support 5 GHz). Ensure you have your network name (SSID) and password ready.
Pre-Installation Checklist: Ensuring a Smooth Setup
Before you even think about mounting your device, run through this critical checklist to prevent common hiccups and ensure a seamless installation process:
- Charge the Battery (for battery-powered models): This is perhaps the most overlooked step. If you have a battery-powered Ring Doorbell, fully charge the battery pack using the provided USB cable. A full charge can take several hours, so plan accordingly. Attempting to set up with a low battery can lead to connection issues.
- Test Wi-Fi Signal Strength: Your Ring Doorbell needs a strong and stable Wi-Fi connection to function optimally. Use your smartphone to check the Wi-Fi signal strength at your intended doorbell location. If the signal is weak, consider repositioning your router or investing in a Wi-Fi extender. A weak signal is a common cause of connectivity issues and delayed notifications. This highlights the importance of Digital Security and consistent connectivity for smart home devices.
- Locate Your Breaker Box and Turn Off Power (for hardwired models): For your safety, it is absolutely critical to turn off the power to your existing doorbell chime and transformer before you begin any wiring work. Locate your home’s main electrical panel and switch off the breaker that controls your doorbell circuit. If unsure, you can turn off the main breaker, but this will cut power to your entire home. Always test the existing doorbell button after flipping the breaker to confirm the power is off.
- Download the Ring App and Create an Account: The Ring app (available on iOS and Android) is the command center for your doorbell. Download it, create an account, and familiarize yourself with its interface. This is also where you’ll register your device and configure all its settings.
- Identify Existing Doorbell Wiring (if applicable): If you’re replacing an existing doorbell, note the color and position of the wires connected to it. Take a photo for reference. Most traditional doorbells use two low-voltage wires. For hardwired Ring models, ensure your existing doorbell transformer meets the specified voltage requirements (typically 8-24 VAC). An underpowered transformer can lead to insufficient power and operational problems.
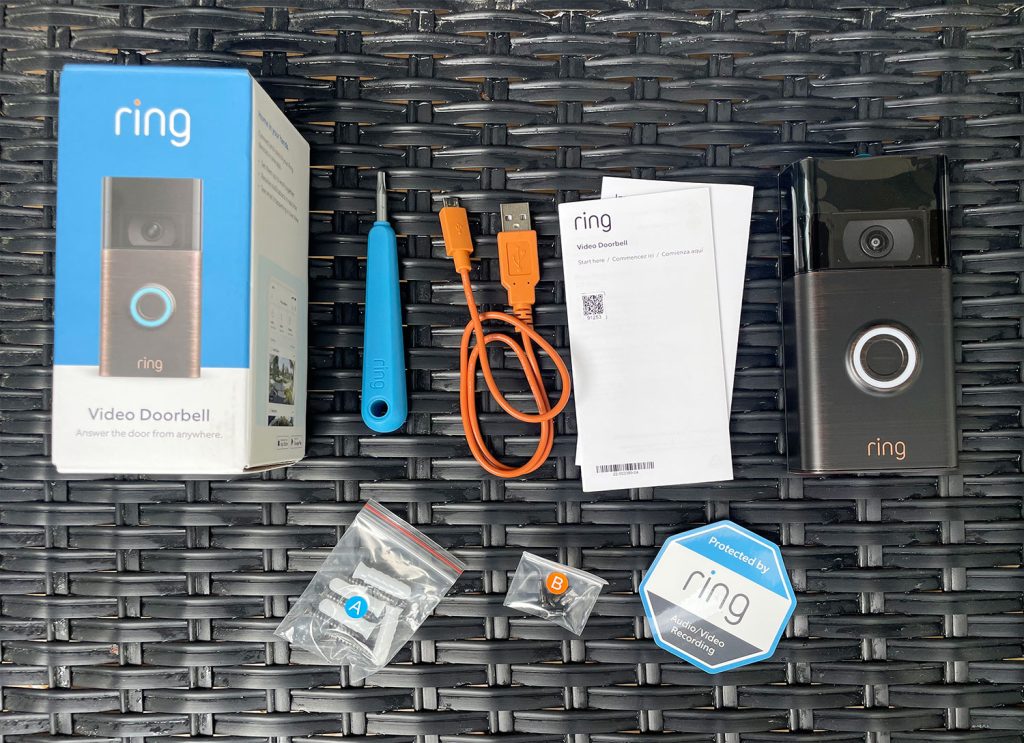
- Unpack and Inventory: Open your Ring Doorbell package and verify that all components listed in the manual are present. This typically includes the doorbell unit, mounting bracket, installation screws, wall anchors, a security screw, and a security screwdriver.
By meticulously completing this checklist, you set the stage for an efficient and trouble-free installation, moving you closer to enjoying the full benefits of your new smart home security device.
Step-by-Step Installation: From Unboxing to Activation
With all preparations complete, you are now ready for the core Tutorial — the physical installation and digital setup of your Ring Doorbell. This section will guide you through each stage, ensuring your device is securely mounted and fully operational.
Physical Installation: Mounting Your Ring Doorbell
The physical installation process varies slightly between battery-powered and hardwired models, primarily concerning the wiring. We will cover the common steps, highlighting distinctions where necessary.
- Turn Off Power (Hardwired Models ONLY): Reiterate this crucial safety step. Ensure the power to your existing doorbell circuit is OFF at the breaker box before touching any wires.
- Remove Your Old Doorbell (If Applicable): If you’re replacing an existing doorbell, unscrew it from the wall. Gently pull it away to expose the two low-voltage wires. Disconnect these wires. If you’re installing where no doorbell existed, you can skip this step and proceed to marking drill holes.
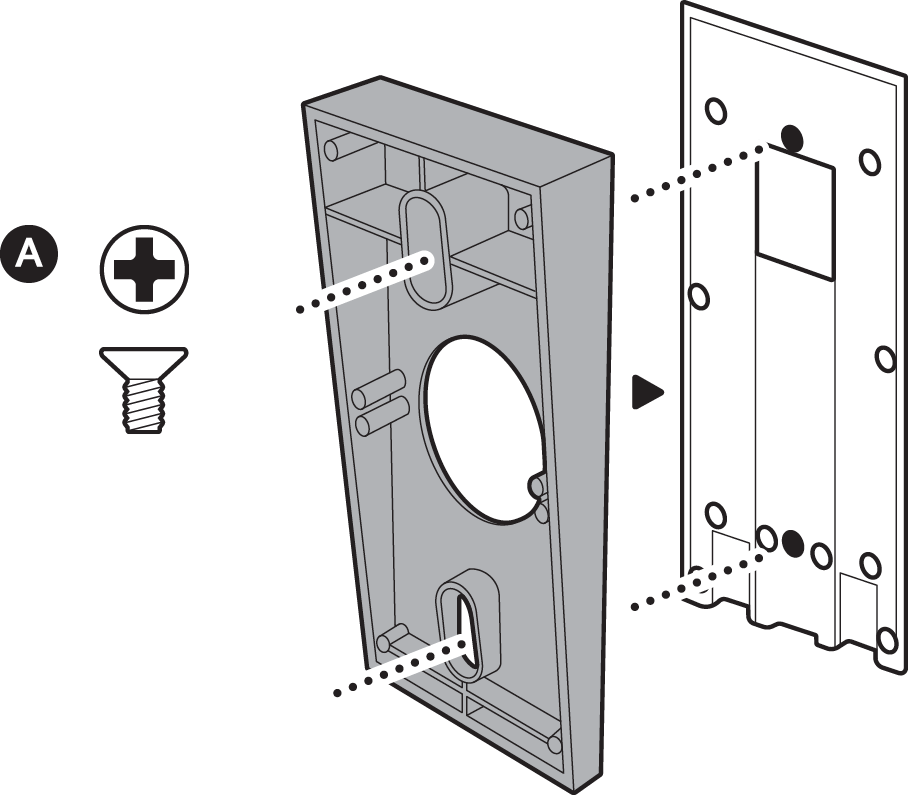
- Mark Drill Holes and Mount the Bracket:
- Hold the Ring mounting bracket against the wall at your desired height. Aim for about 48 inches (1.2 meters) from the ground for optimal camera angle, but adjust based on your specific porch and stairs. Use the level to ensure it’s straight.
- Use a pencil to mark the locations for the drill holes through the bracket.
- If mounting on wood, you can usually drill the screws directly. If mounting on brick, stucco, or concrete, use a power drill with the appropriate drill bit to create pilot holes for the wall anchors.
- Insert the wall anchors flush with the wall.
- Secure the mounting bracket to the wall using the provided screws.
- Connect Wires (Hardwired Models ONLY):
- Loosen the terminal screws on the back of the Ring Doorbell.
- Connect one of your existing doorbell wires to each terminal screw. It doesn’t matter which wire goes to which screw, as it’s a low-voltage circuit.
- Tighten the terminal screws to secure the wires. Ensure there are no loose strands that could short circuit.
- If your Ring model includes a “jumper cable” or “pro power kit” for your existing indoor chime, follow those specific instructions carefully. This typically involves wiring it into your chime box to ensure proper power delivery and chime functionality.
- Attach the Ring Doorbell to the Bracket:
- Align the Ring Doorbell unit with the mounting bracket.
- Push the doorbell firmly onto the bracket, ensuring it clicks into place.
- Secure the doorbell to the bracket using the small security screw located at the bottom of the unit. Use the specialized screwdriver often included by Ring. This anti-tamper screw helps prevent theft.
- Restore Power (Hardwired Models ONLY): Once the doorbell is physically secured, return to your breaker box and turn the power back ON to your doorbell circuit.
In-App Setup and Configuration: Bringing Your Doorbell Online
With the physical installation complete, the next phase involves connecting your Ring Doorbell to your home network and configuring its smart features through the Ring app. This is where your AI Tools and Apps expertise comes into play.
- Open the Ring App and ‘Set Up a Device’: Launch the Ring app on your smartphone or tablet. Tap the “Set Up a Device” button, then select “Doorbells” from the list of device types.
- Scan the QR Code or Enter Serial Number: The app will prompt you to scan the QR code located on your Ring Doorbell or its packaging. Alternatively, you can manually enter the device’s 5-digit PIN. This step registers your specific device with your Ring account.
- Set Your Location: The app will ask you to confirm or set your device’s location. This is important for accurate motion detection, time synchronization, and accessing neighborhood features like Ring’s “Neighbors” community alerts.
- Name Your Device: Give your doorbell a descriptive name (e.g., “Front Door,” “Main Entry”). This is helpful if you have multiple Ring devices.
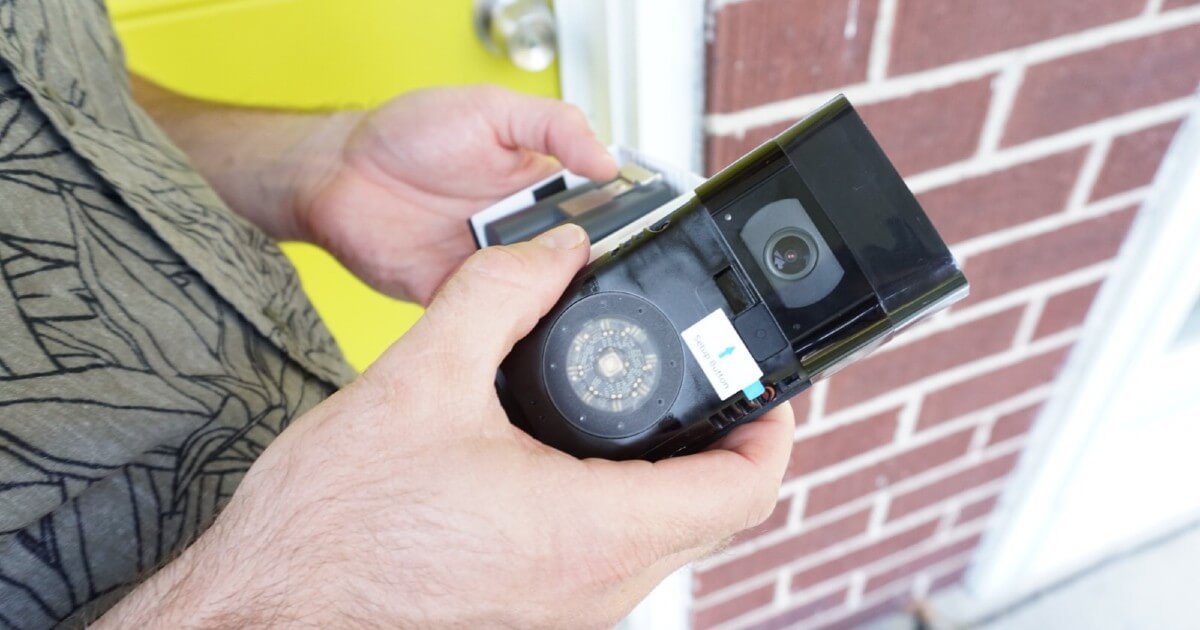
- Put Your Ring Device into Setup Mode: For battery models, pull out the clear plastic tab from the battery compartment or press the orange button on the back. For hardwired models, it will usually enter setup mode automatically upon receiving power. The light ring on the front of the doorbell will begin to spin or flash blue when it’s in setup mode.
- Connect to Ring’s Temporary Wi-Fi Network: Your phone will temporarily disconnect from your home Wi-Fi and connect to a Wi-Fi network broadcast by your Ring Doorbell (e.g., “Ring-XXXXXX”). Follow the in-app instructions to make this connection.
- Connect to Your Home Wi-Fi Network: Once connected to the Ring network, the app will ask you to select your home’s Wi-Fi network from a list and enter its password. Ensure you choose your 2.4 GHz network (or 5 GHz if your model supports it and you prefer it). Confirm the connection. The light ring will flash and then glow solid blue once connected.
- Configure Motion Settings and Privacy Zones: This is a critical step for optimizing your security and avoiding false alerts.
- Motion Zones: Define specific areas within the camera’s view where you want the doorbell to detect motion. This helps to ignore busy streets or neighboring properties. Ring’s advanced features, often powered by AI Tools, allow for “person detection” to minimize alerts from pets or passing cars.
- Privacy Zones: Black out areas within the camera’s field of view that you wish to exclude from recording (e.g., a neighbor’s window). This demonstrates a commitment to privacy in Digital Security.
- Motion Sensitivity: Adjust how sensitive the motion detection is.
- Notification Preferences: Set how you want to receive alerts (push notifications, email).
- Test Your Doorbell: Press the doorbell button to ensure it rings your existing chime (if hardwired and configured) and sends a notification to your phone. Test the live view and two-way talk features.
- Install Ring Protect Plan (Optional but Recommended): While your Ring Doorbell offers live view, a Ring Protect Plan (a subscription service) unlocks crucial features like video recording storage (cloud storage), allowing you to review past events. It also often includes an extended warranty and professional monitoring options, enhancing your overall Digital Security and Productivity by automating surveillance.
Congratulations! Your Ring Doorbell is now installed and ready to provide a new layer of security and convenience to your home.
Optimizing Your Ring Experience: Security, Features, and Troubleshooting
Installing your Ring Doorbell is just the beginning. To truly leverage its potential as a comprehensive Digital Security solution and a seamless part of your smart home, it’s essential to optimize its settings, explore its features, and know how to troubleshoot common issues. This proactive approach ensures maximum performance, privacy, and peace of mind, aligning with the “Tech” category’s focus on Gadgets, Reviews, and Productivity.
Enhancing Digital Security and Performance
A Ring Doorbell is more than just a camera; it’s a networked device that contributes to your overall home security posture. Optimizing its performance and security involves several key considerations:
- Ring Protect Plan: While optional, a Ring Protect Plan subscription significantly enhances your doorbell’s utility. It provides cloud storage for recorded videos, allowing you to review footage later. Without it, you only get live view and motion alerts without recording. The plan also often includes an extended warranty, 24/7 professional monitoring options, and integration with Ring Alarm systems, creating a holistic security ecosystem. This transforms your doorbell from a simple alert system into a robust surveillance and archival tool, directly impacting your home’s overall Digital Security.
- Two-Factor Authentication (2FA): Enable 2FA on your Ring account immediately. This adds an extra layer of security, requiring a code from your phone in addition to your password to log in. This crucial step protects your account from unauthorized access, even if your password is compromised, safeguarding your private video feeds and account details.
- Smart Motion Detection (AI Tools): Leverage Ring’s advanced motion detection features. Many models offer “Person Detection,” which uses AI Tools to differentiate between humans and other moving objects (like cars, pets, or swaying branches), significantly reducing false alarms. Customize your motion zones precisely to cover only the areas you care about, ignoring high-traffic public spaces.
- Integration with Smart Home Ecosystems: Integrate your Ring Doorbell with other smart home devices. For example, connecting it with Amazon Alexa allows you to view live feeds on an Echo Show or Fire TV, or even enable announcements when someone rings the doorbell or motion is detected. This seamless integration boosts Productivity and convenience, making your smart home truly interconnected.
- Optimal Wi-Fi Connectivity: A strong Wi-Fi signal is paramount for clear video, quick notifications, and reliable two-way audio. If your doorbell is far from your router or if walls obstruct the signal, consider a Wi-Fi extender or mesh Wi-Fi system. Ring offers its own Chime Pro, which doubles as a Wi-Fi extender specifically for Ring devices, enhancing both connectivity and acting as an indoor chime.
- Privacy Settings: Regularly review your privacy settings within the Ring app. Adjust privacy zones to ensure you’re not inadvertently recording areas you don’t wish to, such as a neighbor’s yard or window. This respects community standards and personal privacy while maintaining effective security.
Common Installation Challenges and Solutions
Even with careful preparation, you might encounter minor issues. Knowing how to troubleshoot them can save you time and frustration.
- Poor Wi-Fi Connection:
- Symptom: Delayed notifications, choppy video, doorbell going offline frequently.
- Solution: Check your Wi-Fi signal strength in the Ring app’s Device Health section. Move your router closer, invest in a Wi-Fi extender (like Ring Chime Pro), or ensure there aren’t too many devices congesting your network.
- Doorbell Not Receiving Power (Hardwired Models):
- Symptom: Doorbell not lighting up, not entering setup mode, showing low power in Device Health.
- Solution: Double-check that the power is ON at the breaker. Verify that the wires are securely connected to the doorbell terminals. Ensure your transformer meets Ring’s voltage requirements (typically 8-24 VAC); older transformers might be insufficient. If your model uses a “Pro Power Kit” or “Jumper Cable,” ensure it’s correctly installed in your indoor chime box.
- Motion Detection Too Sensitive or Not Sensitive Enough:
- Symptom: Too many false alerts (cars, pets) or missed events.
- Solution: Adjust the motion sensitivity settings in the Ring app. Refine your motion zones to exclude areas that cause false alarms. If available, enable “Person Detection” or adjust the “Motion Frequency” settings to optimize detection and battery life.
- Indoor Chime Not Ringing (Hardwired Models):
- Symptom: Doorbell works, but your traditional indoor chime doesn’t sound.
- Solution: Go to your Ring app’s Device Settings -> In-Home Chime Settings. Ensure “Mechanical Chime” or “Digital Chime” is enabled and correctly configured for your chime type. Some newer Ring models (like the Ring Video Doorbell Wired) are designed to bypass existing chimes and require a separate Ring Chime accessory for an audible indoor alert.
- Doorbell Unit Loose on Mount:
- Symptom: The doorbell feels wobbly or can be easily pulled off.
- Solution: Ensure the security screw at the bottom of the unit is tightened using the provided star-shaped screwdriver. If the mounting bracket itself is loose, tighten the screws securing it to the wall, potentially using larger anchors if the original holes are stripped.
By actively managing these aspects, you ensure your Ring Doorbell not only functions as intended but also provides the robust, intelligent security and convenience that modern smart homes demand, further justifying its role as a key Gadget in your digital life.
Conclusion
Installing a Ring Doorbell is a tangible step towards embracing modern Technology Trends and enhancing your home’s Digital Security. What might initially seem like a technical endeavor is, in reality, a straightforward process that, with careful preparation and attention to detail, can be accomplished by most homeowners. From understanding the nuances of different models to meticulously following the physical and in-app setup instructions, each stage contributes to creating a robust, intelligent surveillance system at your doorstep.
Beyond the immediate satisfaction of a successful DIY project, integrating a Ring Doorbell into your home unlocks a new dimension of peace of mind. The ability to monitor your property remotely, communicate with visitors, and deter potential threats empowers you with unprecedented control over your home’s security. This intelligent Gadget not only safeguards your property but also enriches your daily life with unparalleled convenience and connectivity, making your home smarter, safer, and more responsive to your needs.
Embrace the future of home security today. Your new Ring Doorbell stands ready to connect you to your doorstep like never before, providing valuable insights and protecting what matters most. Enjoy the tranquility that comes with being securely connected.
aViewFromTheCave is a participant in the Amazon Services LLC Associates Program, an affiliate advertising program designed to provide a means for sites to earn advertising fees by advertising and linking to Amazon.com. Amazon, the Amazon logo, AmazonSupply, and the AmazonSupply logo are trademarks of Amazon.com, Inc. or its affiliates. As an Amazon Associate we earn affiliate commissions from qualifying purchases.