In our increasingly digital world, the ability to translate digital documents into tangible, physical copies remains essential. Whether you’re a student printing an essay, a professional producing reports, or a hobbyist bringing creative projects to life, a functioning printer is a cornerstone of productivity and personal expression. However, the magic behind your printer’s ability to communicate with your computer isn’t inherent; it relies on a crucial piece of software called a printer driver.
Many users find themselves bewildered when their printer suddenly refuses to cooperate, often leading to frustration and a sense of helplessness. The culprit? Frequently, it’s an outdated, corrupted, or missing printer driver. This article aims to demystify the process of installing printer drivers, providing a clear, step-by-step guide that will have you printing smoothly in no time. We’ll cover everything from initial identification to troubleshooting common issues, ensuring you have the knowledge to tackle this common tech hurdle with confidence.
Understanding Printer Drivers: The Bridge Between Your Computer and Printer
Before we dive into the installation process, it’s vital to understand what a printer driver actually is and why it’s so important. Think of a printer driver as a translator. Your computer speaks one language (digital data), and your printer speaks another (ink, toner, and mechanical movements). The driver acts as the intermediary, converting the commands and data from your operating system into a format that your specific printer model can understand and execute.
Without the correct driver, your computer won’t know how to send instructions to the printer, and your printer won’t know what to do with the data it receives. This can manifest in various ways: the printer might not be recognized at all, print jobs might be garbled or incomplete, or you might encounter error messages.
Why Drivers Matter for Performance and Features
The importance of a printer driver extends beyond basic functionality. Up-to-date drivers often include optimizations that can improve printing speed, enhance print quality (such as better color reproduction or sharper text), and enable advanced features specific to your printer model. These features might include duplex (two-sided) printing, scanning capabilities, print queue management, or specialized paper handling.
Conversely, outdated drivers can lead to performance bottlenecks, compatibility issues with newer operating system updates, and a failure to access the full range of your printer’s capabilities. Therefore, understanding how to install and maintain these drivers is a fundamental aspect of effective technology management, aligning perfectly with the “Tech” pillar of our website, where we explore software, tutorials, and productivity tools.
Installing Printer Drivers: A Step-by-Step Approach
The process of installing printer drivers can vary slightly depending on your operating system (Windows, macOS, or Linux) and the type of printer you have (new, old, networked, or USB). However, the fundamental steps remain largely consistent.
Identifying Your Printer Model and Operating System
The very first step, and arguably the most crucial, is to accurately identify your printer’s make and model number. This information is typically found on a label on the printer itself, often on the front, back, or bottom. For example, it might be something like “HP LaserJet Pro MFP M428fdw” or “Epson EcoTank ET-2720.”
Simultaneously, you need to know your operating system and its version. For Windows users, you can find this by right-clicking on “This PC” or “Computer” and selecting “Properties.” For macOS users, click the Apple menu and select “About This Mac.” Knowing these details ensures you download the correct driver, preventing compatibility issues.
Method 1: Automatic Installation (Plug-and-Play)
Many modern printers and operating systems utilize a plug-and-play approach. When you connect a new printer via USB or connect to a network printer, your operating system will often attempt to identify the device and automatically download and install the necessary drivers from its built-in library or through Windows Update/macOS Software Update.
Steps for Automatic Installation:
- Connect the Printer: If it’s a USB printer, connect it to your computer. If it’s a network printer, ensure it’s connected to your network and powered on.
- Follow On-Screen Prompts: Your operating system should detect the new hardware and present you with a prompt indicating it’s installing a device or driver.
- Wait for Completion: This process can take a few minutes. Once complete, your printer should be ready to use.
When This Method Might Not Work:
- Older Printers: Very old printers might not be supported by modern operating system driver libraries.
- Specialized Features: If you want to access advanced features not covered by the basic driver, you might need to install the manufacturer’s full software suite.
- Corrupted OS Drivers: Sometimes, existing drivers in your operating system might be outdated or corrupted, preventing automatic detection.
Method 2: Manual Installation Using Manufacturer’s Website (Recommended)
The most reliable and recommended method for installing printer drivers is to download them directly from the manufacturer’s official website. This ensures you get the latest, most compatible version of the driver, along with any associated software that unlocks your printer’s full potential. This method is also crucial for troubleshooting when automatic installation fails.
Steps for Manual Installation:
- Visit the Manufacturer’s Support Website: Open your web browser and navigate to the support or downloads section of your printer manufacturer’s website (e.g., hp.com/support, canon.com/support, epson.com/support).
- Enter Your Printer Model: Use the search bar to enter your printer’s exact make and model number.
- Select Your Operating System: On the printer’s support page, you’ll usually see an option to select your operating system (Windows 10, Windows 11, macOS Ventura, etc.). Be precise here.
- Locate and Download the Driver: Browse the list of available software and drivers. Look for the “Driver,” “Full Software and Driver,” or “Basic Driver” option. For most users, the full software package is recommended as it includes utilities for scanning, maintenance, and advanced settings. Download the appropriate file.
- Run the Installer: Once the download is complete, locate the downloaded file (usually in your Downloads folder) and double-click it to run the installer.
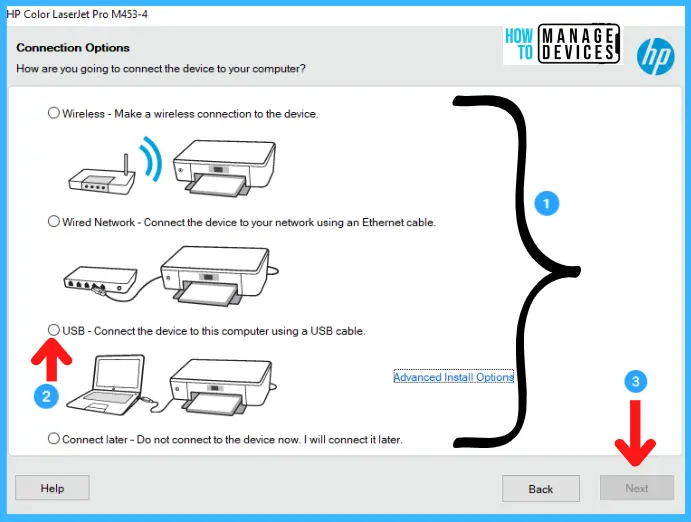
- Follow the On-Screen Instructions: The installer will guide you through the process. This typically involves accepting license agreements, choosing installation types (e.g., typical or custom), and specifying how your printer is connected (USB, Wi-Fi, Ethernet). Crucially, many installers will instruct you to connect the printer or turn it on only when prompted during the installation process. Following these instructions precisely is vital to avoid installation errors.
- Complete and Test: After the installation is finished, restart your computer if prompted. Then, try printing a test page to ensure everything is working correctly.
Method 3: Using Device Manager (Windows) or System Preferences (macOS)
If your printer is already detected but not functioning correctly, or if you need to update an existing driver, you can use your operating system’s built-in tools.
For Windows Users:
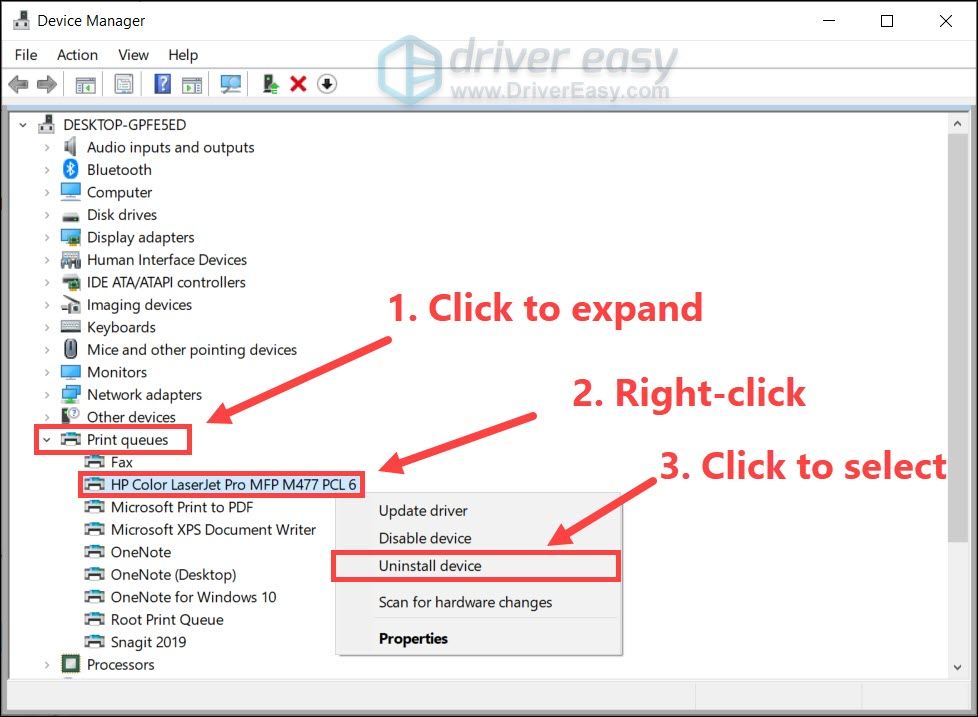
- Open Device Manager: Press the Windows key + X and select “Device Manager” from the menu, or search for “Device Manager” in the Start menu.
- Locate Your Printer: Expand the “Printers” or “Print queues” category. You should see your printer listed. If it has a yellow exclamation mark, it indicates a problem.
- Update Driver: Right-click on your printer’s name and select “Update driver.”
- Choose Search Option:
- “Search automatically for drivers”: This will let Windows search online for the latest driver.
- “Browse my computer for drivers”: If you’ve downloaded a driver manually (from Method 2), select this option and navigate to the folder where you saved the driver files.
- Follow Prompts: Complete the installation process as guided by Windows.
For macOS Users:
macOS generally handles printer driver updates through its system update mechanism. However, if you need to add a printer or manually select a driver:
- Open System Preferences/Settings: Click the Apple menu and select “System Preferences” or “System Settings.”
- Go to Printers & Scanners: Click on “Printers & Scanners.”
- Add Printer: Click the “+” button to add a new printer.
- Select Your Printer: Your Mac will search for nearby printers. Select your printer from the list.
- Driver Selection: macOS will often automatically select the correct driver. If not, or if you want to choose a specific driver (e.g., if you installed one manually), you might see a “Use” or “Driver” dropdown menu where you can select the driver.
- Add: Click “Add.”
Troubleshooting Common Printer Driver Issues
Even with careful installation, printer driver problems can arise. Here are some common issues and their solutions:
Printer Not Recognized
- Check Connections: Ensure all cables (USB, Ethernet) are securely plugged in. For wireless printers, verify Wi-Fi connectivity.
- Restart Everything: Turn off your printer, then restart your computer. Once your computer has fully booted, turn the printer back on. This simple step can resolve many temporary glitches.
- Try a Different USB Port: If using a USB connection, try plugging the printer into a different USB port on your computer.
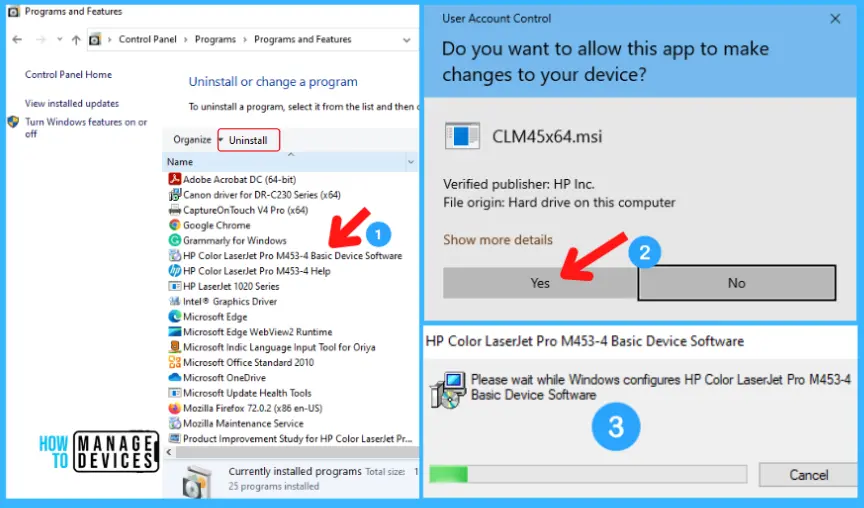
- Reinstall the Driver: Uninstall the current driver and software, then perform a clean installation using the latest drivers from the manufacturer’s website.
Printing Errors or Garbled Output
- Update or Reinstall Driver: This is the most common fix. An outdated or corrupted driver is often the cause of printing errors.
- Clear Print Queue: Sometimes, print jobs get stuck. Go to “Printers & Scanners” (or “Devices and Printers” in Windows), select your printer, and click “See what’s printing.” Cancel all documents in the queue.
- Check Printer Status: Ensure the printer has enough ink/toner, paper, and no paper jams.
New Operating System Update Breaks Printer Functionality
- Check for Manufacturer Updates: Operating system updates can sometimes create compatibility issues with existing drivers. Visit your printer manufacturer’s website and check if they have released updated drivers specifically for your new OS version.
- Reinstall Driver: Uninstall the current driver and install the latest compatible driver from the manufacturer’s website.
Accessing Advanced Features
- Install Full Software Suite: If you downloaded only the basic driver, you might be missing out on features like scanning, faxing, or advanced print settings. Revisit the manufacturer’s website and download the “Full Software and Driver” package.
- Explore Printer Properties: Once the driver is installed, right-click on your printer in Windows (or go to “Printers & Scanners” in macOS) and look for “Printer properties” or “Options & Supplies.” This is where you can usually access advanced settings.
Conclusion: Empowering Your Printing Experience
Installing printer drivers might seem like a daunting technical task, but by understanding the role of drivers and following these systematic approaches, you can overcome most printing challenges. Whether you’re setting up a brand-new printer or troubleshooting an existing one, remember to always rely on the manufacturer’s official website for the most accurate and up-to-date software.
By keeping your printer drivers current, you not only ensure seamless printing but also unlock the full potential of your device, leading to better quality prints, faster performance, and a more productive workflow. In the realm of technology, having the right software foundation, like a properly installed printer driver, is key to a smooth and efficient digital experience, allowing you to focus on what truly matters – bringing your ideas to life.
aViewFromTheCave is a participant in the Amazon Services LLC Associates Program, an affiliate advertising program designed to provide a means for sites to earn advertising fees by advertising and linking to Amazon.com. Amazon, the Amazon logo, AmazonSupply, and the AmazonSupply logo are trademarks of Amazon.com, Inc. or its affiliates. As an Amazon Associate we earn affiliate commissions from qualifying purchases.