
In the rapidly evolving landscape of digital commerce, establishing a robust online presence is no longer an option but a necessity. For countless entrepreneurs and established businesses alike, Shopify stands as a leading e-commerce platform, renowned for its user-friendliness, extensive feature set, and scalability. However, transforming a nascent business idea into a fully functional online store requires more than just signing up; it demands a systematic approach to technical setup and configuration.
This comprehensive guide delves into the intricate steps involved in setting up your Shopify store, focusing specifically on the technical aspects that underpin a successful launch. From initial account registration to fine-tuning critical operational parameters, we will navigate the Shopify admin dashboard, illuminate essential configurations, and equip you with the knowledge to build a technically sound and high-performing digital storefront. By adhering to best practices and understanding the platform’s capabilities, you can lay a solid technological foundation for your e-commerce venture, ensuring seamless operations and an optimal customer experience.

Laying the Foundation: Initial Setup and Store Configuration
The journey to launching your Shopify store begins with the foundational steps of account creation and essential system configurations. These initial technical decisions are crucial for shaping the operational environment of your digital storefront.
Registering Your Shopify Account and Store Name
The first technical hurdle involves creating your Shopify account. This process typically starts with a free trial, requiring a valid email address, a password, and a chosen store name. While the store name can be modified later, selecting a definitive, brand-aligned name from the outset is recommended. Shopify automatically generates a default .[your-store-name].myshopify.com URL. Understanding this default URL is important, as it serves as your administrative access point before a custom domain is connected. Ensure the store name is unique and reflects your brand identity, as this URL will be the backbone of your store’s backend infrastructure.
Navigating the Shopify Admin Dashboard
Upon successful registration, you are introduced to the Shopify admin dashboard – the central command center for your entire e-commerce operation. Technologically, this dashboard is a sophisticated web application designed for intuitive management. Familiarizing yourself with its layout is paramount. Key navigation elements include sections for Orders, Products, Customers, Analytics, Marketing, Discounts, and crucially, Settings. The Settings section, accessible via the gear icon, is where the majority of technical configurations for your store will take place. Spending time to understand where each function resides will significantly streamline subsequent setup processes and ongoing store management.
Essential General Settings Configuration
Within the “Settings” menu, the “General” section houses fundamental store details that dictate how Shopify functions globally for your business. This includes defining your store’s name, legal company name (if applicable), and contact information, all of which are used for official communications and customer service. Crucially, you must configure your store’s timezone, currency, and weight unit system. Incorrect settings here can lead to operational discrepancies, miscalculations in shipping rates, and confusion for customers. For instance, setting the correct timezone ensures accurate order timestamps and scheduling of marketing campaigns. Similarly, selecting the appropriate currency and weight units (e.g., kilograms vs. pounds) is vital for product descriptions, inventory management, and accurate shipping calculations, preventing potential technical errors in logistics and financial reporting.
Populating Your Digital Shelves: Product and Inventory Management
Once the foundational settings are in place, the next critical phase involves populating your store with products. This technical process extends beyond simply uploading images; it encompasses structured data entry, variant management, and robust inventory control.
Adding Products: Details, Media, and Variants
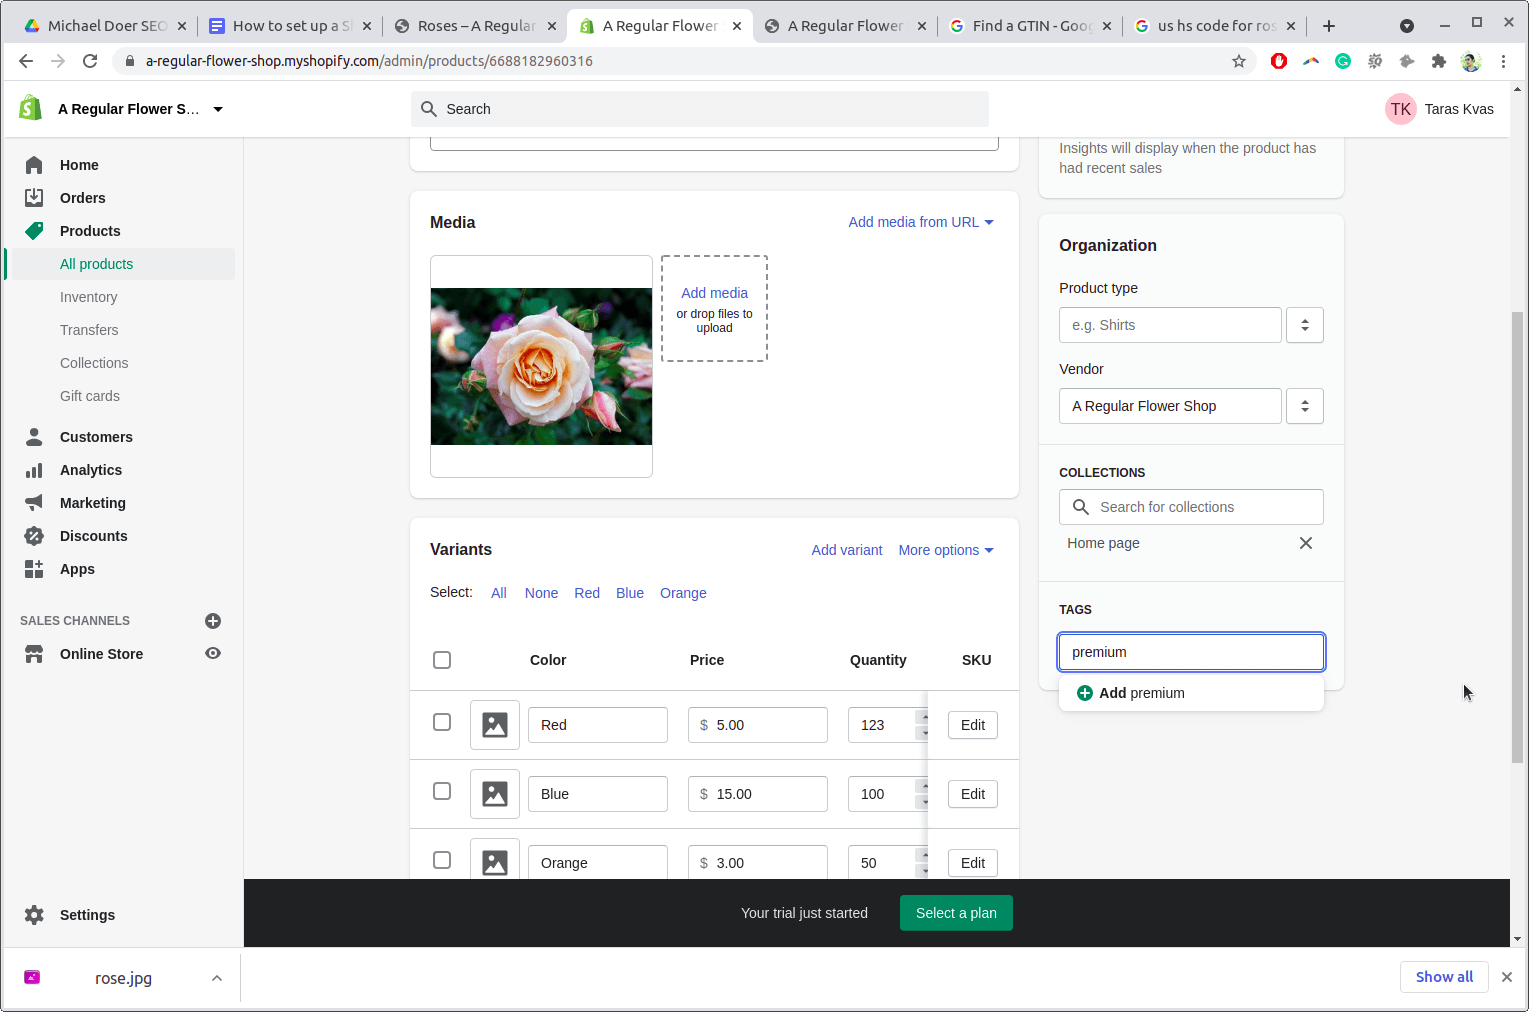
Adding products to Shopify involves a structured data input process that feeds directly into the store’s database and front-end display. Each product requires a title, detailed description (optimized for readability and SEO), and high-quality media (images and videos). Technically, image optimization is crucial here – ensuring files are compressed without losing quality helps maintain fast page load times, a key factor for user experience and search engine ranking. For products with variations (e.g., different sizes, colors, materials), Shopify’s “Variants” feature is indispensable. This allows you to define multiple options for a single product, each with its own SKU (Stock Keeping Unit), price, and inventory level. Proper SKU management is a critical technical detail for streamlined order fulfillment and inventory tracking.
Structuring Collections for Optimal Browsing
Collections serve as the organizational backbone of your product catalog, enabling customers to navigate your store efficiently. Technically, collections are dynamic filters or static groupings of products. You can create automated collections based on specific conditions (e.g., products with a certain tag, price range, or vendor) or manually curate collections. Implementing a logical collection structure significantly enhances user experience (UX) by improving discoverability and reducing cognitive load. From a technical perspective, well-organized collections also contribute to better internal linking, which is beneficial for search engine optimization (SEO), helping search engines understand your store’s hierarchy and index products more effectively.
Implementing Robust Inventory Tracking
Effective inventory management is a cornerstone of e-commerce operations, preventing overselling and ensuring customer satisfaction. Shopify provides built-in tools for inventory tracking, which should be configured meticulously. For each product or variant, you can set an initial stock quantity and choose whether Shopify tracks inventory automatically. Enabling this feature means that every sale automatically decrements the stock count. You can also set up alerts for low stock levels, prompting you to reorder. Furthermore, integrating with a POS (Point of Sale) system if you have a physical store, or leveraging third-party inventory management apps from the Shopify App Store, extends these capabilities. Accurate, real-time inventory data is vital for operational efficiency and directly impacts order fulfillment rates, shipping schedules, and ultimately, customer trust.
Crafting Your Online Presence: Theme Selection and Customization
The visual and functional representation of your store is driven by its theme. This section focuses on the technical aspects of selecting, customizing, and optimizing your Shopify theme to create an engaging and high-performing digital storefront.
Choosing a Shopify Theme: Functionality Meets Aesthetics
Shopify themes are more than just cosmetic overlays; they are comprehensive templates that dictate your store’s layout, styling, and much of its inherent functionality. When selecting a theme, it’s crucial to balance aesthetic appeal with technical capabilities. Consider factors like responsiveness (ensuring optimal display across all devices), page loading speed (which significantly impacts user experience and SEO), and built-in features that align with your business needs (e.g., mega menus, quick view options, product filters). Shopify offers a wide range of free and paid themes. While paid themes often provide more advanced features and dedicated support, free themes can be a solid starting point. Always test a theme’s performance and compatibility before committing, ensuring its underlying code structure is clean and efficient.
Utilizing the Theme Editor for Brand Integration
Shopify’s Theme Editor is a powerful, visual interface that allows extensive customization without requiring coding knowledge. Through this editor, you can modify sections, blocks, colors, typography, and layout elements to align with your brand identity. Technically, these changes are applied to the theme’s Liquid files (Shopify’s templating language) and CSS, though you interact with a user-friendly GUI. It’s essential to maintain consistency in branding elements across your site. Beyond aesthetics, the theme editor also allows you to configure dynamic sections on your homepage and other pages, enabling you to showcase products, promotions, and content strategically. Always preview your changes before publishing to ensure they render correctly across different screen sizes and browsers.
Enhancing User Experience Through Navigation and Page Creation
A well-structured navigation system is fundamental to a positive user experience. Shopify allows you to create and manage multiple menus (e.g., main menu, footer menu) within the “Navigation” section of your admin. This involves linking to product collections, specific pages, blog posts, or external sites. From a technical SEO perspective, logical navigation with clear anchor text helps search engine crawlers understand your site’s architecture. Additionally, creating essential pages such as “About Us,” “Contact Us,” “Privacy Policy,” and “Refund Policy” is crucial. These pages not only provide vital information to customers but also contribute to your store’s credibility and legal compliance, often being linked in the footer navigation. Ensure these pages are easily accessible and contain accurate, up-to-date information.
Establishing Seamless Transactions: Payment, Shipping, and Taxes
The operational heart of any e-commerce store lies in its ability to process transactions securely and deliver products efficiently. This section details the critical technical configurations for payments, shipping, and taxes.
Configuring Payment Gateways
Setting up payment gateways is one of the most critical technical steps, directly impacting your ability to accept payments. Shopify Payments, the platform’s native payment processor, is often the easiest to set up and integrates seamlessly, offering competitive rates and accelerated checkouts. However, you can also integrate various third-party payment providers such as PayPal, Stripe, Authorize.net, and many others, depending on your region and business needs. Each gateway requires specific technical configurations, including API keys, merchant account details, and security settings. It’s imperative to ensure that your chosen payment gateways are PCI DSS compliant to protect sensitive customer data and adhere to industry security standards. Offering multiple payment options can also reduce cart abandonment, providing customers with flexibility.
Defining Shipping Zones and Rates
Shipping configuration involves defining where you ship to and how much it costs. This technical process requires careful consideration to avoid undercharging or overcharging customers. You start by establishing “Shipping Zones,” which are geographical areas (countries, regions, states) where you will deliver products. Within each zone, you can set up various shipping rates: flat rates, price-based rates, or weight-based rates. Shopify also integrates with major carriers to provide real-time calculated rates, which dynamically pull shipping costs directly from carriers based on product weight, dimensions, and destination. Configuring these rates accurately is vital for profitability and customer satisfaction. Misconfigured shipping rates are a common cause of cart abandonment and customer complaints.
Setting Up Tax Rules for Compliance
Navigating sales tax can be complex, but Shopify provides robust tools to help manage this. The platform allows you to set up automatic tax calculations based on your store’s location and the customer’s shipping address. Shopify Payments simplifies this further by handling tax calculations automatically for most regions. However, for specific regions or products, you might need to configure manual overrides or understand how to manage tax exemptions. It’s crucial to understand your legal obligations regarding sales tax in the regions where you operate and sell. Consulting with a tax professional is always recommended to ensure full compliance. Technically, Shopify’s tax engine is designed to adapt to various tax jurisdictions, but accurate initial setup is paramount to prevent legal and financial complications.
Finalizing Your Digital Storefront: Domain, Launch, and Beyond
With the core technical elements in place, the final steps before going live involve connecting your custom domain and conducting thorough pre-launch checks. The journey, however, extends beyond launch, encompassing ongoing technical optimization.
Connecting Your Custom Domain
While Shopify provides a default .myshopify.com domain, connecting a custom domain (e.g., yourbrand.com) is essential for branding, professionalism, and SEO. This technical process typically involves purchasing a domain from a domain registrar (like GoDaddy, Namecheap, or Google Domains) and then pointing its DNS records (specifically the A record and CNAME record) to Shopify’s servers. Shopify offers detailed guides on this, and it can often be done directly within the Shopify admin under “Settings > Domains” with minimal technical expertise. Ensure the domain is properly propagated, which can take up to 48 hours, before officially launching your store under the new URL. A custom domain reinforces brand identity and improves trust with customers.
Pre-Launch Checklist: Testing Your Setup
Before unveiling your store to the public, a rigorous technical testing phase is non-negotiable. This involves simulating customer journeys and administrative tasks to identify and rectify any glitches. Key tests include:
- End-to-end Purchase Flow: Add products to cart, proceed through checkout, enter shipping and payment details (use a test payment gateway if available, or make a small actual purchase that you refund).
- Payment Gateway Functionality: Verify all configured payment methods are working correctly.
- Shipping Calculations: Confirm that shipping rates are accurately calculated for various destinations and order sizes.
- Email Notifications: Check that order confirmations, shipping updates, and other automated emails are sent and received correctly.
- Mobile Responsiveness: Browse your entire store on different devices (smartphones, tablets) to ensure optimal display and functionality.
- Form Submissions: Test contact forms, newsletter sign-ups, and any other interactive elements.
This thorough technical audit ensures a smooth customer experience from day one.
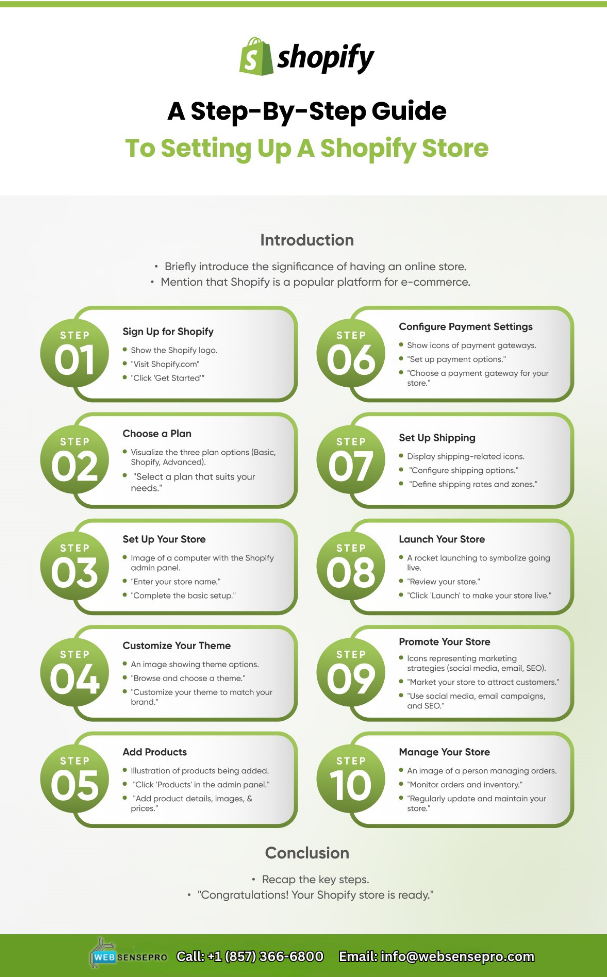
Post-Launch Technical Optimizations
Launching your store is just the beginning. Ongoing technical optimization is vital for sustained success. This includes:
- App Integrations: Explore the Shopify App Store for tools that enhance functionality, such as SEO apps, marketing automation tools, customer support integrations, or advanced analytics. Evaluate apps carefully for their technical compatibility and impact on store performance.
- SEO Enhancements: Implement on-page SEO best practices (meta titles, descriptions, image alt text), configure Google Analytics and Google Search Console, and work on technical SEO aspects like sitemaps and schema markup to improve visibility.
- Performance Monitoring: Regularly monitor your store’s loading speed and overall performance using tools like Google PageSpeed Insights. Optimize images, minimize CSS/JS, and consider using a CDN if traffic is high.
- Security Updates: Keep your Shopify store and any integrated apps updated. While Shopify handles platform-level security, being aware of app updates and best security practices is crucial.
By meticulously handling these technical aspects, you not only set up a Shopify store but also build a resilient, efficient, and scalable e-commerce operation ready to thrive in the digital marketplace.
aViewFromTheCave is a participant in the Amazon Services LLC Associates Program, an affiliate advertising program designed to provide a means for sites to earn advertising fees by advertising and linking to Amazon.com. Amazon, the Amazon logo, AmazonSupply, and the AmazonSupply logo are trademarks of Amazon.com, Inc. or its affiliates. As an Amazon Associate we earn affiliate commissions from qualifying purchases.