
In the modern digital landscape, the modem serves as the indispensable gateway between your household and the vast expanse of the internet. Whether you are transitioning to a new service provider, upgrading to the latest hardware standards, or simply moving into a new home, understanding the intricacies of modem installation is a fundamental technical skill. While many Internet Service Providers (ISPs) offer professional installation services, “self-installation” has become increasingly popular due to its convenience and the cost savings associated with avoiding technician fees.
This guide provides a professional, deep-dive walkthrough of the installation process, ensuring that your hardware is not only “plugged in” but also optimized for peak performance and security.

Understanding the Fundamentals of Modem Hardware
Before handling cables and power adapters, it is crucial to understand the technology sitting on your desk. A modem—short for modulator-demodulator—is the device that translates the signals from your ISP (via cable, copper, or fiber) into a digital format that your devices can interpret.
Modem vs. Router: Knowing the Difference
One of the most common points of confusion in home networking is the distinction between a modem and a router. In a tech-centric context, the modem is your “bridge” to the outside world. It typically has one input (the line from the ISP) and one output (an Ethernet port).
A router, conversely, takes that single internet connection from the modem and “routes” it to multiple devices via Wi-Fi or additional Ethernet ports. Many modern consumers use a “Gateway,” which is a hybrid device combining both a modem and a router into a single chassis. For the purposes of this guide, we will focus on the modem’s role in establishing that primary handshake with the ISP.
Selecting the Right Modem for Your ISP Service Level
Technology evolves rapidly, and using an outdated modem can create a bottleneck for your high-speed internet plan. If you are purchasing your own hardware rather than renting from an ISP, you must ensure compatibility. For cable internet, this means looking at the DOCSIS (Data Over Cable Service Interface Specification) version.
A DOCSIS 3.1 modem is currently the gold standard, capable of supporting gigabit speeds and providing better efficiency than the older DOCSIS 3.0 standard. Always verify your ISP’s “Approved Devices” list before installation, as certain chipsets (like the Intel Puma 6) have historically suffered from latency issues that can degrade the user experience.
Preparing for the Installation: Tools and Prerequisites
A successful installation is built on a foundation of preparation. Rushing into the setup without the necessary components can lead to intermittent connectivity or total failure during the activation phase.
Inventory Check: What’s in the Box?
Upon unboxing your modem, you should identify four primary components:
- The Modem Unit: The main hardware.
- The Power Adapter: Specifically designed for this model (using an incorrect adapter can fry the internal circuitry).
- An Ethernet Cable: Usually Category 5e (Cat5e) or Category 6 (Cat6), used to connect the modem to a computer or router.
- The Coaxial or Phone Cable: Depending on whether you have Cable or DSL service.
Additionally, keep your ISP account information, such as your account number and the MAC (Media Access Control) address printed on the modem’s sticker, within arm’s reach. The MAC address is a unique identifier that the ISP uses to recognize your specific hardware on their network.
Locating the Optimal Entry Point for Connectivity
The location of your modem significantly impacts the quality of your signal. For cable modems, you want to connect to the “lead-in” line—the primary coaxial cable entering your home from the street. Every time a cable signal passes through a “splitter” (a device used to send cable to multiple rooms), the signal strength degrades.
To ensure a “clean” signal with a high Signal-to-Noise Ratio (SNR), place the modem as close to the main entry point as possible. Avoid placing the unit in enclosed cabinets or behind heavy furniture, as modems require adequate airflow to dissipate heat generated during high-speed data processing.
The Step-by-Step Physical Installation Procedure
Once you have selected the location and inventoried your gear, you can begin the physical setup. Precision during this stage prevents physical layer errors that can be difficult to diagnose later.
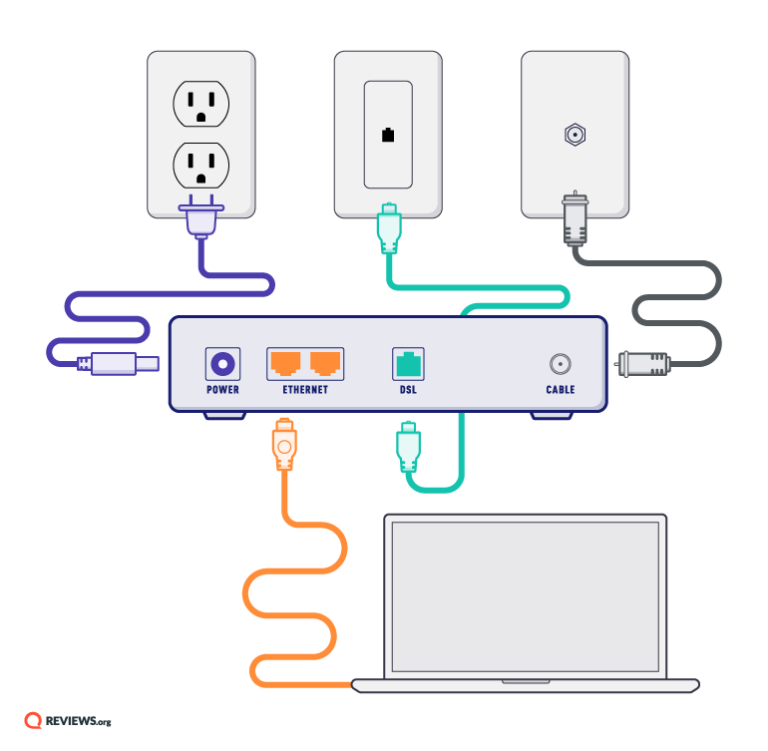
Establishing the Coaxial or DSL Connection
For a cable modem, take the coaxial cable and thread it onto the connector on the back of the modem. It is vital to tighten this connection “finger-tight.” Over-tightening with a wrench can damage the connector, while a loose connection can introduce “ingress” (noise from outside radio frequencies) into your line, causing slow speeds or frequent disconnects.
If you are installing a DSL modem, you will use a standard RJ11 phone line. Ensure that you use a DSL filter if you share the line with a traditional landline telephone; this prevents the high-frequency digital signal from interfering with voice calls.
Powering the Device and Understanding Status Indicators
Connect the power adapter to the modem and then to a wall outlet. It is highly recommended to use a surge protector to safeguard your hardware against electrical spikes. Once powered, the modem will undergo a “Power-On Self-Test” (POST).
During the first few minutes, the LED indicators on the front panel will blink in a specific sequence. Generally, the “Power” light will stabilize first, followed by “Downstream” (receiving data), “Upstream” (sending data), and finally “Online” or “Internet.” If the lights continue to flash for more than 10 minutes, the modem is likely failing to “lock” onto the ISP’s signal, indicating a potential line issue.
Interfacing with Your Local Area Network (LAN)
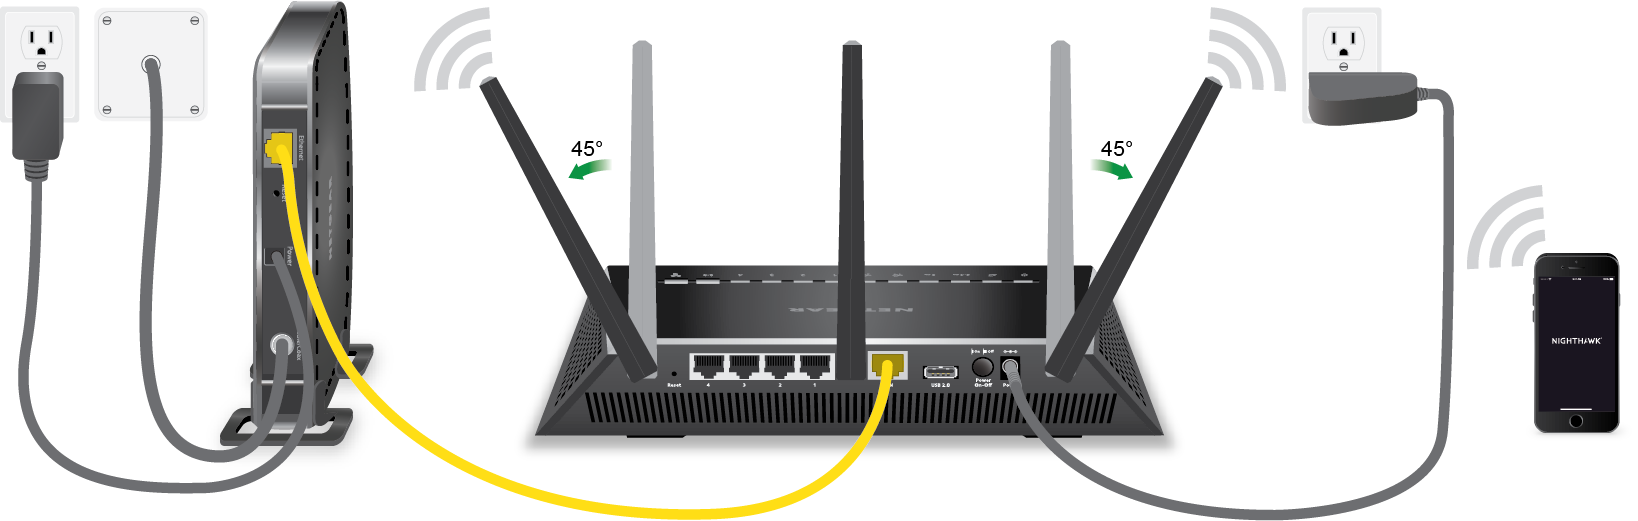
With the modem showing a stable “Online” light, connect the Ethernet cable to the port on the back of the modem. The other end should go into the “WAN” or “Internet” port of your wireless router. If you are performing the initial setup without a router, connect the Ethernet cable directly to a laptop or desktop computer. This direct connection is often the most reliable way to perform the initial activation.
Software Configuration and ISP Activation
Hardware installation is only half the battle. The modem must now be “provisioned” by your ISP so that it is authorized to access their network infrastructure.
Navigating the Service Provider’s Activation Portal
Most modern ISPs utilize a “Walled Garden” approach for new installations. When you first open a web browser on a device connected to the modem, you will be automatically redirected to an activation page.
You will likely be asked to sign in to your ISP account or enter the MAC address and Serial Number of the modem. This process updates the ISP’s CMTS (Cable Modem Termination System) to recognize your device. Once the process is complete, the modem will often reboot one final time to download the latest “Config File,” which dictates your subscribed download and upload speeds.
Accessing the Modem Web Interface for Advanced Settings
For tech enthusiasts, the “set it and forget it” approach isn’t enough. You can access the modem’s internal diagnostic page by typing its IP address—typically 192.168.100.1 or 192.168.1.1—into a browser.
In this interface, you can monitor “Power Levels” (measured in dBmV) and “Uncorrectable Codewords.” If your downstream power is outside the ideal range of -7 to +7 dBmV, you may need to contact your ISP to balance the line. Furthermore, if you are using a Gateway but prefer to use your own high-end router, this is where you would enable “Bridge Mode” to disable the built-in routing functions and avoid “Double NAT” issues.
Troubleshooting and Performance Optimization
Even with a perfect installation, technical hurdles can arise. Knowing how to diagnose these issues distinguishes a casual user from a tech-savvy professional.
Resolving Connectivity and Synchronization Errors
If the modem fails to stay online, the first step is the “power cycle.” Unplug the modem, wait 30 seconds to allow the capacitors to discharge fully, and plug it back in. This clears the volatile memory and forces a fresh handshake with the ISP.
If the “Online” light remains off, check the coaxial pins. A bent center conductor in the coaxial cable is a common culprit for “Sync No Timing” errors. Additionally, check for “RF ingress” caused by old, unshielded cables in your walls; replacing a cheap, 20-year-old cable with a modern RG6 quad-shielded cable can often double your real-world speeds.
Ensuring Long-Term Reliability Through Firmware Management
Unlike routers, modems usually have their firmware managed directly by the ISP. You cannot manually upload a new firmware version to a cable modem. However, you can trigger an update by rebooting the device during off-peak hours.
Keeping your modem “healthy” also involves physical maintenance. Ensure the vents are free of dust to prevent thermal throttling. In the world of tech, heat is the enemy of longevity. A cool-running modem will provide a consistent, low-latency connection for years, serving as the silent, sturdy foundation of your entire digital life.
aViewFromTheCave is a participant in the Amazon Services LLC Associates Program, an affiliate advertising program designed to provide a means for sites to earn advertising fees by advertising and linking to Amazon.com. Amazon, the Amazon logo, AmazonSupply, and the AmazonSupply logo are trademarks of Amazon.com, Inc. or its affiliates. As an Amazon Associate we earn affiliate commissions from qualifying purchases.