Embarking on a fresh Windows installation can feel like a significant undertaking, especially when it involves venturing into the depths of your computer’s BIOS. However, understanding how to install Windows from BIOS is a fundamental skill for any tech enthusiast, whether you’re upgrading your operating system, troubleshooting persistent issues, or setting up a new build. This guide will demystify the process, breaking it down into manageable steps, and ensuring you can confidently navigate your BIOS and initiate a successful Windows installation.
Understanding the Role of BIOS in Windows Installation
Before we dive into the practical steps, it’s crucial to grasp why accessing and configuring your BIOS (or UEFI, its modern successor) is essential for installing Windows. The BIOS/UEFI is the foundational firmware that initializes your computer’s hardware when you power it on. It’s the first piece of software that runs, and its primary job is to prepare your system for the operating system to load.
When you’re installing Windows from a USB drive or a DVD, your computer needs to know which device to boot from. By default, it’s usually set to boot from your existing hard drive or SSD. To install a new operating system, you need to instruct the BIOS/UEFI to prioritize your installation media (USB or DVD) over your internal storage. This is achieved by changing the “boot order” or “boot priority” settings within the BIOS/UEFI interface.
What is BIOS/UEFI?
BIOS, which stands for Basic Input/Output System, is a legacy firmware that has been around for decades. UEFI (Unified Extensible Firmware Interface) is its modern replacement, offering more advanced features, faster boot times, and better security. Most modern computers use UEFI, though the term BIOS is often used interchangeably. Regardless of whether your system uses BIOS or UEFI, the fundamental principles of accessing and configuring boot settings remain similar.
Why Install Windows from BIOS?
There are several compelling reasons why you might need to install Windows from BIOS:
- Fresh Installation: This is the most common reason. A clean installation can resolve software conflicts, remove malware, and generally give your system a performance boost.
- Upgrading to a New Version: While Windows often offers in-place upgrades, a clean install from BIOS ensures a completely fresh start with the latest version.
- Troubleshooting System Issues: If your current Windows installation is severely corrupted or won’t boot, accessing BIOS to initiate an installation from media is often the only solution.
- Installing on a New Hard Drive/SSD: When you replace or add a new storage device, you’ll need to install Windows from scratch.
- Dual Booting: Setting up a dual-boot system (e.g., Windows and Linux) often requires specific boot configurations.
Preparing Your Installation Media
Before you can even think about accessing your BIOS, you need to have your Windows installation media ready. This typically involves creating a bootable USB drive.
Creating a Bootable Windows USB Drive
The most efficient and widely used method for creating bootable installation media is using a USB flash drive.
- Download the Windows Media Creation Tool: Visit the official Microsoft website and download the “Media Creation Tool” for the version of Windows you wish to install (e.g., Windows 10 or Windows 11).
- Run the Tool: Execute the downloaded file. Accept the license terms.
- Choose “Create installation media (USB flash drive, DVD, or ISO file) for another PC” and click “Next.”
- Select Language, Edition, and Architecture: The tool will usually suggest recommended options based on your current PC. You can uncheck “Use the recommended options for this PC” to customize these settings if needed. Ensure you select the correct version of Windows and architecture (32-bit or 64-bit).
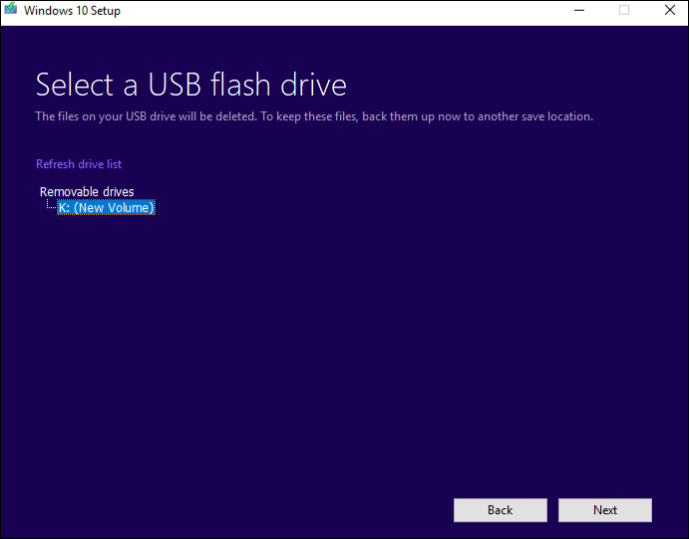
- Choose “USB flash drive” as the media to use.
- Select Your USB Drive: Make sure you have a USB drive with at least 8GB of storage plugged in. The tool will list available drives. Be extremely careful to select the correct drive, as all data on it will be erased.
- Download and Creation: The Media Creation Tool will download the necessary Windows files and create the bootable USB drive. This process can take some time depending on your internet speed.
Important Note: Ensure you have a stable internet connection throughout the download process.
Alternative: Using an ISO File
If you prefer to create an ISO file and burn it to a DVD or use it with other tools, you can select “ISO file” in step 5. You will then need a separate program (like Rufus or even the Windows built-in disc image burner) to create the bootable media from the ISO.
Accessing Your Computer’s BIOS/UEFI
This is where the “from BIOS” part of the installation process begins. Accessing the BIOS/UEFI is generally done by pressing a specific key during the very early stages of your computer’s startup sequence.
Common BIOS/UEFI Access Keys
The key you need to press varies depending on your motherboard manufacturer and computer model. The most common keys are:
- Delete (DEL)
- F2
- F10
- F12
- ESC (Escape)
You’ll usually see a brief message on your screen during boot-up that says something like “Press [Key] to enter Setup” or “Press [Key] for BIOS.” This message often disappears very quickly, so you need to be ready to press the key as soon as you power on your computer.
Steps to Enter BIOS/UEFI:
- Restart or Power On Your Computer: If your computer is on, restart it. If it’s off, turn it on.
- Immediately Press the BIOS Key: As soon as the manufacturer’s logo appears (or even before), start repeatedly pressing the designated BIOS access key for your system. Don’t just hold it down; tap it repeatedly.
- Navigate the BIOS/UEFI Interface: Once you’re in the BIOS/UEFI, you’ll be presented with a text-based or graphical interface. Navigation is typically done using the arrow keys, Enter key, and ESC key. Newer UEFI interfaces may support mouse input.
Tip: If you miss the window to press the key, your computer will boot into your existing operating system. Simply restart your computer and try again. If you’re unsure of the key for your specific machine, consult your computer’s manual or search online for your motherboard model.
Configuring Boot Order in BIOS/UEFI
Once you’re inside the BIOS/UEFI, your primary goal is to tell your computer to boot from your USB drive (or DVD) instead of your hard drive.
Locating Boot Settings
The exact location of boot settings can vary significantly between BIOS/UEFI implementations. Look for menu items such as:
- “Boot”
- “Boot Order”
- “Boot Priority”
- “Advanced BIOS Features”
- “System Configuration”
Changing the Boot Sequence
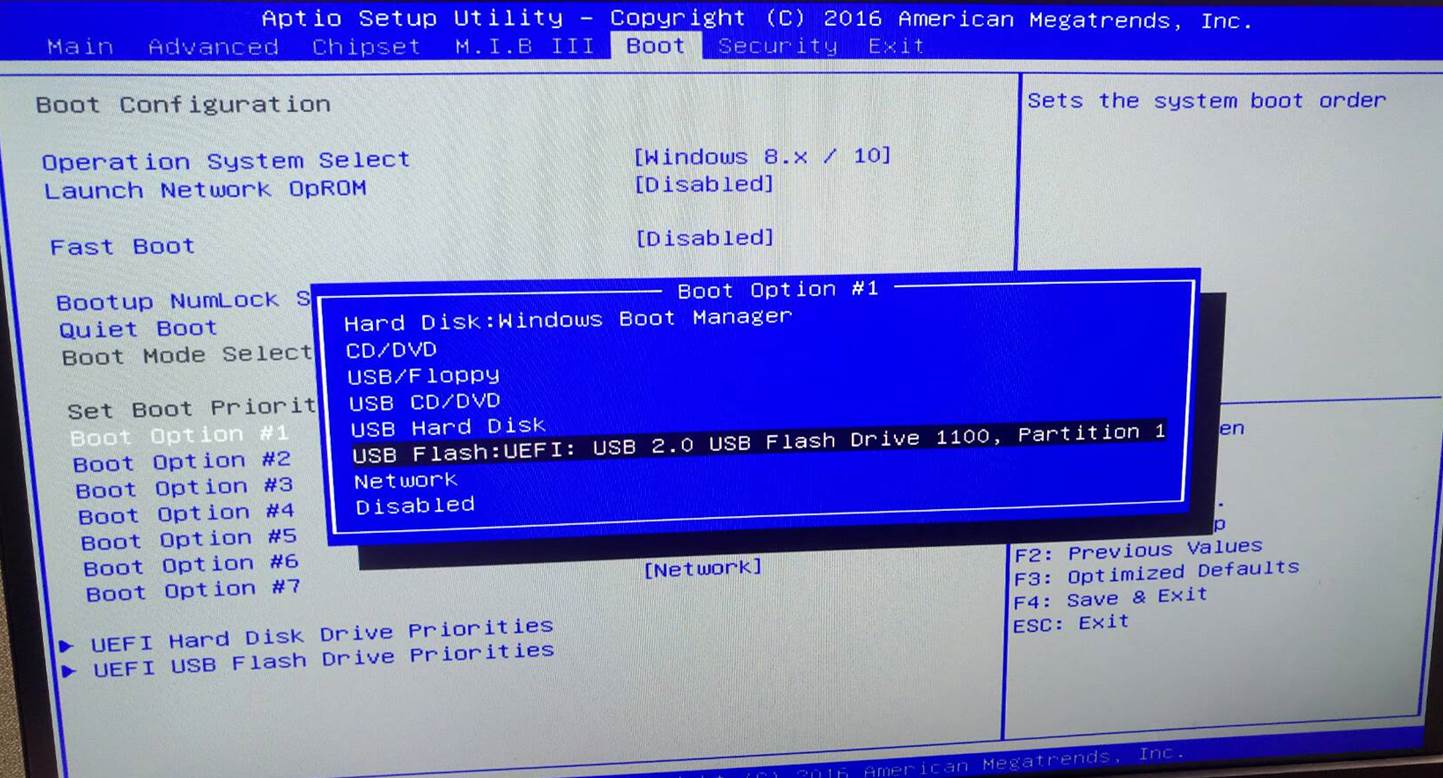
Within the boot settings, you’ll find a list of boot devices. You need to move your USB drive (or DVD drive) to the top of this list.
- Identify Your Boot Media: Look for an entry that corresponds to your USB drive. It might be listed as “USB HDD,” “Removable Devices,” or the specific brand name of your USB drive. If you’re using a DVD, it will be listed as “CD/DVD Drive” or similar.
- Adjust the Order: Use the on-screen instructions to change the boot order. Often, you’ll use the ‘+’ and ‘-‘ keys, or specific function keys (like F5/F6) to move devices up or down in the list.
- Set USB/DVD as First Boot Device: Ensure your USB flash drive or DVD drive is listed as the first boot device.
Example: A typical boot order might look like:
- USB HDD
- SATA HDD (Your main hard drive)
- CD/DVD Drive
- Network Boot
You would want to move “USB HDD” to the number 1 position.
Saving Changes and Exiting
After you’ve adjusted the boot order, it’s crucial to save your changes before exiting the BIOS/UEFI.
- Find the “Save and Exit” Option: This is usually found in a dedicated menu or by pressing a specific function key (often F10).
- Confirm Save: You’ll likely be prompted to confirm that you want to save the changes and exit. Select “Yes” or “OK.”
Your computer will then restart. If you’ve configured the boot order correctly, it should now attempt to boot from your USB drive.
Installing Windows from Your Bootable Media
With the boot order set, your computer will now attempt to load the Windows installer from your prepared USB drive.
Booting from USB/DVD
When your computer restarts, if the boot order is correct, you should see a message on the screen like: “Press any key to boot from USB…” or “Press any key to boot from CD/DVD…”.
- Press a Key: Quickly press any key on your keyboard to initiate the boot process from the installation media. If you don’t press a key, your computer might revert to booting from your hard drive, and you’ll have to restart and try again.
The Windows Setup Process
Once the installer loads, you’ll be guided through the Windows setup.
- Language and Region Settings: Choose your preferred language, time and currency format, and keyboard layout. Click “Next.”
- Install Now: Click the “Install now” button.
- Product Key: You’ll be prompted to enter your Windows product key. If you don’t have it handy or are performing a clean install on a system that previously had Windows activated, you can click “I don’t have a product key.” Windows will usually activate automatically later if the hardware is recognized as having a digital license.
- Select Operating System: If you’re installing a version of Windows that has multiple editions (e.g., Home, Pro), select the edition you have a license for.
- Accept License Terms: Read and accept the Microsoft Software License Terms.
- Choose Installation Type: This is a critical step. You will be presented with two options:
- Upgrade: This option attempts to install Windows and keep your files, settings, and applications. It’s usually only available if you’re running Windows setup from within an existing Windows environment, not typically when booting from BIOS.
- Custom: Install Windows only (advanced): This is the option you’ll want for a clean installation. It allows you to choose where to install Windows.
- Drive Selection: The “Custom” installation will show you a list of drives and partitions on your computer.
- For a New Drive: If you’re installing on a brand-new hard drive or SSD, you’ll see “Unallocated Space.” Select it and click “Next.” Windows will automatically create the necessary partitions.
- For Reinstallation: If you’re reinstalling on a drive that already has Windows, you’ll see existing partitions. To perform a clean install, you’ll want to delete the existing Windows partition(s) (usually the “Primary” partition where Windows is currently installed). Select the partition and click “Delete.” Be absolutely sure you are deleting the correct partition, as this action is irreversible and will erase all data on that partition. After deleting, select the resulting “Unallocated Space” and click “Next.”
- Installation: Windows will now begin copying files, installing features, and installing updates. Your computer will restart several times during this process. Important: After the first restart, your computer might try to boot from the USB drive again. You’ll need to either quickly remove the USB drive or access BIOS again and set your hard drive as the primary boot device to prevent restarting the installation process.
- Out-of-Box Experience (OOBE): Once the core installation is complete, you’ll go through the OOBE, where you’ll set up your region, keyboard, connect to a network, create a user account, set privacy settings, and customize your initial Windows experience.
Post-Installation Steps and Best Practices
After successfully installing Windows from BIOS, there are a few crucial steps to ensure your system is secure, up-to-date, and optimized.
Update Windows and Drivers
- Windows Updates: The first thing you should do is run Windows Update. Go to
Settings > Update & Security > Windows Updateand click “Check for updates.” Install all available updates, including optional ones that might contain driver updates. - Driver Installation: While Windows Update often installs generic drivers, it’s best to install the latest drivers directly from your hardware manufacturers’ websites. This is especially important for:
- Graphics Card (GPU): Download drivers from NVIDIA, AMD, or Intel.
- Motherboard Chipset: Visit your motherboard manufacturer’s website for the latest chipset drivers.
- Network Adapter (Wi-Fi/Ethernet): Essential for internet connectivity.
- Audio Card: For optimal sound performance.
- Other Peripherals: Any specific devices you’ve installed.
Install Essential Software
With drivers and Windows updated, you can start installing your essential applications. Consider antivirus software (if you’re not relying solely on Windows Defender), web browsers, productivity suites, and any specialized software you use.
Consider Performance Tweaks and Digital Security
- Performance: Depending on your hardware, you might consider enabling features like Game Mode or adjusting power settings for better performance.
- Digital Security: Ensure your firewall is enabled and that you have a reputable antivirus program installed and updated. Be mindful of where you download software from to avoid malware.

Reverting Boot Order (Optional but Recommended)
Once you’ve confirmed that Windows is booting correctly from your hard drive, it’s a good practice to go back into the BIOS/UEFI and set your hard drive (or SSD) as the primary boot device again. This prevents accidental re-initiation of the Windows setup if the USB drive is left plugged in and ensures faster boot times.
By following these steps, you’ve not only successfully installed Windows from BIOS but also ensured your system is ready for optimal performance and security. This foundational knowledge empowers you to manage your PC’s operating system effectively.
aViewFromTheCave is a participant in the Amazon Services LLC Associates Program, an affiliate advertising program designed to provide a means for sites to earn advertising fees by advertising and linking to Amazon.com. Amazon, the Amazon logo, AmazonSupply, and the AmazonSupply logo are trademarks of Amazon.com, Inc. or its affiliates. As an Amazon Associate we earn affiliate commissions from qualifying purchases.