
In the rapidly evolving landscape of technology, virtualization has become an indispensable tool for IT professionals, developers, and even tech-savvy home users. VMware, a leading name in this domain, offers robust solutions for creating and managing virtual machines (VMs). However, to unlock the full potential of your VMware environment, a crucial step is often overlooked: installing VMware Tools. This seemingly simple installation process significantly enhances the performance, usability, and management capabilities of your guest operating systems.
This guide will delve into the intricacies of installing VMware Tools, covering its importance, different installation methods, and common troubleshooting tips. Whether you’re a seasoned system administrator or just starting with virtualization, understanding how to properly install and leverage VMware Tools is paramount for a seamless and efficient virtual experience.

The Indispensable Role of VMware Tools
Before we dive into the installation process, it’s vital to understand why VMware Tools are so important. Essentially, VMware Tools is a suite of utilities and drivers designed to improve the performance of a guest operating system running on a VMware platform, such as VMware Workstation, Fusion, or ESXi. Without VMware Tools, your virtual machine operates with generic drivers, which are not optimized for the virtual hardware presented by VMware. This can lead to a host of issues, including:
- Subpar Graphics Performance: Display resolution might be limited, mouse movement could be laggy, and graphics-intensive applications will perform poorly.
- Slow Disk I/O: The virtual hard disk will operate at a reduced speed, impacting application loading times and overall system responsiveness.
- Limited Networking Capabilities: Network adapter drivers might be generic, leading to lower throughput and potential connectivity issues.
- Lack of Integration Features: Essential features like drag-and-drop file transfer between the host and guest, copy-paste functionality, and proper shutdown/restart commands from the VMware management interface will not work.
- Poor Time Synchronization: The guest OS time might drift from the host time, causing issues with scheduled tasks and logging.
- Enhanced Management: Features like graceful guest OS shutdown and restart from the vSphere Client or Workstation console rely on VMware Tools.
In essence, VMware Tools acts as a bridge, enabling tighter integration between the guest operating system and the underlying VMware hypervisor. It allows the guest OS to communicate more effectively with the virtual hardware, thereby unlocking optimized performance and a host of convenient features.
Preparing for Installation: Key Considerations
Before you begin the installation process, a few preliminary steps and considerations will ensure a smooth experience.
System Requirements and Compatibility
While VMware Tools is generally compatible with a wide range of operating systems, it’s always prudent to check the specific compatibility matrix for your VMware product version and the guest operating system you intend to install it on. You can find this information on the official VMware website. Ensure your guest OS is supported and that you have the correct version of VMware Tools available.
Downloading VMware Tools
The method for obtaining VMware Tools varies slightly depending on your VMware product:
- VMware Workstation/Fusion: These desktop virtualization products typically bundle VMware Tools. You can often initiate the installation directly from the product’s menu.
- VMware vSphere (ESXi/vCenter Server): For server virtualization, VMware Tools are often delivered via an ISO image that is mounted to the virtual machine. In some cases, you might need to download the latest version from the VMware Support website. vSphere also offers an “Open-VM-Tools” option, which we’ll discuss later.
Snapshotting Your Virtual Machine (Recommended)
Before making any significant changes to your virtual machine, including installing drivers and utilities, it is highly recommended to take a snapshot. A snapshot captures the current state of your VM, allowing you to easily revert to that state if the installation process encounters issues or causes unexpected behavior. This is a critical safety net.
Installing VMware Tools: Step-by-Step Methods
VMware offers several ways to install VMware Tools, catering to different scenarios and operating systems. The most common methods involve using the VMware Tools ISO image or leveraging the installer provided within the VMware product itself.
Method 1: Installing from the VMware Tools ISO Image (Most Common for vSphere)
This method is prevalent when managing VMs on VMware ESXi hosts, especially when the guest OS doesn’t automatically detect and offer the VMware Tools installation.
Step 1: Mount the VMware Tools ISO Image
- Power on your virtual machine.
- In the VMware vSphere Client (or Workstation/Fusion interface), locate your VM.
- Right-click on the VM and select “Guest OS” > “Install VMware Tools” (or a similar option). This action tells the hypervisor to “insert” the VMware Tools ISO into the virtual CD/DVD drive of the VM.
- Alternatively, if you’re using ESXi directly or need to manually mount: Navigate to the VM’s settings, find the virtual CD/DVD drive, and select “Datastore ISO File.” Browse your datastores to locate the VMware Tools ISO image.
Step 2: Launch the Installer within the Guest OS
Once the ISO is mounted, the guest operating system should detect it. The exact behavior depends on the OS:
- Windows:
- Open “File Explorer” (or “My Computer”).
- You should see the VMware Tools CD drive.
- Double-click to open it.
- Run the
setup.exeorsetup64.exe(for 64-bit systems) file. - If autorun is enabled, a dialog box might pop up automatically.
- Linux:
- Open a terminal window.
- The CD-ROM drive is usually mounted automatically. Check common mount points like
/media/cdrom,/mnt/cdrom, or/run/media/your_username/VMware Tools. - If not mounted, you can mount it manually using a command like:
sudo mount /dev/cdrom /mnt/cdrom(adjusting device and mount point as needed). - Navigate to the mount point in the terminal:
cd /mnt/cdrom - Extract the tarball:
tar zxpf VMwareTools-x.x.x-xxxxxx.tar.gz(replace with the actual filename). - Navigate into the extracted directory:
cd vmware-tools-distrib - Run the installer script:
sudo ./vmware-install.pl
Step 3: Follow the On-Screen Installation Prompts
The installer will guide you through the process.
- Windows: A standard Windows installer wizard will appear. You can typically choose “Typical” or “Custom” installation. “Typical” is usually sufficient for most users. Follow the prompts, accept the license agreement, and click “Install.”
- Linux: The Perl script will ask a series of configuration questions. For most users, accepting the default options by pressing Enter for each question is recommended. The installer will compile and install the necessary kernel modules.

Step 4: Reboot the Virtual Machine
After the installation is complete, it is crucial to reboot the guest operating system for the changes to take effect.
- Windows: The installer will usually prompt you to reboot.
- Linux: You will need to reboot manually:
sudo reboot
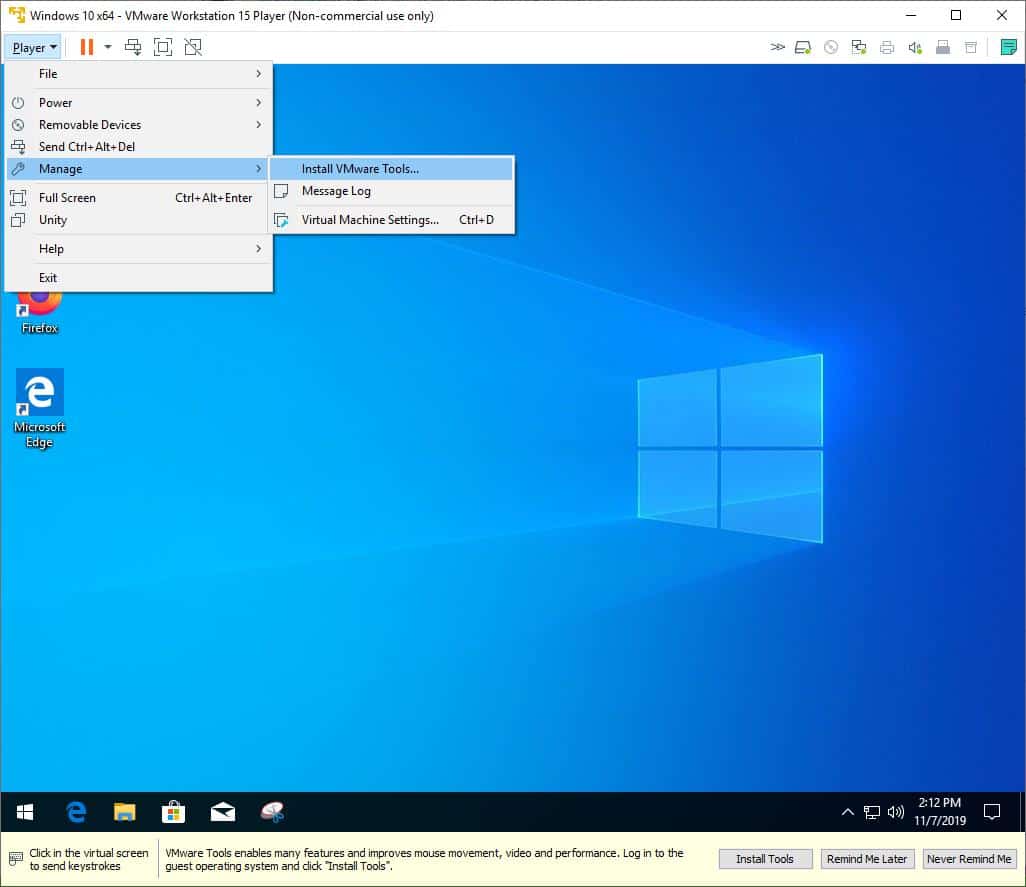
Method 2: Using the “Install VMware Tools” Option from the Menu (Workstation/Fusion)
VMware Workstation and Fusion provide a more streamlined, integrated experience for installing VMware Tools.
Step 1: Initiate Installation from the VMware Menu
- Power on your virtual machine.
- In VMware Workstation or Fusion, go to the VM’s menu.
- Select “VM” > “Install VMware Tools…” (or “Update VMware Tools…”).
This action will automatically mount the appropriate VMware Tools ISO for your guest operating system and initiate the installation process within the VM.
Step 2: Follow the Installer Prompts within the Guest OS
Once initiated, the installer will launch inside the guest operating system.
- Windows: The installer will launch automatically. If not, open “File Explorer,” go to the CD drive, and run
setup.exeorsetup64.exe. Follow the wizard, choose “Typical” installation, and complete the process. - Linux: The installer might launch automatically, or you might need to open a terminal, navigate to the mounted CD drive, extract the tarball, and run the
vmware-install.plscript as described in Method 1.
Step 3: Reboot the Virtual Machine
As with the previous method, a reboot of the guest OS is necessary for the installed VMware Tools to function correctly.
Method 3: Using Open-VM-Tools (Linux-Specific)
For Linux guest operating systems, especially in vSphere environments, Open-VM-Tools is often the preferred and more modern solution. It’s an open-source implementation of VMware Tools that is often pre-installed or easily installable through the Linux distribution’s package manager.
Why Use Open-VM-Tools?
- Native Integration: Open-VM-Tools are designed to integrate seamlessly with various Linux distributions and their packaging systems.
- Automatic Updates: They can often be updated through the standard system update mechanisms of your Linux distribution.
- Reduced Dependencies: They typically have fewer dependencies than the traditional VMware Tools.
Installation Steps (General for Debian/Ubuntu and RHEL/CentOS/Fedora)
The exact commands may vary slightly depending on your Linux distribution.
- Ensure your VM is running.
- Open a terminal window.
- For Debian/Ubuntu-based systems:
bash

sudo apt update

sudo apt install open-vm-tools open-vm-tools-desktop
(Theopen-vm-tools-desktoppackage provides enhanced graphical features). - For RHEL/CentOS/Fedora-based systems:
bash

sudo yum update  # or sudo dnf update

sudo yum install open-vm-tools  # or sudo dnf install open-vm-tools
For graphical environments, you might also need:
bash

sudo yum install open-vm-tools-desktop # or sudo dnf install open-vm-tools-desktop
- Reboot the virtual machine:
bash

sudo reboot
Note: If you previously installed traditional VMware Tools on a Linux VM, it’s generally recommended to uninstall them before installing Open-VM-Tools to avoid conflicts.
Verifying the Installation and Common Troubleshooting
After installing VMware Tools and rebooting your VM, how do you confirm it’s working correctly?
Verification Steps
- Graphics and Display: Check if you can change the display resolution to match your host screen resolution. Mouse movement should be smooth.
- Copy-Paste and Drag-and-Drop: Try copying text from your host to the guest and vice-versa. Attempt to drag and drop a small file.
- VMware Tools Service (Windows): Open the “Services” console (search for
services.msc). Look for a service named “VMware Tools.” It should be running. - Linux Status: In a Linux terminal, you can often check the status with commands like
systemctl status vmtoolsd(for systems using systemd). - VMware vSphere Client: In vSphere, the VM’s summary tab should indicate that VMware Tools are installed and running. If it shows “Not installed” or “Out of date,” there’s an issue.
Common Troubleshooting Scenarios
- Installation Fails:
- Disk Space: Ensure there’s enough free disk space within the guest OS.
- Permissions: On Linux, ensure you’re running the installer with root privileges (
sudo). - Corrupted ISO: If you downloaded the ISO manually, try re-downloading it.
- Antivirus/Security Software: Temporarily disable any aggressive antivirus or security software within the guest OS that might be interfering with the installation.
- Previous Versions: If an older version of VMware Tools is present, it might need to be uninstalled first.
- VMware Tools Not Running After Installation:
- Reboot Again: Sometimes, a second reboot is necessary.
- Check Services (Windows): Ensure the VMware Tools service is running and set to start automatically.
- Check Processes (Linux): Verify that the
vmtoolsdprocess is running. - Reinstall: If problems persist, try uninstalling and then reinstalling VMware Tools.
- “Mount VMware Tools” Option is Grayed Out:
- VMware Product Version: Ensure you are using a supported version of VMware Tools for your guest OS and VMware product.
- Guest OS State: The VM might need to be powered on.
- Network Issues (vSphere): In some rare cases, network configuration on the ESXi host or vCenter Server might affect the ability to mount ISOs.
- Open-VM-Tools Conflicts: If you installed traditional VMware Tools and then tried Open-VM-Tools (or vice-versa), conflicts can arise. It’s best to have only one set of tools installed. Uninstall the old one before installing the new.
Conclusion
Installing VMware Tools is not merely an optional step; it is a fundamental requirement for optimizing your virtual machine’s performance and ensuring seamless integration with your host environment. By following the methods outlined in this guide, you can confidently install and maintain VMware Tools across various operating systems and VMware platforms. From enhanced graphics and faster I/O to crucial management features, the benefits of a properly installed VMware Tools suite are undeniable, contributing significantly to the efficiency and effectiveness of your virtualized infrastructure. Remember to always keep your VMware Tools updated to benefit from the latest performance improvements and security patches.
aViewFromTheCave is a participant in the Amazon Services LLC Associates Program, an affiliate advertising program designed to provide a means for sites to earn advertising fees by advertising and linking to Amazon.com. Amazon, the Amazon logo, AmazonSupply, and the AmazonSupply logo are trademarks of Amazon.com, Inc. or its affiliates. As an Amazon Associate we earn affiliate commissions from qualifying purchases.