In the fast-evolving landscape of technology, having the right tools isn’t just a convenience; it’s a necessity. For developers, designers, data scientists, and anyone deeply involved in software creation, an Integrated Development Environment (IDE) or a powerful code editor is the command center of their digital universe. Among the pantheon of coding tools, Visual Studio Code (VS Code) has emerged as an undisputed leader, celebrated for its lightweight yet incredibly powerful nature, extensive customization options, and vibrant community support. This article will serve as your definitive guide to installing Visual Studio Code across various operating systems, ensuring you can harness its full potential and propel your tech endeavors, personal brand, and even financial pursuits to new heights.
The Essential Toolkit for Modern Developers: Why Visual Studio Code?
At the heart of every groundbreaking application, every innovative AI model, and every robust website lies meticulously crafted code. Visual Studio Code, developed by Microsoft, isn’t just another code editor; it’s a gateway to efficient development, fostering an environment where creativity and productivity coalesce. Its ascendancy in the tech world isn’t accidental; it’s a testament to its design philosophy focused on flexibility, performance, and developer experience.
A Glimpse into VS Code’s Power and Popularity
Visual Studio Code stands out primarily due to its open-source nature and cross-platform compatibility. Whether you’re a seasoned developer working on complex enterprise solutions or a budding enthusiast experimenting with your first lines of Python, VS Code offers an unparalleled blend of features. Its core strength lies in its extensibility. Through a vast marketplace of extensions, users can transform VS Code into a highly specialized IDE for virtually any programming language, framework, or development task imaginable. From intelligent code completion (IntelliSense) and robust debugging tools to integrated Git control and syntax highlighting for hundreds of languages, VS Code provides a seamless, intuitive, and highly responsive coding experience.
This versatility makes VS Code an indispensable tool for staying abreast of the latest technology trends. As AI tools evolve, as new software paradigms emerge, and as app development frameworks shift, VS Code’s adaptability ensures that developers always have the cutting-edge capabilities they need. Its performance is optimized to handle large projects without bogging down your system, a crucial factor for maintaining productivity in today’s demanding development cycles.
Bridging Innovation and Efficiency: How VS Code Supports Your Tech & Brand Journey
In today’s competitive digital economy, the tools you use reflect not just your technical proficiency but also your commitment to efficiency and quality. For professionals and freelancers alike, leveraging a modern, powerful IDE like VS Code significantly enhances their personal brand. A developer who can rapidly prototype, debug effectively, and collaborate seamlessly using a sophisticated tool like VS Code projects an image of professionalism and competence.
Think about the implications for your ‘Brand’ in the tech space. Delivering projects on time, with fewer bugs, and maintaining high code quality are cornerstones of a strong reputation. VS Code’s productivity features directly contribute to these outcomes. For those venturing into online income streams, such as developing apps for clients, creating software for sale, or contributing to open-source projects, VS Code acts as a foundational element. Its efficiency gains translate directly into saved time, which, in turn, can be reinvested into more projects or further skill development, ultimately impacting your ‘Money’ through increased earning potential and reduced operational overhead. This powerful editor empowers you to not only keep up with technology trends but to actively shape them through your contributions.
Preparing Your Environment: System Requirements and Pre-Installation Checks
Before diving into the installation process, it’s prudent to ensure your system meets the basic requirements and to perform a quick check for any potential conflicts. While Visual Studio Code is renowned for being lightweight, understanding its minimal needs will guarantee a smooth setup and optimal performance.
Ensuring a Smooth Setup: Essential Prerequisites
Visual Studio Code is incredibly flexible, supporting a wide range of operating systems. However, specific versions are recommended for the best experience:
- Operating System:
- Windows: Windows 8, 10, or 11 (64-bit recommended).
- macOS: macOS X Yosemite (10.10) or higher.
- Linux: Debian, Ubuntu, Red Hat, Fedora, or CentOS-based distributions. A modern kernel and desktop environment are generally sufficient.
- Processor: 1.6 GHz or faster processor (modern multi-core processors are ideal).
- RAM: 1 GB RAM (2 GB or more recommended for optimal performance, especially with multiple extensions or large projects).
- Disk Space: 200 MB of available disk space.
- Display: 1024 x 768 minimum resolution.
Pre-Installation Checks:
- Internet Connection: You’ll need an active internet connection to download the installer and any desired extensions.
- Administrator Rights: For Windows and Linux installations, you might need administrator or root privileges to install the software in system directories. On macOS, dragging to Applications usually requires user permissions.
- Existing Installations: While VS Code can coexist with other IDEs, ensure you’re not inadvertently installing multiple versions to avoid confusion. If you have an older version of VS Code, the installer will typically update it automatically.
Meeting these basic requirements ensures that VS Code runs efficiently, allowing you to focus on coding without performance bottlenecks. This attention to detail is part of a productive digital security and productivity mindset, ensuring your tools are always ready for action.
Step-by-Step Installation Across Major Operating Systems
The installation process for Visual Studio Code is straightforward, though it varies slightly depending on your operating system. Below, we’ll walk through the specific steps for Windows, macOS, and Linux.
Installing Visual Studio Code on Windows
Installing VS Code on Windows is a familiar process for most users, involving a standard executable installer.
-
Download the Installer:
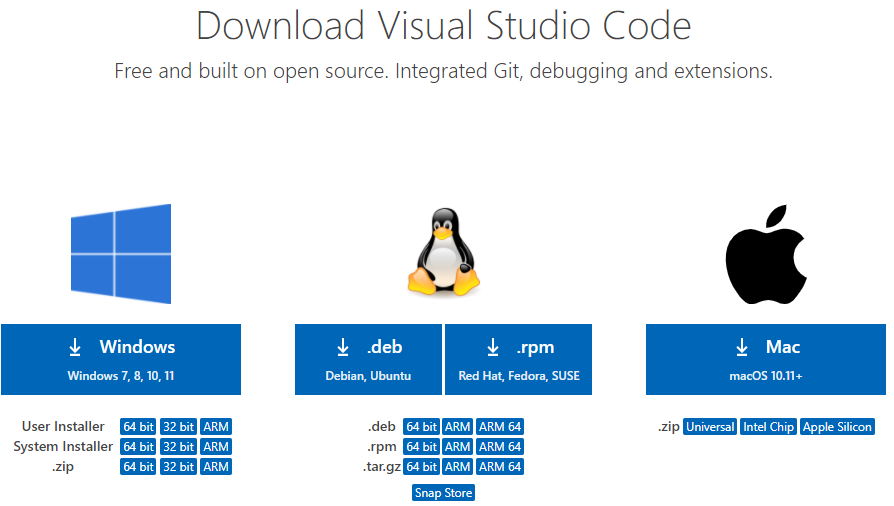
- Open your web browser and navigate to the official Visual Studio Code website:
code.visualstudio.com. - Look for the prominent “Download for Windows” button. There are usually options for System Installer (recommended for most users) and User Installer (doesn’t require administrator privileges and installs per user). For most, the 64-bit System Installer is the preferred choice. Click to download.
- Open your web browser and navigate to the official Visual Studio Code website:
-
Run the Installer:
- Once the download is complete, locate the
.exefile (e.g.,VSCodeUserSetup-x.x.x.exe) in your Downloads folder and double-click it to start the installation wizard. - Accept the License Agreement: Read the license agreement and select “I accept the agreement,” then click “Next.”
- Choose Installation Location: The installer will suggest a default installation path (e.g.,
C:Program FilesMicrosoft VS Code). You can keep this default or click “Browse…” to choose a different location. Click “Next.” - Select Start Menu Folder: You can choose to create a Start Menu folder shortcut or opt not to. Click “Next.”
- Select Additional Tasks: This is an important step for enhancing your workflow:
- “Create a desktop icon”: Optional, for quick access.
- “Add ‘Open with Code’ action to Windows Explorer file context menu”: Highly recommended. This allows you to right-click on files or folders and open them directly in VS Code.
- “Add ‘Open with Code’ action to Windows Explorer directory context menu”: Also highly recommended for opening entire project folders.
- “Register Code as an editor for supported file types”: Recommended if you want VS Code to be your default editor for common code files.
- “Add to PATH (requires shell restart)”: Crucial. This allows you to launch VS Code directly from the command prompt or PowerShell by typing
code .(to open the current directory) orcode filename. Ensure this box is checked.
- Click “Next” after making your selections.
- Once the download is complete, locate the
-
Ready to Install and Finish:
- Review your chosen settings and click “Install.”
- The installation process will begin. Once complete, you can choose to “Launch Visual Studio Code” immediately. Click “Finish.”
Installing Visual Studio Code on macOS
Installing VS Code on a Mac is typically a drag-and-drop affair, aligning with the macOS philosophy of simplicity.
-
Download the Installer:
- Go to
code.visualstudio.com. - Click the “Download for Mac” button. This will download a
.zipfile.
- Go to
-
Extract and Move to Applications:
- Once the download is complete, locate the
.zipfile (e.g.,VSCode-darwin-universal.zip) in your Downloads folder. Double-click it to extract its contents. - This will create an application bundle named “Visual Studio Code.app”.
- Drag the “Visual Studio Code.app” file into your “Applications” folder. This makes it available in your Launchpad and ensures proper system integration.
- Once the download is complete, locate the
-
First Launch and Configure Shell Command:
- Open your Applications folder and double-click “Visual Studio Code.app” to launch it. The first time you launch it, macOS might ask for confirmation that you want to open an application downloaded from the internet. Click “Open.”
- Install ‘code’ command in PATH: To enable launching VS Code from the terminal, similar to Windows, open the Command Palette (Cmd+Shift+P) inside VS Code, type “shell command,” and select “Install ‘code’ command in PATH.” You might be prompted for your administrator password. This allows you to type
code .in any terminal window to open the current directory in VS Code.
Installing Visual Studio Code on Linux
Linux offers several ways to install VS Code, catering to different distributions and preferences. We’ll cover the most common methods.
- Download from Official Website (Debian/Ubuntu & Red Hat/Fedora/CentOS):
- Navigate to
code.visualstudio.com. - Download the appropriate package:
- For Debian/Ubuntu-based systems (
.deb): Click “Download .deb”. - For Red Hat/Fedora/CentOS-based systems (
.rpm): Click “Download .rpm”.
- For Debian/Ubuntu-based systems (
- Navigate to
-
Installation via Package Managers:
-
Debian/Ubuntu (APT):
- Once the
.debfile is downloaded, open your terminal. - Navigate to your Downloads folder:
cd ~/Downloads - Install the package:
sudo dpkg -i code_*.deb - If there are dependency issues, resolve them:
sudo apt-get install -f - Alternatively, you can add the official Microsoft repository to your system for easy updates:
bash

sudo apt-get update

sudo apt-get install software-properties-common apt-transport-https wget

wget -q https://packages.microsoft.com/keys/microsoft.asc -O- | sudo apt-key add -

sudo add-apt-repository "deb [arch=amd64] https://packages.microsoft.com/repos/vscode stable main"

sudo apt-get update

sudo apt-get install code
- Once the
-
RHEL/Fedora/CentOS (YUM/DNF):
- After downloading the
.rpmfile: - Open your terminal and navigate to your Downloads folder.
- Install the package:
sudo rpm -ivh code_*.rpm - Similar to Debian, you can add the repository for easier updates:
bash

sudo rpm --import https://packages.microsoft.com/keys/microsoft.asc

sudo sh -c 'echo -e "[code]nname=Visual Studio Codenbaseurl=https://packages.microsoft.com/yumrepos/vscodenenabled=1ngpgcheck=1ngpgkey=https://packages.microsoft.com/keys/microsoft.asc" > /etc/yum.repos.d/vscode.repo'

# For Fedora/RHEL 8+

sudo dnf check-update

sudo dnf install code

# For CentOS/RHEL 7-

sudo yum check-update

sudo yum install code
- After downloading the
-
Snap or Flatpak (Universal Linux Packages):
- These package formats allow for easy installation across most Linux distributions, often providing the latest versions.
- Snap: If Snap is enabled on your system (common on Ubuntu, Fedora, etc.):
bash

sudo snap install --classic code
- Flatpak: If Flatpak is enabled:
bash

flatpak install flathub com.visualstudio.Code
(You may need to set up Flatpak first if you haven’t already:flatpak remote-add --if-not-exists flathub https://flathub.org/repo/flathub.flatpakrepo)
-
Manual Installation (Tarball):
- Download the
tar.gzarchive from the VS Code website. - Extract it to a preferred location (e.g.,
~/toolsor/opt). bash
cd ~/Downloads
tar -xzf code-stable-x64-*.tar.gz
mv VSCode-linux-x64 /opt/VSCode
- You’ll then need to create a desktop entry and potentially add it to your PATH manually for convenience. This method is generally recommended for advanced users or specific scenarios where other methods are not viable.
- Download the
-
After installation, you can launch VS Code from your applications menu or by typing code in your terminal.
Optimizing Your VS Code Experience: Post-Installation & Personalization
Installing Visual Studio Code is just the beginning. To truly leverage its power and maximize your productivity, a few post-installation steps and personalization efforts are key. This is where you tailor the environment to your specific tech needs and personal coding style, enhancing your digital security through robust settings and improving workflow.
Your First Launch: Essential Settings and Customization
Upon launching VS Code for the first time, you’ll often be greeted by a welcome screen, offering quick access to customization options. Take a moment to explore these:
- Themes: VS Code ships with several built-in color themes (dark, light, high contrast). You can easily change these via the “Color Theme” option in the Command Palette (Ctrl+Shift+P or Cmd+Shift+P on Mac). Many developers opt for dark themes to reduce eye strain.
- Icons: Similarly, you can change file icon themes to make file types more visually distinct.
- Fonts: Adjust your editor font and font size to your preference for readability. Monospaced fonts like Fira Code, Source Code Pro, or Cascadia Code are popular among developers.
- Settings: The gear icon in the bottom-left corner opens the Settings menu (or
File > Preferences > Settings). Here, you can fine-tune almost every aspect of VS Code, from auto-save behavior and tab size to integrated terminal settings. Many settings are available as JSON, allowing for advanced configuration and portability.
Investing a little time in these initial customizations makes your coding environment more comfortable and efficient, directly contributing to your overall productivity.
Supercharging Productivity with Extensions
The true magic of Visual Studio Code lies in its vast marketplace of extensions. These add-ons significantly enhance functionality, offering language support, debuggers, linters, formatters, and much more. Think of extensions as specialized AI tools for your development workflow, helping you write cleaner code and work smarter.
To install extensions:
- Click the “Extensions” icon on the Activity Bar (left-hand side) or press Ctrl+Shift+X (Cmd+Shift+X on Mac).
- Search for extensions by name or functionality.
- Click “Install” for any extension you wish to add.
Some highly recommended extensions to kickstart your productivity include:
- Prettier – Code formatter: Ensures consistent code styling across your projects.
- ESLint / Pylance / TSLint: Language-specific linters that catch errors and enforce coding standards.
- GitLens — Git supercharged: Provides rich Git insights directly within the editor.
- Docker: Integrates Docker commands and simplifies container management.
- Live Share: Enables real-time collaborative coding with others.
- Remote – SSH / WSL / Containers: Microsoft’s official extensions for remote development, crucial for modern cloud-native workflows.
- Various language support extensions: Python, JavaScript (ES7 React/Redux/GraphQL/React-Native snippets), C#, Java Extension Pack, Go, PHP Intelephense, etc., for enhanced IntelliSense, debugging, and refactoring.
By thoughtfully selecting extensions, you can tailor VS Code to be the ultimate financial tool for your specific coding needs, optimizing your time and effort on every project.
Leveraging Settings Sync for Seamless Workflow Across Devices
For developers working across multiple machines (e.g., a desktop at home, a laptop for travel, or a remote server), maintaining a consistent development environment is crucial for productivity and personal branding. VS Code’s “Settings Sync” feature is a game-changer in this regard.
Settings Sync allows you to synchronize your VS Code settings, keyboard shortcuts, user snippets, extensions, and UI state (like theme) across different installations using your Microsoft or GitHub account.
To enable it:
- Click the gear icon in the bottom-left corner and select “Turn On Settings Sync…”
- Choose what you want to synchronize.
- Sign in with your Microsoft or GitHub account.
This ensures that no matter where you open VS Code, your familiar, finely-tuned environment is ready to go. It’s an essential feature for maintaining an efficient workflow and upholding a consistent professional “brand” across all your digital workstations, contributing to overall productivity and digital security by having a backed-up, consistent environment.
Beyond Installation: VS Code’s Role in Your Tech, Brand, and Financial Growth
Installing Visual Studio Code is not merely about getting a program onto your computer; it’s about empowering yourself with a critical tool that can profoundly influence your career trajectory, bolster your professional reputation, and unlock new avenues for financial growth.
Empowering Innovation: How VS Code Fuels Tech Development
VS Code sits at the nexus of modern tech trends. Its integration capabilities mean it’s equally adept at frontend web development (React, Angular, Vue), backend services (Node.js, Python with Flask/Django, .NET Core, Go), mobile app development (React Native, Flutter, Xamarin), and even data science and machine learning (with Python extensions and Jupyter notebooks). As AI tools become more pervasive, VS Code’s ability to seamlessly integrate with various AI/ML frameworks and tools positions developers to stay at the forefront of innovation.
By facilitating rapid iteration, robust debugging, and seamless collaboration, VS Code allows developers to focus on the creative problem-solving aspects of their work. This leads to higher quality software, faster project delivery, and a continuous learning curve that keeps professionals agile in a dynamic industry. It’s a foundational tool for anyone serious about contributing to, and benefiting from, the ongoing technology revolution.

Building Your Personal Brand and Financial Freedom with a Robust IDE
For the individual developer, whether employed or freelancing, a command over powerful tools like VS Code is a significant asset for personal branding. It demonstrates a commitment to efficiency, quality, and modern development practices. Being proficient with a widely adopted IDE also means easier collaboration and quicker onboarding onto new projects, making you a more valuable team member or contractor.
From a ‘Money’ perspective, the productivity gains offered by VS Code are tangible. Faster coding, fewer bugs, and streamlined workflows mean you can complete projects more quickly, take on more clients for your side hustles, or deliver higher-quality work that justifies better compensation. For those building digital products, online income streams, or contributing to open-source projects that elevate their profile, VS Code acts as a crucial financial tool, directly supporting the creation of assets that generate revenue or boost career prospects. It reduces friction, allowing you to convert your ideas into marketable solutions more efficiently. In essence, it helps you build a strong reputation, attracting opportunities that lead to greater financial freedom and success in the digital realm.
By meticulously following this guide, you’ve not only installed Visual Studio Code but have also laid the groundwork for a more productive, efficient, and ultimately, more rewarding development journey. Embrace its power, customize it to your heart’s content, and watch how this indispensable tool transforms your approach to technology, strengthens your professional brand, and opens doors to new financial possibilities.
aViewFromTheCave is a participant in the Amazon Services LLC Associates Program, an affiliate advertising program designed to provide a means for sites to earn advertising fees by advertising and linking to Amazon.com. Amazon, the Amazon logo, AmazonSupply, and the AmazonSupply logo are trademarks of Amazon.com, Inc. or its affiliates. As an Amazon Associate we earn affiliate commissions from qualifying purchases.