In today’s fast-paced digital landscape, the ability to run multiple operating systems concurrently on a single physical machine has become an invaluable asset for IT professionals, developers, students, and curious tech enthusiasts alike. This capability is made possible through Virtual Machines (VMs) – a technology that allows you to create and run “virtual” computers within your existing “physical” computer. Whether you’re looking to test new software without risking your main system, develop applications in an isolated environment, explore different operating systems, or simply improve your digital security, understanding how to set up a virtual machine is a fundamental skill.

This comprehensive guide will walk you through everything you need to know about installing a virtual machine, from understanding the core concepts to a detailed, step-by-step installation process, and essential post-setup configurations. We’ll focus on widely accessible and popular hypervisors, ensuring you have the knowledge to get started regardless of your specific needs.
Understanding Virtual Machines: Why and What They Are
Before diving into the installation process, it’s crucial to grasp what virtual machines are and the significant benefits they offer. This foundational knowledge will help you appreciate the power and flexibility that virtualization brings to your computing experience.
What is a Virtual Machine (VM)?
At its core, a Virtual Machine (VM) is a software-based emulation of a physical computer. It’s a complete, self-contained operating environment that runs on top of your existing operating system (the “host” OS). Each VM includes its own virtual hardware, such as a virtual CPU, memory, hard disk, network interface, and other devices, all provided by a special software called a “hypervisor.”
Imagine your computer as a physical office building. A hypervisor acts like a sophisticated property manager, allowing you to create several independent “virtual offices” (VMs) within that building. Each virtual office operates as if it were a standalone structure, with its own furniture (virtual hardware) and occupants (guest operating system), completely isolated from the others and from the main building’s operations. This isolation is key to the power of VMs.
The Benefits of Using Virtual Machines
The adoption of virtual machines has skyrocketed across various sectors due to a myriad of compelling advantages:
Isolation and Security
One of the most significant benefits of VMs is the inherent isolation they provide. If you download a suspicious file, visit a risky website, or run untested software within a VM, any potential damage is contained within that virtual environment. Your host operating system remains protected, making VMs an excellent sandbox for security testing, malware analysis, or simply browsing the web with an extra layer of protection. This isolation is critical for maintaining the integrity and security of your primary system.
Software Compatibility and Legacy Applications
Have an older application that only runs on Windows XP or an obscure Linux distribution? Or perhaps you need to run a macOS application on a Windows machine? VMs bridge compatibility gaps. You can install virtually any operating system as a guest, enabling you to run legacy software, niche applications, or platform-specific tools without needing dedicated hardware for each. This eliminates the need for dual-booting or maintaining multiple physical machines, streamlining your workflow considerably.
Testing and Development Environments
For software developers, system administrators, and quality assurance testers, VMs are indispensable. They provide a clean, consistent, and reproducible environment for testing applications, operating system updates, or network configurations. Developers can set up identical development environments for team members, ensuring consistency. Testers can easily revert to previous states using snapshots, making it simple to reproduce bugs or test different scenarios without complex reconfigurations. This agility significantly speeds up development cycles and improves software quality.
Resource Optimization and Cost Efficiency
While VMs consume resources from your host machine, they allow you to maximize the utilization of your physical hardware. Instead of having multiple physical servers each running a single application inefficiently, you can consolidate them onto a single powerful server hosting several VMs. This leads to reduced hardware costs, lower power consumption, and less physical space required, translating to significant savings for businesses and more efficient resource management for individuals.
Key Components: Hypervisors Explained
The magic behind virtual machines lies in the “hypervisor” (also known as a Virtual Machine Monitor or VMM). This crucial piece of software creates and runs VMs, abstracting the physical hardware resources (CPU, memory, storage) and presenting them as virtual resources to the guest operating systems.
There are two main types of hypervisors:
- Type 1 (Bare-Metal) Hypervisors: These hypervisors run directly on the host hardware, without an underlying operating system. They are typically used in data centers and enterprise environments for server virtualization. Examples include VMware ESXi, Microsoft Hyper-V (when installed as a server role), and Citrix XenServer. They offer high performance and efficiency due to direct hardware access.
- Type 2 (Hosted) Hypervisors: These hypervisors run as an application on top of an existing host operating system (e.g., Windows, macOS, Linux). They are more common for individual users and desktop virtualization. Popular examples include Oracle VirtualBox, VMware Workstation Player/Pro, and Parallels Desktop for Mac. While they introduce a slight overhead compared to Type 1 hypervisors, their ease of installation and use make them ideal for personal and development purposes.
For the purpose of this guide, we will primarily focus on Type 2 hypervisors, as they are most accessible for individual users looking to set up VMs on their personal computers.
Choosing Your Hypervisor and Preparing for Installation
With a solid understanding of VMs and hypervisors, the next step is to select the right virtualization software and prepare your system for the installation process. Careful planning here will ensure a smooth and successful setup.
Selecting the Right Hypervisor for Your Needs
The choice of hypervisor often depends on your operating system, budget, and specific requirements. Here are some of the most popular Type 2 hypervisors:
-
Oracle VM VirtualBox:
- Pros: Completely free and open-source, cross-platform (Windows, macOS, Linux, Solaris), very user-friendly interface, robust feature set.
- Cons: Can sometimes be less performant than commercial alternatives for very demanding tasks.
- Best For: Most home users, students, developers, and those looking for a free solution. It’s an excellent starting point for anyone new to virtualization.
-
VMware Workstation Player/Pro:
- Pros: Workstation Player is free for personal use and offers excellent performance and integration features. Workstation Pro (paid) offers advanced features like cloning, snapshots, and network customization, along with superior performance.
- Cons: Player has limited features compared to Pro; Pro is a commercial product.
- Best For: Users seeking high performance, extensive features, and tighter integration, especially in professional or academic settings where budget isn’t the primary constraint. VMware is a dominant player in enterprise virtualization.
-
Microsoft Hyper-V:
- Pros: Built into Windows 10 Pro, Enterprise, and Education editions, as well as Windows Server. No additional software download required, offers good performance.
- Cons: Only available on specific Windows editions, can be slightly less intuitive for beginners compared to VirtualBox or VMware, requires disabling some other virtualization tools.
- Best For: Windows users who have the supported editions and prefer a native Microsoft solution, especially if they are already familiar with the Windows ecosystem.
-
Parallels Desktop for Mac:
- Pros: Excellent performance and integration on macOS, allows seamless running of Windows applications alongside Mac apps (Coherence mode).
- Cons: Mac-only, commercial product (paid).
- Best For: Mac users who frequently need to run Windows or Linux applications with high performance and tight integration with the macOS environment.
For this guide, we will proceed with Oracle VirtualBox as our primary example due to its widespread accessibility, cost-free nature, and cross-platform support, making it an ideal choice for the majority of users.
Essential Prerequisites Before You Begin
Before you embark on the VM installation journey, ensure your system meets these critical requirements:
Hardware Requirements (Host Machine)
- CPU: A modern CPU (Intel Core i5/i7/i9 or AMD Ryzen 5/7/9 or better) is highly recommended. Crucially, your CPU must support hardware virtualization extensions. For Intel, this is typically VT-x, and for AMD, it’s AMD-V. Most modern CPUs support these, but they often need to be enabled in your computer’s BIOS/UEFI settings. Without these, performance will be severely degraded, or VMs might not run at all.
- RAM: This is perhaps the most critical resource. Each VM you run will require a portion of your host machine’s RAM. A minimum of 8GB of RAM on your host is recommended if you plan to run one VM with 2-4GB allocated. If you plan for multiple VMs or resource-intensive guest OSs, 16GB or 32GB (or more) is highly advisable.
- Storage: VMs require significant disk space for their virtual hard drives and snapshots. An SSD (Solid State Drive) on your host machine is strongly recommended for storing VMs, as it drastically improves their performance (boot times, application loading, general responsiveness) compared to traditional HDDs. Plan for at least 20-50GB per VM, depending on the guest OS and intended usage.
Software Downloads
- Hypervisor Software: Download the installer for your chosen hypervisor (e.g., VirtualBox from
virtualbox.org). - Operating System ISO Image: You’ll need an ISO file (disk image) of the operating system you wish to install in your VM. Common choices include:
- Windows: You can download official ISOs for Windows 10 or 11 from Microsoft’s website. You will typically need a product key for activation.
- Linux: Distributions like Ubuntu, Fedora, Mint, Debian, etc., offer free ISO downloads from their respective websites. These are excellent choices for learning and development.
- Other OSes: Research official download sources for your desired operating system.
Enabling Virtualization in BIOS/UEFI
This is a step often overlooked but absolutely critical. Hardware virtualization technology (Intel VT-x or AMD-V) allows the hypervisor to run guest operating systems much more efficiently. It is usually disabled by default in the BIOS/UEFI settings of many computers.
To enable it:
- Restart your computer.
- During boot-up, press the designated key to enter BIOS/UEFI setup (common keys include F2, F10, F12, DEL, ESC – check your motherboard or laptop manufacturer’s documentation).
- Navigate through the settings to find options related to “Virtualization Technology,” “Intel VT-x,” “AMD-V,” “SVM Mode,” or similar. This is often found under CPU Configuration, Advanced Settings, or Security.
- Enable this setting and save your changes before exiting the BIOS/UEFI.
Without this enabled, you might encounter errors during VM creation or experience extremely poor performance.
Step-by-Step Guide: Installing Your First Virtual Machine (Focus on VirtualBox)
Now that your system is prepared, let’s walk through the detailed process of installing VirtualBox and setting up your first virtual machine.
Installing the Hypervisor Software (VirtualBox)
- Download VirtualBox: Visit the official VirtualBox website (
virtualbox.org) and download the appropriate installer for your host operating system (Windows hosts, macOS hosts, Linux distributions). - Run the Installer:
- Windows: Double-click the
.exefile. Follow the prompts, accepting the default installation location and features unless you have specific reasons to change them. Allow the installer to install device drivers if prompted, as these are necessary for network adapters and USB support. - macOS: Open the
.dmgfile and double-click the VirtualBox.pkg. Follow the on-screen instructions. You might need to grant system extensions permission in System Preferences/Settings. - Linux: Installation varies by distribution. For Ubuntu/Debian, you can typically add the VirtualBox repository and install via
apt(recommended) or download a.debpackage. Refer to the VirtualBox website for specific instructions for your distribution.
- Windows: Double-click the
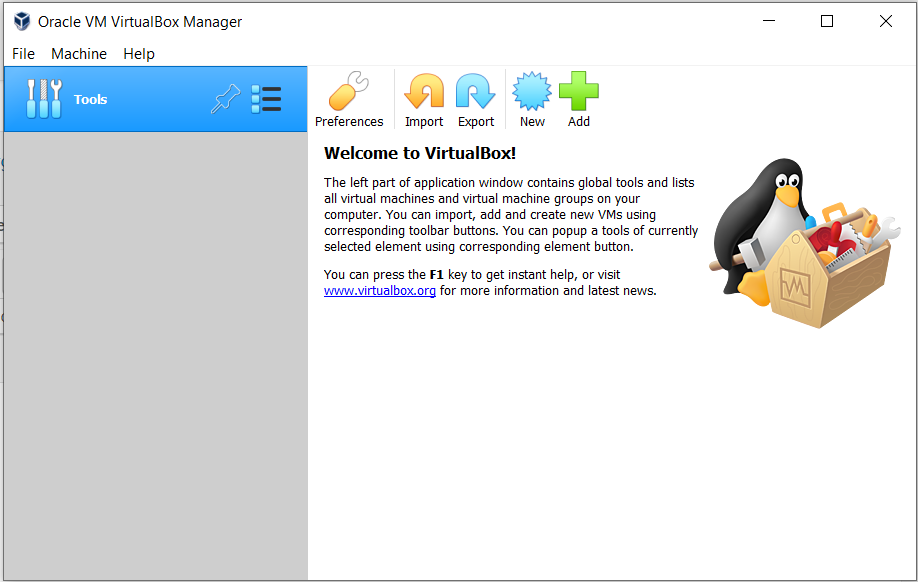
- Launch VirtualBox: Once installed, launch the VirtualBox application. You should see an empty main window, ready for you to create your first VM.
Creating a New Virtual Machine
- Click “New”: In the VirtualBox Manager window, click the “New” button (usually a blue gear icon).
- Name and OS Type:
- Name: Give your VM a descriptive name (e.g., “Windows 10 Dev,” “Ubuntu Test”).
- Folder: Choose where to store your VM files. It’s recommended to put this on a fast SSD if available.
- ISO Image: Click the arrow next to “ISO Image” and navigate to select the ISO file of the operating system you downloaded earlier. VirtualBox will often try to automatically detect the OS type based on the ISO.
- Type and Version: Verify that VirtualBox has correctly identified the operating system (e.g., “Microsoft Windows,” “Windows 10 (64-bit)” or “Linux,” “Ubuntu (64-bit)”). Adjust if necessary.
- Skip Unattended Installation: For a manual, step-by-step installation, check “Skip Unattended Installation”.
- Click “Next”.
- Hardware Allocation (Memory and Processors):
- Base Memory: Allocate RAM to your VM. This RAM will be unavailable to your host OS while the VM is running. A minimum of 2GB is recommended for most Windows guests, and 1-2GB for lightweight Linux distributions. For better performance, assign more if your host has ample RAM (e.g., 4GB for Windows 10/11, 2-4GB for Ubuntu). Stay within the green zone of the slider to avoid over-allocating.
- Processors: Assign the number of CPU cores. Start with 1-2 cores for most general-purpose VMs. You can increase this later if needed. Again, stay within the green zone.
- Click “Next”.
- Hard Disk Creation:
- Create a Virtual Hard Disk Now: This is the default and recommended option.
- Disk Size: Allocate space for your virtual hard drive. For Windows 10/11, at least 50-60GB is recommended. For Linux, 20-30GB is usually sufficient for a basic installation. You can choose a Dynamically Allocated disk (grows as needed, saving space) or a Fixed Size disk (faster, but consumes all allocated space immediately). Dynamically allocated is often preferred for beginners.
- Click “Next”.
- Summary and Finish: Review the summary of your VM settings. If everything looks correct, click “Finish”. Your new VM will appear in the left panel of the VirtualBox Manager.
Installing an Operating System Within the VM
With the VM created, the next step is to install the guest operating system using the ISO image you provided.
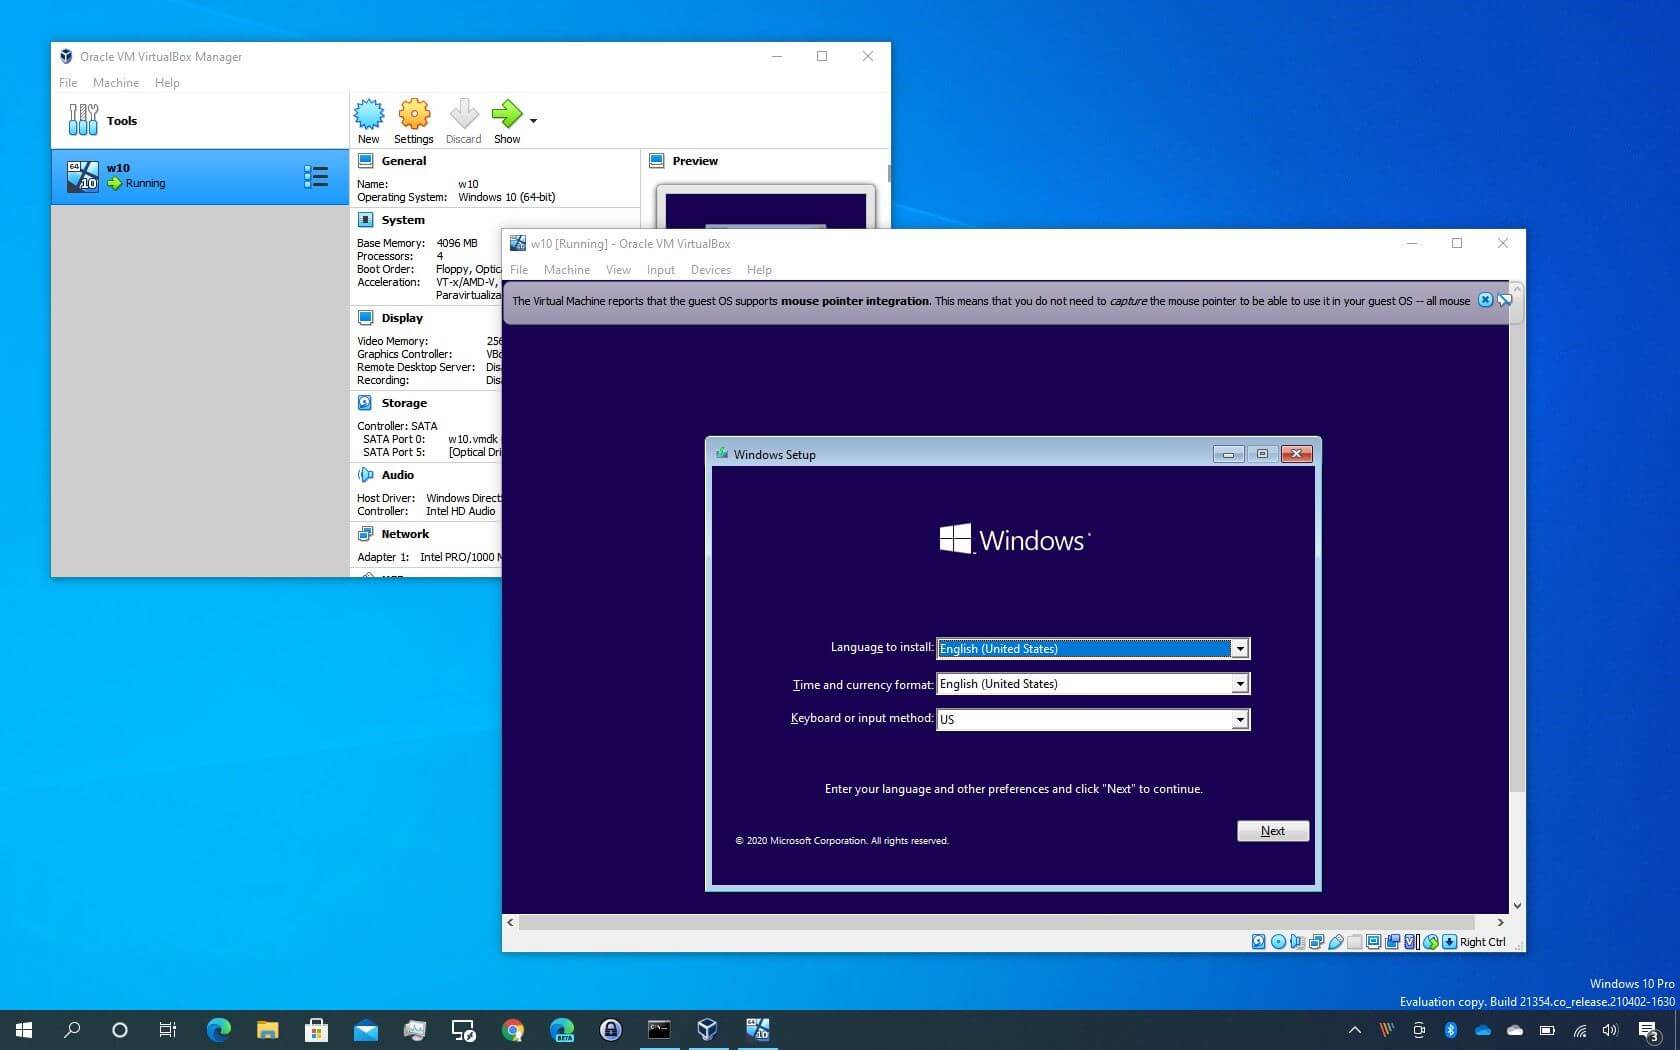
- Start the VM: Select your newly created VM in the VirtualBox Manager and click the “Start” button (the green arrow).
- Boot from ISO: The VM will boot up, behaving like a brand-new physical computer. Since you specified the ISO earlier, it should automatically boot from it. If not, VirtualBox will prompt you to select a startup disk, where you can browse to your ISO.
- Follow OS Installation Prompts:
- You will now be inside the virtual machine’s window, and the installation process for your chosen operating system will begin.
- Windows: Follow the standard Windows installation steps: choose language, input product key (if applicable, you can often skip this and enter it later), accept terms, select “Custom: Install Windows only (advanced),” and choose the unallocated space on the virtual hard disk you created. The installer will partition and format it. Proceed with the installation.
- Linux (e.g., Ubuntu): Choose your language, select “Install Ubuntu” (or “Try Ubuntu” first to test), decide whether to install third-party software, and when prompted for installation type, choose “Erase disk and install Ubuntu.” Don’t worry, this only erases the virtual disk within the VM, not your host’s physical disk! Continue with setting your region, keyboard layout, and creating a user account.
- Complete Installation: Allow the operating system to install. This process will take some time, just like installing an OS on a physical computer. The VM will likely restart several times during the installation.
- First Boot and Post-Installation: Once the installation is complete, the VM will boot into your newly installed guest operating system. You might be prompted to remove the installation media. If not, VirtualBox often handles this automatically. You now have a fully functional OS running inside your VM!
Post-Installation Essentials: Enhancing Your VM Experience
To get the most out of your virtual machine, there are several crucial post-installation steps, especially installing “Guest Additions” (for VirtualBox) or “VMware Tools” (for VMware).
Installing Guest Additions (VirtualBox) / VMware Tools
Guest Additions (VirtualBox) or VMware Tools (VMware) are a set of device drivers and system applications that significantly enhance the performance and usability of your guest operating system. They enable features like:
- Better video resolution and graphics performance.
- Seamless mouse integration (no need to capture/release the mouse pointer).
- Shared clipboard (copy/paste between host and guest).
- Drag-and-drop functionality.
- Shared folders between host and guest.
- Improved network performance.
To install VirtualBox Guest Additions:
- With your VM running, go to the VirtualBox window menu: Devices > Insert Guest Additions CD Image…
- Inside the guest OS, open the virtual CD-ROM drive.
- Windows: An auto-run program might launch, or you might need to navigate to “This PC” and double-click the CD drive. Run the
VBoxWindowsAdditions.exeinstaller. - Linux: An auto-run might prompt you. If not, you’ll need to open a terminal, mount the CD-ROM, navigate to the directory, and run
sudo ./VBoxLinuxAdditions.run. You might need to installbuild-essentialanddkmsfirst (sudo apt install build-essential dkms).
- Windows: An auto-run program might launch, or you might need to navigate to “This PC” and double-click the CD drive. Run the
- Follow the installation prompts and restart the VM when requested. You will immediately notice the improvements.
Networking Configurations
By default, VirtualBox often sets up NAT (Network Address Translation) for your VM. This means your VM can access the internet through your host’s network connection, but external machines generally cannot directly access the VM.
- Bridged Adapter: If you want your VM to appear as a separate device on your network (getting its own IP address from your router), change the network adapter type to “Bridged Adapter” in the VM’s settings (Settings > Network > Adapter 1 > Attached to: Bridged Adapter). This is useful for testing network services.
- Host-Only Adapter: For isolated networks between your host and VM(s) only.
- Internal Network: For VMs to communicate with each other but not the host or external network.
Shared Folders and Clipboard
- Shared Clipboard/Drag and Drop: After installing Guest Additions, go to the VM’s menu: Devices > Shared Clipboard and Devices > Drag and Drop. Select “Bidirectional” for both to allow seamless copy-pasting and file dragging between your host and guest.
- Shared Folders: To easily share files between your host and VM without using network shares, set up Shared Folders. Go to the VM’s settings: Settings > Shared Folders. Add a new shared folder, choose a path on your host, give it a name, and check “Auto-mount” and “Make Permanent.” After restarting the VM, the shared folder will typically appear as a network drive (Windows) or in
/media/sf_<folder_name>(Linux).
Creating Snapshots
Snapshots are incredibly powerful features that allow you to save the exact state of your VM at a given point in time. This is invaluable for:
- Testing: Revert to a clean state after trying new software or system changes.
- Recovery: Roll back to a stable point if something goes wrong.
- Development: Save different configurations or application states.
To create a snapshot, ensure the VM is either running or powered off, then in the VirtualBox Manager, select the VM, go to Snapshots tab (usually next to “Details”), and click “Take.” Give your snapshot a descriptive name. You can revert to any snapshot at any time.
Advanced Tips, Troubleshooting, and Best Practices
To ensure your virtual machines run smoothly and securely, consider these advanced tips, common troubleshooting scenarios, and best practices.
Optimizing VM Performance
While VMs inherently share resources, you can often tweak settings for better performance:
- Resource Allocation: Don’t over-allocate RAM or CPU cores to your VM, as this can starve your host and lead to overall system slowdowns. Find a balance that meets the guest OS’s needs without crippling your host.
- SSD Usage: Store your VM files on a Solid State Drive. The difference in I/O performance between an SSD and an HDD is substantial for VMs, impacting boot times, application loading, and overall responsiveness.
- Regular Updates: Keep both your host OS and the hypervisor software (VirtualBox, VMware) updated to the latest versions. These updates often include performance enhancements and bug fixes. Also, keep your guest OS updated.
- Guest Additions/VMware Tools: As mentioned, these are crucial for performance. Always ensure they are installed and up-to-date within your guest OS.
- Disable Unnecessary VM Features: If you don’t need features like USB 2.0/3.0 support, sound, or webcam integration, you can disable them in the VM settings to conserve host resources.
- Hardware Virtualization: Double-check that Intel VT-x or AMD-V is enabled in your BIOS/UEFI. Without it, your VM performance will be severely hampered.
- Video Memory: Increase the video memory in VM settings (Settings > Display > Video Memory) if you experience graphical glitches or slow video performance, especially in graphical desktop environments.
Common Troubleshooting Scenarios
Even with careful setup, you might encounter issues. Here are some common problems and their solutions:
- VM Won’t Start (Error: VT-x/AMD-V is disabled): This almost always means hardware virtualization is not enabled in your BIOS/UEFI. Refer to the “Enabling Virtualization in BIOS/UEFI” section and your computer’s documentation.
- VM is Extremely Slow:
- Verify Guest Additions/VMware Tools are installed.
- Check resource allocation (RAM, CPU). Ensure you’ve given enough to the VM and that your host isn’t running out of resources.
- Ensure VM files are on an SSD if possible.
- Confirm hardware virtualization is enabled.
- Network Issues (No Internet in VM):
- Check VM network settings (Settings > Network). NAT is usually the easiest for internet access.
- Ensure your host machine has a working internet connection.
- Inside the guest OS, check network adapter drivers (Guest Additions help here) and IP configuration.
- Try changing the “Attached to” setting (e.g., from NAT to Bridged) and restarting the VM.
- USB Device Passthrough Not Working:
- Install the VirtualBox Extension Pack (downloadable from the VirtualBox website) if using VirtualBox, as it provides USB 2.0/3.0 support.
- Ensure your user account on the host is part of the
vboxusersgroup (on Linux hosts). - Go to VM settings (Settings > USB) and add the specific USB device you want to connect.
- Resolution is Low / Cannot Maximize VM Window:
- This is a classic sign that Guest Additions/VMware Tools are not installed or are outdated. Install them and restart the VM.
Security and Maintenance
Virtual machines, while isolated, are not entirely immune to risks. Practicing good security and maintenance habits is crucial:
- Regular Backups: Regularly back up your VM files, especially before major changes or if the VM holds critical data. Snapshots are great for quick reverts, but full backups protect against host disk failure.
- Patching VMs: Keep your guest operating systems and all installed software within them fully patched and updated. A vulnerable guest can still be exploited, even if the host is protected.
- Antivirus/Antimalware: Run antivirus software on your guest OS, especially if it’s Windows or another commonly targeted OS.
- Isolating Sensitive Operations: Use VMs as sandboxes for risky activities (e.g., opening suspicious email attachments, testing unverified software).
- Network Segmentation: Utilize different network adapter types (Host-Only, Internal Network) to control how your VMs communicate, enhancing security. For instance, a VM for testing malware should be on a highly isolated network segment.
- Secure Passwords: Use strong, unique passwords for your guest OS user accounts.
By following this comprehensive guide, you’re well on your way to mastering the installation and management of virtual machines. This powerful technology opens up a world of possibilities for exploration, development, and enhanced digital security. Don’t hesitate to experiment with different operating systems and configurations – the beauty of virtualization lies in its flexibility and the ability to revert to previous states with ease. Happy virtualizing!
aViewFromTheCave is a participant in the Amazon Services LLC Associates Program, an affiliate advertising program designed to provide a means for sites to earn advertising fees by advertising and linking to Amazon.com. Amazon, the Amazon logo, AmazonSupply, and the AmazonSupply logo are trademarks of Amazon.com, Inc. or its affiliates. As an Amazon Associate we earn affiliate commissions from qualifying purchases.