
In today’s dynamic technological landscape, the ability to experiment with different operating systems without altering your primary setup is invaluable. Whether you’re a developer testing new environments, a student exploring Linux, or a curious user keen on digital security, virtualization offers an elegant solution. At the heart of this flexibility lies Oracle VM VirtualBox, a powerful, open-source virtualization software that allows you to run multiple operating systems on a single physical machine. This guide will walk you through the entire process of installing Ubuntu, one of the most popular and user-friendly Linux distributions, onto VirtualBox, transforming your computer into a versatile hub for diverse computing experiences.
The benefits of virtualization extend far beyond mere curiosity. From a Tech perspective, it’s a cornerstone for software development, allowing for sandboxed testing environments that prevent conflicts with your main system. It enhances Digital Security by isolating potentially risky software or browsing activities in a separate virtual machine (VM). For Productivity, it enables you to leverage specialized tools or applications that might only be available on a different OS, without the hassle of dual-booting. By mastering this process, you gain a significant advantage in managing your digital life efficiently and securely, aligning perfectly with the core principles of innovation and practical application that define the modern tech world.
Understanding Virtualization and Why VirtualBox is Your Go-To
Before we dive into the installation process, it’s essential to grasp what virtualization is and why VirtualBox stands out as an excellent choice for this purpose. Virtualization is the creation of a virtual, rather than actual, version of something, such as an operating system, a server, a storage device, or network resources. In our context, we’re talking about hardware virtualization, where software mimics a physical computer, allowing another operating system (the “guest OS”) to run inside it, while your primary operating system (the “host OS”) continues its normal operation.
VirtualBox, developed by Oracle, is a robust and feature-rich virtualization product for enterprise and home use. It supports a vast array of host operating systems, including Windows, macOS, Linux, Solaris, and OpenSolaris, and can virtualize an equally impressive number of guest operating systems. Its open-source nature, coupled with its powerful capabilities, makes it a preferred choice for millions of users worldwide. For individuals and businesses alike, VirtualBox provides a cost-effective way to:
- Test Software Securely: Run beta software, suspicious files, or new applications in an isolated environment without risking your host system’s stability or security.
- Develop Cross-Platform Applications: Set up multiple virtual machines with different operating systems to test your software’s compatibility across various platforms.
- Learn New Operating Systems: Experiment with Linux distributions like Ubuntu, Windows Server versions, or other niche OSes without dedicating physical hardware.
- Run Legacy Applications: Keep old software running on older operating systems even if your host machine no longer supports them.
- Enhance Digital Security: Create a secure environment for sensitive tasks, knowing that any malware or vulnerability within the VM won’t affect your host system.
Ubuntu, on the other hand, is a Debian-based Linux operating system, renowned for its user-friendliness, extensive software repositories, and robust community support. It’s a fantastic entry point into the world of Linux, offering a polished desktop experience that rivals commercial operating systems, all while being completely free and open source. Combining Ubuntu with VirtualBox creates an ideal sandbox for learning, development, and secure computing.
Preparing Your System: Prerequisites and Downloads
Before you embark on the journey of installing Ubuntu, ensure your system is adequately prepared. This involves downloading the necessary software and ensuring your computer meets the minimum requirements. Think of this as laying a solid foundation – crucial for a smooth and successful installation.
Gathering the Essentials: VirtualBox and Ubuntu ISO
-
Download VirtualBox:
The first step is to obtain the VirtualBox software itself. Navigate to the official VirtualBox website (virtualbox.org). On the downloads page, select the appropriate installer for your host operating system (e.g., Windows hosts, macOS hosts, Linux distributions). Download the latest stable version. -
Download VirtualBox Extension Pack:
While VirtualBox itself provides the core virtualization engine, the Extension Pack adds crucial functionalities that significantly enhance the guest OS experience. These features include USB 2.0 and USB 3.0 host controller support, VirtualBox RDP, disk encryption, NVMe and PXE boot for Intel cards. It’s highly recommended to download the Extension Pack from the same VirtualBox downloads page. Make sure the version of the Extension Pack matches your VirtualBox installation. -
Download Ubuntu ISO Image:
Next, you’ll need the installation file for Ubuntu. Visit the official Ubuntu website (ubuntu.com/download/desktop). You’ll typically find several options, including the latest Long Term Support (LTS) version, which is recommended for most users due to its extended support period and stability. Download the 64-bit desktop ISO image. The file size is usually around 4-5 GB, so ensure you have a stable internet connection and sufficient storage.
System Requirements and Considerations
- RAM: While Ubuntu can run on as little as 1 GB of RAM, for a smooth experience within a virtual machine, allocate at least 4 GB of RAM to the VM if your host system has 8 GB or more. If your host has 16 GB or more, allocating 6-8 GB to the VM will provide an even better experience, especially for development or resource-intensive tasks.
- CPU: Your host machine should have a modern multi-core processor. Virtualization performance benefits greatly from multiple CPU cores. Ensure that hardware virtualization (Intel VT-x or AMD-V) is enabled in your computer’s BIOS/UEFI settings. This is usually enabled by default on newer systems, but it’s worth checking if you encounter performance issues.
- Storage: A modern SSD (Solid State Drive) on your host machine will significantly improve the VM’s performance compared to an HDD (Hard Disk Drive). For the virtual hard disk itself, allocate at least 25 GB for Ubuntu, but 50 GB or more is recommended to allow for software installations, updates, and personal files without quickly running out of space.
- Disk Space: Ensure you have enough free disk space on your host machine to store the VirtualBox software, the Ubuntu ISO, and the virtual machine’s files (which can grow quite large).
- Network Connection: A stable internet connection is required for downloading the necessary files and for Ubuntu to download updates and additional software during and after installation.
Setting Up Your Virtual Machine: Creation and Configuration
With all the necessary components downloaded and your system ready, it’s time to set up the virtual machine within VirtualBox. This stage involves creating a new VM and configuring its virtual hardware settings to ensure optimal performance for your Ubuntu installation.
Installing VirtualBox and the Extension Pack
- Install VirtualBox: Locate the downloaded VirtualBox installer and run it. Follow the on-screen prompts, accepting the default options in most cases. You may be prompted to install network adapters; allow these installations to proceed as they are essential for network connectivity within your VMs.
- Install VirtualBox Extension Pack: Once VirtualBox is installed, open the VirtualBox Manager. Go to
File > Preferences > Extensions. Click the “Adds new package” icon (a small box with a plus sign) and navigate to the downloaded Extension Pack file (.vbox-extpack). Select it and click “Install,” then agree to the license terms.
Creating a New Virtual Machine
- Launch VirtualBox Manager: Open VirtualBox from your applications or desktop shortcut.
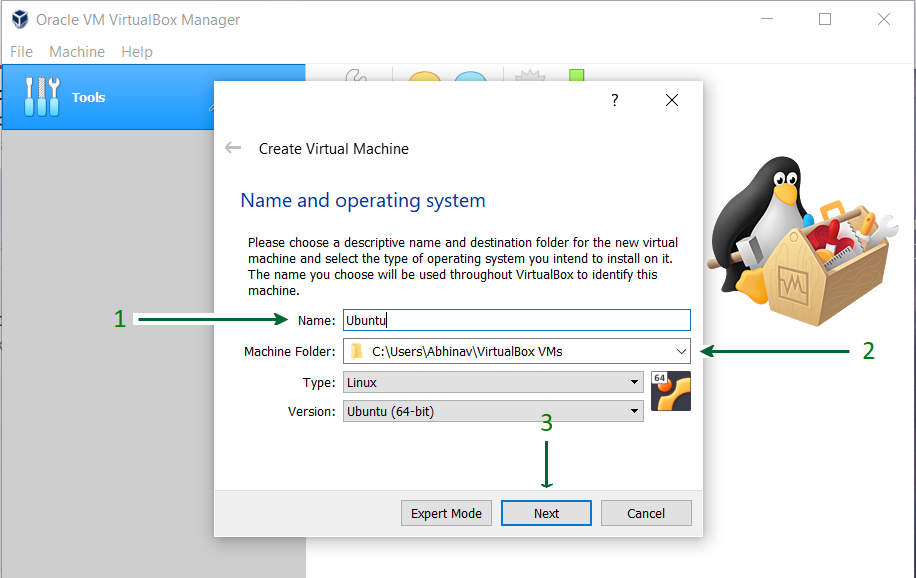
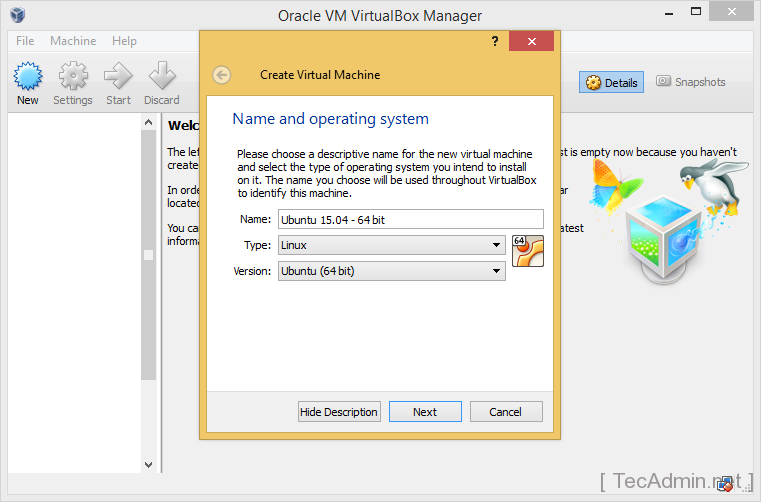
- Click “New”: In the VirtualBox Manager window, click the “New” button (usually a blue star icon) to start the Create Virtual Machine wizard.
- Name and Operating System:
- Name: Give your virtual machine a descriptive name, like “Ubuntu 22.04 LTS.”
- Machine Folder: Choose a location on your hard drive where the VM files will be stored. Make sure this location has ample free space.
- Type: Select “Linux.”
- Version: Select “Ubuntu (64-bit).” VirtualBox will often automatically detect these based on the name you provide. Click “Next.”
- Memory Size (RAM):
Allocate RAM to your VM. As recommended earlier, aim for at least 4 GB (4096 MB) if your host has 8 GB or more. Use the slider or enter the value manually. Do not allocate more than half of your host system’s RAM to avoid making your host unstable. Click “Next.” - Hard Disk:
- Select “Create a virtual hard disk now” and click “Create.”
- Hard disk file type: Choose “VDI (VirtualBox Disk Image).” This is VirtualBox’s native format. Click “Next.”
- Storage on physical hard disk: Select “Dynamically allocated.” This means the virtual disk file will only grow as you fill it up, rather than taking up the full specified size immediately. This is more efficient for disk space. Click “Next.”
- File location and size: Specify the size of your virtual hard disk. A minimum of 25 GB is needed for Ubuntu, but 50 GB or more is highly recommended for long-term use. Click “Create.”
Your new virtual machine will now appear in the left panel of the VirtualBox Manager.
Configuring VM Settings for Optimal Performance
Before starting the VM, it’s crucial to fine-tune its settings for a smoother Ubuntu experience.

- Select your VM: In the VirtualBox Manager, select your newly created Ubuntu VM.
- Click “Settings”: Click the “Settings” button (gear icon) in the toolbar.
- System:
- Motherboard tab: Ensure
Enable I/O APICis checked. - Processor tab: Increase the number of CPU cores allocated to your VM. If your host has 4 cores, allocate 2 cores to the VM. Again, avoid allocating more than half of your host’s cores. Ensure
Enable PAE/NXis checked. - Acceleration tab: Ensure
Enable VT-x/AMD-VandEnable Nested Pagingare checked.
- Motherboard tab: Ensure
- Display:
- Screen tab: Maximize
Video Memoryto 128 MB or 256 MB. CheckEnable 3D Accelerationfor better graphical performance.
- Screen tab: Maximize
- Storage:
- Under the
Storage Tree, click on theEmptyCD icon under yourController: IDE. - On the right, next to
Optical Drive, click the small disc icon. - Select
Choose a disk file...and navigate to where you saved your Ubuntu ISO image. Select the ISO file. This mounts the Ubuntu installer to your virtual CD drive.
- Under the
- Network (Optional but Recommended):
- Adapter 1 tab: Ensure
Enable Network Adapteris checked. The defaultNAT(Network Address Translation) is sufficient for most users, allowing the VM to access the internet. If you need your VM to be directly accessible on your network (e.g., for serving local applications), considerBridged Adapter.
- Adapter 1 tab: Ensure
- Shared Folders (Optional):
- This setting allows you to easily share files between your host and guest OS. We’ll set this up more fully after Ubuntu is installed and Guest Additions are in place. For now, you can leave it.
Click “OK” to save all your settings. Your virtual machine is now ready for the Ubuntu installation.
Installing Ubuntu within Your Virtual Machine
Now comes the exciting part: booting up your VM and installing Ubuntu. This process closely mirrors a standard Ubuntu installation on physical hardware.
Starting the Virtual Machine
- Launch the VM: In the VirtualBox Manager, select your Ubuntu VM and click the “Start” button (green arrow).
- First Boot: The VM window will open, and you should see the Ubuntu boot menu. If prompted, select the Ubuntu ISO from the list.
- Choose “Try or Install Ubuntu”: Once Ubuntu starts booting, you’ll reach a screen asking to “Try Ubuntu” or “Install Ubuntu.” Choose “Install Ubuntu” to proceed with the permanent installation to your virtual hard disk.
The Ubuntu Installation Process
Follow these steps within the Ubuntu installer:
- Language Selection: Choose your preferred language for the installation process and the operating system itself. Click “Continue.”
- Keyboard Layout: Select your keyboard layout. You can usually auto-detect this or choose it manually. Click “Continue.”
- Updates and Other Software:
- Normal installation: Recommended for most users.
- Minimal installation: For users who want a bare-bones system to build upon.
- Download updates while installing Ubuntu: Recommended. This ensures your system is up-to-date from the start.
- Install third-party software for graphics and Wi-Fi hardware and additional media formats: Recommended, especially for better multimedia support and potential hardware compatibility (though less critical in a VM). Click “Continue.”
- Installation Type:
- Since this is a fresh installation on a virtual hard disk, select “Erase disk and install Ubuntu.” Don’t worry, this will only affect the virtual disk you created, not your host machine’s physical drives.
- Click “Install Now,” then “Continue” on the warning prompt to confirm disk partitioning.
- Where Are You? (Time Zone): Click on your location on the map or type it in. Click “Continue.”
- Who Are You? (User Setup):
- Your name: Enter your full name.
- Your computer’s name: This will be automatically generated, but you can change it.
- Pick a username: This will also be automatically generated, but you can customize it.
- Choose a password: Create a strong password and confirm it.
- Require my password to log in: Recommended for security.
- Encrypt my home folder: Optional, provides an extra layer of security for your personal files. Consider if you’re dealing with highly sensitive data. Click “Continue.”
- Installation Begins: The installer will now copy files and install Ubuntu. This process can take some time, depending on your system’s performance and internet speed. You’ll see a slideshow showcasing Ubuntu’s features during this period.
- Installation Complete: Once finished, you’ll be prompted to “Restart Now.” Click this button.
- Remove Installation Medium: After clicking “Restart Now,” the VM might prompt you to “Please remove the installation medium, then press ENTER.” Go to
Devices > Optical Drivesin the VirtualBox VM menu and uncheck the Ubuntu ISO. Then, press Enter in the VM window. If it restarts without this prompt, that’s fine too.
Congratulations! Ubuntu is now installed on your VirtualBox virtual machine.
Post-Installation Optimization and Enhancements
Installing Ubuntu is just the first step. To unlock the full potential of your virtualized environment, especially concerning screen resolution, clipboard sharing, and file transfers, you need to perform some crucial post-installation steps.
Installing VirtualBox Guest Additions
This is perhaps the most critical post-installation step. VirtualBox Guest Additions are a set of device drivers and system applications that optimize the guest operating system for better performance and usability when running inside VirtualBox. They enable features like:
- Automatic Screen Resizing: The guest OS resolution automatically adjusts when you resize the VM window.
- Shared Clipboard: Allows copying and pasting text between your host and guest OS.
- Drag and Drop: Enables dragging files between host and guest.
- Shared Folders: Facilitates easy file sharing.
- Improved Mouse Integration: Smoother mouse pointer movement between host and guest.
Steps to Install Guest Additions:
- Start your Ubuntu VM and log in.
- Update your system: Open a terminal (
Ctrl+Alt+T) and run:
bash

sudo apt update

sudo apt upgrade -y

sudo apt install build-essential linux-headers-$(uname -r) -y
This ensures you have the necessary tools and kernel headers. - Insert Guest Additions CD Image: In the VirtualBox VM window menu, go to
Devices > Insert Guest Additions CD Image.... - Run the Installer: Ubuntu should automatically detect the virtual CD and prompt you to run it. Click
RunorOKif prompted. If not, open your file manager, navigate to the “VBoxGAsxxxx” CD drive, right-click onVBoxLinuxAdditions.run, and select “Run as Program” or open a terminal in that directory and runsudo ./VBoxLinuxAdditions.run. - Authenticate and Wait: Enter your password when prompted. The installation script will run in a terminal window. This may take a few minutes.
- Reboot: Once the installation is complete, reboot your VM:
sudo reboot.
After rebooting, you should immediately notice improvements: the screen resolution will adapt to your window size, and you can enable shared clipboard and drag-and-drop from the Devices menu in VirtualBox (Devices > Shared Clipboard > Bidirectional and Devices > Drag'n'Drop > Bidirectional).
Setting Up Shared Folders
Shared folders provide a seamless way to exchange files between your host and guest operating systems.
- Create a Folder on Host: On your host machine, create a new folder that you wish to share (e.g.,
C:VM_Sharedon Windows or~/VM_Sharedon Linux/macOS). - Configure Shared Folder in VirtualBox:
- With your Ubuntu VM running, go to
Devices > Shared Folders > Shared Folder Settings...in the VirtualBox VM window menu. - Click the “Adds new shared folder” icon (green plus sign).
- Folder Path: Browse to the folder you created on your host.
- Folder Name: VirtualBox will suggest a name; you can keep it or change it.
- Mount point: (Leave empty for now if auto-mount is checked).
- Check “Auto-mount” and “Make Permanent.”
- Click “OK” twice.
- With your Ubuntu VM running, go to
- Access in Ubuntu: The shared folder should appear in your Ubuntu file manager, typically under
/media/sf_YOUR_FOLDER_NAME.- Important: By default, only the
vboxsfgroup has access. To allow your user account to access it, you need to add your user to thevboxsfgroup. Open a terminal (Ctrl+Alt+T) in Ubuntu and run:
bash

sudo adduser $USER vboxsf
- Then, reboot your VM:
sudo reboot. - After reboot, you should be able to access the shared folder.
- Important: By default, only the
Additional Optimizations and Best Practices
- Keep Ubuntu Updated: Regularly update your Ubuntu system from the terminal:
sudo apt update && sudo apt upgrade -y. - Take Snapshots: VirtualBox allows you to take “snapshots” of your VM’s state. This is incredibly useful before making major changes, testing new software, or performing updates. If anything goes wrong, you can revert to a previous snapshot. Go to
Machine > Take Snapshot...in the VirtualBox Manager. - Adjust Display Settings: Within Ubuntu’s Display Settings, you can further fine-tune your screen resolution and scaling, especially if you’re using a high-DPI monitor.
- Allocate More Resources (If Needed): If you find your VM consistently sluggish, and your host machine has spare resources, you can shut down the VM and increase its allocated RAM or CPU cores via
Settings > Systemin the VirtualBox Manager.
Conclusion: Unleashing Your Virtual Potential
You’ve now successfully installed Ubuntu on VirtualBox, establishing a versatile virtual environment that unlocks a multitude of possibilities. From secure software testing and cross-platform development to exploring new operating systems and enhancing your digital security posture, the skills you’ve acquired in this guide are fundamental for any modern tech enthusiast or professional.
This ability to run a robust Linux distribution like Ubuntu within an isolated VirtualBox container empowers you with unparalleled flexibility and control over your computing experiences. It embodies the spirit of innovation and Productivity that drives the Tech industry, allowing you to experiment freely without the constraints or risks associated with altering your primary system. As you continue to explore Ubuntu and other virtualized environments, remember the core benefits: isolation for Digital Security, adaptability for diverse tasks, and a powerful platform for continuous learning and development. Embrace your new virtual playground and continue to push the boundaries of what your computer can achieve.
aViewFromTheCave is a participant in the Amazon Services LLC Associates Program, an affiliate advertising program designed to provide a means for sites to earn advertising fees by advertising and linking to Amazon.com. Amazon, the Amazon logo, AmazonSupply, and the AmazonSupply logo are trademarks of Amazon.com, Inc. or its affiliates. As an Amazon Associate we earn affiliate commissions from qualifying purchases.