Ubuntu, a free and open-source operating system, has gained immense popularity for its user-friendliness, robust security, and remarkable flexibility. Whether you’re a seasoned tech enthusiast looking to explore a new platform, a student seeking a powerful yet free alternative to commercial operating systems, or someone interested in the world of Linux, installing Ubuntu is a fantastic step. One of the most common and efficient methods to achieve this is by installing it from a USB drive. This approach offers a portable and convenient way to bypass the need for optical media and allows for easy upgrades or even live sessions without altering your existing system.
This comprehensive guide will walk you through every step of installing Ubuntu from a USB drive. We’ll cover everything from preparing your USB drive and downloading the necessary Ubuntu ISO file to booting from the USB and completing the installation process. While the technical aspects might seem daunting at first, we’ll break it down into manageable steps, ensuring that even those new to operating system installations can follow along with confidence.
Preparing Your Ubuntu Installation Media: The USB Drive and the ISO
Before we dive into the actual installation, the foundational step is to prepare your bootable USB drive. This involves two key components: a USB flash drive and the Ubuntu operating system image, known as an ISO file.
Choosing the Right USB Drive
For an Ubuntu installation, a USB drive with a minimum capacity of 8GB is generally recommended. While some smaller distributions might fit on a 4GB drive, 8GB provides ample space and future-proofing, especially as Ubuntu releases continue to evolve with new features and updates. It’s also advisable to use a USB drive that you’re comfortable erasing, as the process of creating a bootable drive will wipe all existing data. Consider using a relatively fast USB drive (e.g., USB 3.0 or higher) to expedite the download and installation process, although any functional USB drive will suffice.
Downloading the Ubuntu ISO Image
The Ubuntu ISO file is essentially a digital snapshot of the entire Ubuntu operating system. You’ll need to download this file from the official Ubuntu website to create your bootable USB.
- Visit the Official Ubuntu Website: Navigate to ubuntu.com.
- Locate the Download Section: On the homepage, you’ll typically find a prominent “Download” button or a dedicated “Get Ubuntu” section.
- Choose the Ubuntu Desktop Version: For most users, the Ubuntu Desktop version is the ideal choice. Ubuntu offers Long Term Support (LTS) releases, which are recommended for their stability and extended support periods, and the latest interim releases, which offer newer features but shorter support cycles. For a new installation, opting for the latest LTS release is usually the safest bet. Click on the download link for your chosen version (e.g., “Ubuntu Desktop LTS”).
- Save the ISO File: Your browser will prompt you to save the
.isofile. Choose a location on your computer where you can easily find it, such as your Downloads folder. The download size can vary but is typically a few gigabytes, so ensure you have a stable internet connection.
Creating a Bootable Ubuntu USB Drive: The Magic of Imaging Software
Once you have the Ubuntu ISO file, the next crucial step is to transfer its contents onto your USB drive in a way that makes it bootable. This process involves using specialized software to “image” the ISO onto the USB drive.
Selecting and Using USB Imaging Software
Several excellent and free tools are available for creating bootable USB drives. The choice often depends on your current operating system.
-
For Windows Users:
-
Rufus: Rufus is a highly popular and straightforward utility that makes creating bootable USB drives a breeze.
- Download Rufus: Visit the Rufus website (rufus.ie) and download the latest portable version.
- Launch Rufus: Run the downloaded executable file.
- Select your USB Drive: In the “Device” dropdown, choose your USB flash drive. Double-check that you’ve selected the correct drive, as all data on it will be erased.
- Select the Ubuntu ISO: Click the “SELECT” button next to “Boot selection” and navigate to the Ubuntu ISO file you downloaded earlier.
- Partition Scheme and Target System: For most modern computers, “GPT” and “UEFI (non CSM)” are the recommended settings. If you have an older computer, you might need to select “MBR” and “BIOS (or UEFI-CSM)”. Rufus usually detects these appropriately.
- Start the Process: Click the “START” button. You might be prompted to download Syslinux or GRUB files, which is normal. Confirm any warnings about data erasure. Rufus will then proceed to format the USB drive and copy the Ubuntu files, making it bootable. This can take several minutes.
-
Balena Etcher: Another excellent cross-platform option, Balena Etcher is known for its simplicity and reliability.
- Download Etcher: Go to the Balena Etcher website (etcher.balena.io) and download the installer for Windows.
- Install and Launch Etcher: Install the application and then run it.
- Flash from File: Click “Flash from file” and select your Ubuntu ISO.
- Select Target: Click “Select target” and choose your USB drive. Again, ensure it’s the correct one.
- Flash! Click the “Flash!” button. Etcher will write the ISO to the USB drive and then validate it, ensuring a successful write.
-
-
For macOS Users:
- Balena Etcher: As mentioned above, Balena Etcher is also available for macOS and is the recommended tool for its ease of use.
- Download Etcher: Download the macOS version from etcher.balena.io.
- Install and Launch Etcher: Drag the Etcher application to your Applications folder and then launch it.
- Flash from File: Click “Flash from file” and select your Ubuntu ISO.
- Select Target: Click “Select target” and choose your USB drive. Verify it’s the correct drive.
- Flash! Click the “Flash!” button. Etcher will guide you through the process and require your administrator password.
- Balena Etcher: As mentioned above, Balena Etcher is also available for macOS and is the recommended tool for its ease of use.
-
For Linux Users:
-
Startup Disk Creator (Ubuntu/Debian-based systems): If you’re already running a Linux distribution like Ubuntu, you likely have “Startup Disk Creator” (or “USB Creator”) pre-installed.
- Open Startup Disk Creator: Search for it in your applications menu.
- Select Disk Image: Click the “Other…” button and browse to your downloaded Ubuntu ISO file.
- Select Disk to Use: In the lower pane, select your USB drive. Be extremely cautious to choose the correct drive.
- Make Startup Disk: Click the “Make Startup Disk” button. You’ll be asked for your administrator password.
-
Balena Etcher: Again, Etcher is a fantastic cross-platform choice for Linux users.
-
Regardless of the software you choose, the core principle remains the same: take the contents of the ISO and make the USB drive capable of booting a computer.
Booting from Your USB Drive: Accessing the Ubuntu Installer
With your bootable Ubuntu USB drive ready, the next step is to tell your computer to start from it instead of its usual hard drive. This involves accessing your computer’s BIOS or UEFI settings.
Navigating Your Computer’s Boot Menu or BIOS/UEFI Settings

The method for accessing these settings varies significantly between computer manufacturers and even different models. However, the general process involves pressing a specific key immediately after powering on your computer.
-
Insert the Ubuntu USB Drive: Make sure your bootable USB drive is plugged into a USB port on your computer.
-
Restart or Power On Your Computer: Turn on your computer.
-
Press the Boot Menu Key: As soon as your computer starts to boot (you’ll usually see the manufacturer’s logo), repeatedly press the designated key for your boot menu or BIOS/UEFI settings. Common keys include:
- F2
- F10
- F12
- Del (Delete)
- Esc
- Look for on-screen prompts that say “Press [Key] for Boot Menu” or “Press [Key] to Enter Setup” during the initial startup screen. If you miss the brief window, restart your computer and try again.
-
Select Your USB Drive as the Boot Device:
- If you accessed the Boot Menu: You’ll see a list of bootable devices. Use your arrow keys to select your USB drive (it might be listed by its brand name, like “Kingston DataTraveler” or “SanDisk Cruzer,” or simply as “USB HDD,” “Removable Device,” or “UEFI USB Device”). Press Enter.
- If you accessed BIOS/UEFI Setup: Navigate through the menus using your arrow keys. Look for a “Boot,” “Boot Order,” or “Boot Priority” section. You’ll need to change the order to place your USB drive (again, identified by its name or type) as the first boot device. Once you’ve made the change, find the option to “Save and Exit” (usually by pressing F10 and confirming) or navigate to the “Exit” tab and select “Save Changes and Exit.”
Once your computer successfully boots from the USB drive, you’ll be presented with the Ubuntu boot menu.
Installing Ubuntu: A Step-by-Step Walkthrough
After successfully booting from your USB drive, you’ll see the Ubuntu welcome screen. This screen offers two primary options: “Try Ubuntu” and “Install Ubuntu.”
Exploring “Try Ubuntu” vs. “Install Ubuntu”
- Try Ubuntu: This option allows you to run Ubuntu directly from the USB drive without making any changes to your computer’s hard drive. This is an excellent way to explore Ubuntu’s interface, test hardware compatibility, and get a feel for the operating system before committing to an installation. You can browse the web, open applications, and experience the desktop environment.
- Install Ubuntu: This option will guide you through the process of installing Ubuntu onto your computer’s hard drive.
For this guide, we will proceed with the “Install Ubuntu” option.
The Installation Wizard: Guided Steps to a New OS
The Ubuntu installer is designed to be user-friendly and guides you through a series of simple steps.
-
Welcome Screen:
- Language Selection: Choose your preferred language for the installation process and for your Ubuntu system. Click “Continue.”
-
Keyboard Layout:
- Select Layout: The installer will often detect your keyboard layout automatically. You can test your selection in the text box provided. If it’s incorrect, select the appropriate layout from the dropdown menus. Click “Continue.”
-
Updates and Other Software:
- Normal Installation: This option installs a web browser, utilities, office software, games, and media players. This is recommended for most users.
- Minimal Installation: This installs a web browser and basic utilities.
- Wi-Fi: If your computer has Wi-Fi capabilities, it’s highly recommended to connect to your network now. This allows the installer to download the latest updates and additional software during the installation, ensuring you have a more up-to-date system from the start.
- Other Options: You’ll also see checkboxes for “Download updates while installing Ubuntu” and “Install third-party software for graphics and Wi-Fi hardware and additional media formats.” It is strongly recommended to check both of these boxes for a smoother experience and broader hardware compatibility. Click “Continue.”
-
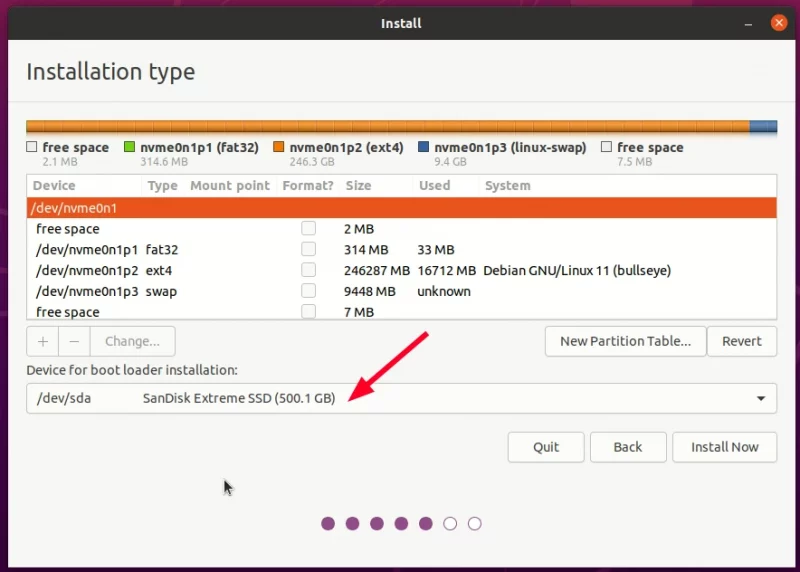
Installation Type: This is perhaps the most critical step, as it determines how Ubuntu will be installed on your storage devices.
- Install Ubuntu alongside [Existing OS]: If you have another operating system installed (like Windows), this option will shrink its partition and create space for Ubuntu, allowing you to dual-boot. The installer will show you a slider to allocate space for each OS.
- Erase disk and install Ubuntu: This is the simplest option if you want Ubuntu to be the only operating system on your computer. It will wipe all data from your selected hard drive and install Ubuntu. Use this option with extreme caution, as all data on the selected drive will be lost.
- Something else: This advanced option allows you to manually partition your hard drive, giving you complete control over where Ubuntu and its various components (root, home, swap) are installed. This is for users who have specific partitioning needs or are experienced with Linux partitioning.
For new users, “Install Ubuntu alongside [Existing OS]” or “Erase disk and install Ubuntu” are the most straightforward choices. If you’re unsure, and want to try Ubuntu without affecting your current system, the “Try Ubuntu” option on the initial boot menu is your best bet. If you’ve decided to dedicate the machine to Ubuntu, “Erase disk and install Ubuntu” is the way to go.
After selecting your desired option, click “Install Now.”
-
Where Are You?
- Time Zone: Select your current location on the map or type it in the search box to set your time zone. Click “Continue.”
-
Who Are You?
- Your Name: Enter your full name.
- Your Computer’s Name: This is the name your computer will be known by on the network.
- Username: Choose a username for logging into your system.
- Password: Create a strong password. You’ll need to enter it twice.
- Login Options: You can choose to “Log in automatically” or “Require my password to log in.” For security, it’s recommended to require a password. Click “Continue.”
-
Installation Progress:
- Ubuntu will now begin copying files and configuring your system. This process can take anywhere from 15 minutes to over an hour, depending on your computer’s speed and the options you selected (like downloading updates). You can browse through the slideshow that plays during this time, which highlights Ubuntu’s features.
-
Installation Complete:
- Once the installation is finished, you’ll see a message prompting you to restart your computer. Click “Restart Now.”
- You will be prompted to remove the installation medium (your USB drive) and press Enter. This is crucial to ensure your computer boots from the hard drive and not from the USB again.
Congratulations! You have successfully installed Ubuntu from a USB drive. Upon restarting your computer, you should be greeted by the Ubuntu login screen. Enter your password, and you’ll be ready to explore the powerful and versatile world of Ubuntu.
aViewFromTheCave is a participant in the Amazon Services LLC Associates Program, an affiliate advertising program designed to provide a means for sites to earn advertising fees by advertising and linking to Amazon.com. Amazon, the Amazon logo, AmazonSupply, and the AmazonSupply logo are trademarks of Amazon.com, Inc. or its affiliates. As an Amazon Associate we earn affiliate commissions from qualifying purchases.