In the intricate world of computing, where powerful processors push the boundaries of innovation, one often-overlooked component plays a disproportionately critical role in maintaining performance and ensuring longevity: thermal paste. This seemingly unassuming compound, nestled between your CPU and its cooler, is the unsung hero that prevents your meticulously chosen hardware from succumbing to the silent killer of excessive heat. For anyone serious about their tech investment, whether you’re a hardcore gamer, a content creator, or a professional relying on peak system efficiency, understanding how to properly install thermal paste isn’t just a technical skill—it’s a fundamental aspect of digital security, productivity, and financial prudence.
This guide will demystify the process, turning what might seem like a daunting task into a straightforward maintenance routine. We’ll delve into why thermal paste is so crucial, how to select the best options from a competitive market, and provide a detailed, step-by-step walkthrough for its installation. By mastering this essential skill, you not only unlock the full potential of your CPU but also safeguard your valuable hardware investment, extending its lifespan and ensuring consistent, top-tier performance for years to come.
The Unsung Hero: Understanding Thermal Paste’s Vital Role
Your CPU, the “brain” of your computer, generates a significant amount of heat during operation. To prevent this heat from damaging the chip and causing performance issues, a CPU cooler is used to dissipate it. However, the surfaces of the CPU’s Integrated Heat Spreader (IHS) and the cooler’s cold plate, despite appearing smooth to the naked eye, are microscopically uneven. These minute imperfections create tiny air pockets, and air, unfortunately, is a poor conductor of heat. This is where thermal paste, or thermal compound, steps in.
What is Thermal Paste and Why Do You Need It?
Thermal paste is a high-thermal-conductivity material designed to fill those microscopic air gaps between the CPU and its cooler. By creating a continuous, efficient pathway for heat to flow from the CPU to the cooler, it dramatically improves heat transfer. Without thermal paste, your CPU would quickly overheat, leading to a cascade of problems:
- Thermal Throttling: The CPU automatically reduces its clock speed to lower temperatures, resulting in drastically reduced performance in games, applications, and demanding tasks. This directly impacts your productivity and enjoyment, effectively rendering your powerful hardware underutilized.
- System Instability: Overheating can cause crashes, freezes, and blue screens of death, disrupting your workflow and potentially leading to data loss.
- Reduced Lifespan: Prolonged exposure to high temperatures can permanently damage your CPU and other surrounding components, turning a significant investment into premature obsolescence. This is a direct financial drain and a concern for any brand that values product longevity.
- Loud Fan Noise: To combat rising temperatures, your CPU cooler fans will spin at maximum RPM, creating an annoying amount of noise that detracts from your user experience.
In essence, thermal paste ensures that your CPU runs cooler, faster, and lasts longer. It’s a small component with a monumental impact on your entire computing experience, making it an indispensable part of PC maintenance.
When and Why You Should Reapply Thermal Paste
Thermal paste isn’t a “set it and forget it” component. Over time, it can dry out, harden, or degrade, losing its thermal conductivity properties. This degradation can lead to the very issues it’s designed to prevent. Knowing when to reapply is crucial for maintaining optimal performance:
- New CPU Cooler Installation: Anytime you install a new CPU cooler or re-mount an existing one, you must apply fresh thermal paste.
- Performance Degradation: If you notice your computer performing slower than usual, experiencing frequent crashes, or if your fan noise has become excessively loud, check your CPU temperatures. High idle or load temperatures are a clear indicator that your thermal paste may have degraded.
- Regular Maintenance: While modern thermal pastes can last several years, a general rule of thumb is to consider reapplying every 2-3 years, especially if your PC operates under heavy loads or in warmer environments. Proactive maintenance is a smart financial strategy, preventing costly repairs or replacements down the line.
- Upgrades or Repairs: If you’re upgrading your CPU, motherboard, or simply performing deep cleaning on your system, it’s an ideal time to check and reapply thermal paste.
Taking the initiative to reapply thermal paste yourself is not just a DIY victory; it’s a testament to personal branding as a tech-savvy individual, saving you money on technician fees while extending the life of your valuable hardware.
Gearing Up: Essential Tools and Preparations
Before you dive into the reapplication process, preparation is key. Having the right tools and understanding the necessary precautions will make the job smoother, safer, and more effective. This stage is where informed choices, often influenced by brand reputation and financial considerations, truly come into play.
Selecting the Right Thermal Compound: Brands and Best Practices
The market is flooded with various brands and types of thermal paste, each with its own characteristics and price point. Making an informed choice can significantly impact your thermal performance.
-
Types of Thermal Paste:
- Silicone-based: Common, inexpensive, and easy to apply. Good for general use but may not offer the best performance.
- Metal-based (e.g., silver, aluminum): Offer excellent thermal conductivity due to metallic particles. However, they are often electrically conductive, posing a short-circuit risk if applied excessively or sloppily. They can also be more difficult to clean.
- Ceramic-based (e.g., aluminum nitride, zinc oxide): Electrically non-conductive, making them safer, and offer good performance.
- Carbon-based: Often feature micro-carbon particles, providing excellent thermal conductivity and are electrically non-conductive. Many premium pastes fall into this category.
- Liquid Metal: Offers the absolute best thermal conductivity but is highly electrically conductive and corrosive to aluminum. Recommended only for experienced users with nickel-plated copper cold plates.
-
Reputable Brands: Investing in a quality thermal paste from a reputable brand is a smart financial decision. While cheap, generic pastes might save a few dollars upfront, their inferior performance can lead to throttling, negating the investment in a high-end CPU or cooler.
- Arctic MX-4/MX-6: A long-standing favorite, known for its excellent performance, non-electrical conductivity, and ease of application. Great value for money.
- Noctua NT-H1/NT-H2: Another highly regarded brand, offering superb performance and reliability, often bundled with Noctua’s acclaimed CPU coolers.
- Thermal Grizzly Kryonaut/Hydronaut: Considered premium choices, these pastes offer top-tier thermal performance, ideal for overclockers and enthusiasts seeking every degree of cooling advantage. They come at a higher price point but deliver exceptional results.
- Corsair TM30/TM50: Good all-around options that provide reliable performance.
When choosing, balance cost with performance and safety. For most users, a non-electrically conductive, high-performance paste like Arctic MX-4/MX-6 or Noctua NT-H1/NT-H2 offers the best blend of value, safety, and efficiency. This decision reflects savvy financial management and an understanding of product reputation (Brand).
Tools of the Trade and Safety First
Gathering your tools beforehand streamlines the process and minimizes potential mishaps.
- High-Concentration Isopropyl Alcohol (90% or higher): Essential for effectively removing old thermal paste residue. Lower concentrations contain more water, which can leave residue.
- Lint-Free Cloths, Coffee Filters, or Cotton Swabs: For cleaning the CPU and cooler surfaces. Avoid paper towels, as they can leave fibers.
- Screwdriver: Appropriate for your CPU cooler mounting bracket (usually Phillips head).
- Anti-Static Wrist Strap (Recommended): While often debated, an anti-static wrist strap connected to a grounded metal object (like your PC case) is a simple and inexpensive way to protect your components from electrostatic discharge (ESD). ESD can cause irreversible damage to sensitive electronics, a costly mistake to avoid.
- Gloves (Optional): To keep your hands clean and prevent skin oils from contaminating surfaces.
- Clean Work Area: A well-lit, clutter-free surface helps prevent accidents and lost screws.
Taking these safety precautions is paramount. Protecting your expensive components from ESD isn’t just a technical recommendation; it’s a critical financial safeguard. The cost of replacing a damaged CPU or motherboard far outweighs the minimal expense and effort of using an anti-static strap.

The Reapplication Process: Step-by-Step Mastery
With your tools ready and your thermal paste selected, it’s time to get hands-on. This process requires a delicate touch and attention to detail, but with this guide, you’ll achieve professional-level results.
Removing the Old: A Clean Slate for Peak Efficiency
The cornerstone of effective thermal paste application is a perfectly clean surface. Any residual old paste or debris will compromise heat transfer.
- Power Down and Disconnect: Completely shut down your PC, unplug it from the wall, and disconnect all peripherals.
- Access the CPU Cooler: Open your PC case and locate the CPU cooler. Depending on your case and cooler, you might need to remove a GPU or RAM sticks to gain easier access.
- Carefully Remove the CPU Cooler:
- Unplug the CPU fan header from the motherboard.
- Loosen the mounting screws or clips holding the cooler in place. Some coolers require specific patterns for loosening (e.g., diagonally).
- Gently twist and lift the cooler. If the paste is very old and hardened, it might “stick” the CPU to the cooler (a phenomenon called “CPU delid,” which you want to avoid unless intended). If it feels stuck, gently twist and apply slight upward pressure.
- Place the cooler aside, making sure its cold plate doesn’t touch any sensitive surfaces.
- Clean the CPU IHS:
- Apply a small amount of isopropyl alcohol to a lint-free cloth or coffee filter.
- Gently wipe away the old thermal paste from the CPU’s metal lid (IHS). Use consistent, gentle pressure.
- Repeat with fresh alcohol and a clean section of the cloth until the IHS is spotless and shiny, with no visible residue.
- Be careful not to get alcohol on the CPU pins (if a PGA socket) or around the edges of the CPU package.
- Clean the Cooler Cold Plate:
- Repeat the cleaning process for the cooler’s cold plate (the metal surface that contacts the CPU). Ensure it’s perfectly clean and free of old paste.
- If there are stubborn, dried patches, you might need to gently scrape with a plastic scraper (never metal!) before wiping.
- Allow both surfaces to air dry completely for a minute or two before proceeding. This step is critical for optimal heat transfer; a residue-free, dry surface ensures maximum thermal contact.
Applying the New: Precision for Performance
Now for the main event: applying the fresh thermal paste. There are several popular methods, each with its proponents. The goal is to achieve a thin, even layer across the entire CPU IHS when the cooler is mounted, without using excessive amounts.
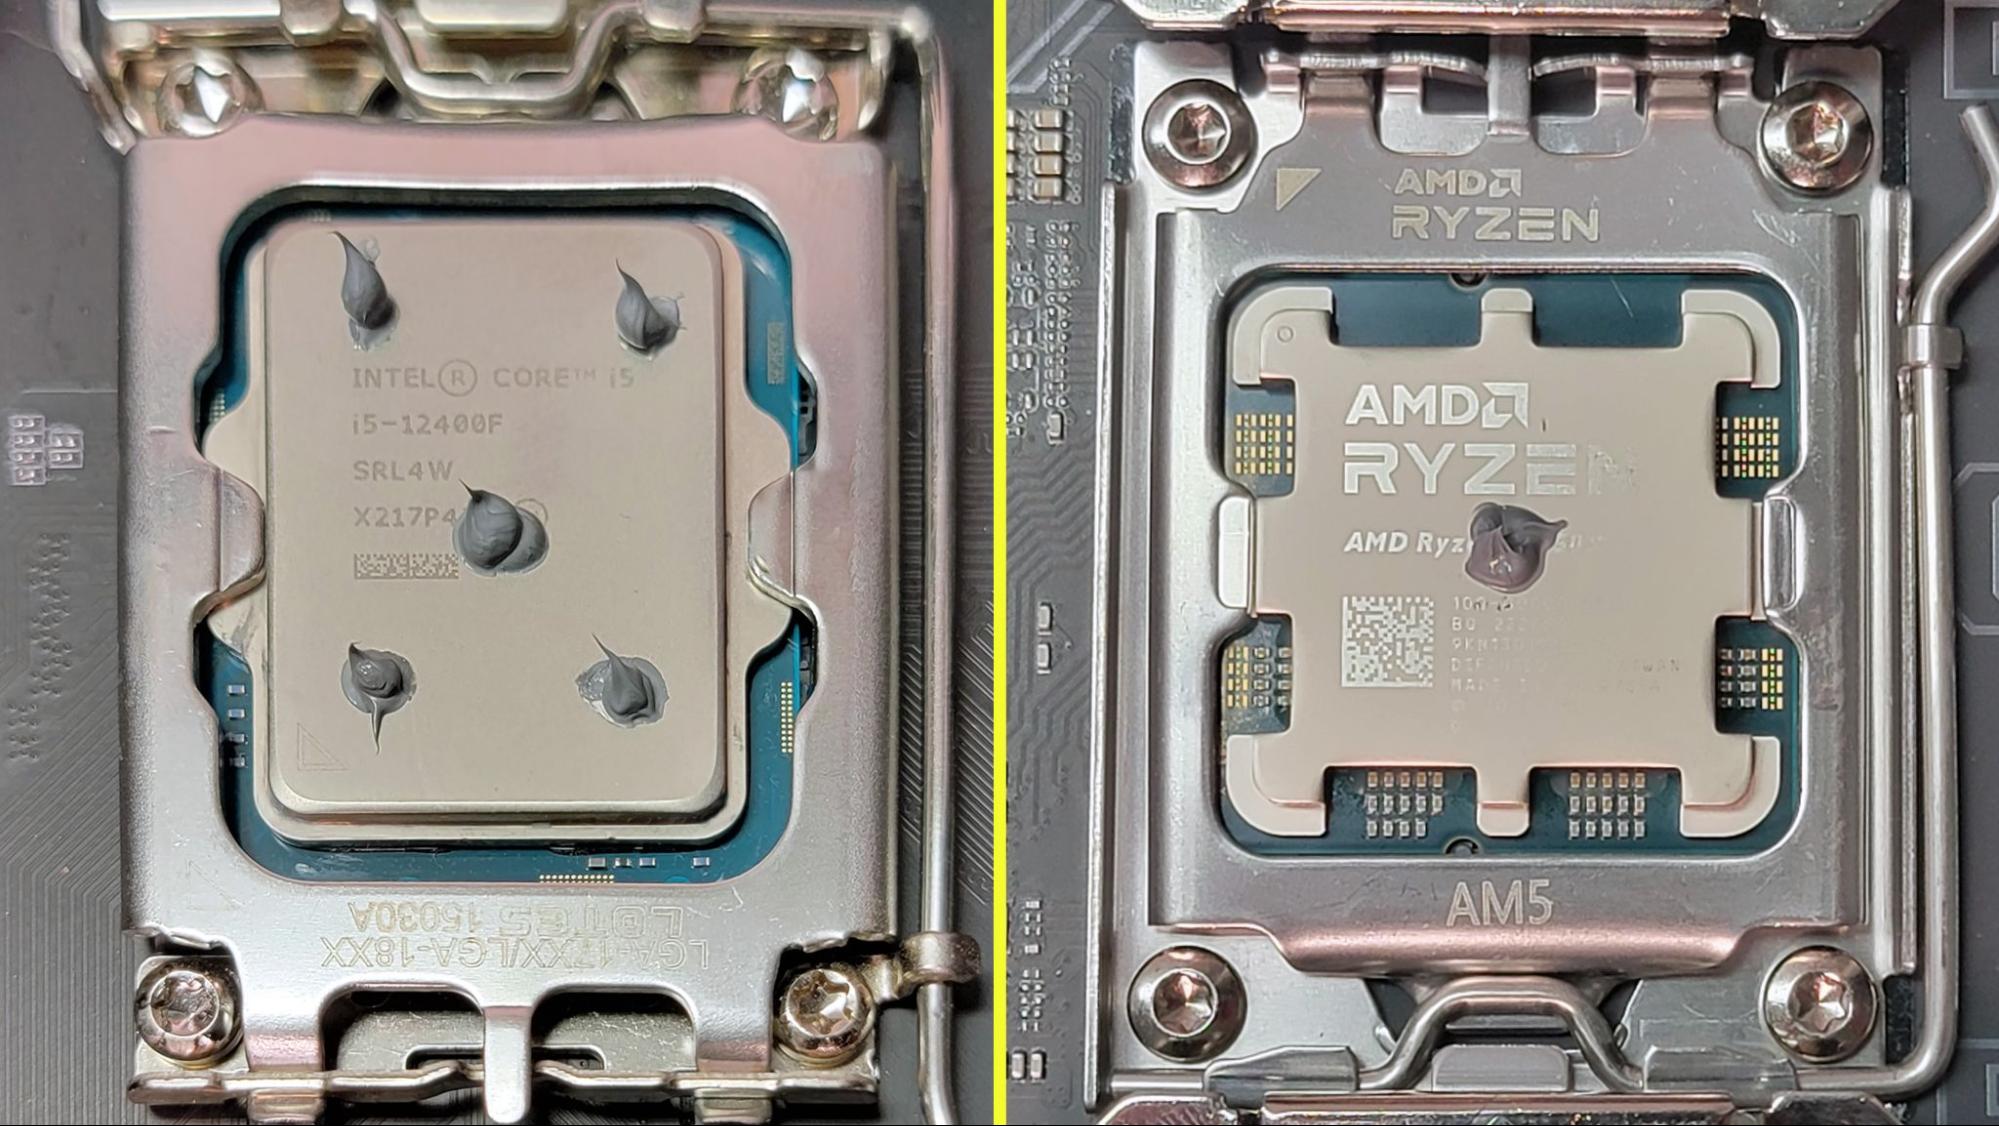
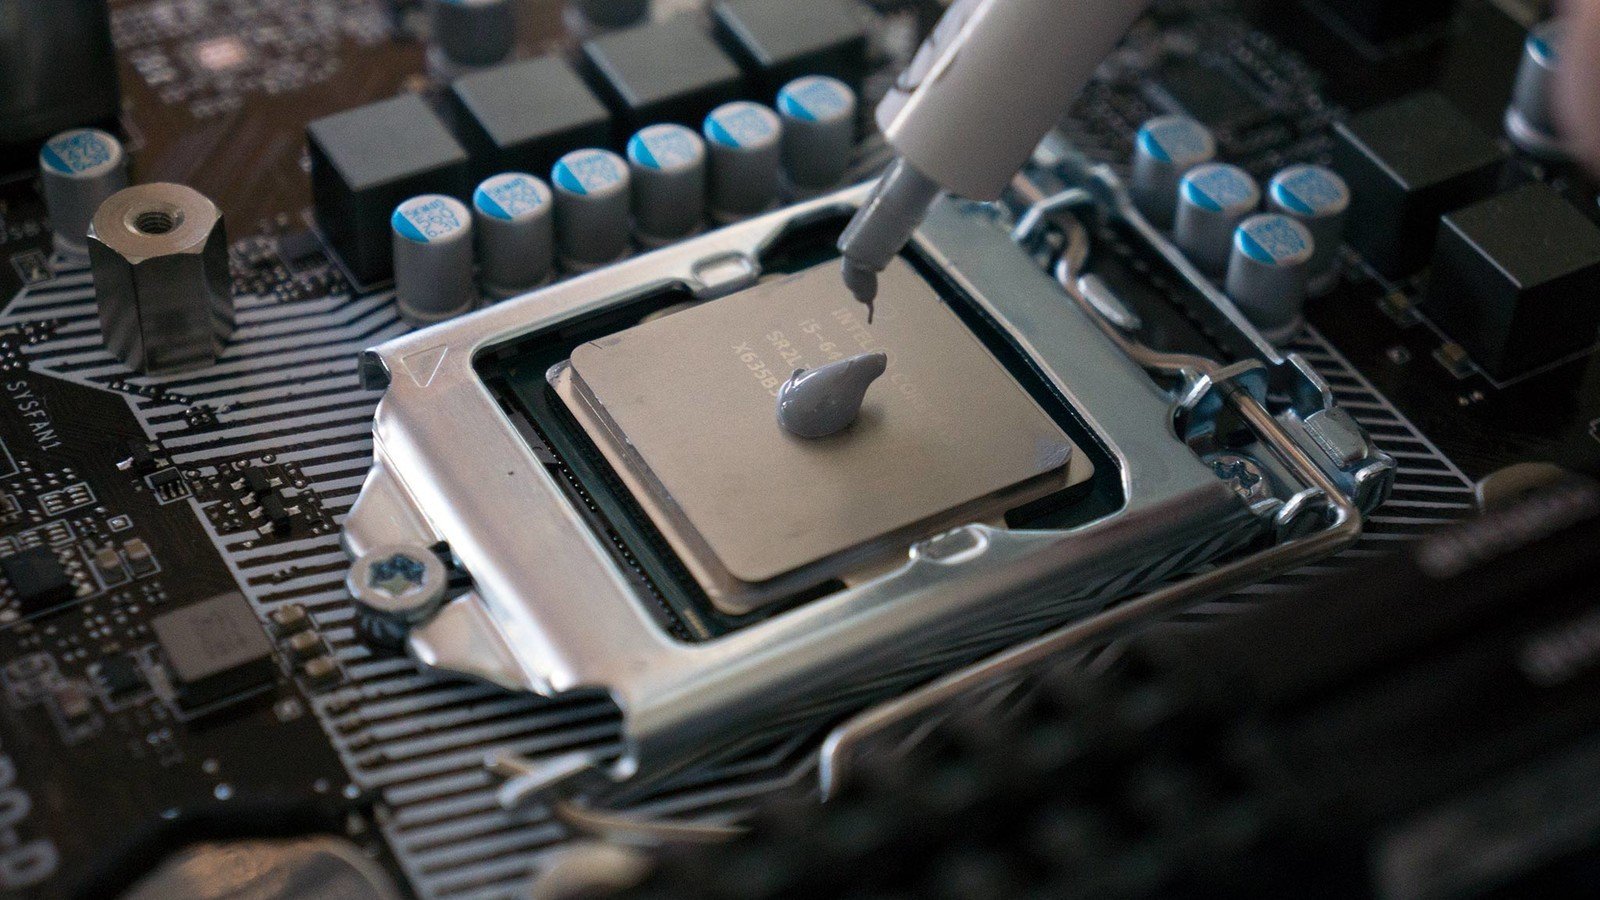
- A Grain of Rice / Pea Method (Most Common):
- Apply a single, pea-sized dot of thermal paste directly in the center of the CPU’s IHS.
- This is generally the recommended method for most thermal pastes and CPU sizes, as the pressure from the cooler will naturally spread it evenly.
- Line Method (for Rectangular Dies):
- For CPUs with a more rectangular die underneath the IHS (e.g., some Intel CPUs), a thin line (or two parallel lines) along the length of the IHS can be effective.
- Cross Method:
- Similar to the line method but forming an “X” or “+” shape on the IHS.
- Spreading Method (Less Common, but effective with some pastes):
- Using a spatula or a thin plastic bag over your finger, gently spread a very thin, even layer of thermal paste across the entire IHS.
- This method ensures complete coverage but can introduce air bubbles if not done carefully. It’s often preferred for liquid metal application.
Key Considerations for Application:
- Quantity: Less is generally more. A small amount is sufficient. Too much paste can actually trap heat or squeeze out onto the motherboard, creating a mess or, in the case of electrically conductive pastes, a short circuit. Too little won’t cover the entire surface, leading to hot spots.
- No Pre-Spreading (for Pea/Line/Cross): For the dot, line, or cross methods, do not pre-spread the paste. The pressure from the cooler will do the spreading for you.
- Evenness: The goal is a consistent, thin layer for maximum efficiency.
Reassembly and Post-Installation Checks
With the thermal paste applied, it’s time to re-mount the cooler and test your work.
- Carefully Mount the CPU Cooler:
- Align the cooler’s cold plate with the CPU, ensuring the mounting holes or clips line up.
- Gently lower the cooler straight down onto the CPU. Avoid wiggling or twisting, as this can create air bubbles or unevenly spread the paste.
- Secure the cooler’s mounting screws or clips. If using screws, tighten them in a diagonal or cross pattern, a quarter turn at a time, to ensure even pressure. This even pressure is vital for the thermal paste to spread correctly and eliminate all air pockets. Do not overtighten.
- Connect Fan Headers: Plug the CPU fan cable back into the “CPU_FAN” header on your motherboard. If you have multiple fans or an AIO cooler, ensure all necessary connections (pump, RGB, etc.) are made.
- Tidy Up: Route cables neatly and close your PC case.
- First Boot and Monitoring:
- Plug your PC back in and power it on.
- Enter your motherboard’s BIOS/UEFI to check initial CPU temperatures. Ensure they are within a reasonable range (e.g., 30-45°C at idle).
- Once booted into Windows (or your OS), install and use a monitoring utility like HWMonitor, Core Temp, or MSI Afterburner to keep an eye on your CPU temperatures under both idle and load conditions. Run a stress test (e.g., Prime95, Cinebench) for 15-30 minutes to ensure temperatures remain stable and within safe limits (typically below 80-85°C for sustained load, though lower is always better). This step is crucial for verifying the success of your reapplication.
Beyond the Basics: Optimization, Troubleshooting, and Long-Term Value
Proper thermal paste installation is a significant step, but understanding common pitfalls and long-term maintenance strategies can further optimize your system and protect your investment.
Common Pitfalls and How to Avoid Them
Even with a guide, mistakes can happen. Recognizing them early can save you from performance issues or even hardware damage.
- Improper Cleaning: Leaving old thermal paste or debris on the CPU or cooler is the most common mistake. This creates barriers to heat transfer, making your fresh paste less effective. Always ensure surfaces are spotless.
- Incorrect Application Amount: Too much paste creates a thicker barrier that can trap heat or spill over. Too little means incomplete coverage, leading to hot spots. Stick to the “pea-sized” or similar conservative methods for most applications.
- Uneven Cooler Mounting: If the cooler isn’t seated perfectly flat or tightened evenly, it won’t apply consistent pressure across the CPU IHS. This can lead to uneven paste spread and poor thermal contact. Always use the diagonal tightening pattern.
- Wiggling the Cooler: Once the cooler is placed on the CPU, avoid wiggling or lifting it. This can introduce air bubbles, which are detrimental to heat transfer. If you make a mistake, remove the cooler, clean everything, and start fresh.
- Using Electrically Conductive Paste Carelessly: Liquid metal or certain metallic pastes must be handled with extreme care. Spillage can short-circuit components. Ensure you understand the risks and take extra precautions if opting for these high-performance, high-risk options.
Avoiding these common errors not only ensures peak performance but also safeguards your hardware, reflecting sound tech practices and preventing costly replacements—a true win for your wallet and your digital security.
Maintaining Your Investment: When to Revisit
The lifespan of thermal paste varies greatly depending on the brand, type, and operating conditions of your CPU. High-quality pastes can last 3-5 years or even longer, while cheaper alternatives might degrade in a year or two.
- Monitor Temperatures: The best indicator is always your CPU temperature. If you notice a gradual increase in idle or load temperatures over time, or if your system starts throttling again, it’s a strong sign that your thermal paste might need a refresh.
- Environmental Factors: PCs operating in dusty environments or at consistently high ambient temperatures may experience faster thermal paste degradation. Regular cleaning of your PC case and cooler fins can also help extend its life by maintaining optimal airflow.
- Performance Expectations: If you’re an overclocker or demand the absolute highest performance from your system, you might consider reapplying more frequently (e.g., every 1-2 years) to ensure peak thermal efficiency.
By proactively monitoring your system and performing regular maintenance, you’re not just ensuring smooth operation; you’re actively managing and extending the life of your technology investment. This forward-thinking approach delivers long-term financial benefits, preserves your productivity, and solidifies your understanding of core technology principles.
Proper thermal paste installation is more than just a repair task; it’s a fundamental aspect of PC ownership that directly impacts performance, longevity, and overall value. By following this comprehensive guide, you’ve not only gained a valuable technical skill but also empowered yourself to maintain your system at peak efficiency, protecting your financial investment and enhancing your computing experience. Embrace this essential maintenance and enjoy the confidence that comes with a well-maintained, high-performing machine.
aViewFromTheCave is a participant in the Amazon Services LLC Associates Program, an affiliate advertising program designed to provide a means for sites to earn advertising fees by advertising and linking to Amazon.com. Amazon, the Amazon logo, AmazonSupply, and the AmazonSupply logo are trademarks of Amazon.com, Inc. or its affiliates. As an Amazon Associate we earn affiliate commissions from qualifying purchases.