The sun, a boundless source of clean energy, offers a compelling alternative to traditional power grids. As awareness of climate change and the desire for energy independence grows, more homeowners are turning to solar power. While the idea of harnessing the sun’s energy might seem complex, understanding the process of installing solar panels can demystify it, empowering you to make informed decisions about your home’s energy future. This guide delves into the “how-to” of solar panel installation, exploring the technological aspects, the financial considerations, and the strategic planning involved.
Understanding the Solar Ecosystem: Beyond the Panels
Installing solar panels isn’t simply a matter of bolting some rectangles to your roof. It’s an integration of sophisticated technology, careful financial planning, and a strategic approach to energy consumption and generation. Before diving into the physical installation, it’s crucial to grasp the foundational elements.
The Technological Heartbeat: From Sunlight to Usable Power
At its core, solar panel installation is about converting sunlight into electricity. This involves several key technological components, each playing a vital role in the system’s efficiency and performance.
Photovoltaic Cells: The Sun’s Direct Conversion Engines
The magic of solar energy begins with photovoltaic (PV) cells. These are the fundamental building blocks of solar panels, typically made from silicon. When sunlight strikes these cells, it excites electrons within the silicon material, creating a flow of direct current (DC) electricity. The efficiency of these cells – how much sunlight they can convert into electricity – is a critical factor in the overall performance of your solar system. Advancements in PV technology have led to increased efficiency and durability, making solar panels a more attractive investment than ever before.
Solar Panels: Assembled for Maximum Capture
Individual PV cells are assembled into solar panels, usually encased in a protective frame with a glass front. The arrangement of cells, the quality of materials, and the manufacturing process all contribute to the panel’s power output and longevity. Modern solar panels are designed to withstand various weather conditions, from intense sun to heavy rain and snow. When considering installation, understanding the different types of solar panels available – monocrystalline, polycrystalline, and thin-film – and their respective advantages and disadvantages is important. Monocrystalline panels, for instance, are generally more efficient and aesthetically pleasing but can be more expensive, while polycrystalline panels offer a good balance of cost and performance.
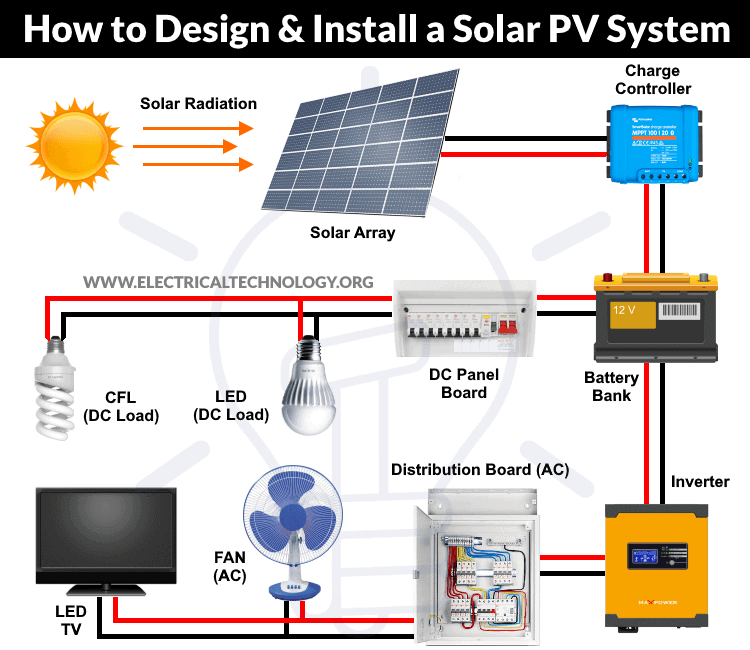
The Inverter: Bridging the DC and AC Divide
The electricity generated by solar panels is in the form of DC. However, most homes and the electrical grid operate on alternating current (AC). This is where the inverter comes in. The inverter’s primary function is to convert the DC electricity produced by the solar panels into usable AC electricity for your home. There are two main types of inverters:
- String Inverters: These are the most common type, connecting multiple solar panels in a series (a “string”) to a single inverter. They are generally more cost-effective but can be less efficient if some panels in the string are shaded or underperform, as the entire string’s output is limited by the weakest link.
- Microinverters: Installed on each individual solar panel, microinverters convert DC to AC at the panel level. This offers significant advantages in terms of performance, as shading on one panel doesn’t affect the others, and it allows for individual panel monitoring. They are typically more expensive upfront but can lead to higher overall energy production and better system resilience.
Mounting Systems: Securing Your Solar Investment
The method of attaching solar panels to your roof or property is crucial for their stability, longevity, and optimal energy capture. Mounting systems are designed to withstand wind, snow, and other environmental factors. Common mounting options include:
- Rooftop Mounts: The most popular choice, these systems secure panels to your existing roof structure. Careful consideration must be given to the roof’s condition, material, and angle to ensure proper installation and prevent damage.
- Ground Mounts: For properties with ample open space, ground-mounted systems offer flexibility in panel orientation and tilt, potentially maximizing energy production. They also simplify maintenance and cleaning.
- Pole Mounts: Similar to ground mounts, but the panels are elevated on a single pole, offering a smaller footprint and the ability to adjust the angle throughout the day.
Battery Storage: The Power of Independence and Resilience
While not strictly part of the initial panel installation, battery storage systems are increasingly becoming a vital component of modern solar setups. These systems store excess solar energy generated during the day for use at night or during power outages. This enhances energy independence, reduces reliance on the grid, and can provide significant savings by allowing you to avoid peak electricity rates. The integration of battery storage adds another layer of technological sophistication to your solar investment.
Financial Foundations: Unpacking the Costs and Savings
The decision to install solar panels is often driven by a desire to reduce electricity bills and contribute to a sustainable future. However, it’s also a significant financial undertaking that requires careful planning and an understanding of the economic landscape.
The Initial Investment: Panels, Inverters, and Installation
The upfront cost of a solar panel system is the most significant barrier for many homeowners. This cost is influenced by several factors:
- System Size: The number of panels required is determined by your home’s energy consumption and the desired level of energy offset. Larger systems naturally cost more.
- Panel and Inverter Technology: As mentioned earlier, higher efficiency panels and advanced inverter systems like microinverters will generally come with a higher price tag.
- Mounting System: The type of mounting system used can also affect the overall cost.
- Installation Labor: Professional installation is crucial for ensuring the system is safe, efficient, and compliant with local regulations. The complexity of the installation and the installer’s rates will factor into the cost.
- Permitting and Fees: Local authorities often require permits for solar installations, which come with associated fees.
Government Incentives and Rebates: Sweetening the Deal
Fortunately, the financial equation is often improved by various government incentives and rebates designed to encourage solar adoption. These can significantly reduce the net cost of your solar system.
- Federal Tax Credits: In many countries, including the United States, federal tax credits allow you to deduct a percentage of the cost of your solar system from your federal taxes.
- State and Local Incentives: Many states, cities, and utility companies offer their own rebates, tax credits, or performance-based incentives (like Solar Renewable Energy Credits or SRECs) that can further offset the cost.
- Net Metering Policies: Net metering allows you to send excess electricity generated by your solar panels back to the grid and receive credit on your electricity bill. This can significantly reduce your overall electricity costs.
Long-Term Savings: Electricity Bill Reduction and ROI
The primary financial benefit of solar panels is the reduction in your monthly electricity bills. Over the lifespan of the system (typically 25-30 years), these savings can be substantial, often exceeding the initial investment. Calculating the Return on Investment (ROI) involves considering the initial cost, the projected savings from reduced electricity bills, and any incentives received. While the payback period varies, many homeowners find that solar panels become a financially sound investment over time, offering both long-term savings and increased property value.
Strategic Planning: Optimizing Your Solar Investment
Beyond the technological and financial aspects, a strategic approach to planning your solar installation is vital for maximizing its benefits and ensuring a smooth process.
Energy Audits and Consumption Analysis: Knowing Your Needs
Before even looking at solar panels, it’s essential to understand your current energy consumption patterns. A professional energy audit can identify areas where your home is losing energy and suggest improvements that can reduce your overall electricity needs. By accurately assessing your home’s energy usage, you can determine the appropriate size of solar system required to meet your goals, whether it’s to offset a portion of your bill or achieve complete energy independence.
Site Assessment: Location, Location, Location
The optimal placement of solar panels is crucial for maximizing sunlight exposure and energy generation. A thorough site assessment will consider:
- Roof Orientation and Tilt: South-facing roofs in the Northern Hemisphere generally receive the most direct sunlight. The optimal tilt angle depends on your geographic location and the time of year.
- Shading: Trees, chimneys, neighboring buildings, or other obstructions that cast shadows on your roof can significantly reduce the efficiency of your solar panels. Identifying and mitigating potential shading issues is paramount.
- Roof Condition: Your roof needs to be in good condition to support the weight of the solar panels and withstand the installation process. Repairs or reinforcement might be necessary before installation.
Permitting and Regulations: Navigating the Bureaucracy
Navigating local building codes, zoning regulations, and utility interconnection agreements is a critical step in the solar installation process. Your chosen solar installer will typically handle much of this paperwork, but it’s important to be aware of the requirements. This includes obtaining building permits, electrical permits, and securing approval from your utility company to connect your system to the grid.
The Installation Process: From Paperwork to Power Generation
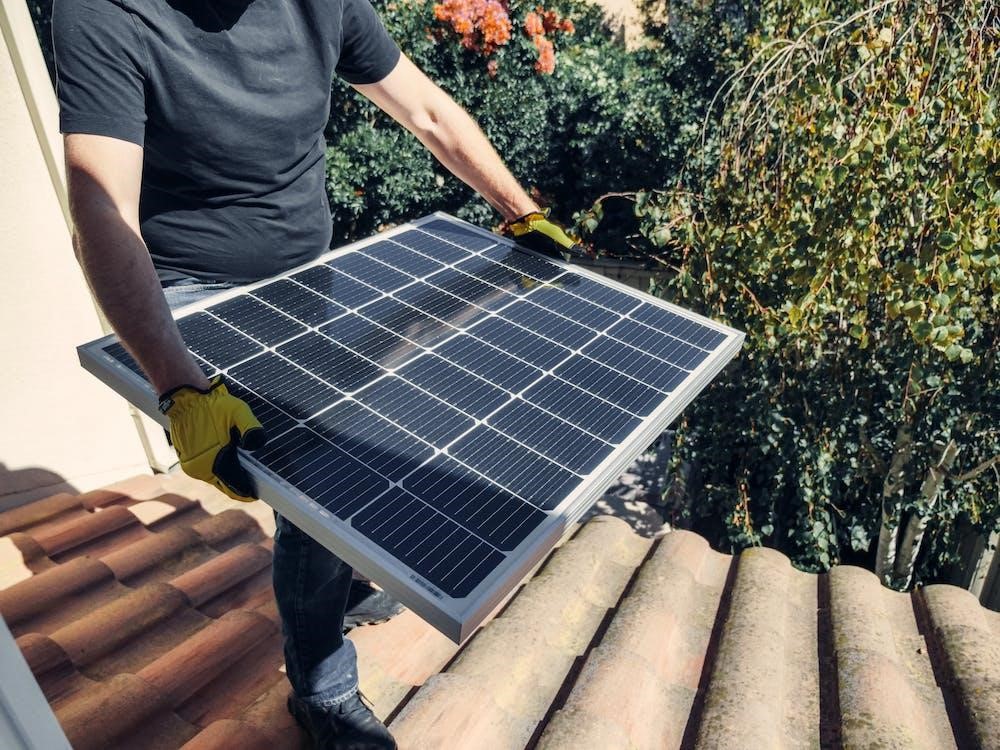
Once the planning and design phases are complete, the physical installation of your solar panel system begins. While it’s highly recommended to use a certified professional installer, understanding the general steps involved can provide valuable insight.
Site Preparation and Structural Assessment
This phase involves preparing the installation site. For rooftop installations, this includes cleaning the roof, identifying suitable mounting points, and ensuring the roof structure can bear the load of the panels and mounting hardware. If necessary, roof repairs or reinforcements will be made. For ground mounts, it involves excavating and preparing the foundation for the mounting structure.
Mounting System Installation
The chosen mounting system is securely attached to the roof or ground. This is a critical step that ensures the panels are stable and positioned at the optimal angle for sunlight capture. Different mounting systems have specific installation procedures, and adherence to manufacturer guidelines and local building codes is essential.
Solar Panel Installation and Wiring
The solar panels are then carefully attached to the mounting system. Following this, electricians will connect the panels to each other (forming strings if using a string inverter) and then run the wiring to the inverter. This is a precise process that requires specialized knowledge to ensure safety and efficiency.
Inverter Installation and Connection
The inverter is installed, typically in a shaded location like a garage or basement, and connected to the solar panel array. The inverter then converts the DC electricity generated by the panels into AC electricity.
Electrical Connections and Grid Interconnection
The AC electricity from the inverter is then connected to your home’s main electrical panel. If your system is grid-tied, a bi-directional meter is usually installed by the utility company to track both the electricity you consume from the grid and the excess electricity you send back. Final inspections by local building authorities and the utility company are often required before the system can be turned on.
Post-Installation: Maintenance and Monitoring for Peak Performance
Installing solar panels is just the beginning of your journey towards energy independence. Ongoing maintenance and monitoring are crucial for ensuring your system operates at peak performance and continues to deliver the expected savings.
Regular Cleaning and Inspections
While solar panels are designed to be low-maintenance, occasional cleaning can improve their efficiency. Dust, dirt, pollen, and bird droppings can accumulate on the panels, reducing their ability to absorb sunlight. The frequency of cleaning depends on your local environment, but a simple rinse with water can often suffice. Professional inspections are also recommended periodically to check for any loose connections, damaged components, or other issues that might affect performance.

Performance Monitoring and Troubleshooting
Most modern solar systems come with monitoring software that allows you to track your system’s energy production in real-time. This is an invaluable tool for understanding your energy generation patterns, identifying any dips in performance, and troubleshooting potential issues. If you notice a significant drop in production, it could indicate a problem that needs to be addressed by your installer.
By understanding the technological intricacies, the financial landscape, and the strategic planning involved, the “how-to install solar panels” becomes a tangible and achievable goal for homeowners seeking a cleaner, more sustainable, and cost-effective energy future.
aViewFromTheCave is a participant in the Amazon Services LLC Associates Program, an affiliate advertising program designed to provide a means for sites to earn advertising fees by advertising and linking to Amazon.com. Amazon, the Amazon logo, AmazonSupply, and the AmazonSupply logo are trademarks of Amazon.com, Inc. or its affiliates. As an Amazon Associate we earn affiliate commissions from qualifying purchases.