
In the ever-evolving landscape of PC hardware and software, the natural inclination is always towards the newest updates. Newer NVIDIA drivers often promise enhanced performance, critical bug fixes, and support for the latest games and applications. However, there are specific, often critical, scenarios where rolling back to an older NVIDIA driver version isn’t just a preference, but a necessity. This deep dive explores the intricacies of installing older NVIDIA drivers, guiding you through the rationale, preparation, and execution with professional insight, ensuring your system remains stable and performs optimally for your specific needs.
Why Revert? Understanding the Rationale Behind Older Driver Installations
The decision to install an older driver might seem counterintuitive in a tech world driven by forward momentum. Yet, for many users, it’s a strategic choice to resolve persistent issues, restore lost functionality, or optimize performance for particular setups.
The Quest for Stability and Compatibility
One of the most common reasons users revert to older drivers is to address stability issues introduced by newer versions. Sometimes, a freshly released driver might contain bugs that cause system crashes, graphical glitches, or application failures on specific hardware configurations. These could range from minor annoyances to critical system instability, making certain tasks impossible. For professional users relying on specific software (e.g., CAD, video editing suites, scientific simulations) that might not be immediately optimized for the latest driver iterations, compatibility becomes paramount. A stable, older driver, though lacking the absolute newest features, ensures that critical workflows remain uninterrupted.
Furthermore, certain legacy games or specialized applications, particularly those no longer actively updated, might exhibit unexpected behavior or even fail to launch with modern drivers. Their codebases were developed and tested against older driver architectures, making a rollback the only viable solution to retain functionality. This is a common predicament for enthusiasts of classic PC gaming or professionals maintaining older specialized software setups.
Optimizing Performance for Legacy Systems
While new drivers are designed to extract maximum performance from the latest GPUs, they can occasionally introduce performance regressions or higher resource utilization on older graphics cards. This might manifest as lower frame rates in games, slower rendering times, or increased latency in applications that previously ran smoothly. For users with aging hardware who aren’t planning an immediate upgrade, finding the “sweet spot” driver version – one that offers the best balance of performance and stability for their specific GPU model – can significantly extend the lifespan and usability of their system. This optimization isn’t about gaining cutting-edge performance, but about preserving the achievable performance ceiling for older components.
Addressing Unforeseen Issues with Newer Releases
Beyond general stability and performance, newer drivers can sometimes remove features, alter control panel layouts, or change underlying APIs in ways that disrupt user-specific configurations or reliance on particular functionalities. For instance, specific settings for multi-monitor setups, custom resolutions, or even professional workstation features (like NVIDIA Mosaic or nView desktop management) might be handled differently or even become unavailable in newer driver packages. When a new driver inadvertently breaks a crucial workflow component or removes a heavily utilized feature, reverting becomes the direct path to restoring that functionality. It’s about maintaining a known-good configuration rather than adapting to potentially detrimental changes.
Essential Preparations Before You Begin
The process of installing older NVIDIA drivers is more involved than a simple update and requires careful preparation to prevent potential system issues. Skipping these preliminary steps can lead to corrupt installations, system instability, or even a non-bootable operating system.
Identifying Your Hardware and Desired Driver Version
Before anything else, you need to know exactly what graphics card you have. This can typically be found in your system’s Device Manager under “Display adapters” or by using system information tools like CPU-Z or GPU-Z. Knowing the exact model (e.g., GeForce RTX 3080, GTX 1060) is crucial because drivers are specific to GPU generations and architectures.
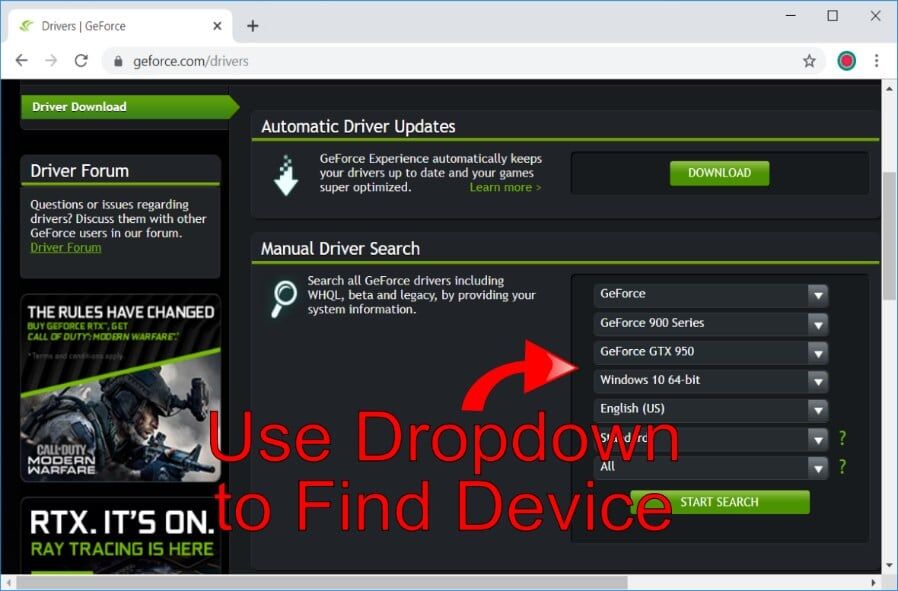
Next, identify the specific older driver version you wish to install. This might come from community recommendations, historical records of stable drivers for your GPU, or a version known to work with a particular application. NVIDIA’s official driver archive website is the primary source for downloading these older packages. Navigate to their driver download page, select your product type, product series, product, and operating system, and then search the archive for older versions. Always download drivers directly from NVIDIA’s official site to avoid counterfeit or malicious software.
Safeguarding Your System: Backup and Restore Points
Any significant driver manipulation carries a degree of risk. It is paramount to safeguard your system before proceeding.
- Create a System Restore Point: This is your first line of defense. A system restore point allows you to revert your operating system to a previous state, including installed drivers, if something goes wrong during the installation. Search for “Create a restore point” in Windows and follow the instructions.
- Backup Important Data: While a driver installation shouldn’t directly affect your personal files, unforeseen system failures could occur. Always ensure your critical documents, photos, and other data are backed up to an external drive or cloud service.
- Create a System Image (Optional but Recommended): For maximum safety, consider creating a full system image backup. This is a complete snapshot of your hard drive, allowing you to restore your entire operating system, applications, and files to a previous state if the system becomes unrecoverable.
Acquiring the Right Tools: Display Driver Uninstaller (DDU) and Driver Packages
While Windows has a built-in uninstaller, it often leaves behind residual files, registry entries, and driver fragments that can interfere with new installations, especially when downgrading.
- Display Driver Uninstaller (DDU): This indispensable freeware utility, developed by Wagnardsoft, is designed to thoroughly remove graphics card drivers (NVIDIA, AMD, Intel) from your system. It cleans out all remnants, ensuring a completely fresh slate for the older driver installation. Download the latest version from its official source (often Guru3D).
- The Older Driver Package: As mentioned, download the specific older NVIDIA driver package you identified from NVIDIA’s official driver archive. Save it to an easily accessible location, like your desktop or a dedicated “Drivers” folder.
Disconnecting from the Network: A Critical Step
Before initiating the driver removal process, it is crucial to disconnect your computer from the internet. Windows Update has a persistent habit of automatically downloading and installing the latest drivers in the background, which can disrupt your manual installation of an older version. Disconnect your Ethernet cable or turn off your Wi-Fi before proceeding to the next steps. This ensures that Windows does not interfere with the driver removal or installation process.
The Step-by-Step Process: A Detailed Installation Guide
With all preparations complete, you can now proceed with the meticulous process of removing existing drivers and installing your chosen older version. Precision in each step is key to a successful outcome.

Step 1: Initiating the Driver Removal Process with DDU
The cleanest way to remove existing drivers is by using DDU in Safe Mode. Safe Mode loads Windows with minimal drivers and services, preventing any active driver components from interfering with DDU’s cleaning process.
- Reboot into Safe Mode:
- In Windows 10/11, go to Settings > Update & Security (or System > Recovery) > Recovery > Advanced startup > Restart now.
- After restarting, select Troubleshoot > Advanced options > Startup Settings > Restart.
- Upon the next restart, you’ll see a list of options. Press
4orF4to boot into “Enable Safe Mode”.
- Run DDU:
- Once in Safe Mode, navigate to the folder where you extracted DDU.
- Run DDU.exe. It might warn you about not being in Safe Mode; ignore this if you are already in Safe Mode.
- In DDU, select “GPU” as the device type and “NVIDIA” as the vendor.
- Click on “Clean and restart (Highly Recommended)”. DDU will now thoroughly uninstall all NVIDIA driver components and then automatically restart your computer into normal mode. During this process, your screen resolution might change, and your display might flicker; this is normal as the graphics drivers are being removed.
Step 2: Running the Older Driver Installer
After DDU completes its cleanup and your system reboots into normal Windows, your display will likely be running on a generic Microsoft Basic Display Adapter. This is the desired state for a clean driver installation.
- Locate the Downloaded Driver: Navigate to the folder where you saved the older NVIDIA driver package.
- Run the Installer: Double-click the executable file (e.g.,
setup.exe). - Extraction Process: The installer will first prompt you to choose an extraction path. You can generally accept the default. After extraction, the NVIDIA installer will launch automatically.
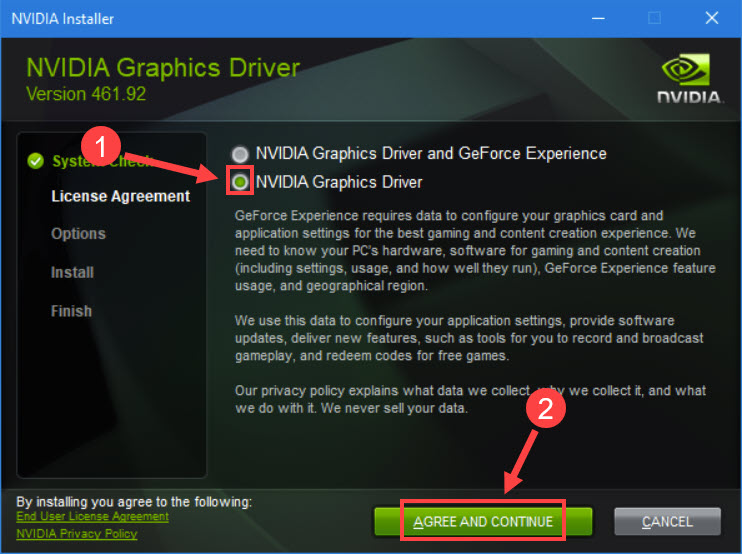
Step 3: Navigating Custom Installation Options
The NVIDIA installer offers various options. Paying attention to these ensures a clean and effective installation.
- License Agreement: Accept the NVIDIA Software License Agreement to proceed.
- Installation Options: You will typically be presented with “Express” and “Custom” installation options.
- Choose “Custom (Advanced)”: This is highly recommended when installing older drivers or any time you want more control.
- Click “Next”.
- Custom Installation Options:
- Select Components: In the Custom installation screen, you can choose which components to install (e.g., Graphics Driver, GeForce Experience, PhysX System Software, HD Audio Driver). For a minimalist approach, you might deselect GeForce Experience if you don’t need its features, as it can sometimes trigger automatic updates.
- Check “Perform a clean installation”: This checkbox is critical. Even though DDU cleaned your system, checking this box tells the NVIDIA installer to perform an additional internal cleanup, ensuring there are no conflicts with any lingering files or settings that DDU might have missed.
- Click “Next” to begin the installation.
The installation process will take several minutes. Your screen may flicker, go black, or change resolution multiple times. This is normal behavior as the new display driver components are being installed and initialized.
Step 4: Completing the Installation and Verifying Success
Once the installation completes, the installer will inform you.
- Restart Your System: Although sometimes not explicitly required by the installer, it is always recommended to restart your computer after a driver installation, especially a clean install or downgrade. This allows the operating system to fully initialize and integrate the new drivers.
- Verify Installation: After rebooting, you can verify the successful installation:
- NVIDIA Control Panel: Right-click on your desktop; you should see “NVIDIA Control Panel” in the context menu. Open it and check the “System Information” link at the bottom left to see the installed driver version.
- Device Manager: Open Device Manager (search for it in Windows), expand “Display adapters,” right-click on your NVIDIA GPU, select “Properties,” and go to the “Driver” tab. The driver version listed here should match the older version you intended to install.
Post-Installation Considerations and Best Practices
Installing an older driver isn’t just a one-time process; it involves ongoing management to ensure its stability and to prevent unwanted updates.
Preventing Automatic Driver Updates
Windows Update is notorious for automatically downloading and installing the latest drivers, which can quickly undo your efforts to maintain an older version.
- Temporarily Pause Updates: In Windows 10/11, you can pause updates for a period (e.g., 7 days).
- Use Group Policy Editor (Pro/Enterprise editions):
- Search for
gpedit.msc. - Navigate to Computer Configuration > Administrative Templates > Windows Components > Windows Update > Manage updates offered from Windows Update.
- Enable “Do not include drivers with Windows Updates.”
- Search for
- Use Registry Editor (Home editions):
- Search for
regedit. - Navigate to
HKEY_LOCAL_MACHINESOFTWAREPoliciesMicrosoftWindowsWindowsUpdate. - Create a new DWORD (32-bit) Value named
ExcludeWUDriversInQualityUpdateand set its value to1.
- Search for
- Third-Party Tools: Some utilities (e.g., Winaero Tweaker, Show or hide updates troubleshooter from Microsoft) can offer more granular control over preventing specific driver updates.
- Disconnecting from Internet before boot-up: For critical systems, ensure you are disconnected from the internet when Windows is likely to perform update checks, allowing you to regain control if an unwanted update occurs.
Troubleshooting Common Issues
Even with careful preparation, issues can arise:
- Black Screen/No Display: If your screen remains black after a reboot, try booting into Safe Mode again. If you can, run DDU once more to thoroughly clean the drivers and attempt the installation again, ensuring you selected the correct driver for your OS and GPU. If all else fails, use your system restore point.
- Performance Issues/Stuttering: Verify that the correct driver is installed. Check in-game or application settings to ensure they haven’t reset. Ensure other system components (CPU, RAM) aren’t bottlenecking.
- Installer Fails: Ensure your antivirus or firewall isn’t blocking the installer. Temporarily disable them if necessary, but remember to re-enable them immediately afterward. Check for sufficient disk space.
- Error Messages: Carefully note any error codes or messages. These can be crucial for diagnosing the specific problem through online searches or NVIDIA support resources.
Weighing the Risks: Security and Future Compatibility
While installing older drivers can solve immediate problems, it’s crucial to acknowledge the long-term implications.
- Security Vulnerabilities: Older drivers will not receive security patches for newly discovered vulnerabilities. This can expose your system to potential exploits, especially if you spend a lot of time online or use sensitive applications. Always consider the trade-off between functionality and security.
- Lack of Support for New Games/Software: As new games and applications are released, they are optimized for current driver versions. An older driver might not support new features, APIs (like DirectX 12 Ultimate or DLSS 3), or deliver optimal performance in future titles.
- OS Compatibility: Future Windows updates might introduce changes that conflict with very old drivers, potentially necessitating an upgrade to a newer driver to maintain basic system stability.
Regularly evaluate whether the benefits of the older driver still outweigh these risks. Consider upgrading if the specific compatibility issue is resolved by a newer, more secure driver, or if the security risks become too significant.
Conclusion
Installing older NVIDIA drivers is a powerful troubleshooting technique that can resolve specific compatibility, stability, or performance issues that arise with newer driver releases. By understanding the rationale, meticulously preparing your system, executing the installation with precision, and managing post-installation concerns, you can maintain a highly functional and stable computing environment tailored to your unique needs. However, remember that this strategy comes with trade-offs, particularly concerning security and future compatibility. Approach this process with informed caution and ensure you regularly re-evaluate your driver choice to keep your system performing optimally and securely in the dynamic world of technology.
aViewFromTheCave is a participant in the Amazon Services LLC Associates Program, an affiliate advertising program designed to provide a means for sites to earn advertising fees by advertising and linking to Amazon.com. Amazon, the Amazon logo, AmazonSupply, and the AmazonSupply logo are trademarks of Amazon.com, Inc. or its affiliates. As an Amazon Associate we earn affiliate commissions from qualifying purchases.