For countless Ubuntu users, the quest for optimal performance, seamless gaming, and robust computing often hinges on one critical component: the graphics driver. While Ubuntu, like many Linux distributions, offers open-source drivers by default, users with NVIDIA graphics cards frequently find themselves needing to install the proprietary NVIDIA drivers to unlock the full potential of their hardware. This comprehensive guide will walk you through the process, ensuring your system is finely tuned for everything from high-definition gaming to demanding AI and machine learning tasks. As part of our commitment to empowering you with the latest in Tech, understanding and mastering your hardware is a fundamental step towards enhanced digital experiences, improved Productivity, and even new avenues for Online Income through accelerated workflows.
The Imperative of Optimal Graphics: Why Install NVIDIA Drivers?
Out of the box, Ubuntu typically uses the open-source nouveau driver for NVIDIA graphics cards. While nouveau provides basic functionality, it often falls short in terms of performance, features, and stability compared to NVIDIA’s proprietary drivers. Installing the official drivers isn’t just a recommendation; for many, it’s a necessity that transforms their Ubuntu experience.
Unlocking Peak Performance: Gaming & Multimedia
For gamers, the difference between nouveau and proprietary NVIDIA drivers is night and day. NVIDIA’s drivers are meticulously engineered to extract every ounce of performance from their GPUs, leading to significantly higher frame rates, smoother gameplay, and access to advanced graphics technologies like DLSS (Deep Learning Super Sampling) and Ray Tracing (where supported by the hardware and game). Similarly, multimedia enthusiasts and professionals will notice vastly improved video playback, accelerated rendering in applications, and more stable performance when dealing with high-resolution content. This enhanced capability directly contributes to a better user experience and can be crucial for those using their system for side hustles in content creation or streaming.
Powering Professional Workloads: AI, ML, & Creative Applications
Beyond gaming, NVIDIA GPUs are workhorses for a multitude of professional applications. The proprietary drivers provide essential support for NVIDIA’s CUDA platform, which is the backbone for accelerating computation in fields like Artificial Intelligence (AI), Machine Learning (ML), scientific simulations, and data analytics. Frameworks such as TensorFlow and PyTorch heavily rely on CUDA for GPU acceleration. Without the official drivers, these applications would either run significantly slower on the CPU or not function at all with GPU acceleration.
Creative professionals leveraging software like Blender for 3D rendering, DaVinci Resolve for video editing, or even specialized CAD applications will find that NVIDIA drivers enable faster processing times and more efficient workflows. This direct correlation between driver performance and application speed underscores its importance for productivity and can directly impact a professional’s capacity for generating online income or delivering projects for their brand.
Ensuring System Stability & Compatibility
While nouveau has improved over the years, it can still sometimes lead to system instability, crashes, or display issues, especially with newer or less common NVIDIA hardware. The proprietary drivers, being developed directly by NVIDIA, offer superior stability, better hardware compatibility, and consistent performance across a wider range of software. They also provide access to the NVIDIA X Server Settings utility, a comprehensive control panel for managing display settings, fan speeds, and other GPU-related configurations, ensuring your system runs optimally and reliably.
Essential Preparations Before Installation
Before embarking on the driver installation process, a few crucial preparatory steps are necessary. These steps help mitigate potential issues, ensure a smoother installation, and safeguard your data. Think of this as laying a solid foundation for your digital infrastructure, a key principle in maintaining digital security and productivity.
Backing Up Your System: A Critical Safeguard
Any significant system change, especially driver installation, carries a small risk of unforeseen complications. A system backup is your most important safeguard. Tools like Timeshift allow you to create snapshots of your system, enabling you to revert to a previous working state if anything goes awry. Alternatively, simply backing up your critical personal files to an external drive or cloud storage (e.g., Google Drive, Dropbox) is a good practice. This aligns with broader digital security best practices and protects your valuable brand assets or financial records.
Updating Ubuntu: Laying a Stable Foundation
Ensuring your Ubuntu system is fully up-to-date provides a stable base for new drivers. Outdated packages or kernels can sometimes lead to compatibility issues. Open your terminal (Ctrl+Alt+T) and run the following commands:
sudo apt update
sudo apt upgrade
sudo apt dist-upgrade
sudo apt autoremove
sudo reboot
These commands refresh your package lists, upgrade all installed packages, handle dependency changes, remove unnecessary packages, and then restart your system to apply any kernel updates.
Identifying Your NVIDIA GPU: Knowing Your Hardware
Knowing your specific NVIDIA GPU model is vital for selecting the correct driver version. Different GPUs require different driver packages. You can find this information by running:
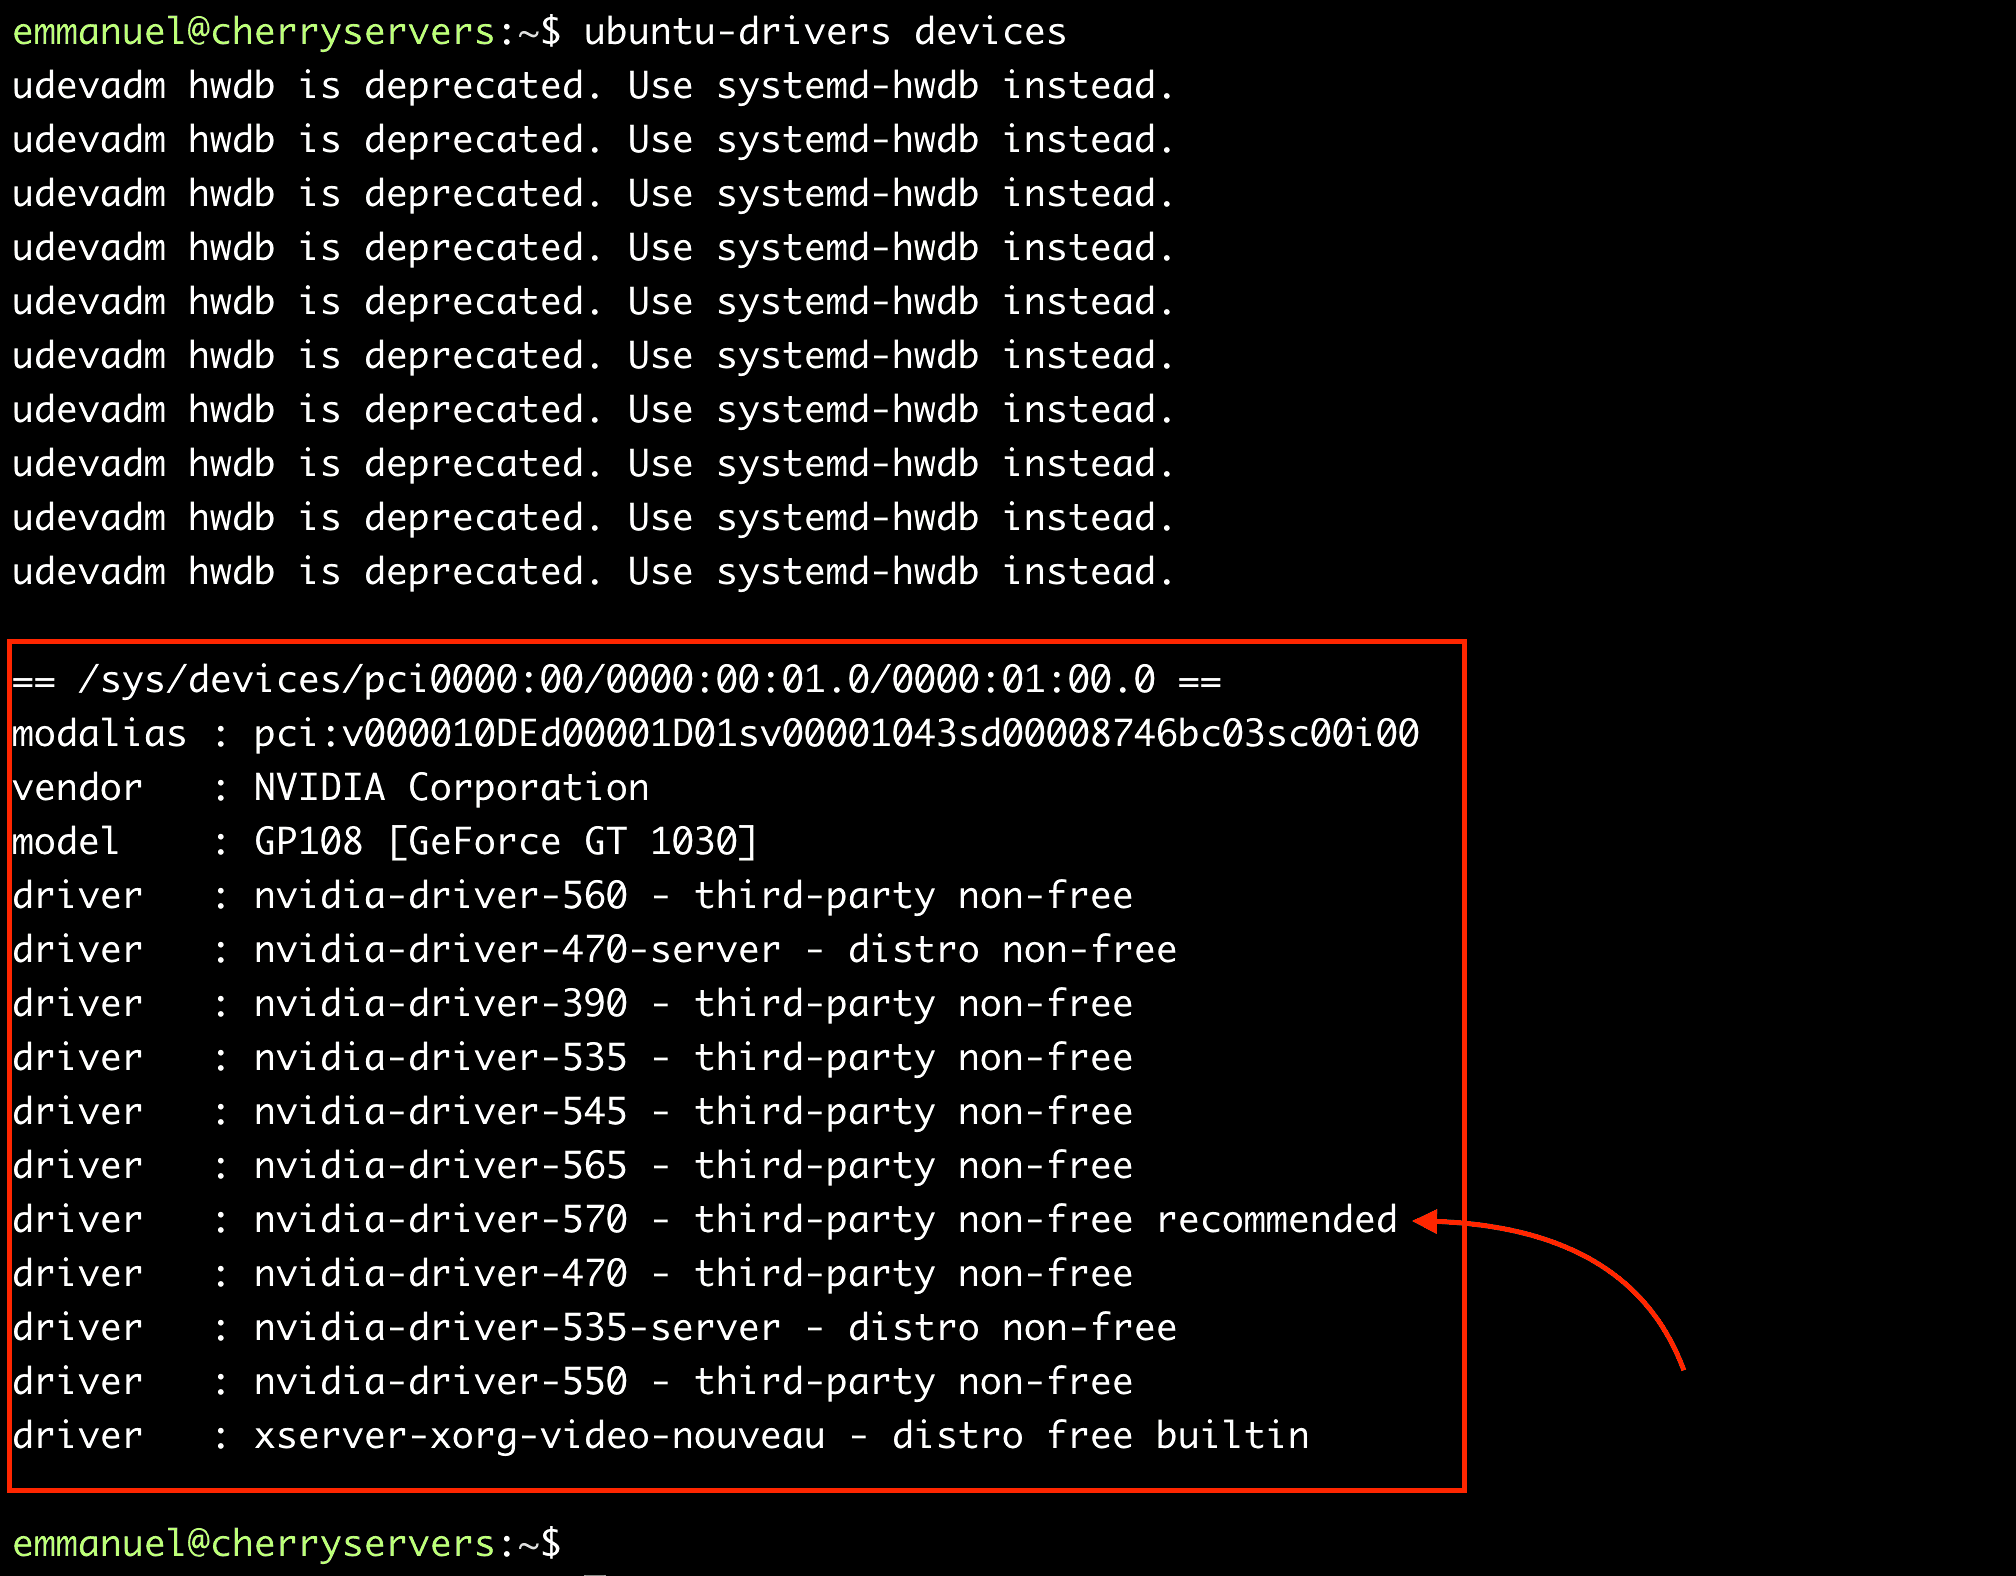
ubuntu-drivers devices
This command will list recommended NVIDIA driver versions for your detected hardware. Alternatively, for a more detailed hardware breakdown, use:
lspci -k | grep -EA3 'VGA|3D|Display'
This will show you the exact model of your NVIDIA card, which you can then cross-reference on NVIDIA’s official website if you opt for the .run file method.
Disabling Nouveau Drivers: Preventing Conflicts
The proprietary NVIDIA drivers can conflict with the open-source nouveau drivers if both are active simultaneously. It’s crucial to blacklist nouveau before installing NVIDIA’s drivers.
- Create a blacklist file:
bash

sudo nano /etc/modprobe.d/blacklist-nouveau.conf
- Add the following lines to the file:
blacklist nouveau

options nouveau modeset=0
- Save and exit (Ctrl+O, Enter, Ctrl+X).
- Update your initial RAM filesystem:
bash

sudo update-initramfs -u
- Reboot your system:
bash

sudo reboot
After rebooting,nouveaushould be disabled, preparing your system for the NVIDIA drivers. You can verify this by runninglsmod | grep nouveau. If it returns no output,nouveauis successfully blacklisted.
Step-by-Step Installation Methods
There are several ways to install NVIDIA drivers on Ubuntu, ranging from user-friendly graphical interfaces to more advanced command-line methods. We’ll cover the most common and recommended approaches.
Method 1: The User-Friendly Graphical Interface (GUI)
This is the simplest and often recommended method for most users, especially if you’re new to the command line.
- Open “Software & Updates”: You can find this application by searching in your applications menu.
- Navigate to “Additional Drivers”: In the “Software & Updates” window, click on the “Additional Drivers” tab.
- Scan for Drivers: Ubuntu will automatically scan for available proprietary drivers for your hardware. This might take a moment.
- Select and Apply: You will see a list of detected NVIDIA drivers, usually with a “proprietary, tested” recommendation. Select the latest recommended driver version (e.g.,
nvidia-driver-535). - Click “Apply Changes”: Ubuntu will download and install the selected drivers. You might be prompted for your password.
- Reboot: Once the installation is complete, a reboot will be required for the changes to take effect.
This method is highly reliable as it draws from Ubuntu’s officially supported repositories, ensuring compatibility with your system’s kernel and other packages.
Method 2: Command Line Installation via PPA (Recommended for Stability)
For users comfortable with the terminal, installing drivers via the graphics-drivers PPA (Personal Package Archive) is an excellent method. It often provides access to newer drivers than those immediately available in Ubuntu’s default repositories while maintaining good stability. This approach offers more control and is widely used by the Ubuntu community for its robustness, which in turn contributes to system reliability and sustained productivity.
- Add the PPA:
bash

sudo add-apt-repository ppa:graphics-drivers/ppa

sudo apt update
- Identify Recommended Drivers: As before, use
ubuntu-drivers devicesto see a list of recommended drivers.
bash

ubuntu-drivers devices
Look for lines likedriver : nvidia-driver-XXX - recommended, whereXXXis the version number (e.g.,535). - Install the Driver:
- Option A: Automatic Installation (Recommended for most): Let Ubuntu choose the best driver.
bash
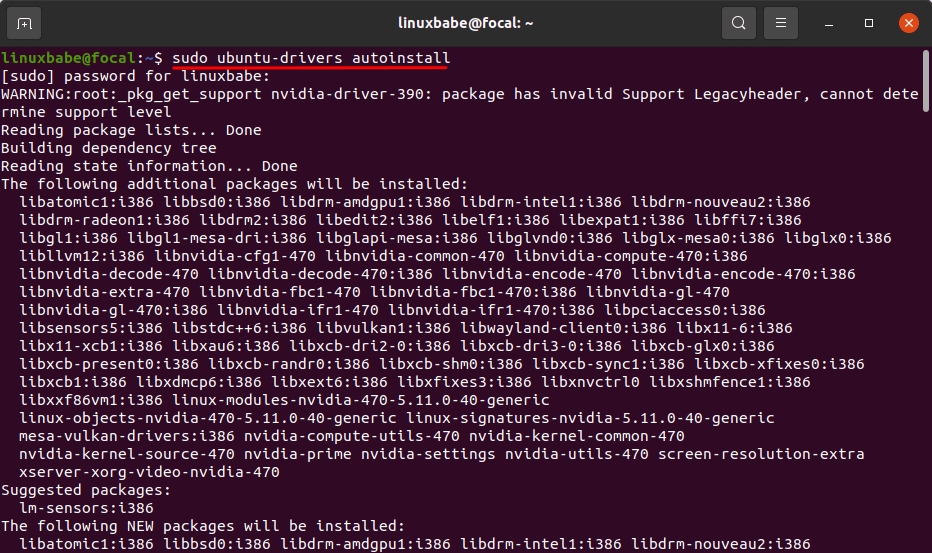
sudo ubuntu-drivers autoinstall
- Option B: Manual Installation of a Specific Version: If you need a particular version (e.g.,
535).
bash

sudo apt install nvidia-driver-535
Replace535with the specific version number you wish to install.
- Option A: Automatic Installation (Recommended for most): Let Ubuntu choose the best driver.
- Reboot:
bash

sudo reboot
After the reboot, your new NVIDIA drivers should be active.
Method 3: Advanced Installation with the NVIDIA .run File (Specific Scenarios)
This method involves downloading the driver directly from NVIDIA’s website and running an executable .run file. It’s generally more complex and less recommended for casual users, as it bypasses Ubuntu’s package management system. However, it can be useful for:
- Installing the absolute newest drivers not yet available in PPAs.
- Specific server setups without a desktop environment.
- Troubleshooting unique compatibility issues.
Warning: This method requires you to manually stop your graphical server and can be harder to troubleshoot or remove.
- Download the Driver: Visit the official NVIDIA driver download page and select your GPU series, model, and operating system (Linux 64-bit). Download the
.runfile to yourDownloadsfolder or another accessible location. - Stop the Display Manager: You need to exit your graphical environment.
- For GNOME (GDM3):
bash

sudo systemctl isolate multi-user.target
- For KDE (SDDM):
bash

sudo systemctl stop sddm
- For LXDE/XFCE (LightDM):
bash

sudo systemctl stop lightdm
You will be dropped to a TTY (text-mode console). Log in with your username and password.
- For GNOME (GDM3):
- Install Build Essentials (if not already installed):
bash

sudo apt install build-essential dkms
- Navigate to the Downloaded File and Run:
bash

cd ~/Downloads

sudo sh NVIDIA-Linux-x86_64-XXX.XX.run
(ReplaceNVIDIA-Linux-x86_64-XXX.XX.runwith the actual filename of your downloaded driver.) - Follow the On-Screen Prompts: The installer is mostly self-explanatory.
- Agree to the license terms.
- Choose to install NVIDIA’s 32-bit compatibility libraries.
- Let the installer update your
xorg.conffile. - Decline to download and install kernel modules from NVIDIA if you already installed
dkms(dkms handles this better).
- Reboot your system:
bash

sudo reboot
After rebooting, your system should load into the graphical environment with the new NVIDIA drivers. If you encounter a black screen, you might need to boot into recovery mode to uninstall the drivers or try an alternative installation method.
Verifying Your NVIDIA Driver Installation
Once you’ve completed the installation and rebooted, it’s crucial to verify that the drivers are correctly installed and functioning. This step ensures all your efforts lead to the desired performance boost and stability, which is vital for any professional using their system for business finance or online income.
Using nvidia-smi: Command Line Confirmation
The nvidia-smi (System Management Interface) tool is a powerful command-line utility for monitoring and managing NVIDIA GPUs. It’s the quickest way to confirm driver presence and check GPU status.
Open a terminal and type:
nvidia-smi
If the drivers are installed correctly, you’ll see an output detailing your driver version, CUDA version, GPU temperature, memory usage, and running processes. If you get a “command not found” error or an empty table, the drivers are not correctly installed, and you might need to retrace your steps or troubleshoot.
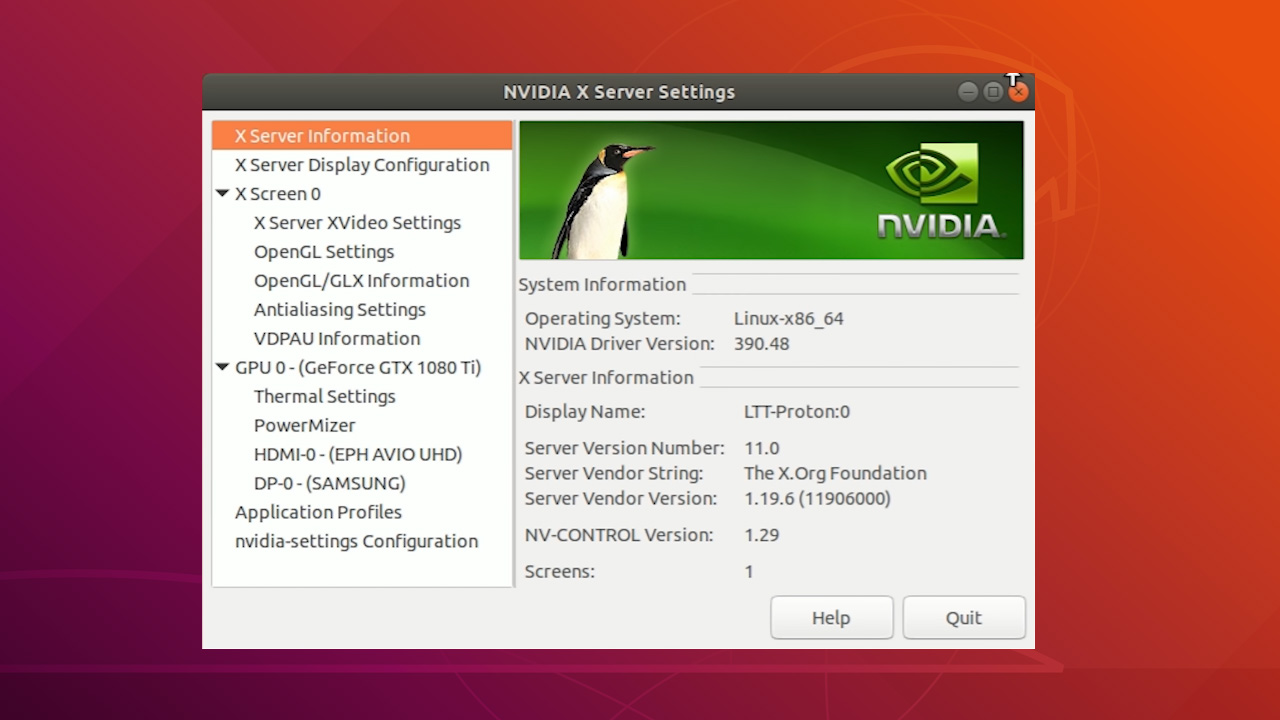
Exploring nvidia-settings: The NVIDIA Control Panel
For a graphical overview and configuration options, use the nvidia-settings utility. You can launch it from the terminal or by searching for “NVIDIA X Server Settings” in your applications menu.
nvidia-settings
This application provides detailed information about your GPU, current driver version, display configuration, and often includes options for fan control, power management, and application profiles. It’s a great tool for fine-tuning your display settings and ensuring optimal visual quality for your brand identity or personal aesthetic.
Troubleshooting Common Issues and Post-Installation Care
Despite careful preparation, issues can sometimes arise. Knowing how to troubleshoot and maintain your drivers is key to a smooth and reliable experience.
Resolving Black Screen and Boot Problems
A common problem after NVIDIA driver installation is booting into a black screen or a login loop. This usually indicates a conflict or an incorrect driver installation.
Steps to Troubleshoot:
- Boot into Recovery Mode: During system startup, repeatedly press
EscorShiftto access the GRUB menu. Select “Advanced options for Ubuntu” and then choose a kernel with “(recovery mode)”. - Access Root Shell: From the recovery menu, select “root Drop to root shell prompt”.
- Uninstall Drivers:
- If installed via PPA/APT:
bash

sudo apt purge nvidia-*

sudo apt autoremove

sudo apt install xserver-xorg-video-nouveau # Reinstall nouveau as fallback

sudo update-initramfs -u

sudo reboot
- If installed via .run file: You’ll need to run the uninstaller. Navigate to
/usr/bin/or/usr/local/bin/and look fornvidia-uninstallornvidia-installer --uninstall.
bash

sudo /usr/bin/nvidia-uninstall # Or wherever the uninstaller is located

sudo reboot
- If installed via PPA/APT:
- Try a Different Driver Version: Sometimes, the latest driver isn’t the most stable for your specific hardware. After uninstalling, try an older recommended version via the GUI or PPA method.
Updating and Removing NVIDIA Drivers
Maintaining your drivers is simple when using the PPA/APT method.
- Updating: Simply run your regular system updates:
bash

sudo apt update

sudo apt upgrade
If newer NVIDIA drivers are available in your enabled repositories/PPAs, they will be updated along with other system packages. - Removing: To completely remove NVIDIA drivers and revert to
nouveau:
bash

sudo apt purge nvidia-*

sudo apt autoremove

sudo apt install xserver-xorg-video-nouveau

sudo update-initramfs -u

sudo reboot
This ensures a clean removal and restores the open-source driver.
Maintaining System Health for Long-Term Performance
Beyond installation, regularly updating your system and drivers is vital for long-term performance and security. Keep an eye on new driver releases from NVIDIA, especially if you’re using cutting-edge hardware or demanding applications. Periodically check your GPU temperatures, especially under heavy load, using nvidia-smi or nvidia-settings to ensure adequate cooling and prevent thermal throttling. A well-maintained system guarantees consistent productivity and extends the life of your valuable gadgets.
Conclusion
Installing NVIDIA drivers on Ubuntu is a fundamental step for anyone looking to maximize their system’s potential, whether for high-performance computing, immersive gaming, or professional creative and AI/ML workloads. By following these detailed steps, you can confidently transition from the basic nouveau experience to the full power of NVIDIA’s proprietary drivers. From careful preparation and choosing the right installation method to verification and troubleshooting, this guide provides a complete roadmap to unlocking peak performance. Embrace the enhanced speed, stability, and features that come with optimized drivers, transforming your Ubuntu machine into a true powerhouse ready for any tech challenge you throw at it, ultimately boosting your productivity and opening new avenues for your digital endeavors.