In today’s rapidly evolving digital landscape, JavaScript reigns supreme not just as the language of the browser, but as a powerful tool for server-side development, thanks to Node.js. For developers working on Apple’s macOS ecosystem, installing and managing Node.js is a fundamental step towards building dynamic web applications, robust APIs, and scalable backend services. This comprehensive guide will walk you through various methods of installing Node.js on your Mac, ensuring you have the right tools to embark on your development journey, perfectly aligning with the “Tech” focus of our platform on software and tutorials.
Understanding Node.js and Its Importance
Before diving into the installation process, it’s crucial to grasp what Node.js is and why it has become an indispensable technology for modern software development.
What is Node.js?
Node.js is an open-source, cross-platform JavaScript runtime environment that allows developers to execute JavaScript code outside of a web browser. Built on Chrome’s V8 JavaScript engine, Node.js boasts exceptional performance and efficiency. Unlike traditional server-side platforms, Node.js uses an event-driven, non-blocking I/O model, which makes it incredibly lightweight and efficient, ideal for data-intensive real-time applications that run across distributed devices. This architecture enables Node.js to handle a large number of concurrent connections with minimal overhead, making it a popular choice for everything from web servers and APIs to microservices and command-line tools.
Why Node.js Matters for Developers
Node.js’s significance in the development world cannot be overstated. Its unified language approach, allowing developers to use JavaScript for both front-end (browser) and back-end (server) development, fosters full-stack JavaScript teams and streamlines workflows. Furthermore, Node.js comes bundled with npm (Node Package Manager), the largest ecosystem of open-source libraries in the world. This vast repository of modules significantly accelerates development by providing pre-built solutions for almost any task imaginable, from database connectivity and authentication to image processing and testing frameworks. For businesses and individual developers alike, Node.js translates to faster development cycles, improved productivity, and the ability to build high-performance, scalable applications that meet the demands of contemporary digital experiences.
Preparing Your Mac for Node.js Installation
Before proceeding with any installation method, a few preliminary steps can ensure a smooth and conflict-free setup on your macOS machine. These preparations are critical for maintaining a clean development environment and avoiding potential headaches down the line.
Essential Prerequisites
First and foremost, you’ll need a Mac running a relatively recent version of macOS. While Node.js generally supports older versions, opting for the latest stable release ensures compatibility with modern development tools and security updates. You’ll also need administrative access to your Mac to install software and make system-level changes. An active internet connection is also required to download installers, packages, and any dependencies.
For those planning to use Homebrew, a popular package manager for macOS, it’s highly recommended to have the Xcode Command Line Tools installed. These tools provide essential Unix-like commands and development utilities that Homebrew relies upon. You can install them by opening your Terminal application (found in Applications/Utilities) and running the command:
xcode-select --install
Follow the prompts to complete the installation. Even if you don’t plan to use Homebrew immediately, having these tools can prevent issues with other development software in the future.
Why a Clean Setup is Crucial
A clean and well-organized development environment is the cornerstone of productive coding. Before installing Node.js, it’s good practice to ensure there are no lingering files from previous, incomplete, or corrupted Node.js installations that might interfere with the new setup. While some installation methods handle this automatically, understanding the importance of a clean slate can help in troubleshooting should issues arise. Avoiding conflicts between different versions of Node.js or between Node.js and other system components ensures that your development tools behave predictably, allowing you to focus on writing code rather than fixing environment problems.
Methods for Installing Node.js on macOS
There are several effective ways to install Node.js on your Mac, each with its own advantages depending on your specific needs and development workflow. We will explore the three most common and recommended methods: using the official installer, leveraging Homebrew, and employing a Node Version Manager.
Method 1: Using the Official Node.js Installer (PKG)
This is often the simplest and most straightforward method, especially for beginners or those who only need one stable version of Node.js.
-
Download the Installer:
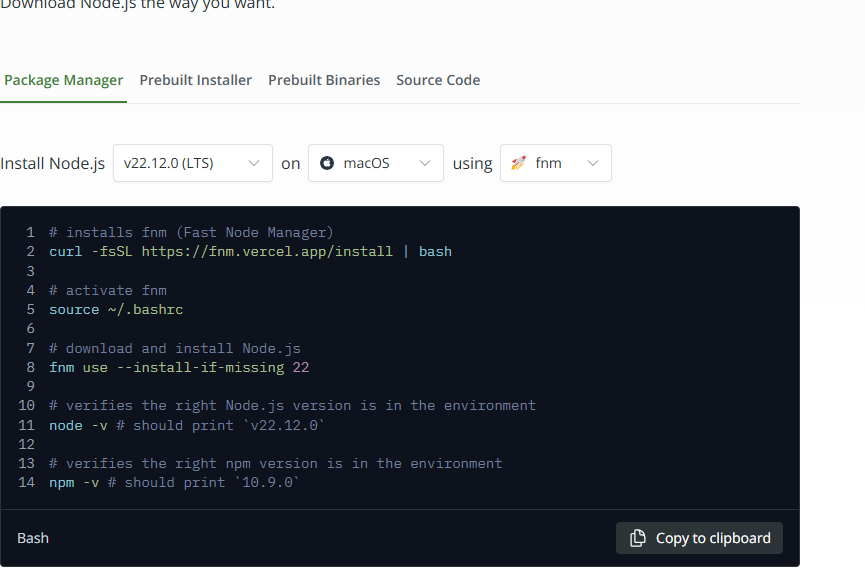
Open your web browser and navigate to the official Node.js website: https://nodejs.org/en/download/.
You will see two recommended versions: the “LTS” (Long Term Support) version and the “Current” version. For most users and production environments, the LTS version is highly recommended as it offers greater stability and ongoing support. Click on the macOS Installer (.pkg) button corresponding to the LTS version. The installer package will be downloaded to your Downloads folder. -
Run the Installer:
Once the download is complete, locate the.pkgfile (e.g.,node-vXX.XX.X.pkg) and double-click it. This will launch the Node.js installation wizard. -
Follow the Installation Wizard:
The wizard will guide you through the installation process.- Click “Continue” on the introduction screen.
- Review the license agreement and click “Continue,” then “Agree” to accept the terms.
- Choose the installation location. For most users, the default location is suitable. Click “Continue.”
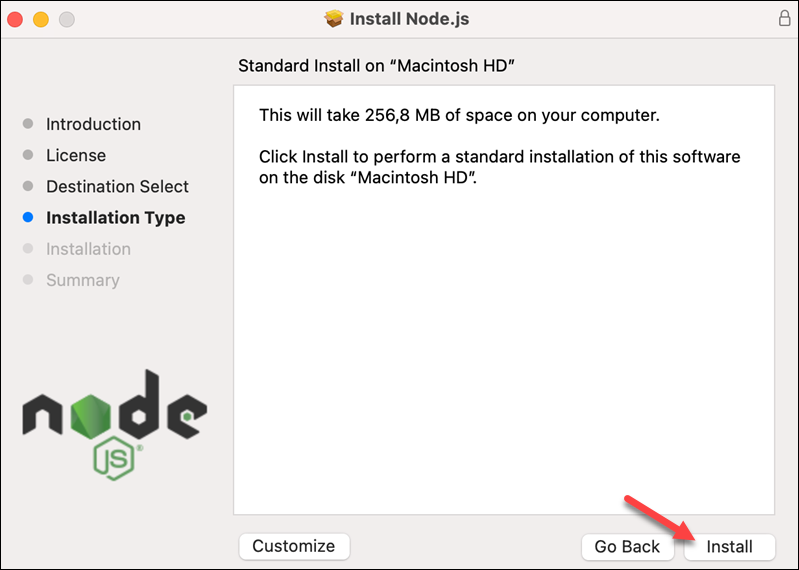
- Click “Install” to begin the installation. You may be prompted to enter your Mac’s password to authorize the installation.
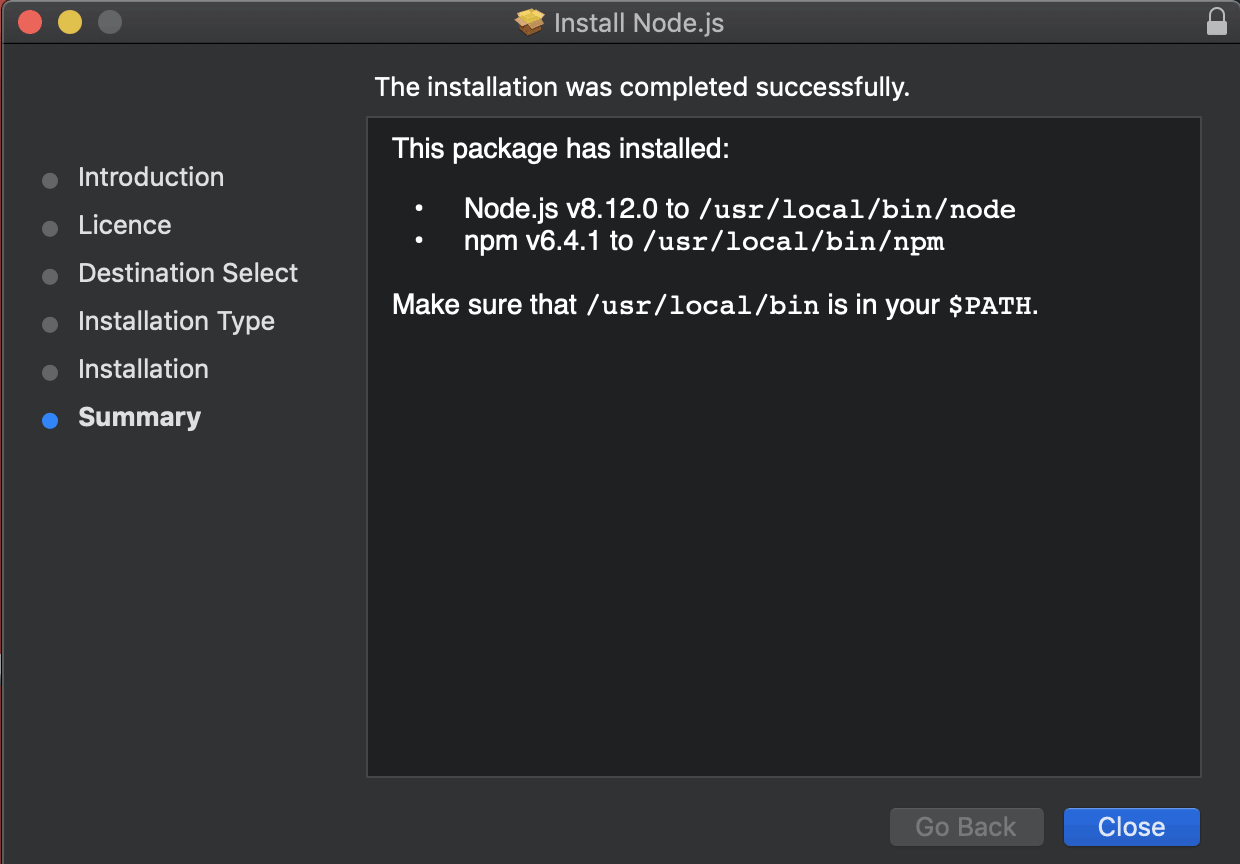
- Wait for the installation to complete. A success message will appear once finished. Click “Close.”
Pros: Extremely user-friendly, no command-line interaction required for installation, provides a stable single version.
Cons: Managing multiple Node.js versions for different projects can be cumbersome as subsequent installations will overwrite the existing one. Uninstalling requires manual removal of files, which can be tricky.
Method 2: Installing with Homebrew (Recommended for Developers)
Homebrew is a free and open-source package management system that simplifies the installation of software on macOS. It’s the preferred method for many developers due to its ease of use for managing various development tools, including Node.js.
-
Install Homebrew (if not already installed):
If you don’t have Homebrew on your Mac, open your Terminal application and paste the following command, then press Enter:/bin/bash -c "$(curl -fsSL https://raw.githubusercontent.com/Homebrew/install/HEAD/install.sh)"You may be prompted to enter your administrator password. Follow the on-screen instructions, which might include installing Xcode Command Line Tools if you haven’t already.
-
Install Node.js using Homebrew:
Once Homebrew is installed and configured, you can install Node.js with a single command:brew install nodeHomebrew will download and install the latest stable version of Node.js along with npm. It automatically handles dependencies and places the executables in your system’s PATH, making them accessible from any directory in your terminal.
Pros: Simple command-line installation, easy to update (brew upgrade node) and uninstall (brew uninstall node), excellent for managing other development packages, Homebrew handles PATH configuration automatically.
Cons: Requires an initial Homebrew setup, which might involve installing Xcode Command Line Tools.
Method 3: Utilizing Node Version Managers (NVM, Volta)
For developers who work on multiple projects that might require different versions of Node.js, a Node Version Manager (NVM) like nvm or Volta is an invaluable tool. NVM allows you to install multiple versions of Node.js and switch between them seamlessly. Volta is a newer, opinionated tool designed for speed and simplicity. We’ll focus on nvm as it’s more widely adopted.
-
Install nvm:
You can install nvm usingcurlorwget. Open your Terminal and run one of the following commands:Using
curl:curl -o- https://raw.githubusercontent.com/nvm-sh/nvm/v0.39.7/install.sh | bashUsing
wget:wget -qO- https://raw.githubusercontent.com/nvm-sh/nvm/v0.39.7/install.sh | bash(Note: Replace
v0.39.7with the latest version number found on the nvm GitHub repository if it has been updated).After running the command, close and reopen your terminal or run
source ~/.bash_profile(or~/.zshrcif you’re using Zsh) to load nvm into your shell.
-
Install Node.js versions with nvm:
Now you can install specific Node.js versions using nvm.- To install the latest LTS version:
bash

nvm install --lts
- To install the latest stable version:
bash

nvm install node
- To install a specific version (e.g., Node.js 18):
bash

nvm install 18
- To install the latest LTS version:
-
Switch between Node.js versions:
Once you have multiple versions installed, you can easily switch between them:nvm use 18 # To use Node.js version 18 nvm use --lts # To switch to the LTS version -
Set a default Node.js version:
To set a default Node.js version that automatically loads every time you open a new terminal:nvm alias default 18 # Sets Node.js 18 as default
Pros: Essential for managing multiple Node.js versions, flexible and powerful, allows project-specific Node.js versions without conflict.
Cons: Adds an extra layer of abstraction which can be slightly more complex for absolute beginners, requires command-line interaction for installation and management.
Verifying Your Node.js and npm Installation
Regardless of the method you chose, the most critical step after installation is to verify that Node.js and npm (Node Package Manager) have been successfully installed and are accessible from your terminal.
Checking Node.js Version
Open your Terminal application and type the following command:
node -v
Press Enter. If Node.js is installed correctly, you should see the version number printed in the terminal (e.g., v20.11.1). This confirms that the Node.js runtime is available in your system’s PATH.
Checking npm Version
npm is always installed alongside Node.js. To check its version, enter the following command in your Terminal:
npm -v
Press Enter. You should see the npm version number displayed (e.g., 10.2.4). This verifies that npm is also properly configured and ready to manage your project’s dependencies.
Running a Simple Node.js Application
To further confirm everything is working, let’s create and run a basic Node.js script.
-
Create a file: In your terminal, navigate to a directory where you want to create a test file (e.g., your Desktop or a
projectsfolder). Then create a new file namedhello.js:touch hello.js -
Add code to the file: Open
hello.jsusing a text editor (like VS Code, Sublime Text, or evennanofrom the terminal) and add the following line of JavaScript code:console.log("Hello, Node.js is working on Mac!");Save and close the file.
-
Run the script: In your Terminal, while in the same directory as
hello.js, execute the script using Node.js:node hello.jsIf everything is set up correctly, you should see the message
Hello, Node.js is working on Mac!printed in your terminal. This confirms that Node.js can execute JavaScript files, marking a successful installation.
Managing and Maintaining Your Node.js Environment
Once Node.js is installed, knowing how to keep it updated, switch between versions, or even uninstall it is crucial for a healthy development workflow.
Updating Node.js
Keeping Node.js updated is important for accessing new features, performance improvements, and security patches. The update process varies slightly depending on your initial installation method.
- Official Installer (PKG): To update Node.js installed via the official
.pkginstaller, simply download the latest.pkgfile from the Node.js website and run it again. The installer will typically replace your existing Node.js installation with the newer version. - Homebrew: Updating Node.js with Homebrew is straightforward:
bash

brew update       # Updates Homebrew itself and its package definitions

brew upgrade node # Upgrades Node.js to the latest stable version
- nvm: If you’re using nvm, you don’t “update” a version in place; rather, you install a new version and switch to it.
bash

nvm install node      # Installs the latest stable version

nvm use node          # Switches to the newly installed latest version

nvm alias default node # (Optional) Sets the latest version as default

nvm uninstall <old_version> # (Optional) Uninstall old versions to save space
Uninstalling Node.js
There might be occasions where you need to uninstall Node.js completely, perhaps to troubleshoot a stubborn issue or to switch to a different management approach.
- Official Installer (PKG): Uninstalling Node.js installed via the
.pkgfile is the most complex, as there isn’t a dedicated uninstaller. You would typically need to manually delete the Node.js binaries and associated files. This usually involves removing files from/usr/local/bin,/usr/local/lib,/usr/local/include, and/usr/local/share. A common script for manual uninstallation involves:
bash

sudo rm -rf /usr/local/{lib/node{,dules},bin,share/doc/node}

sudo rm -rf /usr/local/n/

sudo rm -rf ~/.npm

sudo rm -rf ~/.nvm # If nvm was installed and you want to remove it too
Be extremely careful when usingsudo rm -rfas incorrect usage can delete important system files. - Homebrew: This is the easiest method to uninstall:
bash

brew uninstall node
This command will cleanly remove Node.js and npm installed via Homebrew. - nvm: With nvm, you uninstall specific versions.
bash

nvm uninstall <version> # e.g., nvm uninstall 18
To uninstall nvm itself, you would remove the nvm directory (~/.nvm) and delete the nvm-related lines from your shell’s profile file (e.g.,~/.bash_profile,~/.zshrc).
Common Troubleshooting Tips
While the installation processes are generally smooth, issues can arise. Here are a few common troubleshooting tips:
node: command not foundornpm: command not found: This usually indicates aPATHissue. Ensure the directory where Node.js is installed is included in your shell’sPATHenvironment variable. If using nvm, make sure it’s correctly sourced in your~/.bash_profileor~/.zshrc. Restarting your terminal can often resolve this.- Permission Errors (
EACCES): If you encounter permission errors when trying to install global npm packages, avoid usingsudo npm install. Instead, fix npm’s permissions or use nvm which manages permissions automatically. Refer to npm’s official documentation for fixing permission issues. - Outdated npm: Sometimes npm itself might be outdated compared to your Node.js version. You can update npm separately:
bash

npm install -g npm@latest
(Note: If you use nvm, nvm manages npm versions with Node.js versions, so this might not be necessary).
Conclusion
Installing Node.js on your Mac is a foundational step for any developer looking to delve into the world of modern web and backend development. Whether you opt for the simplicity of the official installer, the developer-friendly package management of Homebrew, or the version control flexibility offered by nvm, each method empowers you to set up a robust development environment. By following the steps outlined in this guide, you can confidently install, verify, and manage your Node.js setup, paving the way for building innovative applications and leveraging the vast ecosystem of npm packages.
With Node.js and npm at your fingertips, you’re now equipped to explore a myriad of possibilities, from building RESTful APIs with Express.js to real-time applications with WebSockets, and even command-line tools that boost your productivity. The journey into Node.js development on your Mac promises to be a rewarding one, unlocking new avenues for creation and problem-solving in the fast-paced world of technology.
aViewFromTheCave is a participant in the Amazon Services LLC Associates Program, an affiliate advertising program designed to provide a means for sites to earn advertising fees by advertising and linking to Amazon.com. Amazon, the Amazon logo, AmazonSupply, and the AmazonSupply logo are trademarks of Amazon.com, Inc. or its affiliates. As an Amazon Associate we earn affiliate commissions from qualifying purchases.