Node.js has become an indispensable technology in the modern web development landscape, powering everything from sophisticated backend services and real-time applications to robust command-line tools and desktop applications. Its unique ability to execute JavaScript code outside of a web browser environment, coupled with its non-blocking, event-driven architecture, has solidified its position as a go-to choice for developers seeking high performance and scalability. For Mac users, getting Node.js up and running is a straightforward process, but choosing the right installation method can significantly impact your development workflow and future project management.
This in-depth guide is designed to walk you through every step of installing Node.js on your macOS system, covering multiple popular and effective methods. Whether you’re a seasoned developer looking for the most flexible setup or a newcomer eager to dive into JavaScript full-stack development, we’ll ensure you have the knowledge and tools to get started. Beyond just installation, we’ll delve into verifying your setup, running your first Node.js application, and best practices for managing your Node.js versions, ultimately empowering you to leverage this powerful technology effectively.
Why Node.js is a Cornerstone of Modern Tech Development
Before we dive into the mechanics of installation, it’s worth understanding why Node.js has garnered such widespread adoption and remains a critical component in the tech ecosystem. Its impact spans across various aspects of software development, driving innovation and efficiency.
What is Node.js?
At its core, Node.js is an open-source, cross-platform JavaScript runtime environment that executes JavaScript code server-side. Built on Chrome’s V8 JavaScript engine, it’s incredibly fast and efficient. Unlike traditional server-side languages, Node.js uses an event-driven, non-blocking I/O model, making it lightweight and highly efficient for data-intensive real-time applications that run across distributed devices. It essentially brings the familiarity and flexibility of JavaScript to the server, allowing developers to build full-stack applications with a single language.
Why Developers and Businesses Choose Node.js
The widespread adoption of Node.js isn’t accidental; it’s a direct result of the tangible benefits it offers to both individual developers and large enterprises:
- Unified Language for Full-Stack Development: One of Node.js’s most compelling advantages is its use of JavaScript on both the frontend and backend. This uniformity reduces cognitive load for developers, streamlines team collaboration, and often leads to faster development cycles. A developer proficient in JavaScript can contribute across the entire application stack.
- Exceptional Performance and Scalability: Leveraging the V8 engine and its asynchronous, non-blocking nature, Node.js excels in handling a large number of concurrent connections efficiently. This makes it ideal for real-time applications like chat services, streaming platforms, and APIs that require low latency and high throughput. Many tech giants, including Netflix, LinkedIn, and Uber, rely on Node.js for their scalable architectures.
- Vast Ecosystem with NPM: Node.js comes bundled with npm (Node Package Manager), the largest ecosystem of open-source libraries in the world. With millions of packages available, developers can quickly integrate functionalities without reinventing the wheel, significantly accelerating development and reducing costs. From database connectors to testing frameworks and utility libraries, npm provides a solution for nearly every development challenge.
- Cross-Platform Compatibility: Node.js runs seamlessly on various operating systems, including macOS, Windows, and Linux. This cross-platform support ensures that development environments can be consistent across teams, regardless of individual preferences, fostering smoother deployment and collaboration.
- Microservices Architecture: Node.js is a natural fit for building microservices due to its lightweight nature and efficiency. Its ability to create small, independent services that communicate with each other allows for greater modularity, easier maintenance, and improved fault isolation within complex systems.
- Strong Community Support: With a massive and active global community, developers can easily find resources, tutorials, and solutions to common problems. This robust support system ensures continuous improvement of the core runtime and its extensive package ecosystem.
For anyone looking to engage with modern web development, build scalable applications, or simply expand their technological skillset, understanding and utilizing Node.js is a crucial step.
Prerequisites and Essential Tools for Your Mac
Before you embark on the installation process, ensuring your macOS system is properly configured will save you potential headaches down the line. A few foundational elements are necessary for a smooth Node.js setup.
System Requirements
Node.js is compatible with various macOS versions. Generally, if your Mac is running a relatively recent version of macOS (e.g., macOS High Sierra or newer), you should have no issues. Ensure your operating system is up to date to benefit from the latest security patches and performance improvements. You can check your macOS version by clicking the Apple menu in the top-left corner of your screen and selecting “About This Mac.”
Understanding the Terminal
The primary way you’ll interact with Node.js and its installation tools on your Mac is through the command line interface (CLI), specifically the Terminal application. You can find Terminal in Applications/Utilities/Terminal.app or by searching for it using Spotlight (Cmd + Space). Familiarity with basic terminal commands (like cd for change directory, ls for list files, pwd for print working directory) will be beneficial, though we’ll provide specific commands to execute.
Xcode Command Line Tools
Many development tools on macOS, including Node.js dependencies for certain installation methods, rely on the Xcode Command Line Tools. These provide essential compilers, debuggers, and other utilities. If you don’t have them installed, you can do so easily by opening your Terminal and running:
xcode-select --install
A pop-up window will appear, prompting you to install the tools. Click “Install” and agree to the terms and conditions. The download and installation process may take a few minutes, depending on your internet connection. Once complete, you’ll be ready for the next steps.
Installation Methods: Choosing Your Path to Node.js
There are several effective ways to install Node.js on your Mac, each with its own advantages. The “best” method often depends on your specific needs, particularly concerning version management and existing toolchains. We’ll explore the most popular and recommended approaches.
Method 1: Using NVM (Node Version Manager) – The Recommended Approach
For most developers, especially those working on multiple projects that might require different Node.js versions, NVM (Node Version Manager) is the gold standard. NVM allows you to install and manage multiple Node.js versions on a single machine, easily switching between them as needed. This flexibility is invaluable for preventing dependency conflicts and ensuring project compatibility.
Installing NVM
-
Open Terminal: Launch your Terminal application.
-
Download and Run the NVM Installation Script: You can install NVM using
curlorwget. It’s recommended to fetch the latest installation script directly from the official NVM GitHub repository. Visit the NVM GitHub page to find the most current version number, then use the following command (replace0.39.7with the latest version if different):curl -o- https://raw.githubusercontent.com/nvm-sh/nvm/v0.39.7/install.sh | bashNote: The version number
v0.39.7is an example; always check the NVM GitHub repository for the latest stable version to use in the command.This script will clone the
nvmrepository to~/.nvmand add the necessary lines to your shell’s profile script (~/.bash_profile,~/.zshrc,~/.profile, or~/.bashrc). -
Verify NVM Installation: After the script finishes, you’ll need to close and reopen your Terminal or source your shell’s profile file (e.g.,
source ~/.zshrc) for the changes to take effect. Then, run:nvm --versionIf NVM is installed correctly, you’ll see its version number. If you get a “command not found” error, double-check that the installation script correctly modified your shell’s profile and that you’ve restarted your terminal.
Installing Node.js with NVM
Once NVM is installed, installing Node.js is simple:
-
Install the Latest Stable Version: To install the latest stable version of Node.js, run:
nvm install nodeThis command will install the latest LTS (Long Term Support) version and set it as the default.
-
Install a Specific Version: If you need a particular version (e.g., for an older project), you can specify it:
nvm install 18.17.1 # Installs Node.js version 18.17.1You can also install the latest LTS version by name:
nvm install --lts -
Use a Specific Version: To switch to a different installed version of Node.js:
nvm use 18.17.1 # Switches to version 18.17.1 -
Set a Default Version: To make a specific version the default whenever you open a new terminal:
nvm alias default 18.17.1
Managing Node.js Versions with NVM
NVM provides several useful commands for managing your Node.js installations:
nvm ls: Lists all installed Node.js versions.nvm current: Shows the currently active Node.js version.nvm uninstall <version>: Removes a specific Node.js version.nvm run <version> <script.js>: Runs a script with a specific Node.js version without changing the current default.
NVM’s flexibility makes it an indispensable tool for any serious Node.js developer on a Mac.
Method 2: Using Homebrew – The Mac Package Manager
Homebrew is an incredibly popular and powerful package manager for macOS, simplifying the installation of various software packages. If you already use Homebrew for other development tools, installing Node.js via Homebrew is a convenient and clean option.
Installing Homebrew (if you don’t have it)
-
Open Terminal: Launch your Terminal application.
-
Run Homebrew Installation Script:
/bin/bash -c "$(curl -fsSL https://raw.githubusercontent.com/Homebrew/install/HEAD/install.sh)"Follow the on-screen prompts, which may include entering your password. The script will install Homebrew, and you might be asked to run two commands to add Homebrew to your PATH. Make sure to execute those commands as instructed.
-
Verify Homebrew Installation:
brew doctorThis command checks for potential issues with your Homebrew setup. If it reports “Your system is ready to brew,” you’re good to go.
Installing Node.js with Homebrew
Once Homebrew is installed, installing Node.js is straightforward:
-
Install Node.js:
brew install nodeThis command will install the latest stable version of Node.js along with npm.
-
Update Node.js (later):
brew update
brew upgrade node
These commands first update Homebrew’s package list and then upgrade Node.js to its latest version.
Note: While Homebrew is excellent for installing a single, up-to-date version of Node.js, it’s not designed for managing multiple Node.js versions simultaneously. If you need robust version management, NVM (Method 1) is still the preferred choice. You can, however, use brew install nvm to install NVM via Homebrew, then proceed with the NVM steps.
Method 3: Official Node.js Installer – The Simplest Route
For users who only need a single version of Node.js and prefer a graphical user interface for installation, the official installer package from the Node.js website is the simplest option.
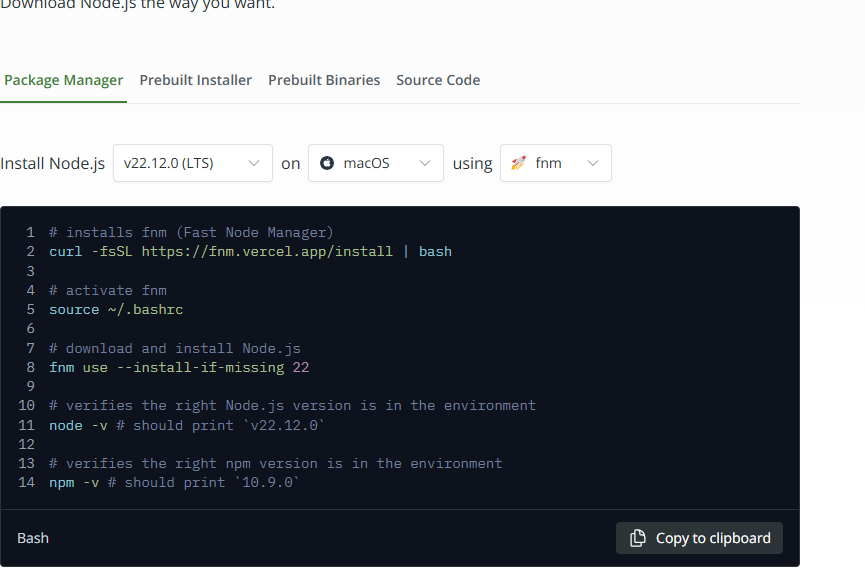
- Visit the Official Node.js Website: Open your web browser and go to nodejs.org.
- Download the macOS Installer: You’ll see two prominent download buttons: “LTS” (Long Term Support, recommended for most users) and “Current” (the latest features, potentially less stable). For most development, choose the “LTS” version. Click the macOS Installer button (usually marked “macOS Installer (.pkg)”).
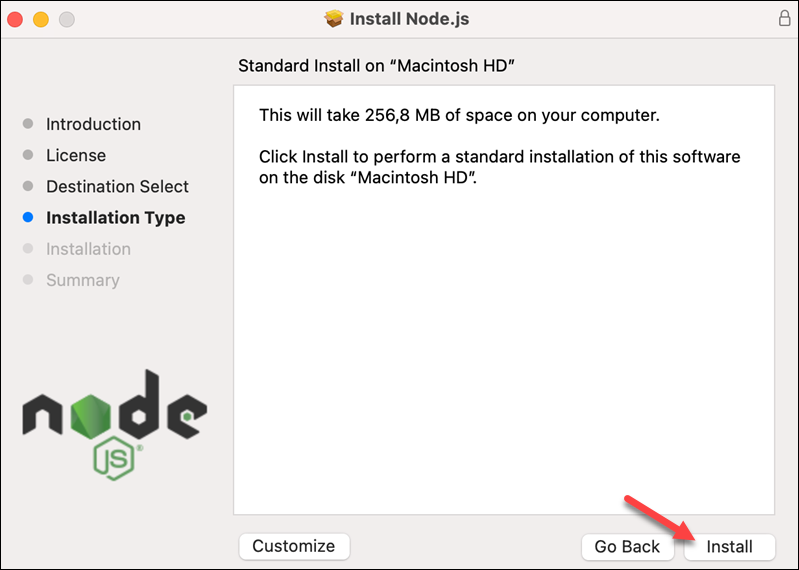
- Run the Installer: Once the
.pkgfile is downloaded, locate it in your Downloads folder and double-click to open it. - Follow On-Screen Instructions: The installer will guide you through the process, which involves agreeing to terms, choosing an installation location (usually the default), and entering your administrator password.
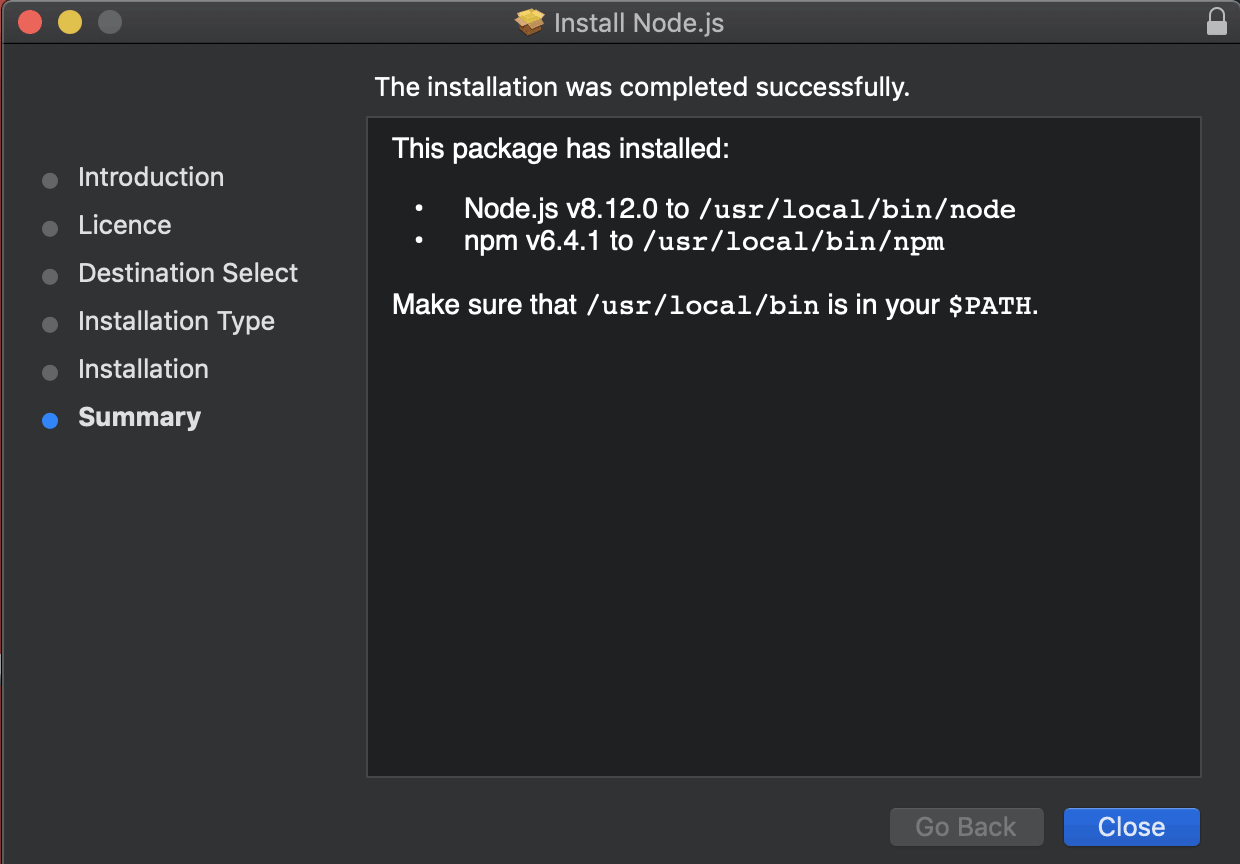
- Complete Installation: After a few clicks, Node.js and npm will be installed on your system.
Pros: Extremely easy and beginner-friendly.
Cons: Does not provide any version management capabilities. Switching to a different Node.js version requires uninstalling the current one and installing another.
Verifying Your Installation and Taking Your First Steps
Regardless of the method you chose, the final and most crucial step is to verify that Node.js and npm are correctly installed and accessible from your Terminal. Then, we’ll run a simple “Hello World” application to confirm everything is working.
Confirming Node.js and npm Installation
-
Open Terminal: If you closed it, open a new Terminal window.
-
Check Node.js Version: Type the following command and press Enter:
node -vYou should see the installed Node.js version number (e.g.,
v18.17.1). -
Check npm Version: Node.js comes bundled with npm. Verify its installation with:
npm -vYou should see the installed npm version number (e.g.,
9.6.7).
If both commands return version numbers without errors, congratulations! Node.js and npm are successfully installed on your Mac.
Your First Node.js Project: “Hello World”
Let’s create a minimal Node.js application to ensure the environment is fully operational.
-
Create a New Directory: In your Terminal, create a new folder for your project:
mkdir my-first-node-app cd my-first-node-app -
Create an Application File: Use a text editor (like
nano, VS Code, Sublime Text, or eventouchand then open in Finder) to create a file namedapp.jsinside yourmy-first-node-appdirectory.If using
nano:nano app.jsPaste the following code into the file:
console.log("Hello from Node.js on Mac!");Save and exit
nano(Ctrl+X, then Y for Yes, Enter). -
Run Your Node.js Application: In your Terminal, while still in the
my-first-node-appdirectory, execute your script:node app.jsYou should see the output:
Hello from Node.js on Mac!
This simple exercise confirms that your Node.js runtime is correctly set up and can execute JavaScript files. You’ve successfully taken your first step into Node.js development!
Maintenance, Troubleshooting, and Conclusion
Installing Node.js is just the beginning. Understanding how to maintain your installation, troubleshoot common issues, and manage different versions will be crucial as your development journey progresses.
Updating Node.js
Keeping your Node.js installation up-to-date is important for security, performance, and access to the latest features. The update process depends on your initial installation method:
- If you used NVM:
bash

nvm install node # Installs the latest LTS and sets it as default

nvm alias default node # Ensures new terminals use the new LTS

nvm uninstall <old_version> # Optionally remove older versions you no longer need
- If you used Homebrew:
bash

brew update

brew upgrade node
- If you used the Official Installer: You’ll need to download the latest
.pkginstaller from nodejs.org and run it again. It will typically overwrite or update your existing installation.
Uninstalling Node.js
Should you ever need to remove Node.js from your system, the method again depends on how it was installed:
- If you used NVM:
bash

nvm deactivate # Deactivates the currently active version (if any)

nvm uninstall <version> # For example, nvm uninstall 18.17.1
To completely remove NVM and all Node.js versions: delete the~/.nvmdirectory and remove the NVM-related lines from your shell’s profile file (~/.bash_profile,~/.zshrc, etc.). - If you used Homebrew:
bash

brew uninstall node
- If you used the Official Installer: This is the trickiest to completely remove. You typically need to manually delete files. Common locations include:
/usr/local/bin/node/usr/local/bin/npm/usr/local/include/node//usr/local/lib/node_modules//usr/local/share/doc/node//usr/local/share/man/man1/node.1/usr/local/share/man/man1/npm.1- Any other related files or directories installed by the package.
Be cautious when deleting files from/usr/localand usesudo rm -rfcommands judiciously.
Common Installation Issues & Solutions
While the installation process is generally smooth, you might encounter a few common hiccups:
command not found: nvmorcommand not found: node:- Solution: This usually means your shell’s PATH isn’t correctly configured or NVM hasn’t been sourced.
- If using NVM: Ensure the NVM initialization lines are in your
~/.zshrc(for zsh, default in modern macOS) or~/.bash_profileand that you’ve restarted your Terminal or runsource ~/.zshrc. - For Homebrew/Official Installer: Ensure
/usr/local/binis in your PATH. Homebrew usually handles this automatically.
- If using NVM: Ensure the NVM initialization lines are in your
- Solution: This usually means your shell’s PATH isn’t correctly configured or NVM hasn’t been sourced.
- Permissions Errors (e.g.,
EACCESwhen installing global npm packages):- Problem: This often happens when npm tries to install packages globally into directories that your user doesn’t have write access to (e.g.,
/usr/local/lib/node_modules). - Solution:
- Recommended: If you’re using NVM, this issue is rarely a problem as NVM installs Node.js and npm into your home directory.
- Alternative (if not using NVM): Configure npm to install global packages in your home directory.
bash

mkdir ~/.npm-global

npm config set prefix '~/.npm-global'
Then, add~/.npm-global/binto your PATH in your shell’s profile file (e.g.,export PATH="$HOME/.npm-global/bin:$PATH"). - Discouraged: Using
sudo npm install -g <package>. This can lead to deeper permission issues and is generally not recommended as a regular practice for global package installation.
- Problem: This often happens when npm tries to install packages globally into directories that your user doesn’t have write access to (e.g.,
- Xcode Command Line Tools issues:
- Problem: Errors during installation or when compiling native Node.js modules might indicate missing or corrupted Xcode Command Line Tools.
- Solution: Re-run
xcode-select --installand ensure it completes successfully.
Conclusion: Empowering Your Development Journey
Installing Node.js on your Mac is a foundational step into a world of powerful server-side JavaScript development. By following this comprehensive guide, you’ve not only successfully set up your environment but also gained an understanding of the different installation methodologies and their implications. Whether you chose the flexibility of NVM, the convenience of Homebrew, or the simplicity of the official installer, you now have a robust platform to build dynamic web applications, real-time services, and innovative tools.
Node.js, with its vibrant ecosystem and unparalleled performance characteristics, is a cornerstone of modern technology trends. From leveraging AI tools through JavaScript libraries to building scalable applications that manage personal finances or power brand strategies, Node.js offers a versatile and efficient solution. As you delve deeper into Node.js, remember to keep your installations updated, experiment with different versions using NVM for diverse project needs, and continuously explore the vast array of npm packages that can accelerate your development. Your journey into creating impactful and cutting-edge software on your Mac has just begun.
aViewFromTheCave is a participant in the Amazon Services LLC Associates Program, an affiliate advertising program designed to provide a means for sites to earn advertising fees by advertising and linking to Amazon.com. Amazon, the Amazon logo, AmazonSupply, and the AmazonSupply logo are trademarks of Amazon.com, Inc. or its affiliates. As an Amazon Associate we earn affiliate commissions from qualifying purchases.