In the rapidly evolving landscape of computational biology and bioinformatics, efficient and reproducible workflows are paramount. The ability to seamlessly install and manage complex software dependencies can be a significant bottleneck, hindering progress and leading to frustrating “it works on my machine” scenarios. Fortunately, tools like Nextflow, coupled with package managers like Conda, offer a robust solution. This article will guide you through the process of installing Nextflow using Conda, unlocking a powerful and streamlined approach to building and executing bioinformatics pipelines.
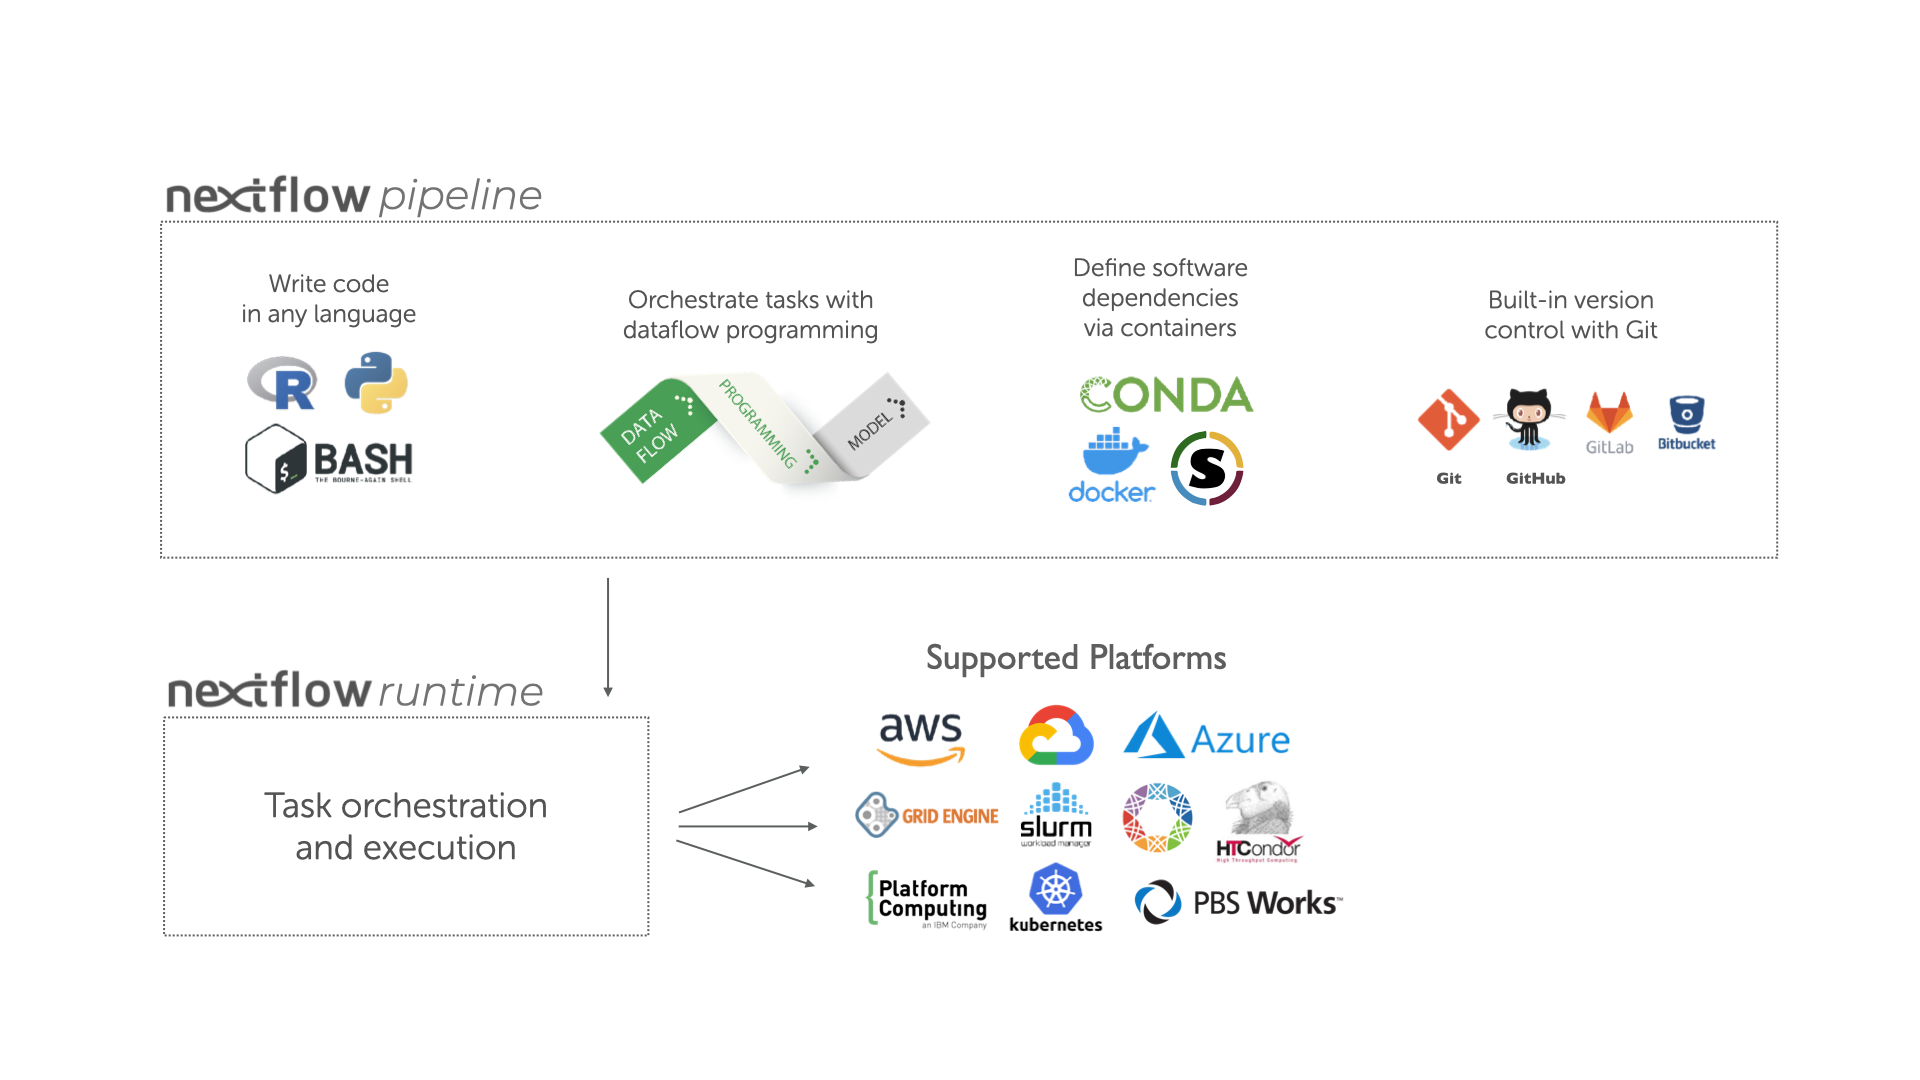
Nextflow has emerged as a de facto standard for developing data-intensive research pipelines. Its Groovy-based DSL (Domain Specific Language) allows for concise and flexible pipeline definitions, while its execution engine intelligently manages parallelization, distribution, and resource allocation across various computing environments. Conda, on the other hand, is a cross-platform, language-agnostic package manager and environment management system. It excels at simplifying the installation of software and its dependencies, creating isolated environments that prevent conflicts between different project requirements. Combining these two powerful tools creates a potent synergy, enabling researchers to focus on their scientific questions rather than wrestling with software installations.
This guide is designed for individuals involved in computational biology, genomics, transcriptomics, and other data-driven life science disciplines who are looking to enhance their workflow efficiency and reproducibility. Whether you are a seasoned bioinformatician or just starting your journey in data analysis, understanding how to leverage Nextflow and Conda will be an invaluable asset. We will cover the fundamental concepts, the step-by-step installation process, and best practices for managing your Nextflow environment using Conda.
Understanding the Synergy: Nextflow and Conda
Before diving into the installation steps, it’s crucial to grasp why this combination is so effective. Nextflow, at its core, is a scripting language and an execution engine. While you can install Nextflow itself via various methods (e.g., downloading a binary, building from source), Conda offers a particularly elegant solution for managing its installation and, more importantly, the dependencies required by the bioinformatics tools your Nextflow pipelines will utilize.
Conda’s strength lies in its ability to create isolated environments. Imagine you have two different bioinformatics projects. Project A might require a specific version of Python 2.7 and an older version of a tool like Samtools, while Project B needs Python 3.9 and the latest version of BWA. Without proper environment management, attempting to install both sets of tools on the same system would inevitably lead to conflicts. Conda solves this by allowing you to create distinct environments for each project. You can install Project A’s dependencies in “environmentA” and Project B’s in “environmentB.” When you activate “environmentA,” only its specific software versions are available. Activate “environmentB,” and you get its distinct set of tools.
This is where Nextflow integrates beautifully. Nextflow pipelines often rely on a plethora of bioinformatics tools (e.g., BWA, Samtools, FastQC, GATK, STAR). Instead of manually installing each of these tools and their versions, you can define them as dependencies within your Nextflow configuration. When you run your pipeline using Conda as the execution environment manager, Nextflow can automatically fetch and install these tools into a dedicated Conda environment for that specific pipeline run. This ensures that your pipeline will always execute with the exact versions of software it was designed for, guaranteeing reproducibility and eliminating the common frustration of incompatible tool versions.
This approach has significant implications for research:
- Reproducibility: Your pipeline will run identically across different machines or at different times because all software dependencies are managed within controlled Conda environments.
- Collaboration: Sharing pipelines becomes significantly easier. Colleagues can clone your repository and run the pipeline with confidence, knowing that Conda will handle the setup.
- Efficiency: No more manual hunting for specific software versions or resolving complex dependency chains. Conda and Nextflow automate much of this grunt work.
- Resource Management: Conda environments can be tailored for specific pipelines, preventing unnecessary software from consuming disk space or memory on your system.
Installing Nextflow with Conda: A Step-by-Step Guide
The installation process is straightforward and leverages the power of the Conda package manager. We will assume you have already installed Miniconda or Anaconda on your system. If not, you can download them from the official Anaconda website.
Step 1: Create a Dedicated Conda Environment for Nextflow
It’s a best practice to create a separate Conda environment specifically for Nextflow and its core dependencies. This helps keep your system organized and prevents potential conflicts with other Python packages or software you might have installed globally.
Open your terminal or command prompt and execute the following command:
conda create -n nextflow_env nextflow
Let’s break down this command:
conda create: This is the command to create a new Conda environment.-n nextflow_env: This flag specifies the name of the environment you are creating. We’ve chosennextflow_envas a descriptive name, but you can choose any name you prefer.nextflow: This tells Conda to install thenextflowpackage into the newly created environment. Conda’s default channels usually have Nextflow readily available.
Conda will then resolve the dependencies for Nextflow and prompt you to proceed with the installation. Type y and press Enter to confirm.
Step 2: Activate the Nextflow Environment
Once the environment is created, you need to activate it to start using Nextflow. Activating an environment makes its installed packages and executables available in your current shell session.
To activate the nextflow_env environment, use the following command:
conda activate nextflow_env
You will notice that your terminal prompt changes to indicate that you are now operating within the nextflow_env environment. It will typically prepend the environment name in parentheses, like (nextflow_env) your_username@your_machine:~/$.
Step 3: Verify the Nextflow Installation
With the environment activated, it’s a good idea to verify that Nextflow has been installed correctly and is accessible. You can do this by checking the version of Nextflow.
Run the following command:
nextflow -v
This command should output the installed version of Nextflow. If you see a version number, congratulations! Nextflow is successfully installed and ready to be used within this Conda environment.
Step 4: Installing Bioinformatics Tools with Conda (within your Nextflow pipeline)
This is where the true power of combining Nextflow and Conda shines. Instead of manually installing every bioinformatics tool your pipeline needs, you can declare them as dependencies within your Nextflow script. Nextflow, when configured to use Conda, will automatically handle their installation into the pipeline’s dedicated Conda environment.
To enable this, you typically specify Conda as a plugin or executor in your Nextflow configuration. A common way to do this is by creating a nextflow.config file in your pipeline’s root directory.
Here’s a simplified example of how you might configure Nextflow to use Conda for dependency management. Let’s assume you have a pipeline that needs fastqc and samtools.
Create a file named nextflow.config in the root of your Nextflow project and add the following content:
// nextflow.config
process {
    executor = 'local' // Or your chosen executor (e.g., 'remote', 'pbs', 'slurm')

    conda {
        enabled = true
        // Optional: specify a base conda environment for shared dependencies
        // environmentFile = 'environment.yml'
    }

    // Define tools required by processes
    withName: * {
        // This process-wide configuration will apply to all processes
        // unless overridden by specific process configurations.
        conda = [
            'bioconda::fastqc', // Example: Installing FastQC from bioconda channel
            'bioconda::samtools'  // Example: Installing Samtools from bioconda channel
        ]
    }
}

// Example of a process that might use these tools
// Although not directly related to installation, this shows how tools are referenced
/*
process.named.qc {
    input:
        val fastq_file
    output:
        stdout 'qc_report.txt'
    script:
    """
    fastqc ${fastq_file} -o .
    samtools flagstat ${fastq_file.baseName}.trimmed.bam > qc_report.txt
    """
}
*/
When you run your Nextflow pipeline (e.g., nextflow run your_pipeline_script.nf), and if the specified tools are not found in the current Conda environment, Nextflow will:

- Attempt to find a suitable Conda environment. If it’s the first time running this pipeline with Conda enabled, it might create a new, temporary environment for the run, or it might create a persistent environment if configured to do so.
- Download and install the specified tools (
bioconda::fastqc,bioconda::samtoolsin this example) into that environment using Conda. Thebioconda::prefix specifies that the tool should be looked for in thebiocondachannel, which is a primary source for bioinformatics software on Conda. - Execute your pipeline processes within that isolated Conda environment, ensuring that the correct versions of the tools are available.
You can also specify Conda dependencies directly within individual process definitions in your main.nf script, offering more granular control.
For instance, in your main.nf file:
// main.nf
workflow {
    // ...
    qc_process(reads)
    // ...
}

process qc_process {
    input:
        val read_file
    output:
        stdout 'qc_report.txt'
    script:
    """
    fastqc ${read_file}
    """
    conda:
        // Tool dependencies specific to this process
        enabled: true
        // You can also specify channels here if not globally configured
        // channels: ['bioconda', 'conda-forge']
        dependencies: [
            'bioconda::fastqc=0.11.9', // Specifying a specific version
            'bioconda::samtools'
        ]
}
In this scenario, when the qc_process is executed, Nextflow will ensure that fastqc (version 0.11.9) and samtools are installed in the Conda environment for that process.
Managing Conda Environments for Nextflow Pipelines
As you work on multiple projects, you might accumulate various Conda environments. It’s good practice to manage these environments efficiently.
Listing Your Conda Environments
To see all the Conda environments you have created, use:
conda env list
or
conda info --envs
This will display a list of all environments, with the currently active one marked by an asterisk (*).
Removing Unused Conda Environments
If you no longer need a specific Nextflow pipeline’s Conda environment (or the main nextflow_env you created initially), you can remove it to free up disk space:
conda env remove -n your_environment_name
For example, to remove the nextflow_env we created:
conda env remove -n nextflow_env
Conda Channels for Bioinformatics Software
The bioconda channel is a treasure trove for bioinformatics tools. It’s highly recommended to add it to your Conda configuration if you haven’t already. You can add it globally:
conda config --add channels bioconda
conda config --add channels conda-forge
This ensures that Conda can find packages from these essential channels when you specify them. conda-forge is another widely used channel that hosts a vast array of scientific packages.
Advanced Tips and Best Practices
While the basic installation is straightforward, adopting a few best practices will enhance your experience with Nextflow and Conda.
Version Pinning for Reproducibility
As demonstrated in the nextflow.config example, pinning specific versions of your bioinformatics tools (e.g., bioconda::fastqc=0.11.9) is crucial for ensuring the absolute reproducibility of your pipelines. Software versions can change, and a pipeline that worked with version X might behave differently or fail with version Y. By pinning versions, you lock down your dependencies.
Using environment.yml Files
For larger or more complex pipelines, managing dependencies directly in the nextflow.config can become cumbersome. A more organized approach is to use a Conda environment file (e.g., environment.yml). This file lists all your dependencies and can be version controlled alongside your pipeline code.
Your environment.yml might look like this:
# environment.yml
name: my_pipeline_env
channels:
  - bioconda
  - conda-forge
  - defaults
dependencies:
  - nextflow             # Install Nextflow itself into this environment
  - fastqc=0.11.9
  - samtools=1.15
  - python=3.9
  - pip
  - pip:
    - pandas             # Example: Installing a Python package via pip
Then, in your nextflow.config:
// nextflow.config
process {
    conda {
        enabled = true
        environmentFile = 'environment.yml' // Point to your environment file
    }
}
When Nextflow encounters this, it will look for or create a Conda environment based on environment.yml. This keeps your dependencies clearly defined in a single, readable file.
Understanding Nextflow’s Conda Executor Options
Nextflow offers flexibility in how it interacts with Conda. You can control whether Nextflow creates temporary environments for each run or persistent environments. You can also specify which Conda executable to use if you have multiple Conda installations. Refer to the official Nextflow documentation for detailed configuration options related to the Conda executor.
Troubleshooting Common Issues
- “Conda command not found”: Ensure that Conda is correctly installed and that its
bindirectory is in your system’s PATH. If you’re using Conda within a virtual environment manager likepyenv, ensure you’ve activated the correct Python environment that includes Conda. - Dependency Conflicts: While Conda is excellent at resolving dependencies, extremely complex or conflicting requirements can still arise. Carefully review the error messages from Conda. Sometimes, adjusting versions or specifying alternative channels can help.
- Slow Installations: Conda downloads packages, which can take time, especially for large bioinformatics tools. Ensure you have a stable internet connection. Using channels like
conda-forgeandbiocondaoften provides faster downloads due to their distributed nature.
Conclusion
Installing Nextflow with Conda is a cornerstone for building robust, reproducible, and efficient bioinformatics workflows. By leveraging Conda’s environment management capabilities, you can eliminate dependency headaches, facilitate collaboration, and focus more on the scientific insights derived from your data. This guide has provided a comprehensive walkthrough from basic installation to advanced best practices. As you delve deeper into Nextflow pipeline development, remember to utilize Conda to its full potential, ensuring your computational biology research is built on a solid and reproducible foundation. Embracing this powerful combination will undoubtedly accelerate your research and streamline your daily bioinformatics tasks.
aViewFromTheCave is a participant in the Amazon Services LLC Associates Program, an affiliate advertising program designed to provide a means for sites to earn advertising fees by advertising and linking to Amazon.com. Amazon, the Amazon logo, AmazonSupply, and the AmazonSupply logo are trademarks of Amazon.com, Inc. or its affiliates. As an Amazon Associate we earn affiliate commissions from qualifying purchases.