In an increasingly digital world, managing our online subscriptions and digital services has become a fundamental aspect of maintaining personal control and optimizing our user experience. Amazon Prime, with its vast ecosystem of benefits ranging from expedited shipping to extensive streaming libraries, represents a significant commitment for many consumers. However, circumstances change, needs evolve, and the decision to cancel a subscription, even one as pervasive as Prime, is a common reality. This comprehensive guide provides a detailed, step-by-step tutorial on how to navigate Amazon’s interface to cancel your Prime membership, ensuring a smooth and informed process. We’ll delve into the technical pathways, clarify the implications for your digital access, and equip you with the knowledge to manage this transition effectively, whether you’re using a desktop browser or a mobile device.

Navigating the Cancellation Process: Desktop and Web
Canceling your Amazon Prime membership through a web browser offers a comprehensive view of your account settings and is often the preferred method for users who appreciate a larger interface and detailed information. Amazon’s platform, while designed for user convenience, also presents various prompts aimed at retaining members, making it crucial to understand the exact steps required to finalize your cancellation. This section guides you through the entire process on a desktop or laptop, focusing on the interface elements and decision points.
Step-by-Step Guide for Browser Users
Initiating the cancellation process on your computer is straightforward, provided you know where to look. Follow these steps meticulously to ensure a successful outcome:
- Access Your Amazon Account: Begin by opening your preferred web browser and navigating to the Amazon.com homepage. Ensure you are logged into the Amazon account associated with the Prime membership you wish to cancel. If you’re not logged in, you’ll be prompted to enter your credentials.
- Navigate to ‘Accounts & Lists’: Once logged in, locate the “Accounts & Lists” dropdown menu in the top right corner of the Amazon homepage. Hover over or click this option to reveal a menu of various account-related links.
- Select ‘Prime Membership’: From the “Accounts & Lists” dropdown, click on “Prime Membership.” This will take you to your dedicated Prime membership management page, which provides an overview of your benefits, billing information, and renewal date.
- Manage Membership Details: On the Prime membership page, look for the “Manage Membership” section. This is usually located on the right-hand side of the page or directly beneath your membership details. Click on the “Update, Cancel, and More” or similar link within this section.
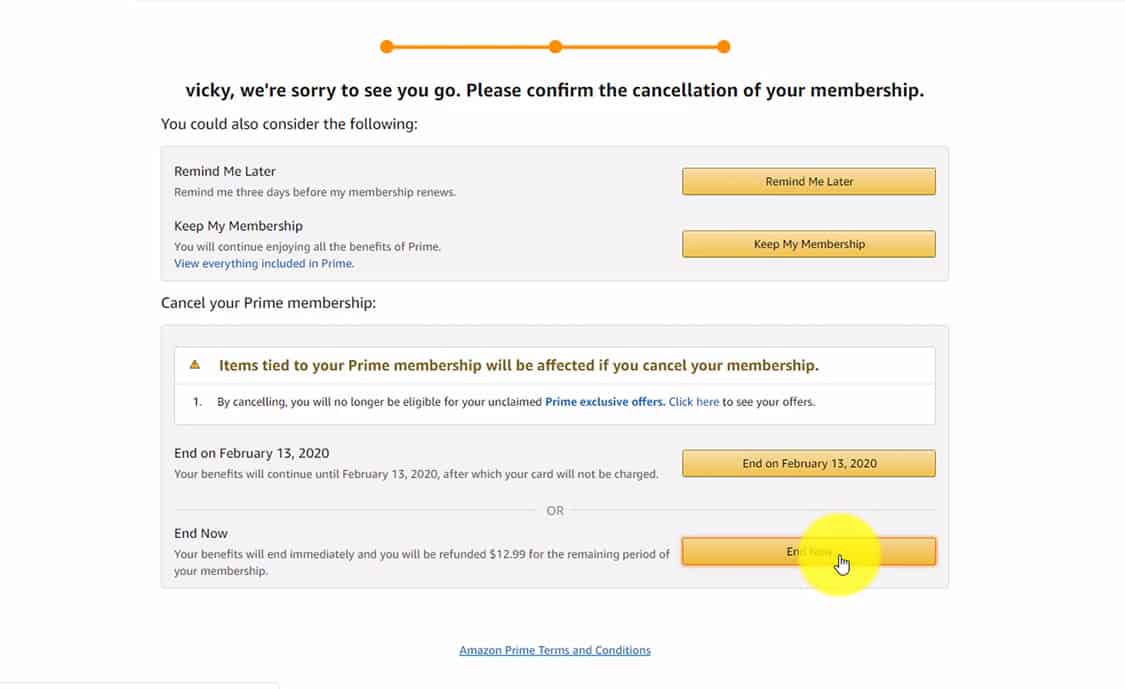
- Choose ‘End Membership and Benefits’: You will then be presented with options related to your membership. Look for a button or link that explicitly states “End Membership and Benefits” or “End Membership.” Be aware that Amazon may display several screens offering alternatives or highlighting the benefits you might lose. You’ll need to persist through these to reach the final cancellation prompt.
- Confirm Your Decision: Amazon will typically present one or more confirmation screens. These screens might reiterate the value of Prime, offer a partial refund for unused time (if applicable), or suggest alternative options like pausing your membership. Carefully read the information provided and select the option that confirms your intent to “End My Benefits” or “Continue to Cancel.” The final confirmation will usually indicate your Prime membership will conclude at the end of your current billing cycle, or offer an immediate cancellation with a potential refund if you haven’t used many Prime benefits.
- Receive Confirmation: Upon successful cancellation, Amazon will send a confirmation email to the email address associated with your account. It’s advisable to retain this email for your records. Your Prime membership page should also reflect the upcoming cancellation or its immediate termination.
Understanding the User Interface and Prompts
Amazon’s user interface is designed with a clear objective: to make it easy for users to sign up and enjoy services, but also to subtly guide them through decisions. When canceling Prime, you’ll encounter a series of prompts that, while legitimate, serve to remind you of Prime’s value and potentially deter cancellation. These often include:
- Benefit Reminders: Screens detailing the number of Prime Video titles watched, free shipping orders received, or Prime Music streamed. This is Amazon’s way of showcasing the tangible value you’ve derived.
- Alternative Offers: You might be offered a reduced rate for future months, an option to downgrade to a different tier (if available in your region), or a reminder of the upcoming renewal date.
- “Keep My Benefits” Buttons: Often, a prominent “Keep My Benefits” or “Don’t End My Benefits” button will be present alongside a less conspicuous “End My Benefits” or “Continue to Cancel” option. It’s important to differentiate and select the correct path to proceed with cancellation.
Understanding these UI elements helps you navigate them efficiently, ensuring you click the right options without accidentally retaining your membership or signing up for something you didn’t intend. The key is to consistently look for the specific language indicating “cancel” or “end benefits” and to carefully read each screen before proceeding.
Canceling via the Amazon Mobile App: A Portable Approach
For many users, managing digital subscriptions on the go is a necessity. The Amazon mobile app provides a convenient, portable interface for accessing account settings, including the Prime membership cancellation feature. While the core process mirrors the desktop version, the app’s streamlined layout and specific navigation paths warrant a dedicated walkthrough. This section details how to cancel Prime using the Amazon shopping app on both iOS and Android devices, highlighting any crucial differences in the mobile user experience.
Instructions for iOS and Android Devices
The Amazon app maintains a consistent look and feel across major mobile operating systems, making the cancellation process largely similar for both iOS and Android users.
- Open the Amazon App: Launch the Amazon Shopping app on your smartphone or tablet. Ensure you are logged into the correct Amazon account.
- Access the Main Menu: Tap the “hamburger” menu icon (three horizontal lines) typically located in the bottom right corner (for iOS) or top left corner (for Android) of the app screen. This will open the main navigation drawer.
- Navigate to ‘Account’: In the main menu, scroll down and tap on “Account.” This will expand a list of account-related options.
- Select ‘Manage Prime Membership’: Under the “Account Settings” section, tap on “Manage Prime Membership.” This will direct you to a mobile-optimized view of your Prime membership details.
- Find ‘Manage Membership’ or ‘End Membership’: On the Prime membership screen, you’ll see your membership details. Look for an option that says “Manage Membership” or “Update, Cancel, and More.” Tap on this.
- Proceed with Cancellation: Similar to the desktop experience, you’ll likely encounter screens prompting you to consider the benefits you’ll lose or offering alternatives. Persist by tapping “End Membership and Benefits” or “Continue to Cancel.” Amazon may present a series of confirmation steps, including an offer to keep Prime.
- Final Confirmation: Once you’ve navigated through these prompts, tap the final “End My Benefits” or “Cancel Prime” button. The app will confirm your cancellation, typically stating when your benefits will cease.
- Email Confirmation: As with the desktop process, an email confirming your cancellation will be sent to your registered email address. This serves as your official record of the transaction.
Syncing Changes Across Devices
One of the fundamental aspects of cloud-based digital services like Amazon Prime is the seamless synchronization of account information across all platforms. When you cancel your Prime membership using the mobile app, these changes are immediately reflected across all other devices where you access Amazon, including your desktop browser, Fire TV devices, Kindle e-readers, and any other connected Amazon services.
This means:
- Universal Impact: A cancellation performed on your phone instantly updates your account status everywhere. You don’t need to cancel separately on your laptop.
- Real-time Status: If you cancel via the app, logging into Amazon.com on your computer will show the updated membership status (e.g., “Prime membership ending on [date]”).
- Consistent Experience: This ensures a consistent user experience and prevents confusion about your membership status, regardless of the device you prefer to use for account management.
This robust synchronization is a testament to the underlying technology of Amazon’s platform, ensuring that your command to end a service is executed and reflected universally, providing clarity and control over your digital subscriptions.
Post-Cancellation Considerations and Digital Rights Management
Canceling your Amazon Prime membership isn’t just about clicking a button; it involves understanding the technical implications for your access to various digital services and potential financial adjustments. Once the cancellation process is initiated, a series of changes come into effect regarding your digital rights and access to Prime-exclusive content and features. This section clarifies what happens after you cancel, focusing on the cessation of digital benefits, refund policies, and how to verify your membership status.
What Happens to Your Digital Benefits?
Upon cancellation, your access to the suite of Amazon Prime benefits does not typically cease immediately. Instead, it usually continues until the end of your current billing cycle (monthly or annual). This is a common practice for subscription services, ensuring you receive the full value for the period you’ve paid for. Once that period concludes, the following changes generally occur:
- Shipping Benefits: You will lose access to free two-day shipping, same-day delivery, and other expedited shipping options. Your orders will revert to standard Amazon shipping policies.
- Prime Video: Access to Prime Video’s library of movies and TV shows, including Amazon Originals, will be revoked. Any content you purchased or rented remains accessible, as those are separate transactions.
- Prime Music: Your access to Prime Music’s ad-free streaming and extensive catalog will end.
- Prime Reading/First Reads: You will no longer be able to borrow books from Prime Reading or get early access to new books through First Reads. Any borrowed books will become inaccessible.
- Amazon Photos: While you might retain unlimited full-resolution photo storage (this can sometimes be a separate benefit or change), the Prime-exclusive photo benefits (like RAW file storage or enhanced photo editing features) might cease. It’s crucial to back up any critical photos if this benefit is a concern.
- Twitch Prime/Prime Gaming: Your Twitch Prime benefits, including free games, in-game content, and a free channel subscription, will be discontinued.
- Whole Foods Market Discounts: Any exclusive Prime member discounts at Whole Foods Market will no longer apply.
It’s important to remember that digital content purchased (e.g., movies bought on Prime Video, MP3s on Amazon Music) remains yours, as these are individual ownership transactions, separate from the subscription access.
Understanding Refund Policies and Prorated Access
Amazon’s refund policy for Prime memberships is generally fair, particularly if you’ve recently renewed or haven’t extensively used the benefits.
- Annual Memberships: If you cancel an annual membership and haven’t used any Prime benefits (like free shipping or streaming) since your last renewal, you are typically eligible for a full refund. If you’ve used some benefits, Amazon may issue a partial refund based on the remaining unused portion of your membership or the extent of benefits utilized. This is a technical calculation based on their internal algorithms.
- Monthly Memberships: For monthly memberships, refunds are less common unless you cancel very soon after being charged and have not used any benefits. More often, your membership simply runs until the end of the paid month without renewal.
- Free Trials: If you cancel during a free trial period, you will not be charged, and your benefits will cease at the end of the trial.
You can usually see the exact end date of your membership and any refund information on your Prime membership management page after initiating the cancellation. The refund processing time can vary but typically takes a few business days to reflect on your original payment method.
Verifying Cancellation and Membership Status
After going through the cancellation steps, it’s a good practice to verify that your request has been successfully processed.
- Confirmation Email: Always check your inbox for a confirmation email from Amazon. This is the primary digital receipt for your cancellation. If you don’t receive one within a few hours, check your spam folder.
- Account Page Check: Log back into your Amazon account (either via desktop or app) and navigate to your Prime membership page. It should clearly state that your membership is scheduled to end on a specific date, or that it has already ended. If it still shows “Active” without any upcoming end date, the cancellation may not have gone through, and you should re-attempt the process or contact customer support.
- No Further Charges: Keep an eye on your bank or credit card statements for subsequent months to ensure no further Prime membership fees are charged.
These verification steps provide peace of mind and confirm that your digital rights management request has been accurately processed by Amazon’s system.
Troubleshooting Common Issues and Technical Support
Even with clear instructions, users can sometimes encounter technical snags or find Amazon’s cancellation interface less than intuitive. From ambiguous button labels to account-specific glitches, knowing how to troubleshoot or where to seek further assistance is vital. This section addresses common challenges users face when attempting to cancel Prime and outlines the avenues for technical support.
Navigating Ambiguous Interface Elements
Amazon’s platform, like many large-scale digital services, uses persuasive design to encourage retention. This can sometimes make the “cancel” option seem less prominent or present a multitude of choices that are not directly about cancellation.
- Hidden Links: The actual “End Membership” button might be smaller, located at the bottom of a page, or nested within several layers of menus compared to “Keep My Benefits” options. Always scan the entire page, even the fine print, for the precise wording.
- Repetitive Prompts: You might click “End Membership” only to be presented with another screen asking “Are you sure you want to miss out on X, Y, and Z benefits?” It requires persistence to click through these layers until you reach the final confirmation.
- Browser-Specific Glitches: Occasionally, an ad-blocker or an outdated browser cache might interfere with how a web page loads, potentially hiding buttons or making elements unresponsive. Try clearing your browser’s cache and cookies, or attempting the cancellation in an incognito/private browsing window, or even a different web browser.
Understanding that these are design choices, rather than technical errors, helps users navigate them with more focus.
Dealing with Account-Specific Problems
While less common, some users might face unique issues related to their specific Amazon account configuration.
- Shared Accounts: If you are part of an Amazon Household, only the primary account holder can manage or cancel the Prime membership. Secondary members will not have the direct option to cancel.
- Payment Issues: If your last Prime payment failed, Amazon’s system might temporarily block certain account management features until the payment issue is resolved. You might need to update your payment method first.
- Locked or Suspended Accounts: If your account has been temporarily locked or suspended for other reasons (e.g., suspicious activity), you’ll need to resolve that issue with Amazon’s support team before you can manage your Prime membership.
- Old or Dormant Accounts: If you’re trying to cancel Prime on an old account you rarely use, you might have difficulty remembering login details. Account recovery processes are essential here.
In these situations, direct interaction with Amazon’s customer support is typically the most effective route.

Temporarily Pausing vs. Full Cancellation
Some subscription services offer a “pause” option, allowing users to temporarily suspend billing and access without fully canceling. As of current knowledge, Amazon Prime does not widely offer a formal “pause” option in the same way some other streaming or subscription services do. Instead, their system generally provides:
- Immediate Cancellation with Refund: If you haven’t used Prime benefits, an immediate cancellation can result in a full refund.
- Cancellation at End of Term: Your membership runs until the end of your current billing period, then stops.
- Reminders: Amazon does allow you to set a reminder a few days before your Prime membership is set to renew, giving you time to decide whether to continue or cancel before being charged. This functions somewhat like a “soft pause” by allowing pre-emptive action.
The distinction is important from a technical standpoint: a “pause” implies a specific system feature designed to hold an account in limbo, whereas Amazon’s system largely operates on an “active” or “inactive” status. If you anticipate wanting Prime again in a few months, you might simply cancel and then re-subscribe when needed, rather than looking for a non-existent pause feature.
For all troubleshooting and complex account scenarios, the most reliable resource is Amazon Customer Service. They can be reached via phone, chat, or email through the “Help” or “Contact Us” links found at the bottom of the Amazon website or within the app’s menu. Providing them with details of your issue will enable their technical support team to assist you effectively.
Managing digital subscriptions is an integral part of modern online life, and understanding how to exercise control over your services is paramount. Canceling your Amazon Prime membership, whether for personal reasons, financial adjustments, or simply optimizing your digital footprint, is a straightforward process when armed with the right knowledge. By following these step-by-step instructions for both desktop and mobile platforms, understanding the interface’s nuances, and being aware of the post-cancellation implications for your digital benefits, you can confidently navigate the process. Remember, user control over digital services empowers you to tailor your online experience to your evolving needs, ensuring that you only subscribe to the services that genuinely enhance your life.
aViewFromTheCave is a participant in the Amazon Services LLC Associates Program, an affiliate advertising program designed to provide a means for sites to earn advertising fees by advertising and linking to Amazon.com. Amazon, the Amazon logo, AmazonSupply, and the AmazonSupply logo are trademarks of Amazon.com, Inc. or its affiliates. As an Amazon Associate we earn affiliate commissions from qualifying purchases.