In the fast-paced world of technology, efficient version control is not just a luxury; it’s a fundamental necessity for any developer, data scientist, or even a diligent individual managing important digital projects. Git, a distributed version control system, stands at the forefront of this domain, offering unparalleled capabilities for tracking changes, collaborating with others, and managing the evolution of codebases and documents. While often associated with Linux and macOS environments, its implementation on Windows has become remarkably streamlined and user-friendly. This guide will walk you through the comprehensive process of installing Git on your Windows machine, empowering you to leverage its power for your projects, regardless of your operating system.
Our exploration will delve into why Git is an indispensable tool in the modern tech landscape, covering its core benefits and applications. We’ll then proceed with a step-by-step installation guide, ensuring a smooth setup. Finally, we’ll touch upon initial configuration and how to verify your installation, setting you up for success in your Git journey. This comprehensive approach is designed to cater to both beginners and those looking to refine their understanding of Git installation on Windows.
Understanding the “Why”: The Indispensable Power of Git
Before we dive into the installation process, it’s crucial to understand why Git is such a vital tool. At its core, Git provides a robust system for version control. Imagine working on a complex software project. Without version control, you might be saving multiple copies of your files with names like project_final.zip, project_final_v2.zip, and project_final_really_final.zip. This quickly becomes unmanageable, error-prone, and makes it incredibly difficult to revert to a previous stable state if something goes wrong.
Git elegantly solves this problem by creating a repository, which is essentially a database of all your project’s changes over time. Every modification, addition, or deletion is recorded as a “commit,” creating a chronological history of your work. This history allows you to:
- Track Changes: See exactly who changed what, when, and why. This is invaluable for debugging and understanding the evolution of your project.
- Revert to Previous Versions: If you introduce a bug or make a mistake, you can easily roll back your project to any previous commit. This “undo” functionality is a lifesaver.
- Collaborate Effectively: Git excels in multi-developer environments. It allows multiple people to work on the same project simultaneously without overwriting each other’s work. Branching and merging features enable seamless integration of individual contributions.
- Experiment Safely: With Git’s branching feature, you can create isolated “branches” to test out new ideas or features without affecting the main codebase. If the experiment fails, you can simply discard the branch. If it’s successful, you can merge it back into the main line of development.
- Backup and Restore: Your Git repository serves as an excellent backup of your project. If your local machine fails, you can clone the repository from a remote server (like GitHub, GitLab, or Bitbucket) and restore your entire project.
Git’s Broad Applicability Beyond Code
While Git is predominantly known in the software development community, its applications extend far beyond just writing code. The principles of version control are applicable to a wide range of digital assets:
- Technical Documentation: Writers can use Git to track changes in user manuals, API documentation, or even entire books. This ensures clarity, allows for collaborative editing, and maintains a historical record of revisions.
- Configuration Files: System administrators can manage server configurations, dotfiles, and other critical settings using Git. This provides a safety net for deployments and allows for easy rollback to known good configurations.
- Data Science Projects: Researchers and data scientists can version control their datasets, analysis scripts, and model configurations. This reproducibility is crucial for scientific integrity and for sharing findings with others.
- Creative Projects: Even designers and artists can use Git to manage different iterations of their design files, although specialized tools might be more fitting for binary assets. However, for accompanying textual elements, notes, or script-based generative art, Git can be a valuable asset.
In essence, any project where tracking changes, enabling collaboration, and maintaining a history is beneficial can leverage the power of Git.
Installing Git on Windows: A Step-by-Step Guide
Installing Git on Windows is a straightforward process thanks to the official Git for Windows installer. This installer bundles Git itself with useful tools like the Git Bash terminal, Git GUI, and other utilities that enhance the Git experience on Windows.
Step 1: Download the Git for Windows Installer
- Navigate to the Official Git Website: Open your web browser and go to the official Git for Windows download page: https://git-scm.com/download/win.
- Automatic Detection: The website will likely detect your operating system (Windows) and offer the latest stable release for download.
- Initiate Download: Click on the download button for the 64-bit version (most modern Windows systems are 64-bit). If you have a very old system, you might need to select the 32-bit version. The download will begin, and you’ll receive an executable file (e.g.,
Git-2.xx.x-64-bit.exe).
Step 2: Running the Git for Windows Installer
Once the download is complete, locate the downloaded .exe file and double-click it to start the installation wizard.
-
License Agreement: You’ll first be presented with the GNU General Public License. Read through it and click “Next” to proceed.
-
Select Destination Location: Choose the directory where you want to install Git. The default location (
C:Program FilesGit) is usually fine for most users. Click “Next.” -
Select Components: This is where you choose which components to install.
- Git Bash: This is a command-line shell that provides a Linux-like environment on Windows, allowing you to use Git commands just as you would on Linux or macOS. It’s highly recommended to keep this selected.
- Git GUI: A graphical user interface for Git. It’s useful for visual learners or those who prefer not to use the command line for every operation. You can choose to install it or not.
- Git LFS (Large File Support): If you plan to work with large binary files (like game assets, large datasets, or media files), you should enable this. Otherwise, you can skip it.
- Associate .git* configuration files with the default editor: This option allows Git to open configuration files in your chosen editor.
- Associate .sh files to be run with Bash: Useful if you plan to use shell scripts.
- Enable experimental support for pseudo consoles: Generally safe to keep enabled for improved command-line experience.
- Enable experimental support for built-in file system caching: Can improve performance.
- Enable Git Credential Manager: This is highly recommended as it securely stores your Git credentials (username and password/token) when interacting with remote repositories like GitHub.
For most users, the default selections are sufficient. Click “Next.”
-
Select Start Menu Folder: Choose where you want the Git shortcuts to appear in your Start Menu. The default is usually acceptable. Click “Next.”
-
Choosing the Default Editor: Git needs an editor to open when you need to write commit messages or edit files. You have several options:
- Vim: A powerful, modal text editor common in Linux environments. It has a steep learning curve.
- Notepad: The basic Windows text editor. Simple but lacks advanced features.
- Notepad++: A popular, free source code editor for Windows with many features. Highly recommended if you don’t have a preferred editor.
- Visual Studio Code (VS Code): A very popular and powerful free code editor from Microsoft. If you already use VS Code for development, selecting it here is a great choice.
- Other Editors: If you have other editors installed, they might appear in the list.
Select your preferred editor from the dropdown menu. If you’re unsure, Notepad++ or VS Code are excellent choices for a balance of power and usability. Click “Next.”
-
Adjusting the Name of the Initial Branch in New Repositories: Historically, Git defaulted to calling the main branch
master. However, there’s a growing movement to use more inclusive names, withmainbeing the most common. This option allows you to choose what your main branch will be called by default.- “Let Git decide”: This will use the default set by the Git project, which is increasingly
main. - “Override the default branch name for new repositories”: This allows you to explicitly choose
mainormaster. It’s generally recommended to choosemainfor new projects.
Make your selection and click “Next.”
- “Let Git decide”: This will use the default set by the Git project, which is increasingly
-
Adjusting your PATH environment: This is a crucial step that determines how you can access Git from your command line. You have three options:
- “Use Git from Git Bash only” (Recommended): This is the safest option. Git will only be available when you run commands from the Git Bash terminal. This prevents potential conflicts with other command-line tools you might have installed.
- “Git from the command line and also from 3rd-party software”: This option adds Git to your system’s PATH, making it accessible from Command Prompt, PowerShell, and other applications. This is convenient but can sometimes lead to conflicts if not managed carefully.
- “Use Git and optional Unix tools from the Command Prompt”: This is the most comprehensive option, adding Git and some common Unix utilities to your PATH. This is generally for users who are very comfortable with the command line and want a more Linux-like experience within Windows.
For most users, especially beginners, “Use Git from Git Bash only” is the recommended and safest choice. If you are comfortable with command-line environments and want Git to be readily available system-wide, you can select the second or third option. Click “Next.”
-
Choosing the SSH executable: This option relates to how Git will handle secure shell (SSH) connections when interacting with remote repositories.
- “Use bundled OpenSSH”: This is the recommended option as it uses the SSH client included with Git for Windows.
- “Use external OpenSSH”: If you have a specific external SSH client installed and configured, you can choose this.
Stick with the bundled OpenSSH unless you have a specific reason not to. Click “Next.”
-
Configuring Line Ending Conversions: This setting determines how Git handles line endings (CRLF vs. LF) when switching between different operating systems.
- “Checkout Windows-style, commit Unix-style line endings” (Recommended): This is the default and generally the best option for Windows users. It ensures that when you check out files, they have Windows-style line endings (CRLF), and when you commit, they are converted to Unix-style line endings (LF). This prevents issues when collaborating with users on Linux or macOS.
- “Checkout as-is, commit Unix-style line endings”: This can be useful if you’re working exclusively on Windows and want to maintain consistency.
- “Checkout as-is, commit as-is”: Use this only if you’re absolutely sure you know what you’re doing and want to preserve line endings exactly as they are. This can lead to issues when collaborating across platforms.
The default option is usually the most robust. Click “Next.”
-
Configuring the Terminal Emulator: This setting determines how Git Bash interacts with your terminal.
- “Use MinTTY (the default terminal of MSYS2)” (Recommended): MinTTY is a feature-rich terminal emulator that provides better font rendering, resizing, and copy-paste functionality compared to the default Windows console.
- “Use Windows’ default console window”: This will use the standard Command Prompt window, which has fewer features.
MinTTY is the preferred choice for a better user experience. Click “Next.”
-
Choosing the Default
git pullBehavior: This option controls howgit pullbehaves when there are local changes in your working directory.- “Default (fast-forward or merge)” (Recommended): This is the standard behavior, attempting a fast-forward merge if possible, or a regular merge otherwise.
- “Rebase”: This rebases your local commits on top of the pulled changes, creating a cleaner, linear history.
- “Only ever fast-forward”: This will only perform a fast-forward merge and will fail if a fast-forward is not possible.
The default behavior is usually sufficient. Click “Next.”
-
Choosing a Credential Helper: This option determines how Git will manage your authentication credentials when pushing or pulling from remote repositories.
- “Git Credential Manager” (Recommended): This is the modern and secure way to manage credentials. It securely stores your username and password (or personal access tokens) for different Git hosting services.
- “None”: You will be prompted for your username and password every time.
Always choose “Git Credential Manager” for a smoother and more secure experience. Click “Next.”
-
Configuring Extra Options:
- “Enable file system caching”: Can improve performance by caching file system information. It’s generally safe to enable.
- “Enable symbolic links”: If you work with symbolic links (shortcuts to files or directories), you might need this.
Click “Install.”

Step 3: Completing the Installation
The installer will now proceed to install Git on your system. This may take a few minutes. Once it’s finished, you’ll see a completion screen.
You’ll have options to:
- “View Release Notes”: Useful for seeing what’s new in this version.
- “Launch Git Bash”: This will open the Git Bash terminal immediately.
You can uncheck these if you prefer to launch them manually later. Click “Finish.”
Verifying Your Git Installation and Initial Configuration
After successfully installing Git, it’s essential to verify that it’s working correctly and to perform some basic configuration.
Verifying the Installation
-
Open Git Bash: If you didn’t launch it from the installer, find “Git Bash” in your Start Menu and open it.
-
Check the Git Version: In the Git Bash terminal, type the following command and press Enter:
git --versionIf Git is installed correctly, you’ll see output similar to
git version 2.xx.x.windows.x, indicating the version of Git you have installed. -
Check Git GUI (if installed): If you installed Git GUI, you can find it in your Start Menu under “Git” and launch it to ensure it opens correctly.
Initial Git Configuration
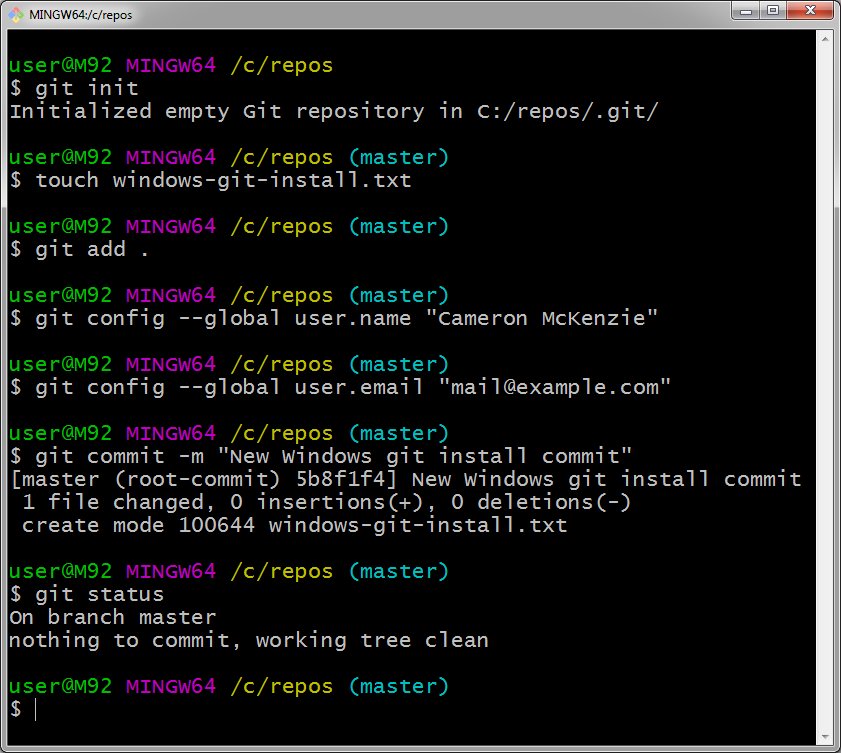
The first time you use Git, you need to configure your identity. This information is used to identify your commits.
-
Set Your Username: In Git Bash, run the following command, replacing
"Your Name"with your actual name:git config --global user.name "Your Name"The
--globalflag means this configuration will apply to all Git repositories on your system. -
Set Your Email Address: Next, configure your email address. This should be the email address you want associated with your commits.
git config --global user.email "your.email@example.com"Replace
"your.email@example.com"with your actual email address. -
Verify Configuration: You can check your configuration settings by running:
git config --listYou should see your
user.nameanduser.emaillisted in the output.

Further Configuration (Optional but Recommended)
-
Default Editor: If you wish to change your default editor later, you can use:
git config --global core.editor "notepad++.exe -multiInst -notabbar -nosession -noPlugin"(Replace
"notepad++.exe -multiInst -notabbar -nosession -noPlugin"with the command to launch your preferred editor.) -
Line Ending Configuration: While the installer sets a good default, you can explicitly set it if needed:
git config --global core.autocrlf true
By following these steps, you have successfully installed Git on your Windows machine and performed the essential initial configurations. You are now ready to start using Git for your projects, benefiting from its powerful version control capabilities. Whether you’re a seasoned developer, a budding data scientist, or a meticulous project manager, mastering Git will undoubtedly enhance your workflow and productivity.
aViewFromTheCave is a participant in the Amazon Services LLC Associates Program, an affiliate advertising program designed to provide a means for sites to earn advertising fees by advertising and linking to Amazon.com. Amazon, the Amazon logo, AmazonSupply, and the AmazonSupply logo are trademarks of Amazon.com, Inc. or its affiliates. As an Amazon Associate we earn affiliate commissions from qualifying purchases.