Fibre-Reinforced Plastic (FRP) panels are a modern, highly practical solution for walls and ceilings in environments where durability, hygiene, and ease of maintenance are paramount. From bustling commercial kitchens and sterile medical facilities to high-traffic public restrooms and moisture-prone basements, FRP panels offer a superior alternative to traditional wall coverings. Their unique composition provides exceptional resistance to moisture, mold, mildew, stains, and impacts, making them a wise investment for any space demanding both resilience and cleanliness.
This comprehensive guide will walk you through the entire process of installing FRP panels, from understanding their benefits and preparing your workspace to the final touches that ensure a long-lasting, professional finish. Whether you’re a seasoned DIY enthusiast or a professional contractor looking for best practices, mastering FRP panel installation can significantly enhance the functionality and longevity of your spaces, contributing to a more efficient and aesthetically pleasing environment.
Understanding FRP Panels and Pre-Installation Essentials
Before you embark on the installation journey, it’s crucial to understand what makes FRP panels a preferred choice and to meticulously prepare your workspace and materials. This foundational knowledge and preparation will be the bedrock of a successful and durable installation.
What Are FRP Panels and Why Choose Them?
FRP panels are composite materials made from a polymer matrix reinforced with glass fibres. This combination results in a lightweight yet incredibly strong and flexible material that outperforms many traditional wall surfaces in demanding conditions. Their non-porous surface is inherently resistant to bacteria growth, making them ideal for areas requiring strict sanitation standards. Unlike painted drywall or ceramic tiles, FRP panels won’t chip, crack, or corrode, and they stand up exceptionally well to frequent washing and chemical cleaning agents.
Choosing FRP panels is a strategic decision for several reasons:
- Durability: High impact resistance prevents dents and scratches, extending the life of your walls.
- Water and Moisture Resistance: Impervious to water, they prevent mold and mildew growth, crucial for humid environments.
- Hygiene and Easy Cleaning: Their smooth, non-porous surface can be quickly wiped down, maintaining a sterile or pristine look with minimal effort. This contributes positively to the “Brand” image of businesses, especially those in food service or healthcare, where cleanliness is a core aspect of reputation.
- Cost-Effectiveness: While the initial outlay might be higher than paint, the long-term “Money” savings from reduced maintenance, repair, and replacement costs make FRP a financially sound choice.
- Versatility: Available in various colours and textures, they offer aesthetic flexibility while delivering superior performance.
Common applications include commercial kitchens, bathrooms, laboratories, food processing plants, car washes, cleanrooms, schools, and any area prone to heavy use or moisture.
Gathering Your Tools and Materials
A successful FRP installation hinges on having the right tools and materials at hand. Investing in quality equipment and ensuring you have everything before you start will streamline the process and prevent unnecessary delays.
Essential Materials:
- FRP Panels: Ensure you purchase enough, accounting for cuts and potential waste (typically 10-15% extra).
- FRP Panel Adhesive: Specific adhesives are formulated for FRP. Common types include water-based (for porous surfaces) and solvent-based (for non-porous surfaces). Always check compatibility with your substrate.
- FRP Trims:
- J-Trims: For finishing exposed panel edges (top, bottom, side edges not meeting other panels).
- Inside Corner Trims: For internal wall corners.
- Outside Corner Trims: For external wall corners.
- Division Bar Trims: For joining two panels on a flat wall, often used for horizontal seams or very long walls.
- Caulk/Sealant: Mildew-resistant silicone caulk for sealing all seams and trim edges, especially in wet areas.
- Fasteners (Optional): Some installations might benefit from mechanical fasteners, especially on ceilings or heavily trafficked areas.
- Denatured Alcohol or Adhesive Cleaner: For cleaning excess adhesive.
Essential Tools:
- Measuring Tape: For accurate measurements.
- Level (Long): To ensure panels are installed perfectly straight. A laser level can provide superior precision, linking to “Tech” for advanced DIY or professional efficiency.
- Chalk Line: For marking guidelines on walls.
- Notched Trowel: For applying adhesive evenly (typically 3/16″ or 1/4″ V-notch, as recommended by the adhesive manufacturer).
- J-Roller or Laminate Roller: To firmly press panels onto the adhesive, ensuring full contact.
- Caulk Gun: For applying sealant.
- Cutting Tools:
- Circular Saw with a Fine-Tooth Carbide Blade (Reverse Tooth or Plywood Blade): Best for straight, clean cuts.
- Router with a Straight Bit: Ideal for very smooth, precise edge finishing, particularly if panels will be exposed or visible.
- Jigsaw with a Fine-Tooth Blade: For intricate cuts around outlets or irregular shapes.
- Utility Knife: For scoring and snapping thinner panels or making small adjustments.
- Safety Gear: Safety glasses, gloves, dust mask (especially when cutting FRP, as it produces fine fiberglass dust).
Preparing Your Installation Surface and Acclimation
Proper surface preparation is arguably the most critical step for a long-lasting FRP panel installation. Failure here can lead to adhesion issues, bubbling, or panels peeling off over time.
- Clean and Dry: The wall surface must be absolutely clean, dry, and free from any dust, grease, wax, or loose paint. Use a suitable cleaner to remove contaminants and allow ample drying time.
- Smooth and Flat: Any imperfections in the wall surface (holes, bumps, cracks) will show through the FRP panels, especially thinner ones. Patch all holes and cracks with spackle or joint compound, and sand down any high spots. The flatter and smoother the surface, the better the adhesive will bond and the more professional the finish will look.
- Prime (If Necessary): If installing over porous surfaces like raw drywall or bare wood, a primer compatible with your FRP adhesive might be recommended to ensure proper adhesion and prevent excessive absorption of the adhesive.
- Temperature and Humidity: Ensure the room temperature and humidity are within the ranges recommended by the panel and adhesive manufacturers. Typically, this is between 60°F and 80°F (15°C to 27°C) with moderate humidity.
- Acclimation of Panels: This step is often overlooked but is crucial for preventing warping or buckling after installation. Unstack the FRP panels and stand them individually or in small groups against a wall in the installation area for at least 24-48 hours. This allows the panels to adjust to the ambient temperature and humidity of the room, reducing stress and movement post-installation.
Mastering the FRP Panel Installation Process
With your materials ready and your surface prepped, it’s time to delve into the actual installation. Precision and attention to detail at each step will ensure a flawless and durable finish.
Planning Your Layout and Initial Cuts
Strategic planning of your panel layout is essential for minimizing waste and achieving a professional appearance.
- Measure and Mark: Use your tape measure and level to determine the exact dimensions of each wall section. Mark the centre of the wall or a prominent starting point.
- Determine Starting Point:
- For a room with a focal point (e.g., a door or window), start from there and work outwards, ensuring full panels are centred or prominent.
- In a typical room, it’s often best to start in the least conspicuous corner and work your way around. This way, any small off-cuts or less-than-perfect seams will be in a less visible area.
- Consider the pattern of your panels. If they are plain, minor inconsistencies are less noticeable. If they have a texture or subtle pattern, plan to maintain consistency.
- Dry Fit and Plan Seams:
- Temporarily position panels to visualize the layout. This allows you to plan where seams will fall and to optimize cuts.
- Aim to minimize horizontal seams. If unavoidable on very tall walls, use a division bar trim.
- Plan cuts around outlets, switches, and other fixtures. Measure carefully and mark these cutouts on the panels.
- Cutting Panels:
- Straight Cuts: For straight, clean cuts, a circular saw with a fine-tooth carbide-tipped blade (like a plywood blade) run in reverse is highly effective. Support the panel firmly to prevent vibration and ensure a smooth cut. You can also use a straight edge guide for perfect lines.
- Smooth Edges (Exposed): A router with a straight bit provides the cleanest, smoothest edge, which is excellent for any panel edge that will be exposed or meet a J-trim.
- Curved/Irregular Cuts: A jigsaw with a fine-tooth blade is suitable for cutting curves or intricate shapes around outlets and pipes. Drill a pilot hole in the corner of any rectangular cutout before using the jigsaw to ease the cut and prevent cracking.
- Utility Knife: For thinner panels or scoring, a heavy-duty utility knife can be used to score the panel multiple times and then snap it along the score line. Sand the snapped edge for smoothness.
- Safety First: Always wear safety glasses and a dust mask when cutting FRP, as it produces fine fiberglass dust. Cut in a well-ventilated area.
Adhesive Application and Panel Placement
This is where the panels meet the wall. Proper adhesive application and panel placement are crucial for a strong, lasting bond.
- Apply Adhesive to Wall: Using the notched trowel, apply the FRP adhesive to the back of the panel or directly to the wall. The recommended method (panel vs. wall) and notch size will be specified by the adhesive manufacturer. A common practice is to apply adhesive in a swirling pattern or parallel lines, ensuring 100% coverage or at least 70-80% coverage to prevent air pockets. Avoid applying too much adhesive near the edges to prevent squeeze-out.
- Adhesive Open Time: Pay attention to the adhesive’s “open time” – the window during which the adhesive remains workable. Once applied, you typically have 15-30 minutes to place the panel.
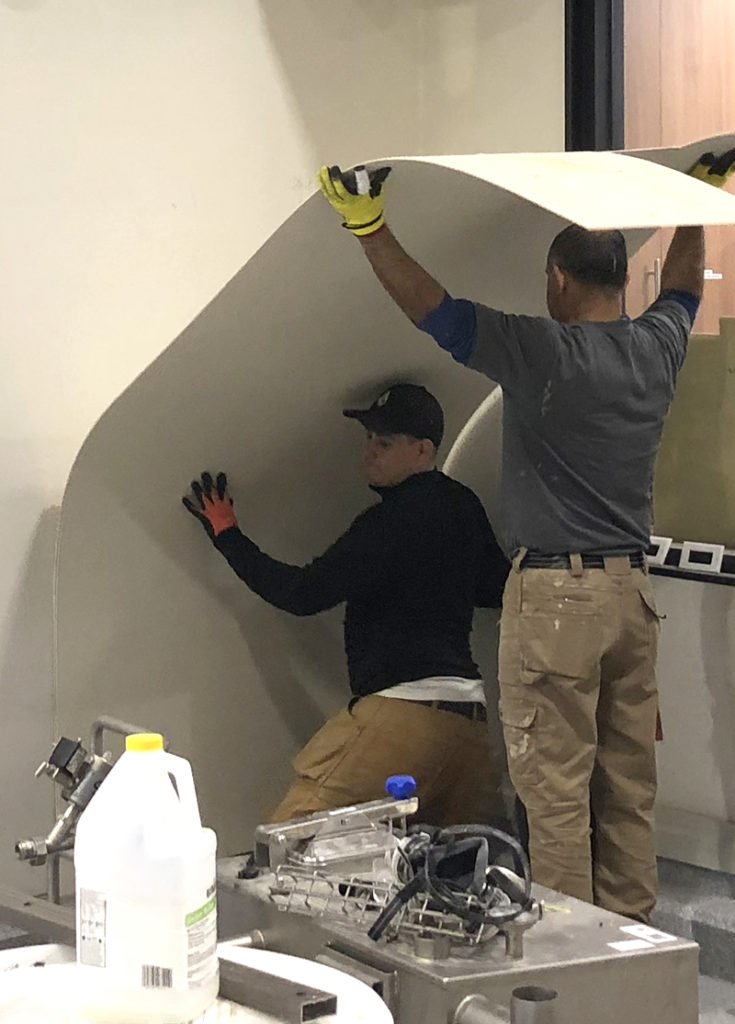
- Position the First Panel:
- Carefully align the first panel, starting from your planned corner or guideline. Ensure it is perfectly level and plumb. This first panel sets the standard for all subsequent panels.
- Place the panel gently onto the adhesive, ensuring it’s in the correct position before applying firm pressure.
- Some installers prefer to set a temporary wooden ledger board along the bottom of the wall to support the first row of panels, ensuring a straight start and keeping panels off the floor (which might be uneven).
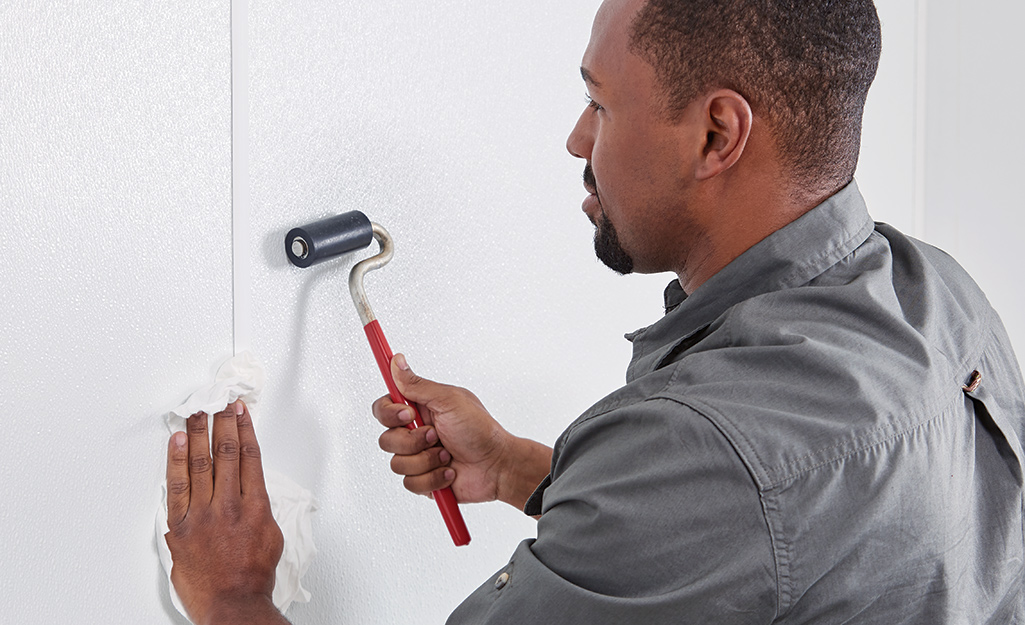
- Firmly Press the Panel: Once the panel is in position, use a J-roller or laminate roller to firmly press the entire surface of the panel, working from the centre outwards. This ensures maximum contact between the panel and the adhesive, removing any trapped air bubbles and achieving a strong bond. Pay particular attention to the edges.
- Wipe Excess Adhesive: Immediately wipe away any adhesive that squeezes out from the edges with a clean, damp cloth or denatured alcohol before it cures.
- Continue with Remaining Panels: Repeat the process for subsequent panels. Maintain a small, consistent gap (e.g., 1/16″) between panels to allow for thermal expansion and contraction. This gap will later be covered by trims or filled with caulk.
Installing Trims and Sealing
Trims provide a finished, professional look while protecting exposed edges and ensuring a waterproof seal.
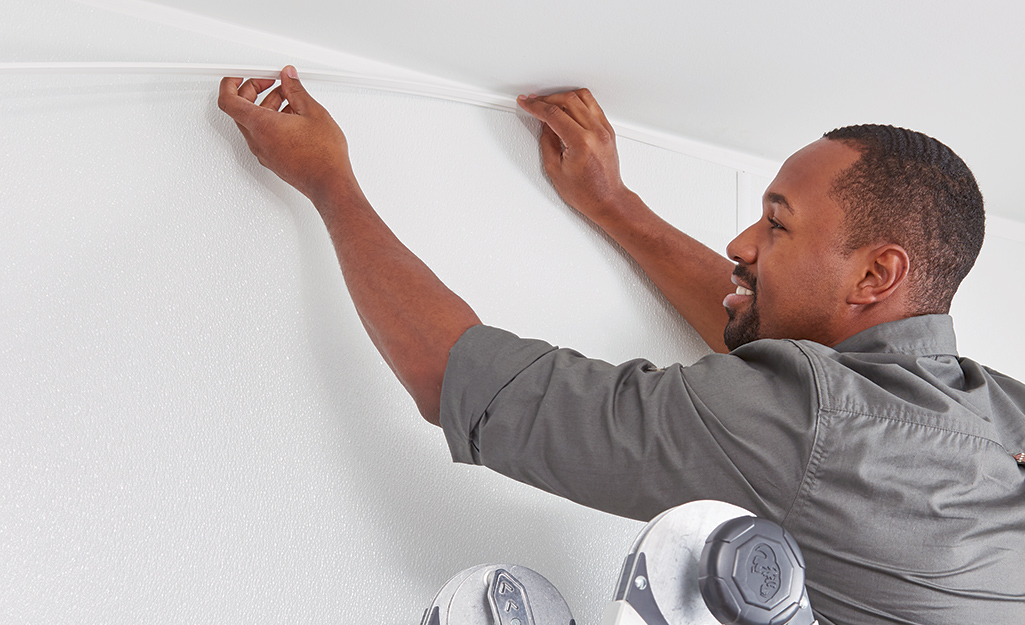
- Install Corner Trims:
- Apply a continuous bead of FRP adhesive to the inside of the appropriate corner trim (inside or outside).
- Fit the trim snugly over the corner where two panels meet. Press firmly to ensure good adhesion.
- Repeat for all corners.
- Install J-Trims:
- Apply adhesive to the inside of the J-trim.
- Fit J-trims along the top and bottom edges of the panels, or any other exposed edges that don’t meet another trim or panel. This provides a clean, finished look and protects the panel edge.
- Install Division Bars:
- If using horizontal seams or joining panels mid-wall, apply adhesive to the inside of the division bar.
- Fit the division bar securely over the seam between two panels.
- Secure Trims (Optional): In some cases, small finishing nails or staples (using a narrow crown stapler) can be used to temporarily hold trims in place until the adhesive cures, especially on ceilings or complex installations. Ensure fasteners are compatible with the trim material and FRP.
- Caulking and Sealing:
- Once all panels and trims are installed and the adhesive has had time to set (check adhesive manufacturer’s recommendations), apply a bead of mildew-resistant silicone caulk to all seams where panels meet trims, where trims meet the wall, and any other gaps.
- Smooth the caulk line immediately with a wet finger, caulk tool, or damp cloth for a clean, professional seal. This step is critical for water resistance and hygiene, especially in wet areas.
- Ensure all cutouts for outlets and switches are also caulked around their perimeters.
Post-Installation Care, Maintenance, and Advanced Considerations
Your FRP panel installation is complete, but a few final steps and ongoing care will maximize its lifespan and ensure it continues to perform its best.
Curing Time and Initial Maintenance
- Allow Full Cure: The adhesive needs time to fully cure and achieve maximum strength. This typically takes 24-72 hours, but always refer to the adhesive manufacturer’s instructions. Avoid putting stress on the panels or exposing them to excessive moisture during this period.
- Initial Cleaning: After the adhesive and caulk have fully cured, do a final wipe-down of all surfaces to remove any lingering adhesive residue, caulk smudges, or dust from the installation process. Use a mild, non-abrasive cleaner and a soft cloth.
Long-Term Care and Troubleshooting Common Issues
FRP panels are renowned for their low maintenance, but proper care will extend their life and appearance.
- Routine Cleaning: For most applications, simply wipe down the panels with a mild detergent and water. A soft cloth or sponge is usually sufficient. Avoid abrasive cleaners, scrub brushes, or harsh chemical solvents, as these can damage the panel surface or the caulk.
- Stain Removal: For stubborn stains, a non-abrasive household cleaner or a diluted bleach solution (check panel manufacturer’s recommendations first) can be used. Always rinse thoroughly with clean water afterwards.
- Preventing Damage: While impact-resistant, extreme sharp impacts can still damage FRP. Be mindful of moving heavy equipment or objects near the walls.
- Caulk Maintenance: Periodically inspect caulk lines for signs of cracking, peeling, or mildew. Re-caulk as needed to maintain a watertight seal and prevent moisture intrusion, which could lead to underlying structural issues. This small “Money” investment in maintenance prevents larger repair costs down the line.
Troubleshooting Common Issues:
- Bubbling/Delamination: Often caused by insufficient adhesive contact, improper surface preparation (e.g., dusty or greasy walls), or not allowing panels to acclimate. If detected early, you might be able to re-roll or press the panel. For cured issues, a professional repair might be necessary.
- Panel Warping: Usually due to improper acclimation or significant temperature/humidity fluctuations post-installation. Ensuring proper acclimation is key to prevention.
- Adhesive Squeeze-Out: Too much adhesive applied too close to the edges. Immediate cleanup is essential.
Professional vs. DIY: A Cost-Benefit Analysis
Deciding whether to undertake an FRP panel installation yourself or hire a professional often comes down to budget, project complexity, and your comfort level with the task.
-
DIY Advantages:
- Cost Savings: Significant “Money” savings on labour costs.
- Control: You have full control over the schedule and methods.
- Learning Experience: A rewarding experience for those who enjoy home improvement.
-
DIY Disadvantages:
- Time-Consuming: Can be a lengthy process, especially for larger areas or first-timers.
- Tools Investment: Requires purchasing or renting specialized tools.
- Risk of Errors: Mistakes can be costly in terms of materials and time.
- Learning Curve: FRP has specific cutting and adhesive requirements that take practice.
-
Professional Advantages:
- Expertise and Efficiency: Professionals have the “Tech” know-how, tools, and experience to complete the job quickly and to a high standard.
- Quality Finish: Typically results in a more polished and durable installation.
- Warranty: Many contractors offer warranties on their workmanship.
- Complex Projects: Ideal for large areas, intricate layouts, or environments with strict regulatory compliance.
-
Professional Disadvantages:
- Higher Upfront Cost: Labour costs add significantly to the overall project budget.
- Scheduling: Dependent on the contractor’s availability.
For smaller, straightforward projects like a single bathroom wall or a utility room, DIY can be a viable and cost-effective option for a homeowner with good handyman skills. However, for large commercial kitchens, medical facilities, or projects requiring complex cuts and perfect finishes to maintain “Brand” standards and meet health codes, hiring a professional often provides a better long-term “Money” return through superior quality, faster completion, and guaranteed workmanship. Always weigh the “Money” savings against the potential for errors and the value of your own time.
In conclusion, installing FRP panels is a manageable project that yields significant benefits in terms of durability, hygiene, and low maintenance. By diligently following these steps—from thorough preparation and precise execution to diligent post-installation care—you can achieve a professional-grade finish that will serve your space effectively for years to come. With the right approach, FRP panels stand as a testament to modern materials technology (“Tech”) that provides practical, long-lasting solutions for demanding environments.
aViewFromTheCave is a participant in the Amazon Services LLC Associates Program, an affiliate advertising program designed to provide a means for sites to earn advertising fees by advertising and linking to Amazon.com. Amazon, the Amazon logo, AmazonSupply, and the AmazonSupply logo are trademarks of Amazon.com, Inc. or its affiliates. As an Amazon Associate we earn affiliate commissions from qualifying purchases.