In the ever-evolving digital landscape, where visual presentation plays a crucial role in communication and branding, the ability to customize your operating system’s typography can significantly enhance your user experience and professional output. Whether you’re a graphic designer looking to add flair to your projects, a writer seeking a more comfortable reading font, or a business professional aiming to maintain brand consistency across documents, knowing how to install new fonts on your Windows machine is an essential skill. This comprehensive guide will walk you through the process, ensuring you can effortlessly integrate any font into your Windows environment.

The world of fonts is vast and varied, encompassing everything from classic serifs that exude sophistication to modern sans-serifs that prioritize clarity and legibility. Beyond aesthetics, the choice of font can subtly influence how your message is perceived. For instance, a playful script font might be perfect for invitations or creative projects, while a robust, easy-to-read font is paramount for lengthy reports or academic papers. In the realm of business and branding, consistent font usage is a cornerstone of a strong corporate identity. A unique font can become instantly recognizable, reinforcing brand recall and projecting a specific image. Therefore, understanding how to acquire and install these visual assets is not just about personal preference; it’s a strategic move that can impact communication effectiveness and brand perception.
This article will not only cover the fundamental methods of font installation but will also touch upon where to find these typographic treasures and how to manage them effectively. We’ll explore the different types of font files you might encounter and the most efficient ways to integrate them into your Windows operating system, ensuring they are readily available for all your applications.
Understanding Font Files and Their Formats
Before diving into the installation process, it’s helpful to understand what you’re dealing with. Fonts on your computer are essentially digital files that contain the design information for a specific typeface. These files dictate how characters are shaped, spaced, and rendered on your screen and in print. Over the years, several font file formats have emerged, each with its own characteristics and compatibility. While modern Windows versions are adept at handling most common formats, knowing the distinction can be beneficial.
Common Font File Types
The most prevalent font file formats you’ll encounter when downloading or purchasing fonts are:
-
TrueType Fonts (.TTF): This is one of the oldest and most widely supported font formats. Developed jointly by Apple and Microsoft, TTF fonts are known for their scalability, meaning they can be resized without losing quality. They are a staple on Windows systems and are compatible with a vast array of software.
-
OpenType Fonts (.OTF): An evolution of TrueType, OpenType fonts offer more advanced typographic features and broader character support. They can contain more glyphs, ligatures, alternate characters, and other stylistic sets, providing designers with greater creative control. OTF fonts are also highly scalable and are the preferred format for professional design work. Windows supports OpenType fonts seamlessly.
-
Web Open Font Format (.WOFF and .WOFF2): While primarily designed for web use to optimize font loading times, WOFF and WOFF2 files can sometimes be found. However, they are generally not directly installable on Windows in the same way as TTF or OTF files. If you find a font in this format and wish to use it on your desktop, you’ll typically need to convert it to TTF or OTF using an online converter or specific font management software.
-
Font Collections and Packages: Sometimes, fonts are distributed in compressed archives like ZIP files. These archives will contain one or more font files (TTF, OTF, etc.) along with potential license information or installation guides. You will need to extract the font files from the archive before you can install them.
Why the distinction matters: While Windows can handle TTF and OTF files with ease, understanding the format helps in troubleshooting or when dealing with specialized font foundries. For most users, however, the primary focus will be on ensuring you have the .ttf or .otf extensions.
Where to Find and Acquire Fonts
The journey of installing a new font begins with finding the perfect typeface for your needs. Fortunately, the digital realm offers a wealth of resources, ranging from free repositories to premium font marketplaces. The source from which you acquire your fonts can also influence the licensing and terms of use, which is particularly important for commercial projects.
Free Font Resources
For those on a budget or looking for readily available options, numerous websites offer free fonts. These are often suitable for personal projects, educational purposes, or testing out different styles.
-
Google Fonts: A fantastic and widely used resource, Google Fonts offers a vast library of open-source fonts that are free for commercial and personal use. You can browse, preview, and download fonts directly from their website. While primarily for web use, these fonts are typically available in TTF or OTF formats and can be installed on Windows.
-
Font Squirrel: This website curates high-quality, free-for-commercial-use fonts. They often provide web versions and desktop versions of their fonts, making them a versatile choice.
-
DaFont / 1001 Fonts: These sites offer a massive collection of free fonts, but it’s crucial to pay close attention to the licensing. Many fonts on these platforms are free for personal use only, and you’ll need to purchase a license for commercial applications. Always check the terms before using them in a professional context.
Premium Font Marketplaces
For designers, businesses, and anyone seeking unique, high-quality, and professionally supported typefaces, premium font marketplaces are the go-to destinations. These platforms offer a curated selection of fonts, often with extensive character sets and advanced features.
-
MyFonts: One of the largest and most respected online font stores, MyFonts features fonts from thousands of independent foundries and designers. You’ll find a vast array of styles, from classic revivals to cutting-edge contemporary designs.
-
Adobe Fonts (formerly Typekit): If you’re an Adobe Creative Cloud subscriber, you have access to a substantial library of high-quality fonts through Adobe Fonts. These fonts are seamlessly integrated into Adobe applications and can also be activated for use system-wide on Windows.
-
Fontspring: Another excellent source for premium fonts, Fontspring offers a wide selection and often provides flexible licensing options.
Important Note on Licensing: When acquiring fonts, especially for professional or commercial use, always read and understand the license agreement. Free fonts may have restrictions on commercial use, and premium fonts will have specific terms regarding the number of users, devices, and applications they can be used on. Proper licensing ensures you are using fonts legally and ethically.
Methods for Installing Fonts on Windows
Now that you have your font files ready, let’s explore the most straightforward ways to install them on your Windows computer. Windows provides several user-friendly methods to integrate new fonts into your system, making them available across all your applications.
Method 1: The Drag-and-Drop Method (Simplest)
This is often the quickest and most intuitive way to install a single font or a small batch of fonts.
Steps:
- Locate Your Font Files: Open File Explorer and navigate to the folder where you have saved your downloaded or acquired font files (e.g.,
.ttfor.otffiles). If the fonts are in a ZIP archive, extract them first by right-clicking the ZIP file and selecting “Extract All.” - Open the Fonts Folder:
- Windows 10/11: Type
C:WindowsFontsinto the File Explorer address bar and press Enter. Alternatively, open the Start menu, type “Fonts,” and select the “Fonts” Control Panel applet. - Older Windows Versions: You might also access this via the Control Panel. Navigate to
Control Panel > Appearance and Personalization > Fonts.
- Windows 10/11: Type
- Drag and Drop: Select the font file(s) you want to install and drag them directly into the
Fontsfolder you opened in step 2. - Installation Confirmation: Windows will automatically begin the installation process. You might see a progress bar or a brief message indicating the font is being installed. Once complete, the font will appear in the list within the Fonts folder and will be available in your applications.
Method 2: Using the Font Previewer
This method offers a bit more visual confirmation before installation and is also very straightforward.
Steps:
- Locate Your Font Files: As before, navigate to the folder containing your
.ttfor.otffont files. - Open a Font File: Double-click on the font file you wish to install. This will open the font preview window, displaying the font in various sizes and showing all its characters.
- Click “Install”: At the top of the font preview window, you will see an “Install” button. Click this button.
- Administrator Permission: You might be prompted to provide administrator permission. Click “Yes” or “Continue” to proceed.
- Font Installed: The font will then be installed and will be available for use in your applications.
This method is excellent for installing fonts one by one or if you want to quickly preview a font before committing to installation.
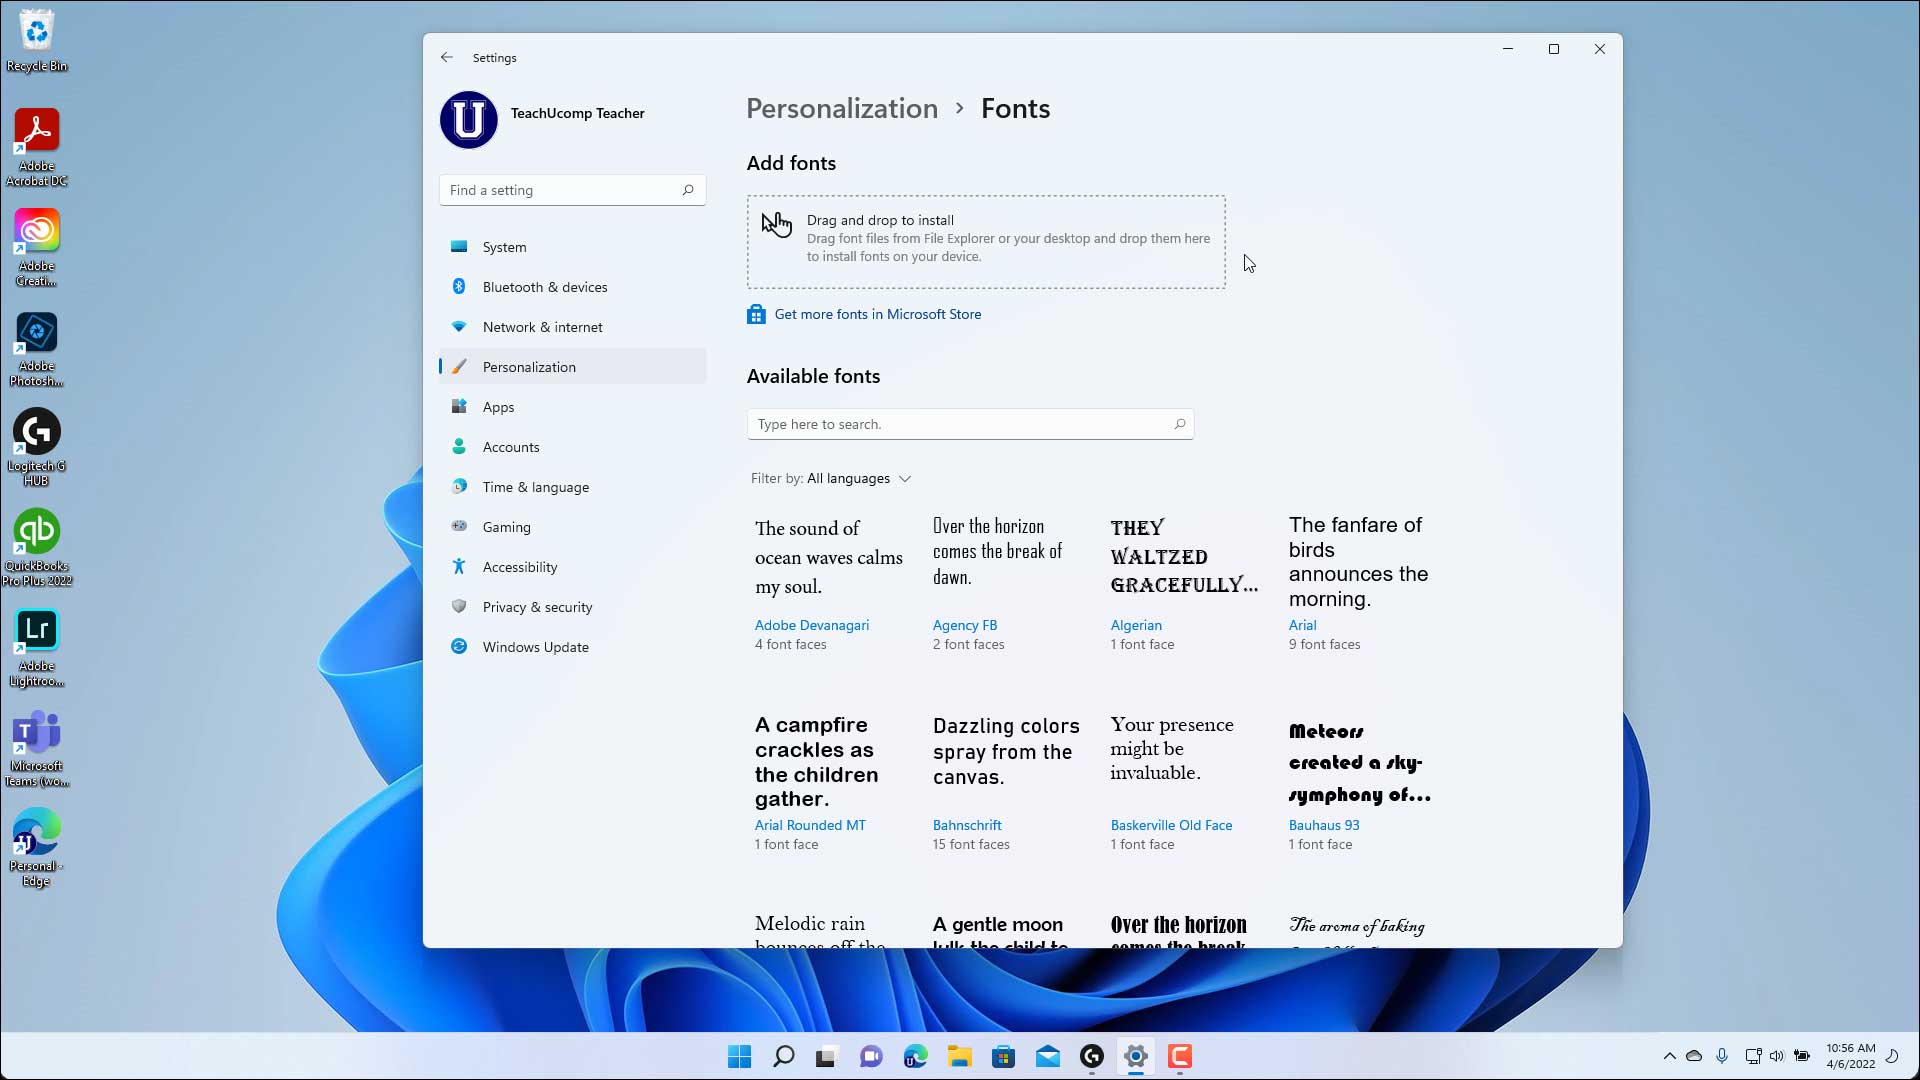
Method 3: Installing Fonts via Settings (Windows 10/11)
Modern versions of Windows offer a dedicated section within the Settings app for managing fonts, providing a more integrated experience.
Steps:
- Open Settings: Click the Start button and select the gear icon to open the Settings app.
- Navigate to Personalization: In the Settings window, click on “Personalization.”
- Select Fonts: On the left-hand side menu, click on “Fonts.”
- Drag and Drop into Settings: You will see a section that says “Add fonts” with a box that says “Drag and drop to install.” Simply drag your
.ttfor.otffont files from File Explorer directly into this designated box within the Settings window. - Automatic Installation: Windows will automatically install the fonts. They will appear in the list of installed fonts below the drag-and-drop area once the installation is complete.
This method is particularly useful as it consolidates font management within the modern Windows interface. It also allows you to see all installed fonts, their styles, and even uninstall them directly from this screen.
Managing and Uninstalling Fonts
As you accumulate fonts over time, your system’s font library can grow quite large. Effective font management is key to keeping your system organized and ensuring optimal performance. Windows provides tools to help you uninstall fonts you no longer need.
Uninstalling Fonts
Keeping your font collection streamlined can prevent potential issues and keep your system running smoothly.
Steps:
- Access the Fonts Folder or Settings:
- Via Control Panel: Open the Control Panel, navigate to
Appearance and Personalization > Fonts. - Via Settings App (Windows 10/11): Go to
Settings > Personalization > Fonts.
- Via Control Panel: Open the Control Panel, navigate to
- Select the Font(s) to Uninstall: In the list of installed fonts, click on the font you wish to remove. To select multiple fonts, hold down the
Ctrlkey and click on each font, or click the first font, hold down theShiftkey, and click the last font in a contiguous list. - Delete the Font(s):
- Control Panel: With the font(s) selected, you will see a “Delete” option at the top of the window. Click it.
- Settings App: With the font(s) selected, a “Uninstall” button will appear at the top of the page. Click it.
- Confirm Deletion: Windows will ask for confirmation. Click “Yes” or “Uninstall” to proceed.
Important Considerations for Uninstallation:
- System Fonts: Be very cautious about uninstalling fonts that are part of the Windows operating system (e.g., Arial, Times New Roman, Calibri). Removing essential system fonts can cause display issues in applications and the operating system itself. Generally, you should only uninstall fonts that you have manually installed for specific purposes.
- Application Dependency: Some applications might rely on specific fonts. If you uninstall a font that an application uses extensively, the application might display text in a fallback font, which can disrupt your intended design.

Font Management Best Practices
- Organize Your Font Files: Keep your downloaded font files in a well-organized folder structure. You can categorize them by project, style, or foundry for easier access and management.
- Use Font Management Software (Optional): For designers who work with a large number of fonts, dedicated font management software can be invaluable. Tools like FontBase, RightFont, or Suitcase Fusion allow you to preview, organize, activate, and deactivate fonts without permanently installing them. This is a powerful way to manage large collections and prevent system clutter.
- Regularly Review Your Fonts: Periodically go through your installed fonts and uninstall any that you no longer use or need. This can help improve system performance and reduce the chances of font conflicts.
By following these methods and best practices, you can effectively manage your font library, ensuring you always have the right tools at your disposal for any creative or professional endeavor. Installing and managing fonts on Windows is a straightforward process that can significantly enhance your digital experience, offering greater control over your visual communications and brand identity.
aViewFromTheCave is a participant in the Amazon Services LLC Associates Program, an affiliate advertising program designed to provide a means for sites to earn advertising fees by advertising and linking to Amazon.com. Amazon, the Amazon logo, AmazonSupply, and the AmazonSupply logo are trademarks of Amazon.com, Inc. or its affiliates. As an Amazon Associate we earn affiliate commissions from qualifying purchases.