In the rapidly evolving landscape of technology, data has become the new oil, fueling innovation across every industry imaginable. From predictive analytics to machine learning, artificial intelligence, and sophisticated data visualization, the ability to harness and interpret data is a skill set that is not just desirable but increasingly essential. For anyone looking to dive deep into this transformative field – be it a budding data scientist, a seasoned developer, or an enthusiast keen on exploring the potential of AI tools – Anaconda stands out as an indispensable platform. It streamlines the complex setup process, offering a comprehensive ecosystem of tools, libraries, and environments crucial for data science, machine learning, and advanced analytics.
This guide will walk you through the precise steps to install Anaconda on various operating systems, ensuring you have a smooth start to your data science journey. Beyond just the technical installation, we’ll explore why mastering Anaconda can be a pivotal step in enhancing your tech prowess, building a robust professional brand, and even unlocking new financial opportunities in the digital economy.
Unpacking Anaconda: What It Is and Why You Need It
Before we delve into the installation specifics, it’s crucial to understand what Anaconda is and why it has become the de facto standard for data scientists and machine learning engineers worldwide.
The All-in-One Data Science Platform
Anaconda is a free and open-source distribution of the Python and R programming languages, specifically designed for scientific computing, data science, and machine learning. What makes it unique is that it bundles together hundreds of popular data science packages, including NumPy, pandas, scikit-learn, TensorFlow, and PyTorch, along with essential development environments like Jupyter Notebook, Spyder, and Visual Studio Code (via integration).
At its core, Anaconda relies on Conda, an open-source package management system and environment management system. Conda allows you to easily install, run, and update packages and their dependencies. More importantly, it enables you to create isolated environments for different projects. This means you can work on Project A requiring Python 3.8 and a specific set of library versions, while simultaneously developing Project B with Python 3.10 and different library versions, without any conflicts between them. This capability is a game-changer for productivity and project integrity in complex development workflows.
The Strategic Edge for Tech Professionals and Aspiring Data Scientists
For anyone navigating the tech landscape, Anaconda isn’t just another software; it’s a strategic asset.
Technology Trends & AI Tools: Anaconda places cutting-edge technology directly at your fingertips. By providing pre-configured access to powerful libraries and frameworks, it accelerates your ability to experiment with AI tools, build machine learning models, and implement advanced algorithms. It removes the friction of dependency management, allowing you to focus on innovation rather than configuration nightmares. This is particularly vital in fields where rapid prototyping and iteration are key to staying competitive.
Productivity & Software Development: For developers, Anaconda significantly boosts productivity. The integrated development environments (IDEs) like Spyder offer a MATLAB-like experience for scientific programming, while Jupyter Notebooks provide an interactive, shareable environment perfect for exploratory data analysis, code execution, and documentation. This seamless workflow supports efficient software development life cycles for data-centric applications.
Building Your Personal Brand: In today’s competitive job market, a strong personal brand is invaluable. Mastering Anaconda demonstrates a commitment to data science and practical technological competence. It signals to potential employers or collaborators that you are equipped with industry-standard tools and ready to tackle complex data challenges. Sharing projects developed within Anaconda environments on platforms like GitHub can significantly enhance your professional portfolio and build your reputation as a knowledgeable tech professional.
Preparing for Installation: A Smooth Start
Before you begin the installation process, a few preparatory steps will ensure a smooth and successful setup.
System Requirements and Best Practices
Anaconda is compatible with Windows, macOS, and Linux operating systems. While the specific requirements are minimal for basic usage, consider the following for optimal performance, especially if you plan to work with large datasets or computationally intensive tasks:
- Operating System: Windows 8 or newer, macOS 10.13 or newer, or a modern Linux distribution (e.g., Ubuntu, Fedora, CentOS).
- Disk Space: A minimum of 3 GB of free disk space is recommended for the full installation. More will be needed as you create new environments and download additional packages.
- RAM: 8 GB RAM or more is highly recommended, especially for machine learning tasks. While it can run on less, performance will be significantly impacted.
- Internet Connection: Required for downloading the installer and additional packages.
Best Practices:
- Administrator Privileges: On Windows and macOS, it’s often best to run the installer with administrator privileges to avoid permission issues.
- Close Other Applications: Close any open Python environments, IDEs, or command prompts before starting the installation to prevent conflicts.
- Review Existing Python Installations: If you have existing Python installations, Anaconda will install its own Python version. It’s generally recommended to let Anaconda manage its Python environment independently to avoid conflicts. You can typically choose to install Anaconda for “Just Me” rather than “All Users” to minimize interference with system-wide Python.
Downloading the Anaconda Installer
The first step is to download the correct installer for your operating system from the official Anaconda website.
- Visit the Official Anaconda Website: Open your web browser and navigate to
www.anaconda.com/download. - Select Your Operating System: The website will usually detect your OS automatically, but you can manually select Windows, macOS, or Linux.
- Choose the Python Version: Anaconda typically offers installers with the latest stable Python 3.x version. Unless you have a specific reason to use an older version, always go for the latest Python 3.x.
- Download the Installer: Click the download button. The file size is substantial (typically 500 MB to 1 GB), so ensure you have a stable internet connection.
Once the download is complete, you’re ready to proceed with the installation steps specific to your operating system.
Step-by-Step Installation Guides Across Operating Systems
The installation process varies slightly depending on whether you’re on Windows, macOS, or Linux. Follow the instructions relevant to your system carefully.
Installing Anaconda on Windows
- Locate the Installer: Find the
.exefile you downloaded (e.g.,Anaconda3-202X.XX-Windows-x86_64.exe) in your Downloads folder. - Run the Installer: Double-click the
.exefile to start the Anaconda Setup Wizard. - Follow the Wizard:
- Click “Next” on the Welcome screen.
- Read the License Agreement and click “I Agree”.
- Choose Installation Type: It’s generally recommended to select “Just Me” unless you need it accessible to all users on a shared computer. “Just Me” doesn’t require administrator privileges.
- Choose Destination Folder: The default location (e.g.,
C:UsersYourUseranaconda3) is usually fine. Ensure it has enough free space. Click “Next”. - Advanced Installation Options: This is a crucial step:
- “Add Anaconda3 to my PATH environment variable” (Recommended NOT to check): Anaconda recommends not adding it to your PATH automatically during installation, as it can conflict with other software. Instead, you should use the Anaconda Navigator or the Anaconda Prompt. If you know what you’re doing and want to use
condacommands directly from any command prompt, you can check this, but be aware of potential conflicts. - “Register Anaconda3 as my default Python 3.x”: It’s recommended to leave this checked. This will ensure that applications designed to use Python 3.x will default to the Anaconda Python installation.
- “Add Anaconda3 to my PATH environment variable” (Recommended NOT to check): Anaconda recommends not adding it to your PATH automatically during installation, as it can conflict with other software. Instead, you should use the Anaconda Navigator or the Anaconda Prompt. If you know what you’re doing and want to use
- Click “Install”.
- Wait for Installation: The installation process can take several minutes.
- Installation Complete: Once finished, click “Next”. You might see options to install VS Code or learn more about Anaconda. You can uncheck these if you don’t need them now.
- Finish: Click “Finish” to exit the setup wizard.
Installing Anaconda on macOS

- Locate the Installer: Find the
.pkgfile you downloaded (e.g.,Anaconda3-202X.XX-MacOSX-x86_64.pkg) in your Downloads folder. - Run the Installer: Double-click the
.pkgfile to start the Anaconda Installer. - Follow the Wizard:
- Click “Continue” on the Introduction and Read Me screens.
- Agree to the License Agreement.
- Installation Type: Select “Install for me only” unless you have specific reasons for “Install on a specific disk” or “Install for all users.” Click “Continue”.
- Installation Location: The default location (
/Users/your_username/opt/anaconda3or/opt/anaconda3) is usually fine. Click “Install”. You may need to enter your macOS password.
- Wait for Installation: The installation process will run.
- Installation Complete: Once finished, you’ll see a summary. You might be prompted to install VS Code; you can skip this for now if you wish.
- Close: Click “Close” to exit the installer. The installer might ask if you want to move the installer to the Trash; you can do so.
Installing Anaconda on Linux
- Open Terminal: Open a terminal window.
- Navigate to Downloads: Change your directory to where you downloaded the Anaconda installer script. For example:
bash

cd ~/Downloads
- Run the Installer Script: Execute the installer script. Replace
Anaconda3-202X.XX-Linux-x86_64.shwith the actual filename of your downloaded installer.
bash

bash Anaconda3-202X.XX-Linux-x86_64.sh
- Follow the Prompt:
- Press
Enterto review the license agreement. - Scroll through the license by pressing
Enterrepeatedly orqto skip to the end. - Type
yesto accept the license agreement. - Installation Location: Press
Enterto accept the default installation location (e.g.,/home/your_username/anaconda3), or specify a different path. - Initialize Anaconda: When prompted, “Do you wish the installer to initialize Anaconda3 by running conda init?”, type
yes. This will add Anaconda to your PATH and configure your shell for Conda commands.
- Press
- Installation Complete: The installation will proceed. Once finished, you’ll see a message indicating completion.
- Activate Anaconda: Close and reopen your terminal or run
source ~/.bashrc(orsource ~/.zshrcif you use Zsh) to apply the changes to your PATH and activate Anaconda.
Verifying Your Anaconda Installation and Taking First Steps
After installation, it’s crucial to verify that everything is working correctly. This section also covers initial steps and common troubleshooting.
Launching Jupyter Notebook and Spyder
The easiest way to verify and start using Anaconda’s tools is through the Anaconda Navigator.
- Launch Anaconda Navigator:
- Windows: Search for “Anaconda Navigator” in the Start Menu and click to open it.
- macOS: Open Launchpad or search in Spotlight for “Anaconda Navigator” and click its icon.
- Linux: Open your terminal and type
anaconda-navigatorthen pressEnter.
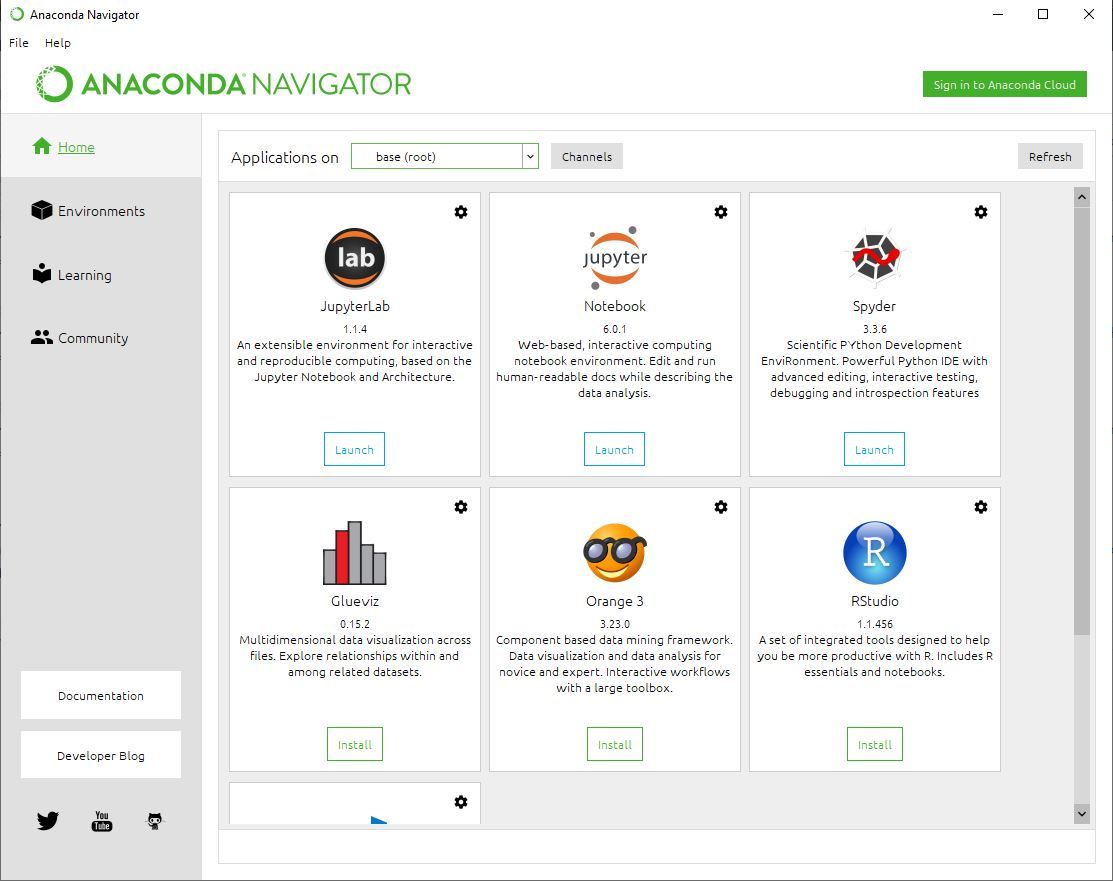
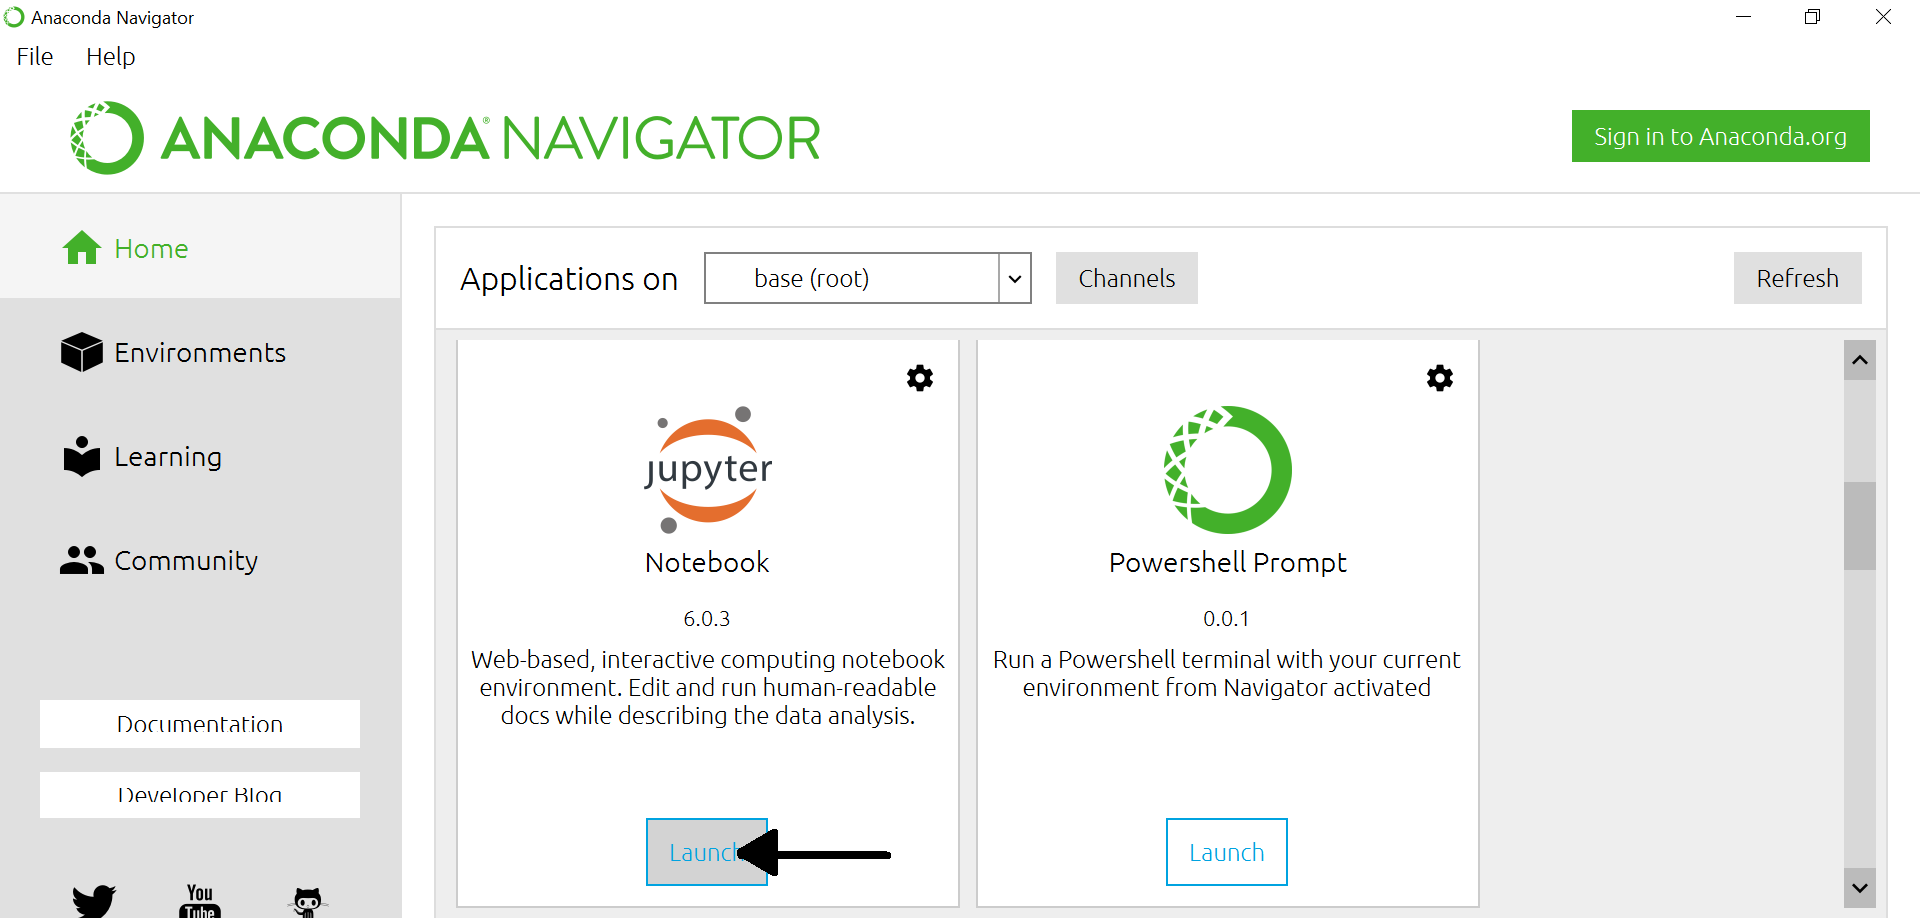
- Explore Navigator: The Navigator provides a graphical user interface (GUI) to launch applications like Jupyter Notebook, Spyder, VS Code, and manage environments.
- Launch Jupyter Notebook: Click the “Launch” button under Jupyter Notebook. This will open a new tab in your web browser, showing the Jupyter interface, ready for you to create new notebooks.
- Launch Spyder: Similarly, click “Launch” under Spyder. This will open the Spyder IDE, a powerful environment for scientific Python development.
If these applications launch successfully, your Anaconda installation is working!
Basic Conda Commands for Environment Management
While Anaconda Navigator is great for GUI users, the command line via Anaconda Prompt (Windows) or Terminal (macOS/Linux) offers more power and flexibility with conda commands.
- Open Anaconda Prompt/Terminal:
- Windows: Search for “Anaconda Prompt” in the Start Menu.
- macOS/Linux: Open your regular terminal.
- Check Conda Version:
bash

conda --version
This confirms Conda is correctly installed and accessible. - List Environments:
bash

conda env list
You should seebaseas your default environment. - Create a New Environment:
bash

conda create --name myenv python=3.9
This creates an environment namedmyenvwith Python 3.9. - Activate an Environment:
bash

conda activate myenv
Your terminal prompt will change to show(myenv), indicating you’re in the new environment. - Install Packages in an Environment:
bash

conda install numpy pandas matplotlib
This installs NumPy, pandas, and Matplotlib intomyenv. - Deactivate an Environment:
bash

conda deactivate
- Remove an Environment:
bash

conda env remove --name myenv
Common Installation Hurdles and Troubleshooting
Even with careful steps, you might encounter issues. Here are common problems and their solutions:
- PATH Environment Variable Issues:
- Symptom:
condacommands don’t work in regular command prompt/terminal, only in Anaconda Prompt (Windows) or aftersource ~/.bashrc(Linux/macOS). - Solution: For Windows, search for “Edit the system environment variables,” click “Environment Variables,” find “Path” under “User variables” or “System variables,” and add the paths to your Anaconda installation’s
ScriptsandLibrarybindirectories (e.g.,C:UsersYourUseranaconda3ScriptsandC:UsersYourUseranaconda3Librarybin). On macOS/Linux, ensureconda initran correctly and your shell’s config file (.bashrc,.zshrc) is sourced.
- Symptom:
- Permission Errors:
- Symptom: Installer fails, or package installations fail due to lack of write access.
- Solution: Ensure you’re running the installer with sufficient privileges (e.g., “Run as administrator” on Windows). For Linux, ensure your user has write permissions to the chosen installation directory.
- Conda Update Problems:
- Symptom:
conda update --allorconda update condahangs or fails. - Solution: Try
conda clean --allfirst to clear caches, then retry. Sometimes, a slow internet connection or corporate firewalls can interfere.
- Symptom:
- CondaHTTPError/Proxy Issues:
- Symptom: Errors when downloading packages, often related to network or proxy settings.
- Solution: If you’re behind a corporate proxy, you might need to configure Conda to use it. Search for “conda proxy configuration” online for detailed steps.
Beyond Installation: Leveraging Anaconda for Career Growth and Financial Opportunities
Installing Anaconda is just the first step. The true value lies in how you leverage this powerful platform to advance your career, build a strong brand, and open doors to new financial avenues.
Building Your Personal Brand in the Data-Driven Economy
In the modern tech sphere, a personal brand rooted in demonstrable skills is paramount. Anaconda empowers you to build this brand through:
- Portfolio Development: Use Jupyter Notebooks to showcase data analysis projects, machine learning models, and insightful visualizations. Each notebook can serve as a detailed case study of your abilities, linking directly to your GitHub or professional website.
- Technical Authority: By actively contributing to open-source projects, participating in Kaggle competitions (using Anaconda as your primary toolkit), or even publishing tutorials on platforms like Medium (referencing your Anaconda-powered workflows), you establish yourself as a thought leader in specific data science domains.
- Networking: Familiarity with Anaconda is a common ground for data professionals. Attending meetups, conferences, or online forums, and discussing your projects developed with Anaconda, can lead to valuable connections and mentorship opportunities.
Opening Doors to Lucrative Tech Careers and Online Income
The demand for data-savvy professionals is skyrocketing, and Anaconda is the gateway to many high-paying roles:
- Data Scientist/Analyst: These roles are directly empowered by Anaconda’s toolkit. From data cleaning and exploration with pandas to model building with scikit-learn and deep learning with TensorFlow, Anaconda provides the comprehensive environment.
- Machine Learning Engineer: Engineers focusing on deploying models into production often rely on Conda environments for consistent and reproducible deployments.
- AI Developer: With access to libraries like PyTorch and Keras, Anaconda supports the development of advanced AI applications, from natural language processing to computer vision.
- Freelancing and Side Hustles: Anaconda provides the infrastructure for individuals to offer services like data cleaning, statistical analysis, dashboard creation, or even building custom AI solutions for small businesses. These side hustles can evolve into significant online income streams, offering financial independence. Tools like Jupyter Notebook are perfect for delivering clear, reproducible reports to clients.
- Financial Tools and Business Finance: Beyond direct data science roles, understanding Python within Anaconda can be invaluable for personal finance and business finance. You can develop scripts for portfolio optimization, financial modeling, algorithmic trading strategies, or automating financial reporting, directly impacting your wealth management or business’s bottom line.
The Future of Data Science with Anaconda
Anaconda continues to evolve, staying at the forefront of technology trends. Its ecosystem constantly integrates the latest AI tools, supports new hardware (like GPUs for deep learning), and enhances productivity features. By being proficient in Anaconda, you are not just learning a tool; you are investing in a future-proof skill set that will keep you relevant and impactful in the dynamic world of technology, ensuring your contributions are both innovative and financially rewarding.
Conclusion
Installing Anaconda is a fundamental step for anyone serious about engaging with data science, machine learning, and advanced analytics. It transforms a complex ecosystem of tools and libraries into an accessible, manageable, and highly productive environment. By following the detailed installation steps provided, you’ve successfully set up a robust platform that will be the foundation for countless projects and learning opportunities.
But remember, installation is merely the beginning. The true power of Anaconda lies in its application: from exploring vast datasets to building intricate AI models, showcasing your work to potential employers, and even crafting strategies for personal and business finance. Embrace the journey of learning and experimentation that Anaconda facilitates. Dive into its rich collection of libraries, master Conda for environment management, and leverage its integrated tools to innovate, create, and carve out your niche in the exciting, data-driven future. Your gateway to data science excellence is now open.
aViewFromTheCave is a participant in the Amazon Services LLC Associates Program, an affiliate advertising program designed to provide a means for sites to earn advertising fees by advertising and linking to Amazon.com. Amazon, the Amazon logo, AmazonSupply, and the AmazonSupply logo are trademarks of Amazon.com, Inc. or its affiliates. As an Amazon Associate we earn affiliate commissions from qualifying purchases.