
In the ever-evolving digital landscape, the ability to customize and personalize your operating system is a hallmark of modern computing. For Windows 10 users, this customization extends beyond mere desktop backgrounds and system sounds. One of the most impactful ways to truly make your computer your own, and to enhance the visual appeal of your projects, is by installing new fonts. Whether you’re a graphic designer seeking the perfect typeface for a client’s branding, a writer looking to add a touch of personality to your documents, or simply someone who appreciates aesthetic variety, understanding how to install fonts on Windows 10 is an essential skill.
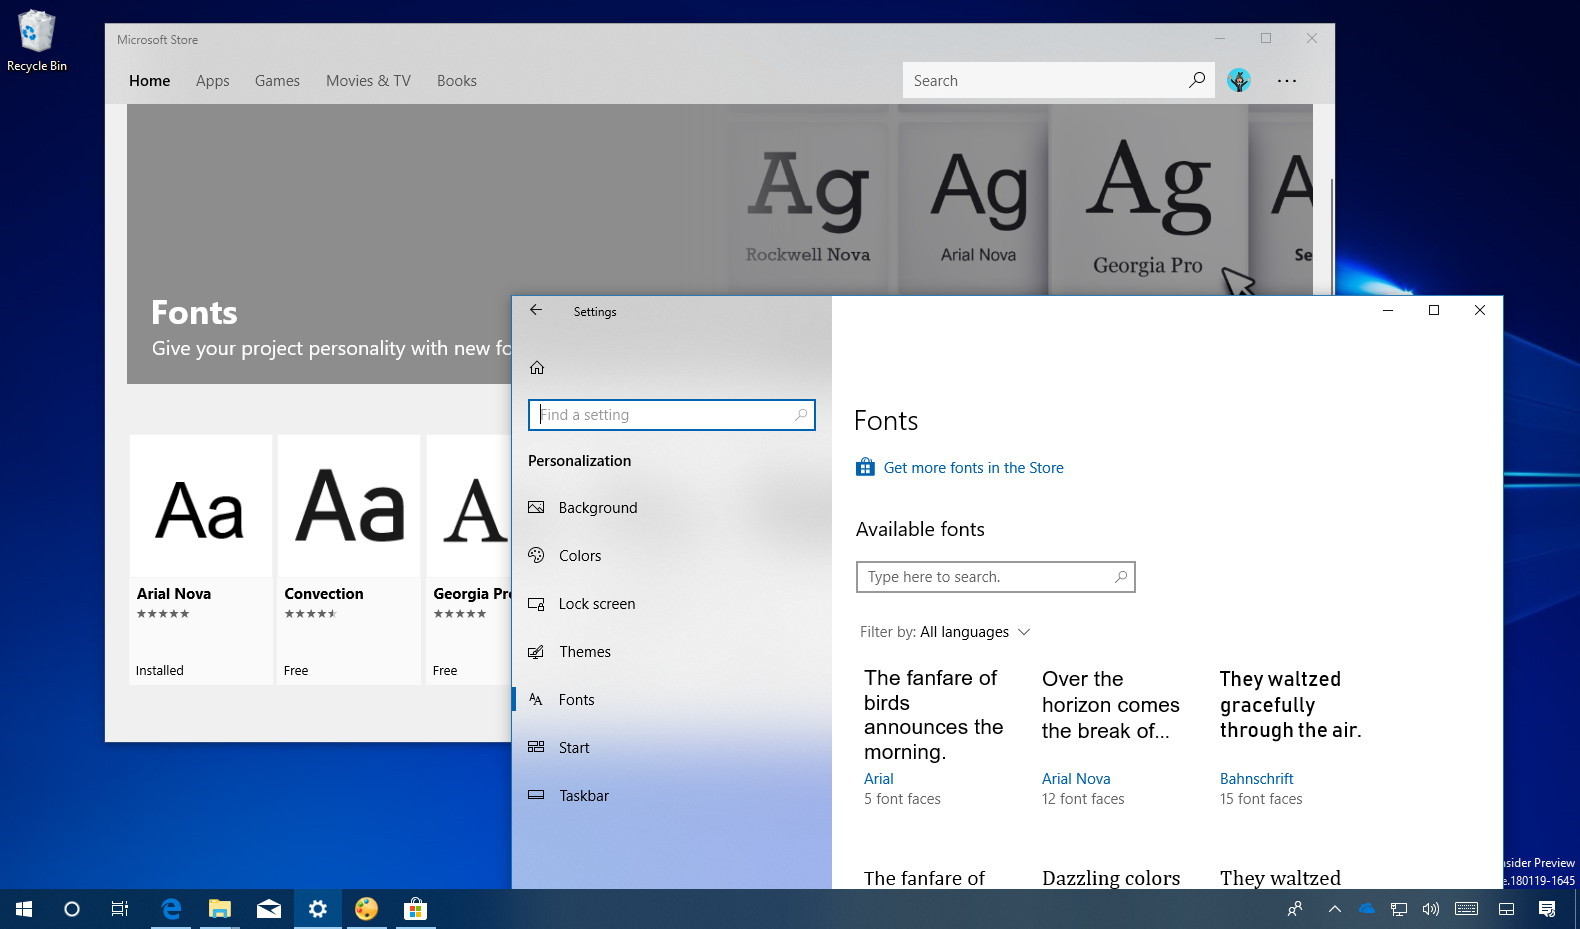
This guide will walk you through the straightforward process of adding new fonts to your Windows 10 system. We’ll cover various methods, from simple drag-and-drop to more advanced techniques, ensuring that you can confidently expand your font library and elevate your digital creations.
Understanding Font Types and Their Installation
Before diving into the installation process, it’s helpful to understand the different types of font files you’re likely to encounter. The most common formats for Windows are:
- TrueType Fonts (.TTF): This is one of the oldest and most widely supported font formats. TTF fonts are known for their scalability and consistency across different devices and applications. They are a safe bet for most installations.
- OpenType Fonts (.OTF): An evolution of TrueType, OpenType fonts offer more advanced features, including support for a wider range of characters, ligatures, stylistic alternates, and more. They are generally considered superior for professional design work due to their richer typographic capabilities.
- Font Collections (.TTC): These files contain multiple TrueType fonts bundled into a single file. While less common for individual font downloads, they are used for certain font families that include variations like bold, italic, and condensed versions.
The installation process for .TTF and .OTF files is largely identical, as Windows 10 has excellent support for both.
Method 1: The Simple Drag-and-Drop Installation
For most users, the easiest and quickest way to install a new font is by simply dragging and dropping the font file into the designated Fonts folder. This method is intuitive and requires no special software.
Locating Your Font Files
First, ensure that you have downloaded the font file(s) you wish to install. These are often found in compressed ZIP archives. If your font is in a ZIP file, you’ll need to extract it first. Right-click on the ZIP file and select “Extract All…” or use a third-party extraction tool like 7-Zip or WinRAR. Once extracted, you should have one or more .TTF or .OTF files.
Accessing the Windows Fonts Folder
There are a couple of straightforward ways to access the Windows Fonts folder:
Option A: Using File Explorer
- Open File Explorer (you can press
Windows key + Eon your keyboard). - In the address bar at the top, type
C:WindowsFontsand press Enter. - This will open the official Windows Fonts folder, displaying all the fonts currently installed on your system.
Option B: Using the Control Panel
- Click on the Start menu and type “Control Panel.”
- Open the Control Panel application.
- In the Control Panel, search for “Fonts” in the search bar at the top right.
- Click on the Fonts option. This will also open the Windows Fonts folder.
Installing the Font
Once you have both the font file(s) and the Fonts folder open side-by-side:
- Select the font file(s) you want to install. You can select multiple files by holding down the
Ctrlkey while clicking on each file. - Drag the selected font file(s) from their location (e.g., your Downloads folder) and drop them directly into the open Windows Fonts folder.
- Windows will then automatically begin the installation process. You might see a progress bar indicating that the fonts are being installed.
Upon successful installation, the new font will appear in the list of installed fonts within the Fonts folder.
Method 2: Installing Fonts Through Settings
Windows 10 also offers a more integrated approach to font management through its Settings app. This method can feel more modern and is especially useful if you prefer navigating through the dedicated Windows settings.
Accessing Font Settings
- Click on the Start menu.
- Click on the Settings cogwheel icon.
- In the Settings window, select Personalization.
- On the left-hand sidebar, click on Fonts.
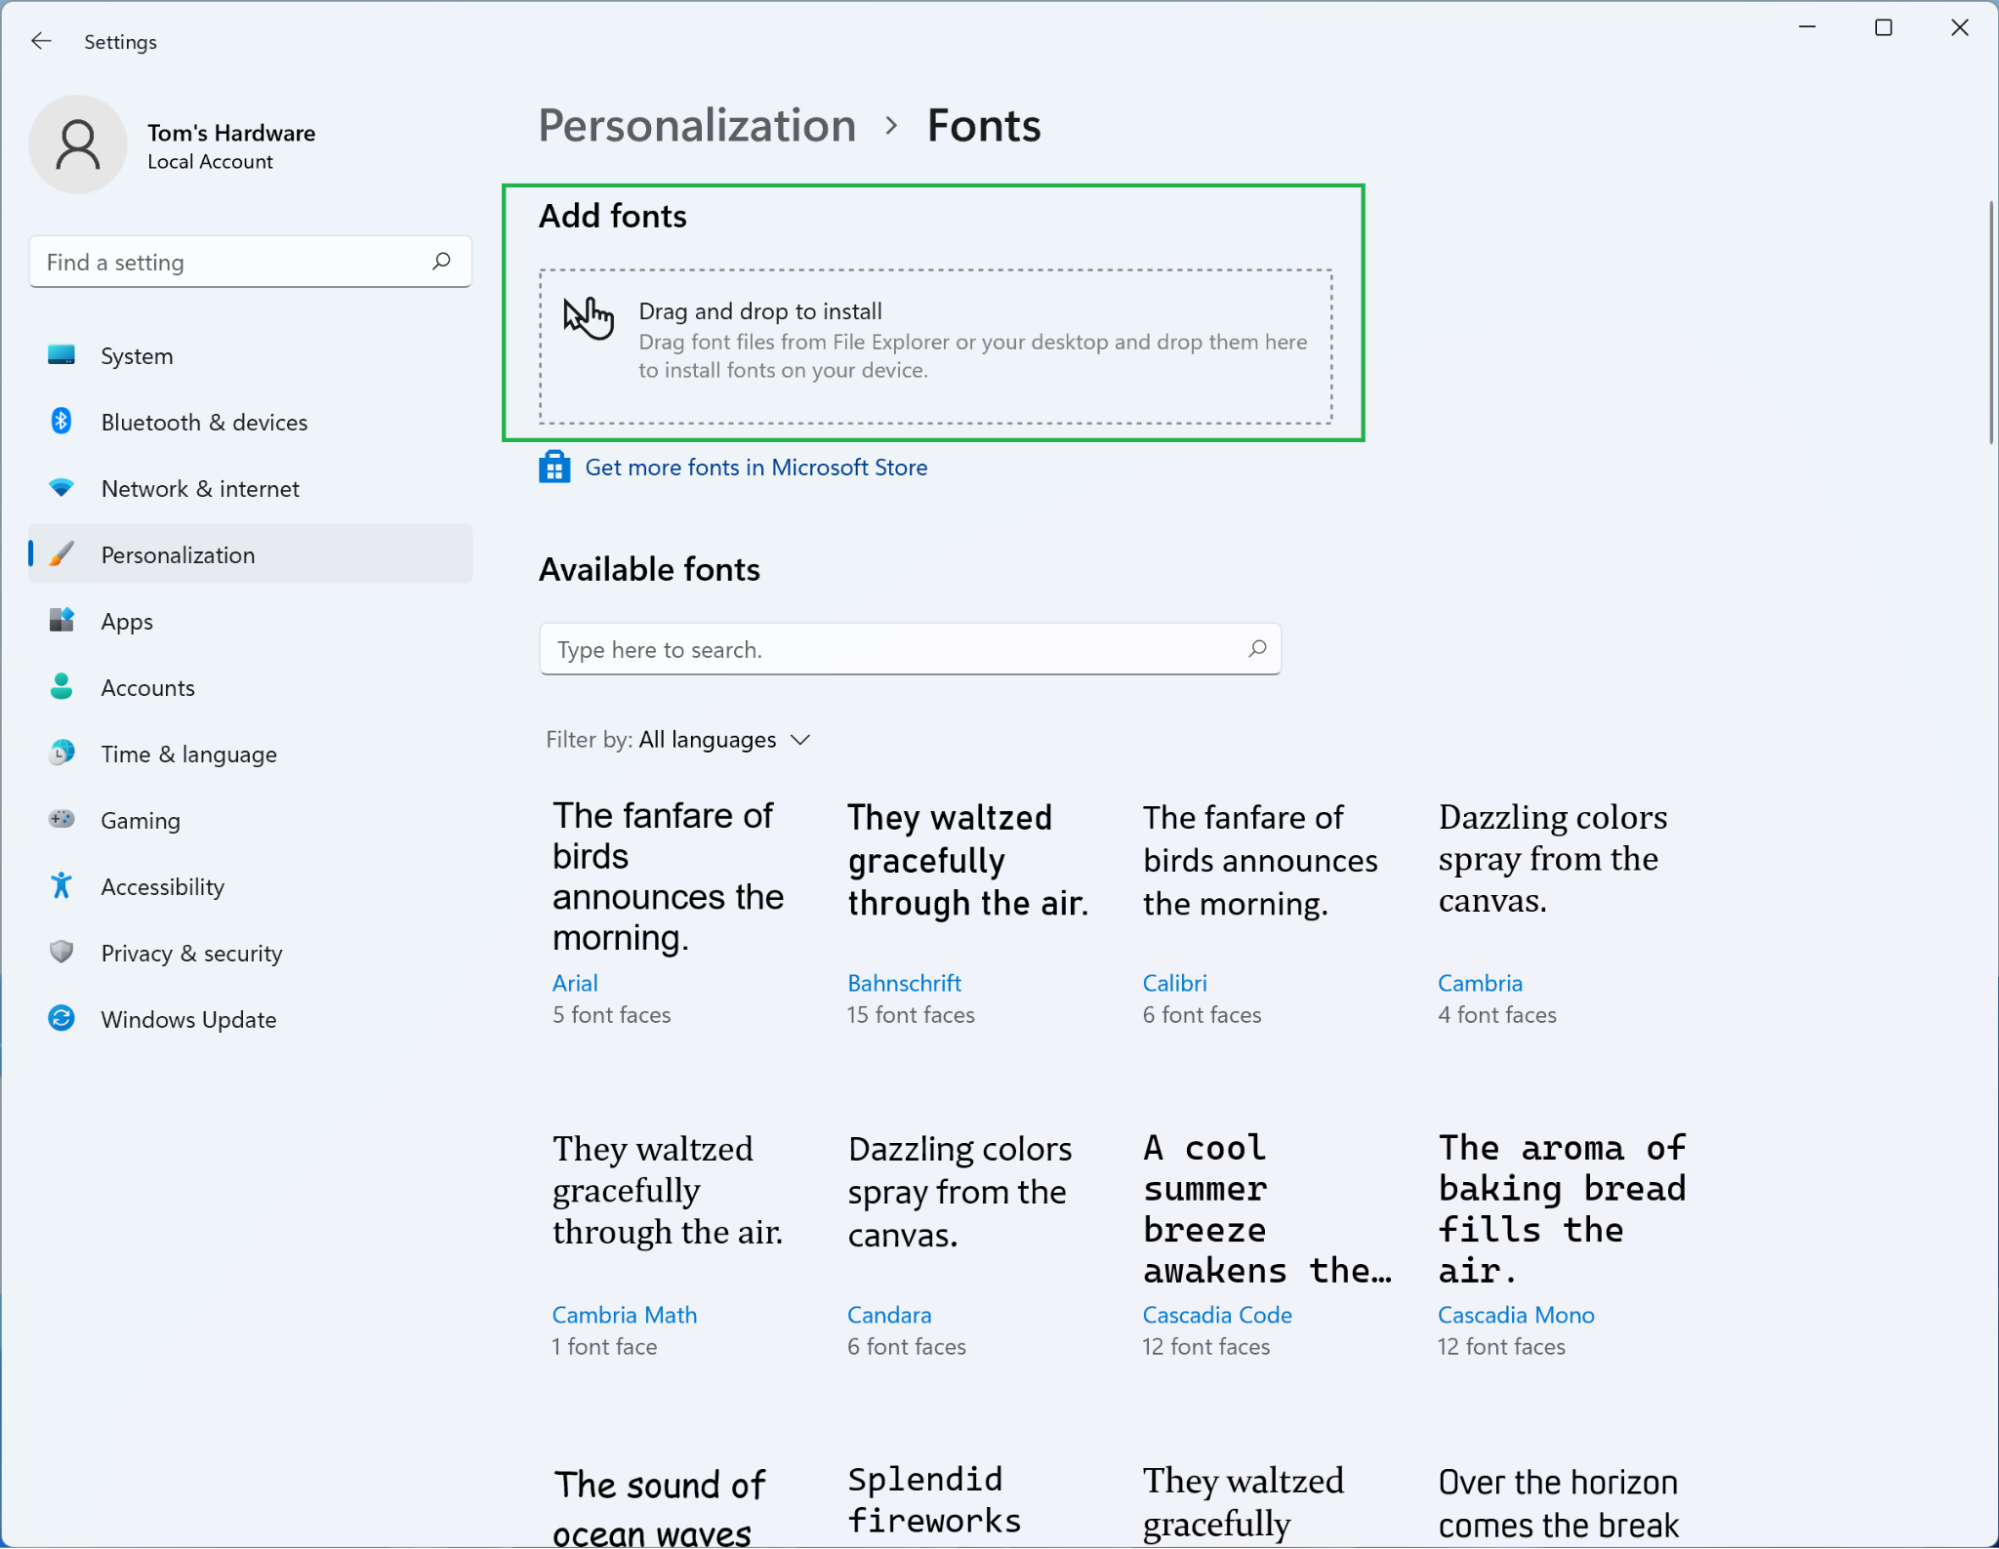
This screen provides a comprehensive view of all your installed fonts. You’ll see previews of each font, their name, and the font family they belong to.
Installing Fonts via Settings
- At the top of the Fonts settings page, you’ll see a section labeled “Add fonts.”
- Click the “Drag and drop font files here to install” area.
- A File Explorer window will open. Navigate to the location where your font files (.TTF or .OTF) are stored.
- Select the font file(s) you wish to install.
- Click “Open”.
Similar to the drag-and-drop method, Windows will proceed with installing the selected fonts. They will then appear in your list of installed fonts within this Settings section and will be immediately available for use in applications.
Method 3: Installing Fonts for All Users

The methods described above typically install fonts for the current user profile. If you have multiple user accounts on your Windows 10 computer and want the new fonts to be accessible to everyone, you’ll need to install them with administrative privileges.
Administrative Installation Using the Fonts Folder
- Ensure you have administrator privileges on your Windows 10 account.
- Open File Explorer and navigate to
C:WindowsFontsas described in Method 1. - Instead of dragging and dropping into the Fonts folder directly, right-click on the Windows Fonts folder.
- From the context menu, select “Install for all users”.
- This will prompt a User Account Control (UAC) dialog box. Click “Yes” to allow the changes.
- Now, drag and drop your .TTF or .OTF font files into the Fonts folder.
Alternatively, when you right-click on a specific font file in File Explorer, you will see an option for “Install for all users.” Clicking this will perform the administrative installation.
Why Install for All Users?
This is particularly useful in a family or shared office environment where different individuals might need access to specific fonts for their work. It ensures consistency and avoids the need for each user to install the same fonts repeatedly.
Troubleshooting Common Font Installation Issues
While font installation on Windows 10 is generally a smooth process, you might occasionally encounter a few snags. Here are some common issues and their solutions:
Font File is Corrupted
- Symptom: You receive an error message stating that the font file is corrupted or invalid during installation.
- Solution: This usually means the font file you downloaded is damaged. Try re-downloading the font from a different source. Ensure you are downloading from reputable font websites to minimize the risk of encountering corrupted files.
Font Not Appearing in Applications
- Symptom: You’ve successfully installed the font, but it doesn’t show up in applications like Microsoft Word, Photoshop, or even the Windows Font viewer.
- Solution:
- Restart the Application: Many applications load available fonts when they start. Close and reopen the program you’re trying to use the font in.
- Restart Your Computer: For a complete system refresh, a simple computer restart can often resolve issues where fonts aren’t being recognized.
- Check Font Validity: While unlikely with .TTF and .OTF, some older or obscure font formats might have compatibility issues. Ensure your font is a standard .TTF or .OTF.
- Verify Installation Location: Double-check that the font is indeed listed in
C:WindowsFontsor in the Fonts section of the Settings app.
Duplicate Fonts
- Symptom: You might accidentally install the same font multiple times, leading to confusion.
- Solution: Windows 10 is usually smart enough to detect duplicate fonts and will ask if you want to replace the existing one. If you notice duplicates, you can manually uninstall older versions from the Fonts folder or Settings.
Permissions Issues
- Symptom: You’re unable to install fonts, and you receive a “Permission denied” error.
- Solution: This typically happens if you’re not logged in with an administrator account and are trying to install for all users, or if you’re trying to modify system folders without the necessary rights. Ensure you are using an administrator account or try installing for the current user only. If installing for all users, make sure you confirm the UAC prompt.
Beyond Installation: Font Management and Usage
Once you’ve mastered installation, you might want to explore more advanced font management.
Uninstalling Fonts
To remove a font you no longer need:
- Open the Fonts folder (
C:WindowsFonts) or go to Settings > Personalization > Fonts. - Locate the font you want to uninstall.
- Right-click on the font and select “Delete”.
- Confirm the deletion when prompted.
Uninstalling unnecessary fonts can help keep your system running smoothly and prevent a cluttered font selection menu in your applications.
Using Fonts in Applications
After installation, new fonts typically appear alphabetically in the font selection dropdown menus within most Windows applications. Simply select the desired application, click on its font menu, and choose your newly installed font.
For design-focused software like Adobe Photoshop, Illustrator, or Microsoft Word, these fonts will be readily available. For example, in Word, you’ll find them in the Home tab, within the font selection box.
Font Licensing and Piracy
It’s crucial to be aware of font licensing. Most fonts, especially professional ones, come with specific licenses that dictate how you can use them.
- Personal Use: Generally allows you to use the font on your personal computer for non-commercial projects.
- Commercial Use: Required for projects that will be sold, advertised, or used for business purposes. This often involves purchasing a license.
- Desktop License: For use on a desktop computer.
- Webfont License: For use on websites.
- App License: For embedding in mobile applications.
Always check the license agreement of any font you download, especially if you plan to use it for professional or commercial work. Downloading and using fonts without the appropriate license can lead to legal issues. Many free font websites clearly state the licensing terms for their downloads.
Conclusion
Installing fonts on Windows 10 is a simple yet powerful way to enhance your digital experience. Whether you’re customizing documents, designing graphics, or simply want to add a personal touch to your computer, the process is accessible to everyone. By following the methods outlined in this guide, you can effortlessly expand your font library and unlock a world of typographic possibilities. Remember to always be mindful of font licensing and to download fonts from reputable sources. Happy fonting!
aViewFromTheCave is a participant in the Amazon Services LLC Associates Program, an affiliate advertising program designed to provide a means for sites to earn advertising fees by advertising and linking to Amazon.com. Amazon, the Amazon logo, AmazonSupply, and the AmazonSupply logo are trademarks of Amazon.com, Inc. or its affiliates. As an Amazon Associate we earn affiliate commissions from qualifying purchases.