In an increasingly digital world, a reliable and feature-rich web browser is an indispensable tool for productivity, communication, and entertainment. For Mac users, while Apple’s native Safari browser offers a polished experience, many gravitate towards Google Chrome for its extensive ecosystem, powerful features, and cross-platform syncing capabilities. Whether you’re a seasoned tech enthusiast or new to the macOS environment, installing Google Chrome is a straightforward process that unlocks a world of enhanced browsing. This guide will walk you through every step, from initial download to optimizing your browsing experience, ensuring a seamless integration of Chrome into your digital life on your Mac.

Google Chrome, a flagship product from the tech giant, has consistently dominated the browser market share, a testament to its robust performance, vast extension library, and deep integration with Google’s suite of services. From cloud-based productivity tools like Google Docs and Gmail to personalized search results and seamless tab syncing across devices, Chrome offers a cohesive and powerful browsing platform. This makes it a compelling choice for anyone looking to maximize their online efficiency and leverage the full power of the internet on their macOS device. Beyond just installation, we’ll delve into why Chrome resonates with millions, how to troubleshoot potential issues, and what steps you can take to make your browsing experience truly your own.
Preparing for Installation: Understanding Chrome’s Appeal on macOS
Before diving into the mechanics of installation, it’s worth understanding why Google Chrome has become such a cornerstone of the internet experience for many Mac users. While macOS provides Safari as a default, Chrome often fills specific niches that enhance a user’s digital workflow and overall productivity.
Why Google Chrome Remains a Top Choice for Mac Users
Google Chrome’s enduring popularity on macOS can be attributed to several key factors that cater to a broad spectrum of users:
- Unparalleled Ecosystem Integration: For users deeply embedded in the Google ecosystem (Gmail, Google Drive, Google Calendar, YouTube, etc.), Chrome offers unparalleled integration. Signing in with your Google account instantly syncs your bookmarks, passwords, browsing history, and open tabs across all your devices, regardless of their operating system. This seamless continuity is a significant draw for professionals, students, and anyone who frequently switches between a Mac, PC, or Android device. This “tech trend” of cross-device experience is something Chrome excels at.
- Vast Extension Library: The Chrome Web Store boasts an enormous collection of extensions that can transform the browser into a highly specialized tool. From productivity enhancers like ad blockers and grammar checkers to developer tools, VPNs, and dedicated social media integrators, the possibilities for customization and functionality are virtually limitless. These “AI Tools” and “Apps” within Chrome can significantly boost productivity, a core theme for any tech-savvy individual.
- Robust Performance and Speed: Chrome is engineered for speed, offering quick page loading times and efficient handling of multiple tabs. While its resource consumption can sometimes be a concern, continuous updates from Google have aimed to optimize its performance, particularly on modern Mac hardware.
- Developer-Friendly Tools: For web developers and designers, Chrome’s built-in developer tools are incredibly powerful and comprehensive. They provide invaluable insights into website structure, performance, and debugging, making it an essential browser for professional web development.
- Regular Updates and Security Features: Google consistently pushes out updates for Chrome, which not only introduce new features but also critically address security vulnerabilities. This commitment to “Digital Security” helps protect users from phishing attempts, malware, and other online threats, making it a safer browsing environment.
- Customization and Personalization: Beyond extensions, Chrome offers extensive options for personalization, from themes and dark mode settings to granular control over privacy settings and experimental features (Chrome Flags).
System Requirements and Pre-Installation Checks
Before initiating the download, it’s prudent to ensure your Mac meets the basic system requirements to run Google Chrome smoothly. While Chrome is generally forgiving, a quick check can prevent potential issues during or after installation.
- Operating System Compatibility: Google Chrome officially supports macOS Catalina (10.15) or later. While older versions of Chrome might run on earlier macOS versions, it’s always best to use the latest version of both your OS and your browser for optimal performance and security. To check your macOS version, click the Apple menu in the top-left corner of your screen and select “About This Mac.”
- Sufficient Disk Space: The Chrome installer file itself is relatively small (around 200 MB), but the application and its cache will consume more space over time. Ensure you have at least a few gigabytes of free space on your hard drive to accommodate the installation and ongoing operations.
- Stable Internet Connection: A reliable internet connection is crucial for downloading the Chrome installer package. While the file size isn’t enormous, a stable connection ensures the download completes without corruption.
The Step-by-Step Installation Process for Google Chrome on Your Mac
Installing Google Chrome on a Mac is designed to be user-friendly, typically involving just a few clicks and a drag-and-drop action. Follow these steps to get Chrome up and running on your system.
Downloading the Official Chrome Installer
The first and most critical step is to obtain the official installer package. It’s imperative to download Chrome only from Google’s official website to ensure you get a legitimate, uncompromised version, thereby safeguarding your “Digital Security.” Avoid third-party download sites, as they may bundle malware or outdated versions.
- Open Your Current Browser: Launch Safari (your Mac’s default browser) or any other web browser you currently use.
- Navigate to the Official Chrome Download Page: In the address bar, type
www.google.com/chromeand press Enter. This will direct you to Google’s official Chrome download portal. - Initiate the Download: On the Chrome download page, you will see a prominent “Download Chrome” button. Click this button. The website should automatically detect that you are on a Mac and offer the correct
.dmg(disk image) file for macOS. - Agree to Terms of Service: A pop-up window might appear, presenting Google Chrome’s Terms of Service. Read them if you wish, then click “Accept and Install” or “Accept & Download” to proceed.
- Save the File: Your browser will prompt you to save the
googlechrome.dmgfile. By default, it will save to your “Downloads” folder. Confirm the location and click “Save.” The download progress will be visible in your browser’s download manager.
Opening the .dmg File and Initiating the Installation
Once the googlechrome.dmg file has finished downloading, the next step is to open this disk image. A .dmg file is a container format commonly used on macOS for software distribution.
- Locate the Downloaded File: Navigate to your “Downloads” folder (or wherever you saved the file). You can do this by opening Finder, selecting “Downloads” from the sidebar, or by clicking the download icon in your browser and selecting “Show in Finder.”
- Open the .dmg File: Double-click the
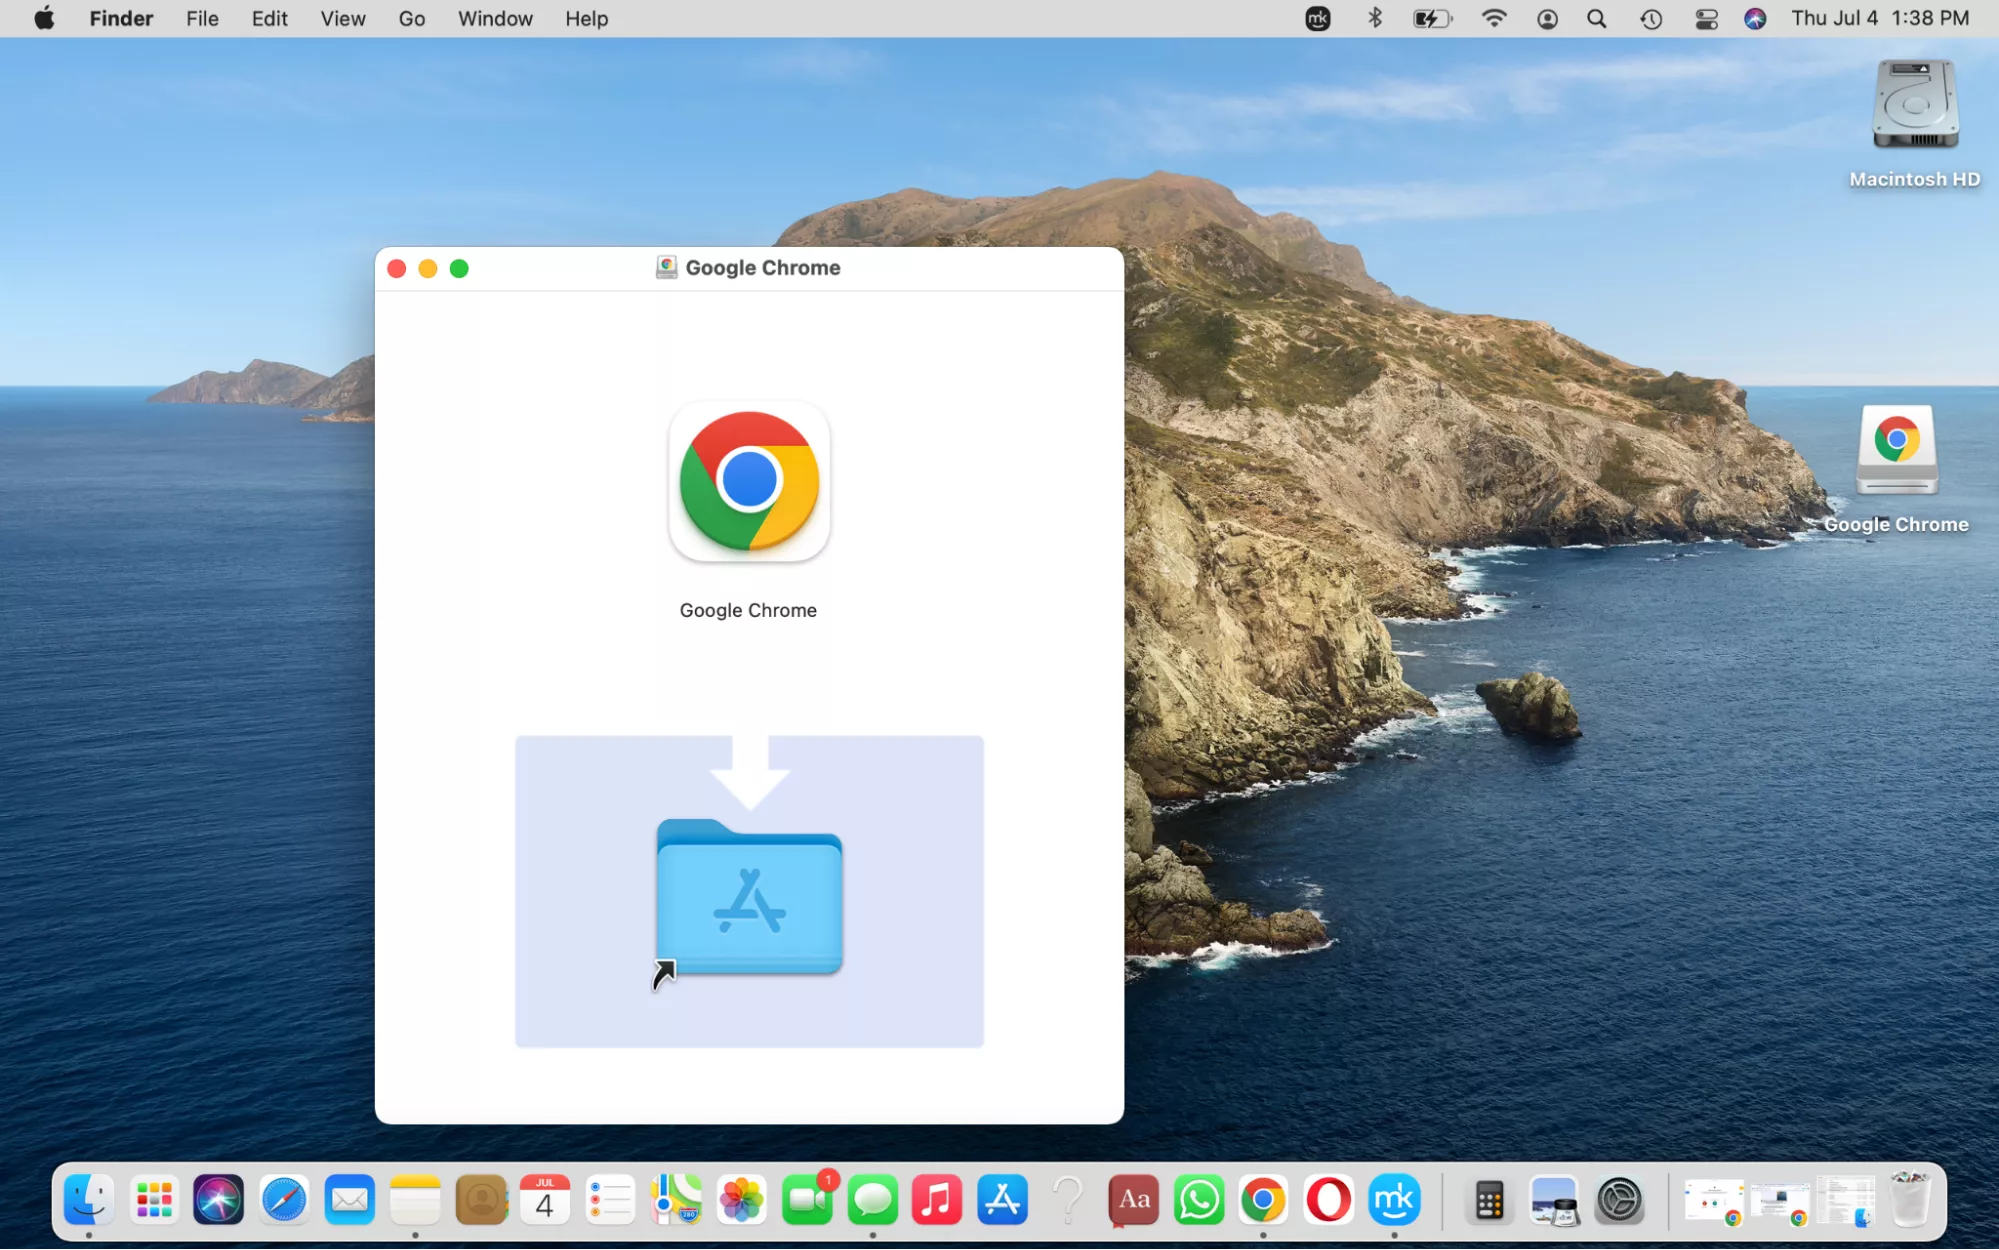
googlechrome.dmgfile. macOS will verify the disk image and then “mount” it, which means it will treat it like a virtual drive on your desktop. A new Finder window will typically open, displaying the contents of the disk image. You might also see a new icon appear on your desktop, often labeled “Google Chrome.” - Review the Installation Window: Inside the newly opened Finder window, you will typically see two icons: “Google Chrome” (the application icon) and an “Applications” folder alias. This setup is standard for macOS application installations.
Dragging Chrome to Your Applications Folder
This is the core installation step, characteristic of how applications are installed on macOS. Unlike Windows, which often uses an installer wizard, Mac applications are frequently installed by simply moving them into the Applications folder.
- Drag and Drop: Click and hold the “Google Chrome” application icon (the colorful circle) within the mounted disk image window. Drag this icon over to the “Applications” folder alias (the folder with the ‘A’ on it) that is also present in the same window.
- Release the Mouse Button: Once the “Google Chrome” icon is hovering over the “Applications” folder, release your mouse button. macOS will then copy the Chrome application into your system’s Applications folder. This process might take a few moments, depending on your Mac’s speed. You may see a progress bar indicating the copy operation.
- Authentication (if necessary): In some cases, especially if it’s a new Mac or specific security settings are enabled, macOS might ask for your administrator password to authorize the copy operation. Enter your password if prompted.
Finalizing Setup and Launching Chrome for the First Time
With Chrome now residing in your Applications folder, there are a couple of final steps to complete the installation and launch the browser.
- Eject the Disk Image: Once the copying process is complete, it’s good practice to “eject” the Google Chrome disk image. You can do this by:
- Right-clicking (or Control-clicking) the “Google Chrome” icon on your desktop and selecting “Eject ‘Google Chrome’.”
- Dragging the “Google Chrome” desktop icon to the Trash (the Trash icon will transform into an Eject icon).
- Clicking the Eject button next to “Google Chrome” in the Finder sidebar.
Ejecting cleans up your desktop and ensures the virtual disk is properly unmounted. You can then delete the originalgooglechrome.dmgfile from your Downloads folder if you wish, as it’s no longer needed.
- Launch Google Chrome:
- From Applications Folder: Open your Applications folder (either from the Finder sidebar or by pressing Shift + Command + A). Locate the “Google Chrome” icon and double-click it.
- From Launchpad: Open Launchpad (usually by pinching with four fingers on your trackpad or clicking its icon in the Dock), find “Google Chrome,” and click it.
- From Spotlight Search: Press Command + Spacebar to open Spotlight, type “Chrome,” and press Enter when “Google Chrome” appears as the top result.
- Initial Launch Prompts: The first time you launch Chrome, macOS will likely present a security warning stating that the app was “downloaded from the Internet.” Click “Open” to confirm you trust the application. Chrome will then typically ask if you want to “Set Google Chrome as your default browser” and “Send usage statistics and crash reports to Google.” Make your selections based on your preferences and click “Start Chrome.”
Congratulations! Google Chrome is now successfully installed and running on your Mac.
Optimizing Your Chrome Experience: Post-Installation Essentials
Installation is just the beginning. To truly harness Chrome’s power, a few post-installation steps can significantly enhance your browsing experience, improving “Productivity” and personalizing your digital environment.
Setting Chrome as Your Default Browser
If you intend to use Chrome as your primary browser, making it the default ensures that all web links clicked from other applications (like email clients or document readers) open directly in Chrome.
- Through Chrome’s Prompt: As mentioned, Chrome often prompts you to set it as default upon its first launch. If you see this, click “Set as Default.”
- From Chrome Settings: If you missed the prompt or decided later, you can do this from within Chrome.
- Open Chrome.
- Click the three vertical dots (More) icon in the top-right corner.
- Go to “Settings” (or type
chrome://settingsin the address bar). - In the “Default browser” section, click “Make default.”
- Via macOS System Settings:
- Click the Apple menu > “System Settings” (or “System Preferences” on older macOS).
- Go to “Desktop & Dock” (or “General” on older macOS).
- Locate the “Default web browser” dropdown menu and select “Google Chrome.”
Syncing Your Google Account and Importing Data
To unlock Chrome’s full potential, especially its cross-device syncing capabilities, signing in with your Google account is highly recommended.
- Sign In: In Chrome, click the profile icon (usually a silhouette or your profile picture) in the top-right corner, then click “Turn on sync…” or “Sign in to Chrome.” Enter your Google account credentials.
- Data Sync: Once signed in, Chrome will prompt you to “Turn on sync.” This will synchronize your bookmarks, history, passwords, extensions, and other settings across all devices where you’re signed into Chrome with the same Google account. This is a game-changer for “Productivity,” ensuring your browsing environment is consistent everywhere.
- Import Bookmarks and Settings (from other browsers): If you’re switching from Safari or another browser, Chrome can import your existing bookmarks, browsing history, and saved passwords.
- Go to Chrome’s “Settings” (
chrome://settings). - In the “You and Google” section, click “Import bookmarks and settings.”
- Select the browser you want to import from and choose the data you wish to transfer.
- Go to Chrome’s “Settings” (
Exploring Essential Chrome Extensions and Customization
Extensions are where Chrome truly shines, offering a tailored browsing experience. The Chrome Web Store is a treasure trove of “Apps” and utilities.
- Access the Chrome Web Store: In Chrome, click the three dots > “More tools” > “Extensions.” Then click the “hamburger” menu (three horizontal lines) on the left and select “Open Chrome Web Store.”
- Discover and Install Extensions: Search for extensions based on your needs. Popular categories include:
- Productivity: Grammarly, Todoist, LastPass, Google Keep.
- Ad Blockers: uBlock Origin, AdBlock Plus (for a cleaner, faster browsing experience).
- Security & Privacy: VPN extensions, Privacy Badger.
- Developer Tools: React Developer Tools, JSON Viewer.
- Entertainment: Enhancements for YouTube, streaming services.
- Customize Appearance:
- Go to Chrome’s “Settings” > “Appearance.”
- Choose a “Theme” to change the browser’s look.
- Adjust font sizes, page zoom, and enable or disable the “Home button” or “Bookmarks bar.”
Keeping Chrome Updated and Secure
Regular updates are vital for “Digital Security” and ensuring optimal performance, introducing new features, and patching vulnerabilities.
- Automatic Updates: Chrome typically updates itself in the background. When an update is available, you might see an “Update” button appear in the top-right corner (replacing the three dots icon), usually colored green, yellow, or red depending on how long the update has been pending.
- Manually Check for Updates:
- Click the three dots > “Help” > “About Google Chrome.”
- Chrome will automatically check for updates and download them if available. You’ll be prompted to “Relaunch” Chrome to apply the update.
This proactive approach ensures you always have the latest “Software” version, benefiting from new “Technology Trends” and enhanced security.
Troubleshooting Common Installation Issues and Advanced Management
While Chrome installation is generally smooth, occasionally users might encounter hiccups. Knowing how to troubleshoot and manage your browser effectively is part of being a savvy Mac user.
Addressing Installation Glitches and Error Messages
- “Cannot Open .dmg File”: This is rare but could indicate a corrupted download. Delete the
.dmgfile and re-download it from the official Google Chrome website. Ensure your internet connection is stable. - “Application Can’t Be Opened”: After dragging to Applications, if Chrome doesn’t launch, check your macOS version compatibility. If your macOS is too old, Chrome might not run. Also, ensure you dragged the application icon, not just a shortcut.
- “Chrome Not Responding” During First Launch: This might be due to a conflict with existing software or insufficient system resources. Try restarting your Mac and attempting to launch Chrome again. Check your Activity Monitor (Applications > Utilities) to see if any processes are hogging CPU or memory.
- “Move to Trash” Warning: If you accidentally try to open Chrome directly from the mounted
.dmgimage instead of dragging it to Applications, macOS might warn you. Always drag the application to the Applications folder first. - Permissions Issues: Ensure your user account has the necessary permissions to install applications. If you are not an administrator, you might need to provide an administrator’s credentials.
How to Uninstall Google Chrome from Your Mac
Sometimes, you might need to remove Chrome from your Mac, perhaps to resolve persistent issues, free up disk space, or switch to another browser. A complete uninstallation involves more than just dragging the app to the Trash.
- Quit Google Chrome: Ensure Chrome is completely closed. Click “Chrome” in the menu bar and select “Quit Google Chrome,” or press Command + Q.
- Open Applications Folder: Navigate to your Applications folder in Finder.
- Move Chrome to Trash: Drag the “Google Chrome” application icon from the Applications folder to the Trash in your Dock.
- Empty the Trash: Right-click the Trash icon and select “Empty Trash” to permanently delete the application.
- Remove Residual Files (Optional, but Recommended for a Clean Uninstall): Chrome leaves behind user data, cache, and preferences files. For a truly clean uninstall, you’ll need to remove these.
- Open Finder, click “Go” in the menu bar, then select “Go to Folder…” (or press Shift + Command + G).
- Type
~/Library/Application Support/Google/Chrome/and press Enter. - This will open the folder containing your Chrome user data. Be cautious here: deleting this folder will remove all your bookmarks, history, extensions, and settings. If you want to retain them for a future reinstall or use on another device, ensure you’ve synced your Google account first.
- Drag the entire “Chrome” folder to the Trash.
- You might also check
~/Library/Caches/Google/Chrome/and~/Library/Preferences/com.google.Chrome.plistand drag them to the Trash.
- Empty Trash Again: Empty the Trash one more time to delete these residual files.
This thorough uninstallation ensures Chrome is completely removed from your Mac, allowing for a fresh start or freeing up significant disk space.
Beyond Installation: Chrome’s Role in Your Digital Ecosystem
Installing Chrome is merely the first step. Understanding its place within your broader digital ecosystem, how it stacks against competitors, and its potential for advanced use can further enhance your “Tech” prowess.
Comparing Chrome to Safari and Other Browsers
While this guide focuses on Chrome, it’s worth briefly comparing it to its primary macOS competitor, Safari, and other browsers like Firefox or Edge.
- Chrome vs. Safari:
- Performance & Battery Life: Safari is often optimized for macOS, frequently offering better battery life on MacBooks and slightly faster performance in certain native tasks.
- Ecosystem: Chrome excels if you live within the Google ecosystem; Safari integrates seamlessly with Apple’s ecosystem (iCloud Keychain, Handoff, Apple Pay).
- Extensions: Chrome’s Web Store is far larger than Safari’s extension gallery.
- Privacy: Safari often emphasizes privacy more prominently, with features like Intelligent Tracking Prevention. Chrome has also enhanced its privacy controls but faces scrutiny due to Google’s data-driven business model.
- Chrome vs. Firefox: Firefox is a strong open-source contender, known for its commitment to privacy and robust customization options. It’s often preferred by users who prioritize privacy and an open internet.
- Chrome vs. Edge: Microsoft Edge, now built on the same Chromium engine as Chrome, offers a very similar experience with competitive performance and features. It can be a good alternative if you prefer Microsoft’s services or want a slightly different take on the Chromium browser.
Choosing between these browsers often comes down to personal preference, ecosystem allegiance, and specific feature needs. Many users opt to have multiple browsers installed for different purposes.
Leveraging Chrome for Enhanced Productivity and Digital Workflow
Chrome’s strength lies not just in its browsing capabilities but also in its ability to act as a hub for your “Productivity” and digital workflow.
- Google Workspace Integration: Deep ties with Gmail, Google Drive, Google Calendar, and Google Meet make Chrome an ideal browser for professionals and students who rely on these tools. Opening a new tab often presents quick links to these services, and real-time collaboration features are optimized for Chrome.
- Task Management and Notes: Extensions for task managers (e.g., Todoist, Asana) and note-taking apps (e.g., Evernote Web Clipper, Google Keep) integrate directly into your browser, allowing you to capture ideas or manage tasks without leaving your current webpage.
- Screen Sharing and Remote Work: Chrome is a popular choice for video conferencing and screen sharing through platforms like Google Meet, Zoom (with extensions), and various remote desktop tools.
- Developer Tools: As mentioned, for those involved in web development, Chrome’s built-in developer tools are invaluable for inspecting elements, debugging JavaScript, monitoring network activity, and optimizing website performance.

The Future of Browsing: Chrome’s Evolution and Impact
Chrome, as a dominant “Software” in the “Tech” landscape, continues to evolve. Google consistently invests in improving its core functionalities, security, and developer features. We can anticipate continued enhancements in:
- Performance and Efficiency: Ongoing efforts to reduce resource consumption and improve speed, especially with new Mac hardware.
- Privacy and Security: New features to give users more control over their data, combat online tracking, and protect against emerging threats.
- Web Standards: Google’s influence in developing new web standards through Chrome will continue to shape how the internet looks and functions.
- AI Integration: Expect more sophisticated AI-powered features, from intelligent search suggestions to enhanced accessibility tools, further integrating “AI Tools” into the browsing experience.
By understanding how to install, optimize, and manage Google Chrome on your Mac, you’re not just adding a browser; you’re equipping yourself with a powerful tool that can streamline your digital life, enhance productivity, and keep you connected to the forefront of “Technology Trends.” Embrace the full potential of Chrome and tailor it to your unique needs, making your Mac an even more potent hub for all your online endeavors.
aViewFromTheCave is a participant in the Amazon Services LLC Associates Program, an affiliate advertising program designed to provide a means for sites to earn advertising fees by advertising and linking to Amazon.com. Amazon, the Amazon logo, AmazonSupply, and the AmazonSupply logo are trademarks of Amazon.com, Inc. or its affiliates. As an Amazon Associate we earn affiliate commissions from qualifying purchases.