The landscape of modern computing is often dominated by proprietary systems, yet for developers, security professionals, and enthusiasts, Linux remains the gold standard for flexibility and performance. Ubuntu, developed by Canonical, stands as the most popular Linux distribution globally. It bridges the gap between technical power and user-friendly accessibility. Whether you are looking to breathe new life into an aging laptop, set up a robust development environment, or transition away from data-heavy operating systems, knowing how to install Ubuntu is a fundamental skill in the modern tech ecosystem.

This guide provides an exhaustive, professional walkthrough of the installation process, from initial environment preparation to post-installation optimization, ensuring a stable and secure computing experience.
1. Preparing Your Hardware and Environment for Ubuntu
Before diving into the installation, meticulous preparation is key to preventing data loss and ensuring hardware compatibility. Unlike closed-source alternatives, Ubuntu is highly versatile, but it still requires specific environmental conditions to thrive.
System Requirements and Compatibility
Ubuntu is known for its efficiency, but modern versions (specifically the Long Term Support or LTS releases) require certain hardware baselines for a smooth experience. As of the latest stable versions, the recommended requirements include:
- A 2 GHz dual-core processor or better.
- At least 4 GB of system memory (RAM).
- 25 GB of free hard drive space (though 64 GB+ is recommended for long-term use).
- VGA capability with a 1024×768 screen resolution.
- A USB port for the installation media.
It is also vital to verify if your hardware has specific “secure boot” or “Fast Boot” settings in the BIOS/UEFI. While Ubuntu supports Secure Boot, some proprietary hardware configurations might require these features to be toggled to allow the system to boot from an external USB drive.
Backing Up Data and Disk Partitioning
Installing an operating system is an invasive process for your hardware. If you are replacing an existing OS or setting up a dual-boot configuration, backing up your data is non-negotiable. Use external drives or cloud storage to secure your documents, SSH keys, and configuration files.
Furthermore, you must decide on your disk strategy. If you intend to run Ubuntu alongside Windows (Dual Booting), you should shrink your Windows partition within the Windows Disk Management tool prior to starting the Ubuntu installation. This creates “Unallocated Space” that the Ubuntu installer can easily claim without damaging your existing files.
Creating a Bootable USB Drive
To install Ubuntu, you need the official ISO file from the Ubuntu website. It is generally recommended to choose the LTS (Long Term Support) version, which provides five years of guaranteed security and maintenance updates.
Once the ISO is downloaded, you cannot simply copy it to a USB drive; you must “flash” it to make it bootable. Tools like Rufus (on Windows) or balenaEtcher (cross-platform) are the industry standards for this.
- Insert a USB drive (at least 8 GB).
- Select the Ubuntu ISO file within the tool.
- Ensure the partition scheme is set to GPT for modern UEFI systems.
- Click “Flash” or “Start” to create the installation media.
2. The Step-by-Step Installation Process
With your bootable USB ready, you are prepared to enter the installation phase. This stage involves transitioning from your host BIOS to the Ubuntu live environment.
Booting from the Installation Media
Restart your computer and enter the Boot Menu. This is usually achieved by tapping a specific key (F12, F10, F2, or Esc) immediately after the power button is pressed. Select your USB drive from the list.
You will be greeted by the “GRUB” menu. Select “Try or Install Ubuntu.” Ubuntu will load into a “Live” mode, allowing you to test your hardware—such as Wi-Fi, Bluetooth, and sound—before actually committing to the installation on your hard drive. This is a critical step for verifying driver compatibility.
Configuring Language and Keyboard Layouts
Once you click the “Install Ubuntu” icon on the desktop, the installer wizard begins. The first few screens are straightforward but important for localizing your experience. Select your preferred language and keyboard layout. For most users in the tech space, the “English (US)” layout is standard, but Ubuntu provides extensive support for international layouts and input methods for various languages.
Installation Type: Clean Install vs. Dual Booting
This is the most critical decision in the process. The installer offers several paths:
- Erase disk and install Ubuntu: This is the “Clean Install” option. It wipes the entire hard drive and sets up Ubuntu as the sole operating system. This is the best choice for a dedicated Linux workstation.
- Install Ubuntu alongside [Existing OS]: If the installer detects Windows or another Linux distro, it can automatically resize partitions to make room for Ubuntu. This is ideal for users who still need access to proprietary software.
- Something Else (Manual Partitioning): For advanced tech users, this allows you to manually define the root (
/), home (/home), and swap partitions. Using a separate/homepartition is an insightful strategy, as it allows you to reinstall the OS in the future without losing your personal files and settings.
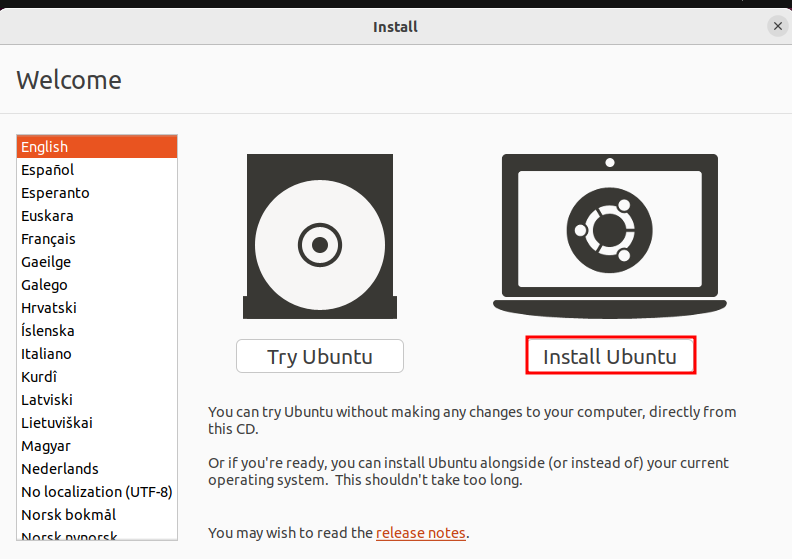
During this stage, ensure you check the boxes for “Download updates while installing” and “Install third-party software for graphics and Wi-Fi hardware.” This ensures that proprietary drivers (like those for NVIDIA GPUs or Broadcom Wi-Fi chips) are configured from the start.
3. Essential Post-Installation Configuration
Once the installation finishes and the system reboots, your journey has just begun. Proper post-installation configuration turns a generic setup into a high-performance machine.
Updating the System and Installing Drivers
The first action in any new Linux environment should be updating the package database. Open the terminal (Ctrl+Alt+T) and execute:
sudo apt update && sudo apt upgrade -y
This command ensures all system components and security patches are current. Next, navigate to “Software & Updates” and check the “Additional Drivers” tab. If you are using a dedicated GPU, Ubuntu will recommend the best proprietary driver. Installing these is essential for hardware acceleration and smooth UI performance.
Setting Up Software Repositories and Snap Store
Ubuntu uses a hybrid approach to software management. The standard APT (Advanced Package Tool) repositories provide stable, vetted software. However, for the latest versions of tools like VS Code, Slack, or Spotify, the Snap Store is invaluable.
Snaps are containerized software packages that include all dependencies, ensuring they run consistently across different versions of Ubuntu. You can manage these via the “Ubuntu Software” center or through the command line. For developers, adding the PPA (Personal Package Archive) for specific tools (like the latest Python or Java versions) is a common way to stay on the cutting edge while remaining on a stable OS base.
Optimizing the GNOME Desktop Experience
The default desktop environment, GNOME, is designed for productivity. However, many tech professionals prefer to customize it for better workflow. Use the GNOME Tweaks tool to:
- Enable “Minimize” and “Maximize” buttons on windows.
- Change system fonts for better readability.
- Manage GNOME Extensions, such as “Dash to Dock” (to make the sidebar look more like a traditional dock) or “Clipboard Indicator” to track your copy-paste history.
4. Security and Performance Tuning for Modern Users
In an era of increasing digital threats, an “out-of-the-box” installation is only the baseline. Fine-tuning your system’s security and performance is what separates a casual user from a professional.
Configuring the Uncomplicated Firewall (UFW)
Ubuntu comes with a powerful firewall called UFW, but it is often disabled by default. Enabling it is the first step in securing your digital perimeter. In the terminal, type:
sudo ufw enable
sudo ufw default deny incoming
sudo ufw default allow outgoing
This configuration blocks unauthorized incoming connections while allowing your applications to reach the internet. If you are a developer running local servers (like Node.js or Docker), you can easily open specific ports using sudo ufw allow [port].
Managing Privacy Settings and User Accounts
Ubuntu provides a “Privacy” menu within the system settings. Here, you can toggle “Connectivity Checking,” manage “Location Services,” and determine how long “Usage & History” data is retained. For those concerned with digital footprints, disabling technical error reporting to Canonical can also be handled here.
Furthermore, ensure you understand the power of the sudo group. Your primary user account has administrative privileges, but for shared machines, creating standard user accounts without sudo access is a vital security practice to prevent accidental system-wide changes.

Leveraging Ubuntu for Development and AI Workflows
For many, Ubuntu is the gateway to advanced technological fields. Because Ubuntu is the reference OS for many AI and Machine Learning frameworks (like TensorFlow and PyTorch), the installation of CUDA and Docker is highly streamlined.
Installing the build-essential package is a prerequisite for any developer:
sudo apt install build-essential
This installs the GCC compiler, make, and other tools required to compile software from source. Combined with Ubuntu’s native support for virtualization and containerization, your newly installed OS becomes a powerhouse for cloud computing, software engineering, and data science.
By following this structured approach—from hardware preparation to advanced security tuning—you transition from merely “installing an OS” to architecting a professional-grade computing environment. Ubuntu’s strength lies in its balance of simplicity and depth, providing a reliable foundation for whatever your technical goals may be.
aViewFromTheCave is a participant in the Amazon Services LLC Associates Program, an affiliate advertising program designed to provide a means for sites to earn advertising fees by advertising and linking to Amazon.com. Amazon, the Amazon logo, AmazonSupply, and the AmazonSupply logo are trademarks of Amazon.com, Inc. or its affiliates. As an Amazon Associate we earn affiliate commissions from qualifying purchases.