Embarking on a Minecraft adventure is an experience many gamers cherish. Whether you’re building elaborate castles, exploring vast, procedurally generated worlds, or battling formidable foes, the visual fidelity of your game can significantly enhance the immersion. However, the vanilla version of Minecraft, while charming, can sometimes fall short of modern graphical expectations. This is where OptiFine, a powerful third-party modification, steps in. OptiFine is renowned for its ability to dramatically boost Minecraft’s performance and introduce a plethora of advanced graphical settings. It allows players to fine-tune everything from shader support to render distances, anti-aliasing, and anisotropic filtering, transforming the look and feel of their game.

This comprehensive guide will walk you through the straightforward process of installing OptiFine into your Minecraft client. While the installation might seem like a technical hurdle, we’ll break it down into simple, actionable steps, ensuring that even those new to game modding can achieve a visually superior Minecraft experience. We’ll cover everything from understanding what OptiFine is and why you’d want it, to the step-by-step installation process, and finally, how to verify that it’s working correctly. This tutorial is designed to be accessible and informative, drawing on our website’s core pillars of Technology and expertly guiding you through this popular software enhancement.
Understanding OptiFine: The Powerhouse for Minecraft Graphics
Before diving into the installation process, it’s crucial to understand what OptiFine is and the benefits it brings to your Minecraft gameplay. At its heart, OptiFine is a performance-enhancing and graphically advanced Minecraft mod. Developed by “sp614x,” it’s not just about making your game look prettier; it’s also about making it run smoother, especially on systems that might struggle with the demands of modern graphics.
Why Install OptiFine? The Benefits Unveiled
The primary motivation for installing OptiFine is the significant improvement in graphical capabilities and performance. Let’s explore the key advantages:
- Enhanced Performance: This is often the most compelling reason. OptiFine optimizes Minecraft’s rendering engine, leading to higher frame rates (FPS) and a smoother gameplay experience, even on less powerful hardware. It achieves this through various optimizations, such as better chunk loading, dynamic rendering, and efficient utilization of system resources.
- Advanced Graphics Settings: OptiFine unlocks a treasure trove of graphical customization options far beyond what the vanilla game offers. Players can meticulously control:
- Shaders: OptiFine provides robust support for shader packs, which can fundamentally alter the lighting, shadows, water effects, and overall atmosphere of your game, adding a level of realism and beauty previously unattainable.
- Render Distance: While vanilla Minecraft has a render distance setting, OptiFine allows for much greater control, enabling you to see further into the world if your system can handle it, or to reduce it further for performance gains.
- Dynamic Lighting: This feature allows items held in your hand that emit light (like torches) to illuminate your surroundings in real-time, adding a dynamic and immersive effect.
- Smooth Lighting: OptiFine offers more sophisticated smooth lighting options, creating softer transitions between light and shadow.
- Animations and Textures: You can control individual animations and texture features, such as animated water, fire, and foliage, and even disable them to improve performance.
- Anti-Aliasing and Anisotropic Filtering: These graphical techniques reduce jagged edges and improve the clarity of textures at a distance, respectively, contributing to a sharper and more visually pleasing image.
- Fog and Cloud Control: OptiFine gives you finer control over fog density and cloud rendering, allowing for more atmospheric or performance-friendly settings.
- Zoom Functionality: A built-in zoom feature allows you to get closer to distant objects without needing any other mods. This is incredibly useful for detailed building, spotting enemies from afar, or simply appreciating the intricate details of your world.
- Better Mod Compatibility (Generally): While not a universal guarantee, OptiFine is widely compatible with many other Minecraft mods, making it a foundational mod for many modded Minecraft installations. It often acts as a prerequisite for other mods that require deeper access to the game’s rendering.
- Configurability: The extensive settings menu within OptiFine allows for unparalleled personalization. You can tailor the game’s visuals and performance precisely to your preferences and hardware capabilities.
Where to Obtain OptiFine
It’s crucial to download OptiFine from its official source to ensure you’re getting a legitimate and safe version. The official OptiFine website is the only reliable place to acquire the mod. Be wary of unofficial sites that may bundle malware or outdated versions.
- Official Website: Navigate to optifine.net.
- Downloads Page: On the website, you’ll find a dedicated “Downloads” section.
- Version Selection: Here, you’ll see a list of OptiFine versions corresponding to different Minecraft versions. It is essential to download the OptiFine version that matches the Minecraft version you intend to play. For instance, if you play Minecraft 1.19.2, you must download the OptiFine installer for 1.19.2.
- Ad-Supported Downloads: The website uses a simple ad-supported model. You’ll typically need to click “Skip” after a short ad plays.
Step-by-Step Installation Guide: Getting OptiFine into Your Minecraft Game
Installing OptiFine is a relatively simple process, primarily involving downloading the correct installer and running it. The process can vary slightly depending on your operating system, but the core steps remain consistent.
Method 1: The Standard Installer (Recommended for Most Users)
This is the most common and straightforward method for installing OptiFine.
1. Download the Correct OptiFine Version
As mentioned in the previous section, the first and most critical step is to download the OptiFine installer that precisely matches your Minecraft version.
- Go to the official OptiFine downloads page: optifine.net/downloads.
- Locate the desired Minecraft version from the list.
- Click the “Download” button next to it.
- You might be taken to an advertisement page. Wait for the countdown timer and then click the “Skip” button in the top-right corner.
- This will download an executable
.jarfile (e.g.,OptiFine_1.19.2_HD_U_H1.jar).
2. Run the OptiFine Installer
Once the download is complete, you need to run the installer.
- Locate the downloaded
.jarfile. It will likely be in your “Downloads” folder. - Double-click the
.jarfile.- Windows: If you have Java installed correctly, double-clicking a
.jarfile should automatically launch the OptiFine installer. If it prompts you to choose a program, select your Java executable. If it still doesn’t work, you might need to associate.jarfiles with Java or run it from the command line (explained below). - macOS: Similar to Windows, double-clicking should work if Java is properly configured.
- Linux: You might need to open a terminal in the directory where you downloaded the file and run the command:
java -jar OptiFine_[version_number].jar(replace[version_number]with the actual filename).
- Windows: If you have Java installed correctly, double-clicking a
- The OptiFine Installer Window: A simple installer window will pop up. It will show the OptiFine version and the Minecraft version it’s for.
- Click “Install.” The installer will then proceed to install OptiFine into your Minecraft launcher.
- Confirmation: You should see a message indicating that OptiFine has been successfully installed. Click “OK.”
3. Launch Minecraft with OptiFine
After successful installation, you need to ensure your Minecraft launcher is configured to use OptiFine.
- Open the Minecraft Launcher.
- Select the Installation: On the left-hand side of the launcher, you’ll see different “Installations” or “Profiles.”
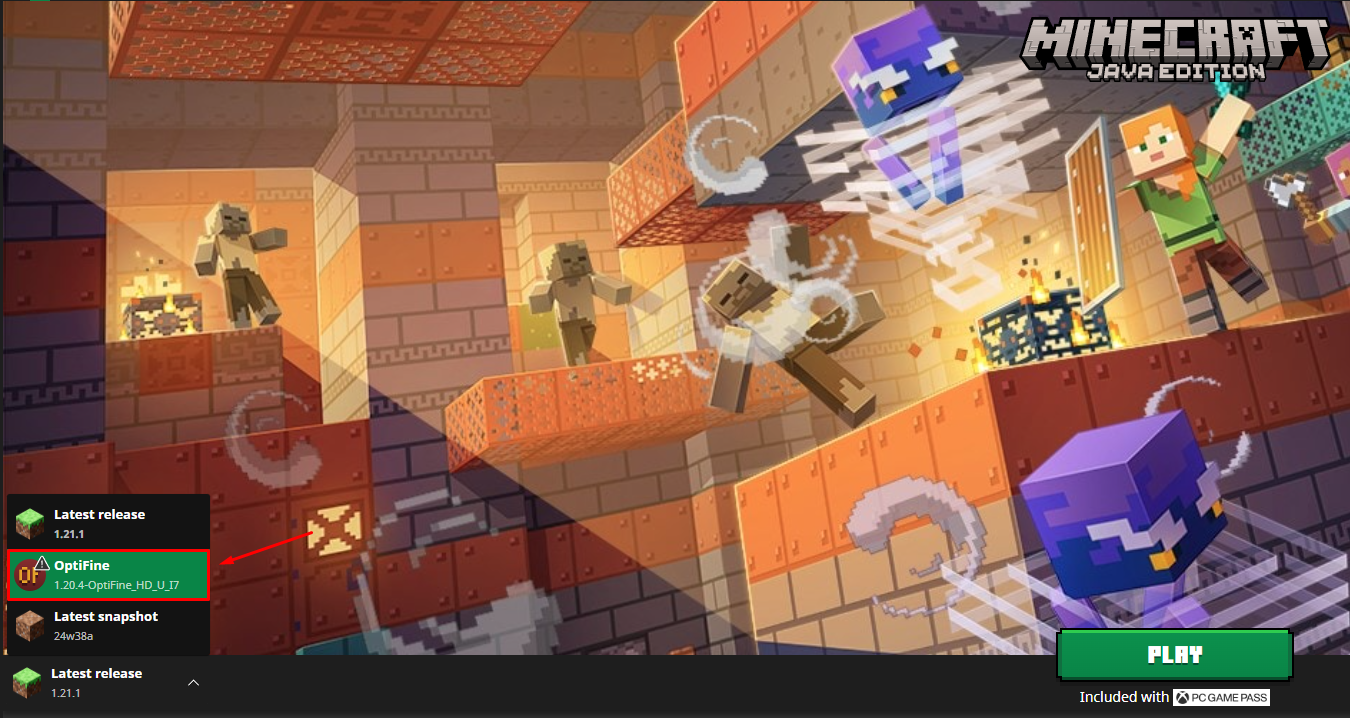
- Find the OptiFine Profile: A new profile named “OptiFine” (or similar, often including the version number) should have been automatically created. Select this profile.
- Play: Click the “Play” button. Minecraft will now launch with OptiFine integrated.

Method 2: Manual Installation (for Forge/Fabric Users or Troubleshooting)
If you are already using mod loaders like Forge or Fabric, or if the standard installer method encounters issues, a manual installation might be necessary. This method involves placing the OptiFine .jar file directly into your mods folder.
Note: This method is generally for users who have already installed Forge or Fabric. OptiFine has specific compatibility with different mod loaders, and the method can change. For most users, the standard installer is preferred as it handles the profile creation.
1. Download OptiFine and Your Mod Loader
- OptiFine: Download the OptiFine
.jarfile as described in Method 1. Make sure it’s for the correct Minecraft version. - Mod Loader (Forge/Fabric): If you haven’t already, download and install the correct version of Forge or Fabric for your Minecraft version. Follow their respective installation guides.
2. Locate Your Minecraft mods Folder
- Open the Minecraft Launcher.
- Go to “Installations.”
- Hover over your Forge or Fabric installation (the one you want to use OptiFine with).
- Click the folder icon that appears on the right. This will open your Minecraft game directory.
- Find or Create the
modsFolder: Inside your Minecraft game directory, you should see a folder namedmods. If it doesn’t exist, create a new folder and name itmods.
3. Place OptiFine into the mods Folder
- Copy the downloaded OptiFine
.jarfile. - Paste it directly into the
modsfolder you located in the previous step.
4. Launch Minecraft with Your Mod Loader Profile
- Open the Minecraft Launcher.
- Select your Forge or Fabric profile.
- Click “Play.”
If done correctly, Minecraft should launch with both your mod loader and OptiFine active.
Verifying OptiFine Installation and Accessing Settings
Once you’ve gone through the installation process, it’s essential to confirm that OptiFine is active and to explore its powerful settings.
Checking if OptiFine is Running
The easiest way to verify that OptiFine is installed and running is by checking the Minecraft main menu or in-game options.
- Launch Minecraft: Make sure you are launching with the OptiFine profile or your modded profile (if installed manually).
- Main Menu: On the Minecraft main menu screen, look at the bottom-right corner. You should see the text “OptiFine [version]” displayed there.
- Options Menu:
- From the main menu, click “Options…”
- Then click “Video Settings…”
- You will immediately notice that the “Video Settings” menu is significantly expanded with new categories and numerous options not present in the vanilla game. This is a clear indication that OptiFine is active.
Navigating and Adjusting OptiFine Settings
The real power of OptiFine lies in its extensive configuration options. Here’s how to access and understand them:
- Accessing the Menu: As mentioned, go to
Options...>Video Settings.... - Key Settings Categories: You’ll find new tabs and expanded options within existing ones. Some of the most impactful include:
- Details: This section controls a vast array of visual elements, from trees, clouds, and rain to stars and fog. You can toggle these on or off, or set them to “Fast,” “Fancy,” or “Default.”
- Animations: Here, you can control specific animations like water, lava, fire, particles, and more. Disabling certain animations can significantly boost performance.
- Quality: This tab allows you to configure texture settings, mipmap levels, anisotropic filtering, and custom sky/water.
- Performance: This is a critical section for optimization. You can enable features like “Render Regions,” “Fast Render,” “Fast Math,” “Dynamic Updates,” and “Chunk Updates.” Experiment with these to find the best balance between performance and visual quality for your system.
- Shaders: If you’ve downloaded shader packs, this is where you enable them. You can also select different shader packs and access their individual settings.
- Others: This section includes options like dynamic lighting, fog control, and the zoom feature.
Troubleshooting Common Installation Issues
While OptiFine is generally easy to install, occasional issues can arise.
- Java Issues:
- Problem: Double-clicking
.jarfiles doesn’t launch the installer, or you get an error about Java. - Solution: Ensure you have the latest version of Java installed from java.com. You might also need to associate
.jarfiles with your Java Runtime Environment (JRE). On Windows, right-click a.jarfile, select “Open with,” and then choose “Choose another app.” Browse to your Java installation (often inC:Program FilesJavajre[version]binjava.exe) and select it.
- Problem: Double-clicking
- Incorrect Minecraft Version:
- Problem: OptiFine doesn’t appear in the launcher, or it crashes the game.
- Solution: You’ve likely downloaded an OptiFine version that doesn’t match your Minecraft version. Go back to the OptiFine downloads page and ensure you select the correct version.
- Mod Loader Conflicts:
- Problem: OptiFine works on its own but crashes when used with other mods.
- Solution: Ensure the OptiFine version you’re using is compatible with your mod loader (Forge/Fabric) and its version. Check the OptiFine website or the mod loader’s community forums for compatibility information. Sometimes, the order of installation or the specific versions of mods can cause conflicts.
- Corrupted Download:
- Problem: The installer fails or the game crashes immediately.
- Solution: Redownload the OptiFine
.jarfile from the official website. Sometimes, downloads can become corrupted.
By following these steps and understanding the nuances, you can successfully install OptiFine and unlock a visually stunning and more performant Minecraft experience. The ability to tailor your game’s graphics to your liking is a testament to the power of community-driven software enhancements in the gaming world, aligning perfectly with our focus on accessible technology tutorials.
aViewFromTheCave is a participant in the Amazon Services LLC Associates Program, an affiliate advertising program designed to provide a means for sites to earn advertising fees by advertising and linking to Amazon.com. Amazon, the Amazon logo, AmazonSupply, and the AmazonSupply logo are trademarks of Amazon.com, Inc. or its affiliates. As an Amazon Associate we earn affiliate commissions from qualifying purchases.