In the rapidly evolving landscape of technology, the lines between operating systems are blurring, offering users unprecedented flexibility and power. For years, developers, system administrators, and tech enthusiasts faced a choice: embrace Windows for its widespread compatibility and user-friendliness, or dive into Linux for its robust command-line tools, open-source freedom, and powerful development environments. Windows 11, however, has fundamentally changed this paradigm by integrating the best of both worlds through the Windows Subsystem for Linux (WSL).
This innovative feature allows you to run a full-fledged Linux environment directly on your Windows machine, without the overhead of dual-booting or the complexity of a virtual machine. For anyone invested in productivity, digital security, or simply expanding their technological horizons, WSL on Windows 11 represents a game-changer. This comprehensive guide will walk you through every step, from understanding what WSL is to seamlessly installing and leveraging a Linux distribution, ensuring you unlock a new dimension of computing power right from your familiar Windows desktop.
Understanding Windows Subsystem for Linux (WSL)
The ability to run Linux commands and applications natively on Windows was once a distant dream. WSL makes this a reality, bridging the gap between two traditionally distinct operating systems. Before diving into the installation, it’s crucial to grasp what WSL is and why it’s become an indispensable tool for so many.
What is WSL and Why Use It?
At its core, Windows Subsystem for Linux is a compatibility layer developed by Microsoft for running Linux binary executables (in ELF format) natively on Windows 10 and Windows 11. It’s not a virtual machine in the traditional sense, nor is it a dual-boot setup that requires restarting your computer to switch operating systems. Instead, WSL provides a lightweight environment that translates Linux system calls into Windows system calls, allowing Linux distributions to run much like regular Windows applications.
The benefits of using WSL are manifold, particularly for those whose professional or personal pursuits heavily involve technology:
- Developer Productivity: WSL provides a robust Unix-like environment crucial for web development, cloud engineering, data science, and more. Access to tools like Git, Docker, Node.js, Python, Ruby, and various compilers becomes incredibly streamlined. Developers no longer need to maintain separate machines or complex VM setups, leading to significant time savings and a more efficient workflow.
- Access to Linux-Exclusive Tools: Many powerful command-line tools, utilities, and applications are primarily designed for Linux. WSL grants you direct access to these without leaving your Windows desktop, expanding your toolkit exponentially. This includes network utilities, system monitoring tools, and specific development frameworks.
- Learning and Experimentation: For students and aspiring IT professionals, WSL offers a safe and accessible sandbox to learn Linux commands, practice scripting, and experiment with different distributions without altering their primary Windows installation. It lowers the barrier to entry for understanding a fundamental operating system used extensively in servers, cloud computing, and cybersecurity.
- Digital Security and Penetration Testing: While not a complete replacement for a dedicated Kali Linux machine, WSL can be configured to run Kali Linux, providing access to many security tools for ethical hacking, penetration testing practice, and digital forensics research within a controlled environment. This enhances one’s practical understanding of digital security protocols and vulnerabilities.
- Resource Efficiency: Compared to traditional virtual machines, WSL 2 (the latest version) uses significantly fewer resources, starting up much faster and integrating more tightly with the Windows file system. This means less strain on your system’s RAM and CPU, ensuring a smoother overall experience.
By offering this hybrid environment, WSL empowers users to leverage the strengths of both Windows and Linux, fostering greater innovation and efficiency in their daily tasks.
WSL 1 vs. WSL 2: A Crucial Distinction
When installing WSL, you’ll encounter two versions: WSL 1 and WSL 2. Understanding the difference is vital for optimal performance and compatibility.
- WSL 1: The original version, released in 2016, worked by translating Linux system calls directly into Windows NT kernel calls. While revolutionary, it had limitations, especially regarding full system call compatibility and performance for file-system intensive operations. It lacked a real Linux kernel, which could lead to compatibility issues with certain applications that expected low-level Linux kernel functionality.
- WSL 2: Introduced in 2019, WSL 2 is a significant architectural overhaul. Instead of a translation layer, WSL 2 runs a real Linux kernel inside a lightweight utility virtual machine (VM). This VM is managed by Windows, requiring no manual setup or configuration. The key advantages of WSL 2 are:
- Full System Call Compatibility: Because it uses a real Linux kernel, WSL 2 offers complete compatibility with all Linux applications, including Docker, which relies on kernel features not available in WSL 1.
- Enhanced Performance: Especially for file system operations, WSL 2 is dramatically faster than WSL 1. Tasks like
git clone,npm install, and compilation are significantly quicker. - Standard Linux Kernel: You benefit from the latest kernel features and security updates, which are automatically managed by Microsoft.
For almost all users, WSL 2 is the recommended choice due to its superior performance, compatibility, and overall user experience. Windows 11 automatically defaults to installing WSL 2, but it’s good to be aware of the distinction.
Preparing Your Windows 11 System for WSL
Before you can unleash the power of Linux on your Windows 11 machine, a few preparatory steps are necessary. These ensure your system is properly configured to run WSL smoothly and efficiently.
Essential Prerequisites and System Requirements
While WSL 2 is lightweight, it still relies on core Windows features and hardware capabilities. Here’s what you need to check:
- Windows 11 Version: Ensure your Windows 11 installation is up to date. WSL is continuously improved, and the latest features and stability fixes come with Windows updates. You can check for updates via
Settings > Windows Update. - 64-bit System: WSL requires a 64-bit version of Windows 11. Most modern computers meet this requirement, but it’s worth verifying if you’re unsure (
Settings > System > About > System type). - Sufficient Disk Space: While a basic Linux distribution can take up only a few GBs, complex development environments can consume significant space. Ensure you have ample free disk space (at least 20-30 GB recommended for comfortable usage).
- Internet Connection: An internet connection is necessary to download the WSL components and your chosen Linux distribution from the Microsoft Store.
Enabling Virtualization in BIOS/UEFI
WSL 2, by its nature as a lightweight VM, requires hardware virtualization to be enabled on your system. This is often disabled by default on many motherboards. Without it, WSL 2 will not function, and you’ll be limited to the less performant WSL 1.
The exact steps to enable virtualization vary depending on your computer’s manufacturer and BIOS/UEFI version, but the general process is as follows:
- Restart Your Computer: As your computer starts up, you’ll need to press a specific key repeatedly to enter the BIOS/UEFI settings. Common keys include
Del,F2,F10,F12, orEsc. Check your computer’s manual or look for a prompt on the screen during boot-up. - Navigate to CPU Configuration: Once in the BIOS/UEFI, look for settings related to “CPU Configuration,” “Processor,” “Virtualization Technology,” “VT-x,” “AMD-V,” “SVM Mode,” or “Intel VT-d.” These options are often found under “Advanced,” “Security,” or “Performance” menus.
- Enable Virtualization: Locate the setting (e.g., “Intel Virtualization Technology,” “AMD-V”) and change its status from “Disabled” to “Enabled.”
- Save and Exit: Save your changes (usually by pressing
F10) and exit the BIOS/UEFI. Your computer will restart.
You can verify if virtualization is enabled in Windows by opening Task Manager (Ctrl + Shift + Esc), navigating to the “Performance” tab, and selecting “CPU.” Look for “Virtualization” status; it should say “Enabled.” If it’s disabled even after enabling it in BIOS/UEFI, your CPU might not support it, or there’s another setting blocking it (less common).
Step-by-Step Guide to Installing Linux on Windows 11
With your system prepared, you’re ready to proceed with the actual installation of WSL and your preferred Linux distribution. The process has been significantly simplified by Microsoft, often requiring just a single command.
Activating WSL Features via PowerShell
Windows 11 makes installing WSL remarkably straightforward. You can often install everything with one command.
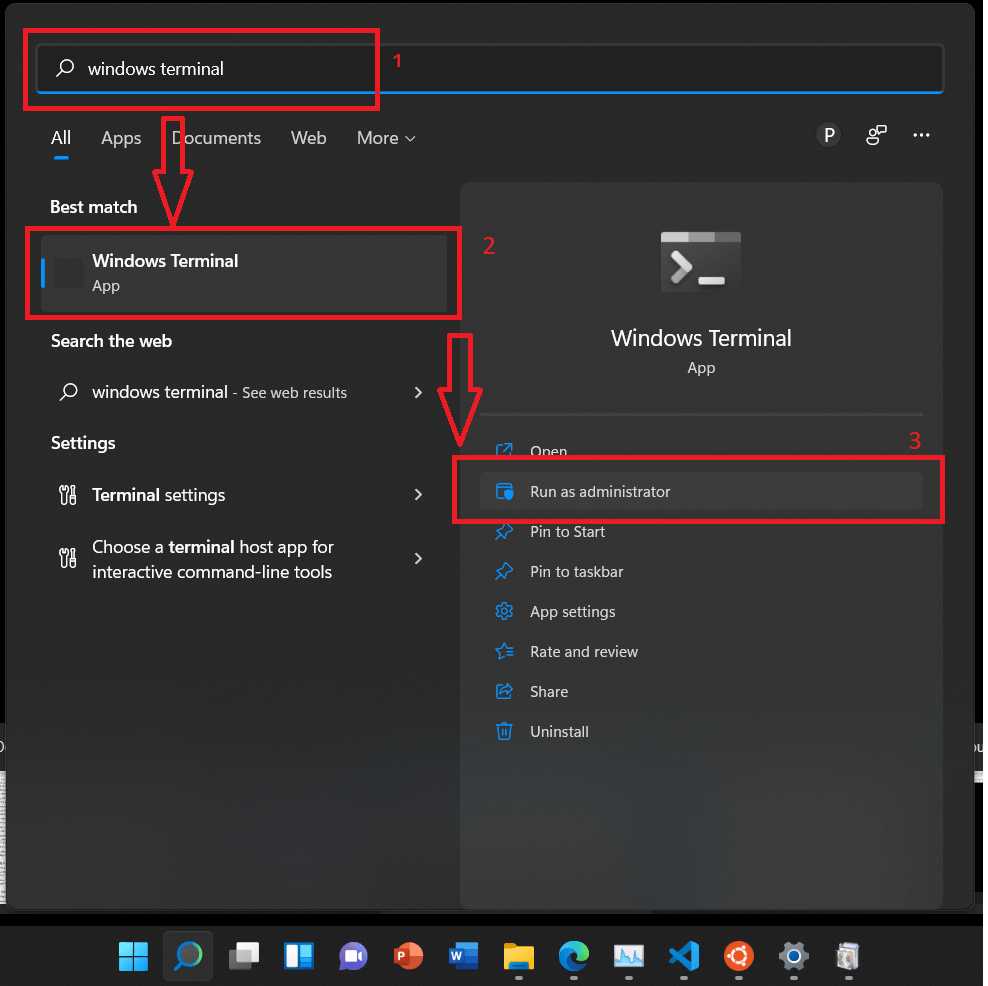
-
Open PowerShell as Administrator: Right-click the Start button and select “Windows Terminal (Admin)” or search for “PowerShell,” right-click it, and choose “Run as administrator.”
-
Run the WSL Installation Command: In the PowerShell window, type the following command and press Enter:
wsl --installThis single command performs several actions:
- Enables the “Virtual Machine Platform” optional component.
- Enables the “Windows Subsystem for Linux” optional component.
- Downloads and installs the latest Linux kernel package for WSL 2.
- Sets WSL 2 as the default version.
- Installs Ubuntu as the default Linux distribution (unless you specify another).
The process may take a few minutes. You might be prompted to restart your computer once the installation is complete. It is crucial to restart to finalize the installation of the necessary components.
Installing a Linux Distribution from the Microsoft Store
If you didn’t specify a distribution during the wsl --install command or if you want to install additional distributions, you can do so easily through the Microsoft Store. Ubuntu is the default and a popular choice due to its extensive community support and documentation, but other options like Debian, Kali Linux, and SUSE Linux Enterprise Server are also available.
- Open the Microsoft Store: Click on the Microsoft Store icon on your taskbar or search for it in the Start menu.
- Search for Linux Distributions: In the search bar, type “Linux” or the name of a specific distribution (e.g., “Ubuntu,” “Debian,” “Kali Linux”).
- Select and Install: Click on your desired distribution (e.g., “Ubuntu 22.04.2 LTS”) and then click the “Get” or “Install” button. The distribution will download and install automatically.
- Launch Your Distribution: Once installed, you can launch your Linux distribution directly from the Start menu. Search for “Ubuntu” (or your chosen distribution) and click the icon. The first time you launch it, a console window will open and finalize the installation.
Initial Setup and User Configuration
The first time you launch your newly installed Linux distribution, you’ll be prompted to create a user account.
- Create a Username: Enter a new Unix username. This does not have to be the same as your Windows username.
- Set a Password: Enter a strong password for your new Linux user. You will be prompted to re-enter it for confirmation. Remember this password, as it’s required for running commands with
sudo(super user do) privileges, which are essential for installing software and making system changes within your Linux environment.
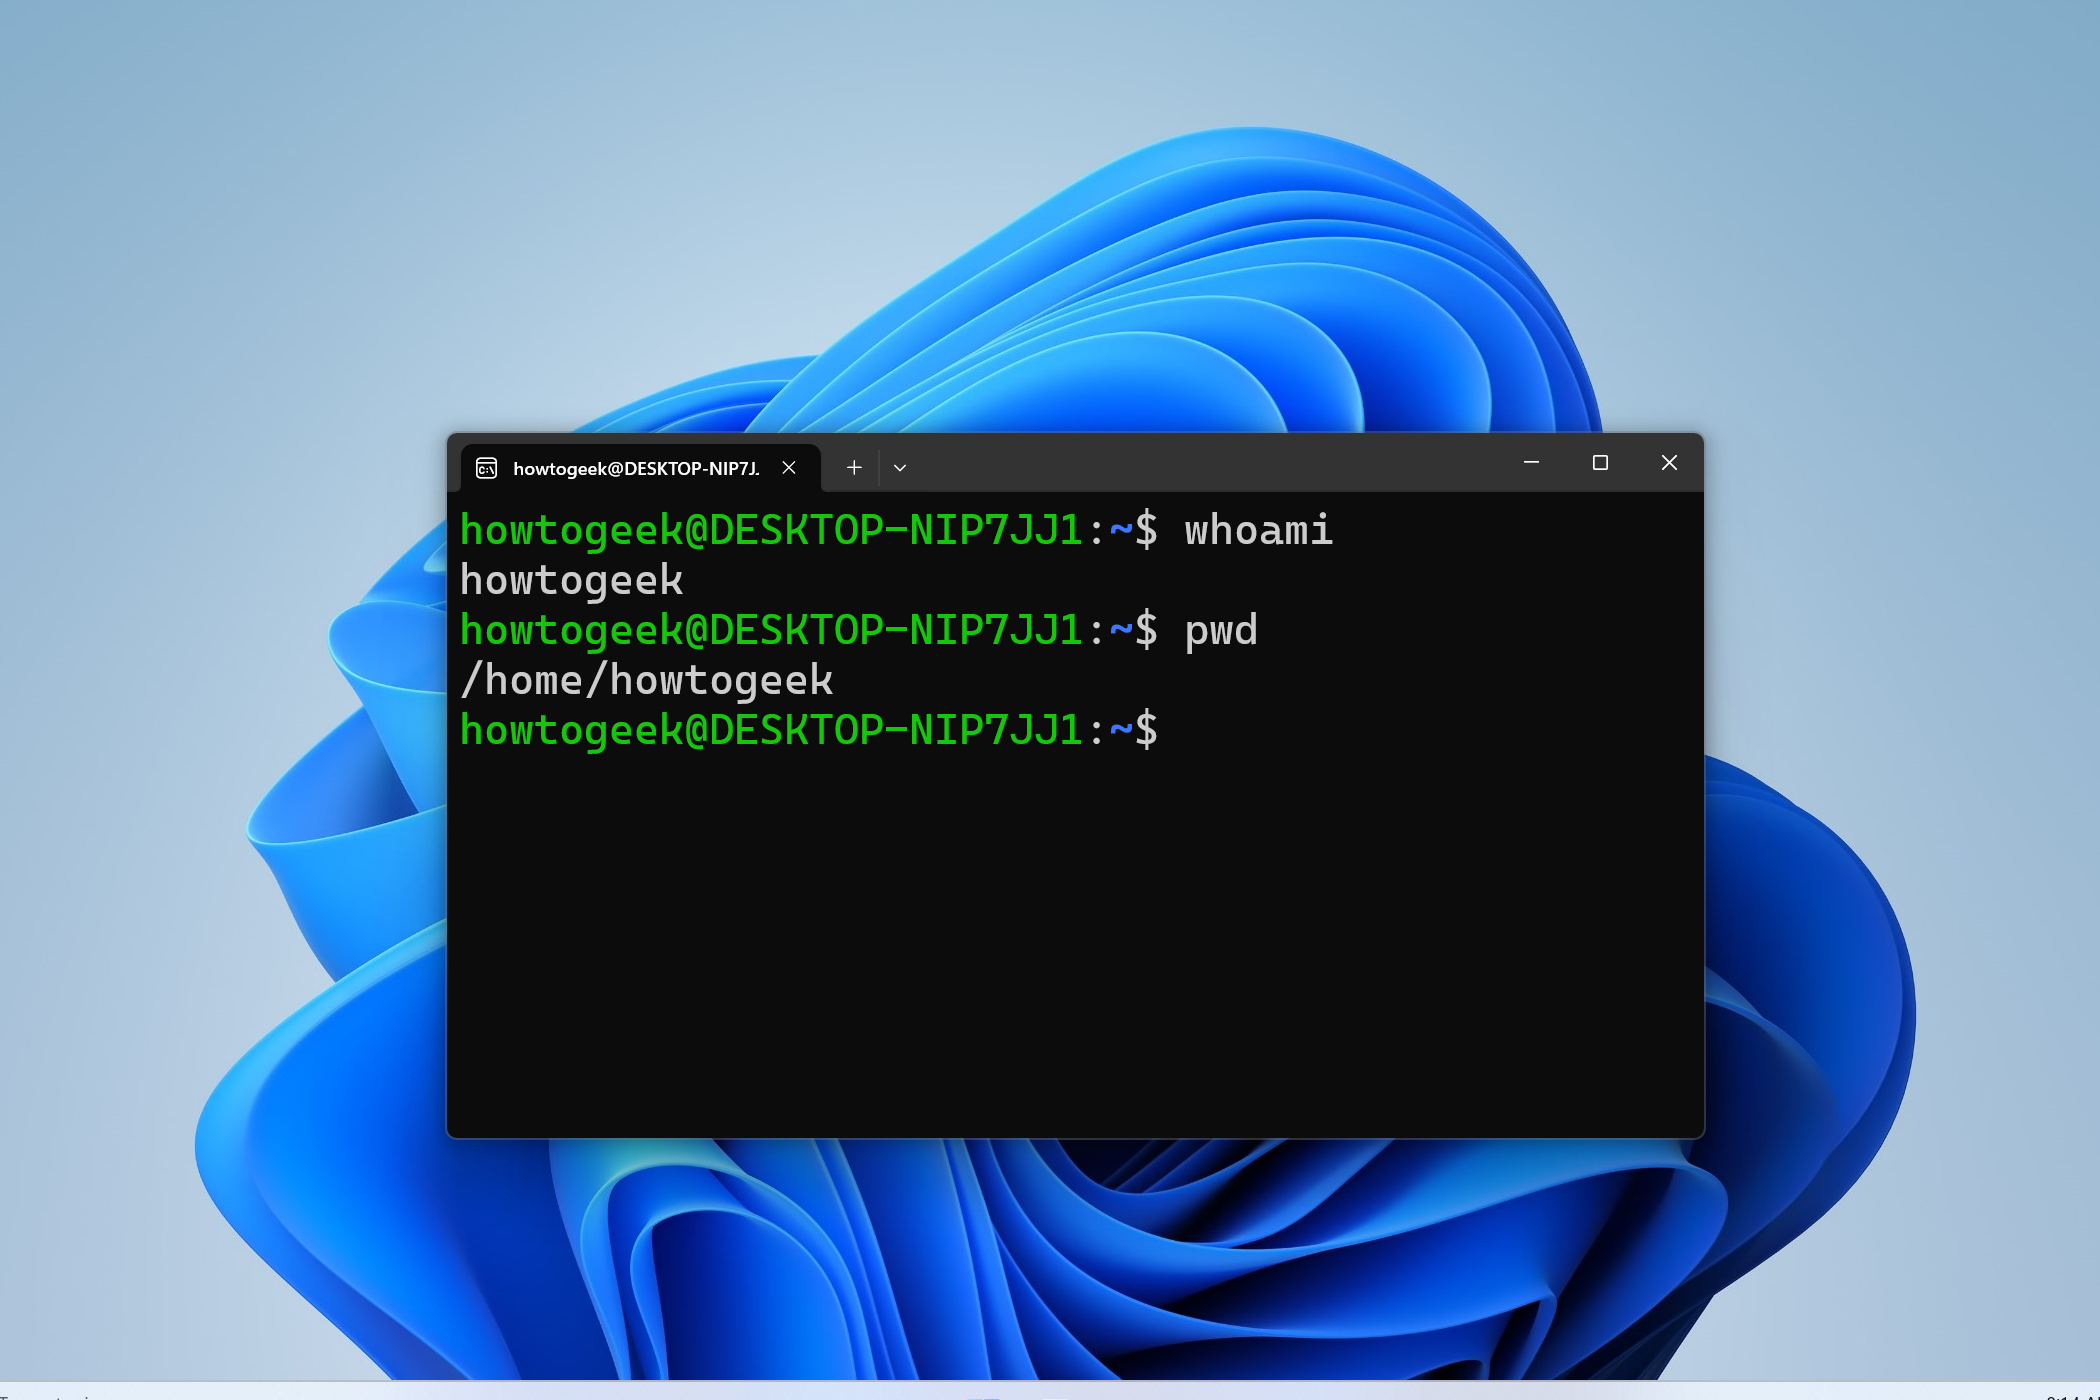
Once this is complete, you’ll be presented with the Linux command line, typically displaying your username and hostname, ready for you to start typing commands. Congratulations! You’ve successfully installed Linux on Windows 11.
Maximizing Your Linux Experience on Windows 11
Installing Linux via WSL is just the first step. To truly unlock its potential and enhance your productivity, it’s essential to understand how to integrate it with your Windows environment and leverage its capabilities.
Seamless Integration with Windows Tools
One of the greatest strengths of WSL is its ability to interact seamlessly with your Windows system, allowing for a truly hybrid workflow.
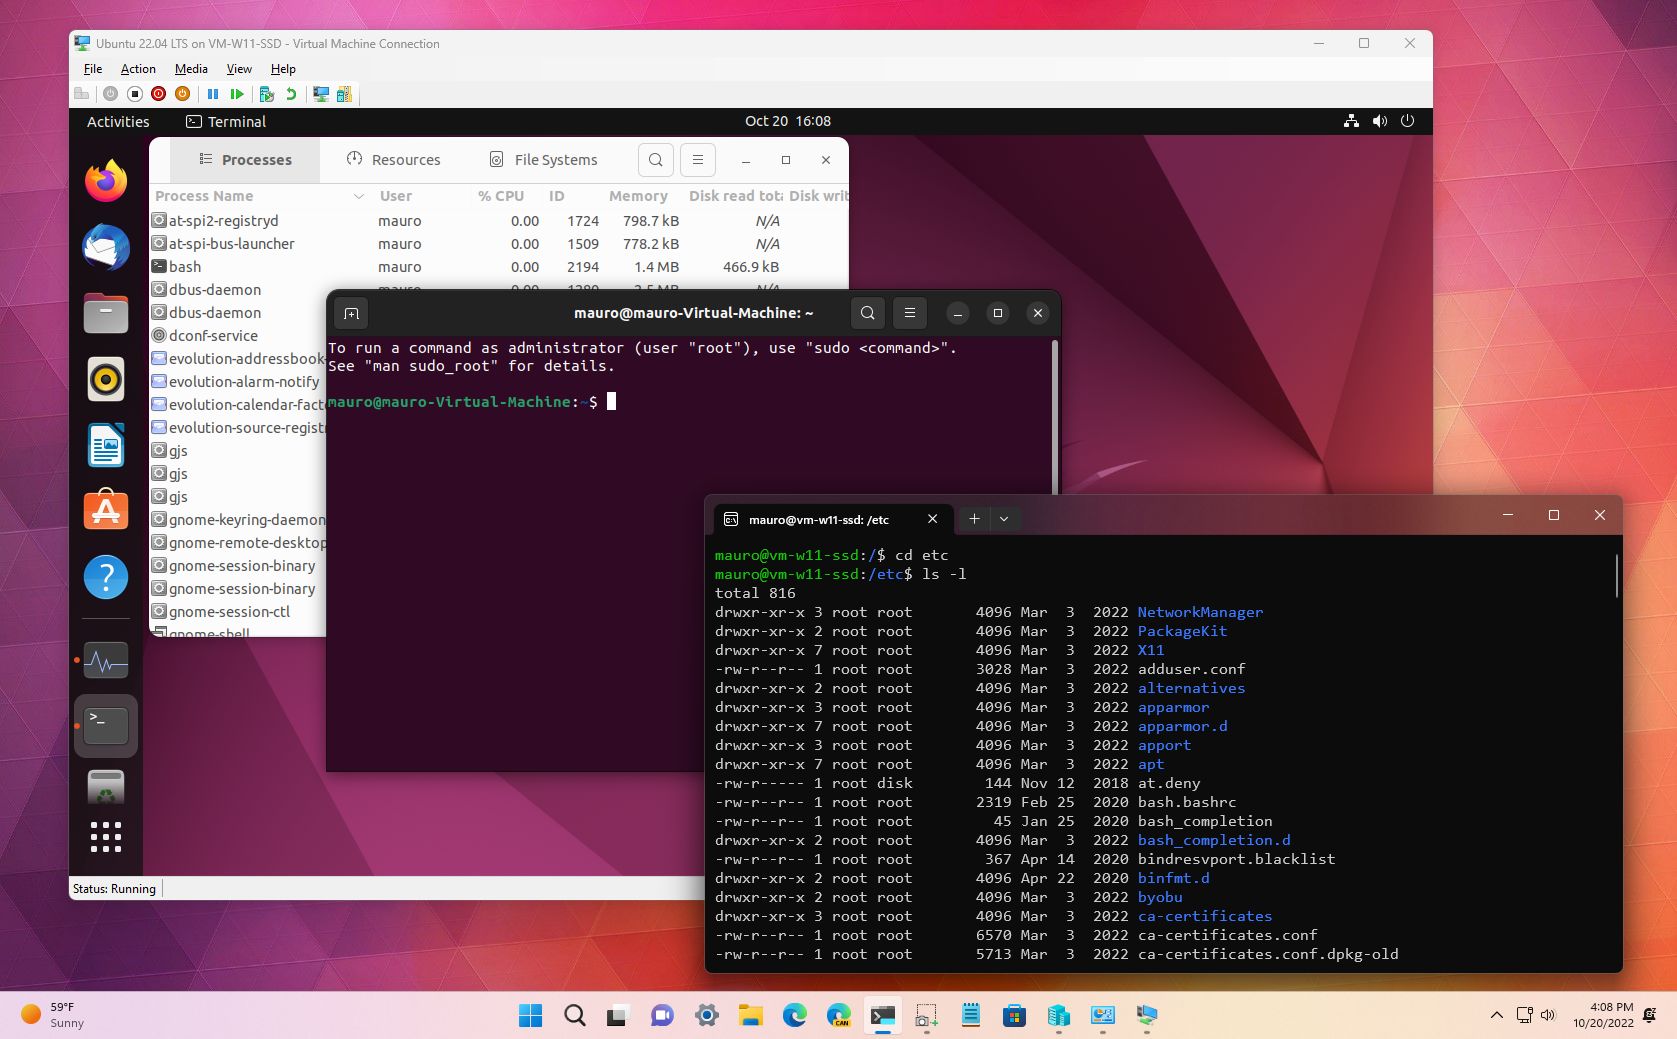
- File System Access: You can access your Windows files directly from your Linux distribution. Your Windows drives are mounted under
/mnt/(e.g.,/mnt/c/for your C: drive). Conversely, Windows File Explorer can access your Linux files. Simply typeexplorer.exe .(note the dot) in your Linux terminal to open the current Linux directory in File Explorer, or navigate to\wsl$in File Explorer to see all your installed distributions. This cross-system file access simplifies moving files and working on projects stored anywhere. - VS Code Integration: Visual Studio Code (VS Code) offers exceptional integration with WSL. By installing the “Remote – WSL” extension, you can develop directly within your Linux environment using VS Code running on Windows. This means all your development tools, extensions, and dependencies are running on Linux, while you benefit from VS Code’s rich UI and features on Windows. This setup is a developer’s dream, offering native Linux performance for compilation and execution with the familiar Windows-based IDE.
- Running Windows Executables from Linux: You can execute Windows applications directly from your WSL terminal. For example, typing
notepad.exewill open Notepad on your Windows desktop. This can be useful for quickly opening files with Windows apps or for scripting. - GUI Applications (WSLg): Windows 11 includes WSLg (WSL Graphics), which allows you to run Linux GUI applications directly on your Windows desktop. This means you can install a Linux-based IDE, a web browser, or any other graphical application within your WSL distribution and launch it like a regular Windows app. It appears in your Start menu and taskbar, further blurring the lines between the two operating systems.
Advanced WSL Tips for Enhanced Productivity
To truly master your WSL environment, consider these advanced tips:
- Manage Multiple Distributions: You’re not limited to one Linux distribution. You can install several (e.g., Ubuntu for development, Kali for security, Debian for specific tools) and manage them with
wsl -l -v(list all distributions with status) andwsl -d <DistroName>(launch a specific distro). - Set Default Distribution and Version: You can set a default distribution for when you type
wslusingwsl --set-default <DistroName>. You can also manually switch a distribution to use WSL 1 or WSL 2 withwsl --set-version <DistroName> <VersionNumber>. - Customize Your Shell: Enhance your terminal experience by installing popular shell frameworks like Oh My Zsh for Zsh or Starship for Bash. These provide powerful auto-completion, themes, and plugins that boost productivity.
- Docker Desktop Integration: Docker Desktop on Windows 11 leverages WSL 2 for its backend, providing a highly performant and stable environment for running Docker containers. This is crucial for modern containerized development workflows.
- Networking and Port Forwarding: WSL 2 runs in a lightweight VM with its own IP address. For development, you might need to access services running in WSL from your host Windows browser. WSL 2 includes automatic port forwarding for common services, but for more complex scenarios, you might need to configure firewall rules or use
socatfor specific port mappings.
These integrations and tips transform WSL from a mere command-line tool into a powerful, integrated development and experimentation platform, enhancing your overall tech proficiency and enabling you to tackle more complex tasks with ease.
Troubleshooting Common WSL Issues
While WSL is designed to be robust, you might occasionally encounter issues. Knowing how to diagnose and resolve common problems can save you a lot of time and frustration.
Addressing Performance Bottlenecks and Network Problems
- Slow File I/O: If you notice your Linux commands (especially those involving many file operations, like
git cloneornpm install) are slow, ensure your distribution is running on WSL 2. If it’s on WSL 1, convert it usingwsl --set-version <DistroName> 2. Also, avoid working on Windows-mounted drives (/mnt/c/) from within WSL if performance is critical; copy files into your Linux filesystem (~or/home/user) for optimal speed. - Network Connectivity Issues:
- “No Internet” in WSL: Restart your WSL distribution (close all WSL windows and type
wsl --shutdownin an admin PowerShell, then relaunch). Sometimes, restarting your Windows machine helps. - DNS Resolution Problems: If you can’t access websites by name, check your
/etc/resolv.conffile inside your Linux distribution. WSL automatically generates this file, but sometimes it can pick up incorrect DNS servers. You can temporarily edit it to use public DNS (e.g.,nameserver 8.8.8.8) or disable automatic generation. - Firewall Interference: Ensure your Windows firewall isn’t blocking network traffic for your WSL instances. You may need to create specific rules if you’re running services on custom ports.
- “No Internet” in WSL: Restart your WSL distribution (close all WSL windows and type
What to Do When WSL Isn’t Starting
If your WSL distribution fails to launch or encounters an error during startup:
- Restart WSL Services: Open PowerShell as Administrator and run
wsl --shutdown. Wait a few seconds, then try launching your distribution again. This often resolves transient issues. - Check for Virtualization (Again): Double-check that virtualization is still enabled in your BIOS/UEFI and that Windows reports it as “Enabled” in Task Manager. Windows updates or certain software can sometimes interfere with this setting.
- Update WSL Kernel: Microsoft frequently releases updates for the WSL kernel. Ensure you have the latest version by running
wsl --updatein an admin PowerShell. - Reinstall Corrupted Distribution: If a specific distribution is repeatedly failing, it might be corrupted. You can export your data (if any important files exist) and then unregister the distribution (
wsl --unregister <DistroName>) and reinstall it from the Microsoft Store. - Check Event Viewer: For more complex issues, Windows Event Viewer can provide detailed error messages. Look under “Applications and Services Logs” -> “Microsoft” -> “Windows” -> “Subsystem for Linux” for clues.
- Consult Microsoft Documentation & Community: The official Microsoft documentation for WSL is excellent, and online communities (e.g., Stack Overflow, Reddit r/wsl) are great resources for finding solutions to unique problems.
By understanding these common troubleshooting steps, you can maintain a smooth and efficient Linux environment on your Windows 11 machine, ensuring that your journey into this hybrid computing world remains productive and frustration-free.
Conclusion
The integration of Linux into Windows 11 through WSL marks a significant milestone in personal computing. It democratizes access to powerful open-source tools and environments, enabling developers, data scientists, cybersecurity enthusiasts, and tech learners to operate with unparalleled flexibility. Gone are the days of rigid operating system boundaries; today, you can harness the best of both Windows’ user experience and Linux’s command-line prowess from a single, cohesive desktop.
By following this guide, you’ve not only installed a Linux distribution on your Windows 11 machine but also gained an understanding of its underlying architecture, its profound benefits for productivity and digital security, and how to troubleshoot potential hurdles. This hybrid setup is more than just a convenience; it’s a testament to the evolving nature of technology, empowering you to build, innovate, and secure in ways that were once impractical. Embrace the power of Linux on Windows 11, and unlock a new realm of possibilities for your technological journey.
aViewFromTheCave is a participant in the Amazon Services LLC Associates Program, an affiliate advertising program designed to provide a means for sites to earn advertising fees by advertising and linking to Amazon.com. Amazon, the Amazon logo, AmazonSupply, and the AmazonSupply logo are trademarks of Amazon.com, Inc. or its affiliates. As an Amazon Associate we earn affiliate commissions from qualifying purchases.