In today’s increasingly connected world, smart home technology is no longer a luxury but a cornerstone of modern living. Among the most popular and accessible entries into this ecosystem is Ring’s suite of security devices, particularly their video doorbells and cameras. Whether you’re looking to enhance your home’s security, keep an eye on deliveries, or simply gain peace of mind, understanding how to install your Ring device is the crucial first step. This guide will walk you through the process, covering everything from initial setup to advanced considerations, all within the context of technology, brand integration, and even the financial implications of smart security.
Getting Started: Unboxing Your Ring Device and Essential Preparations
Before you even think about mounting a Ring device, the initial steps involve understanding what you’ve purchased and ensuring you have everything necessary for a smooth installation. This preparation phase is crucial and often overlooked, but it sets the stage for a successful and frustration-free experience.
Inside the Box: What to Expect and What You’ll Need
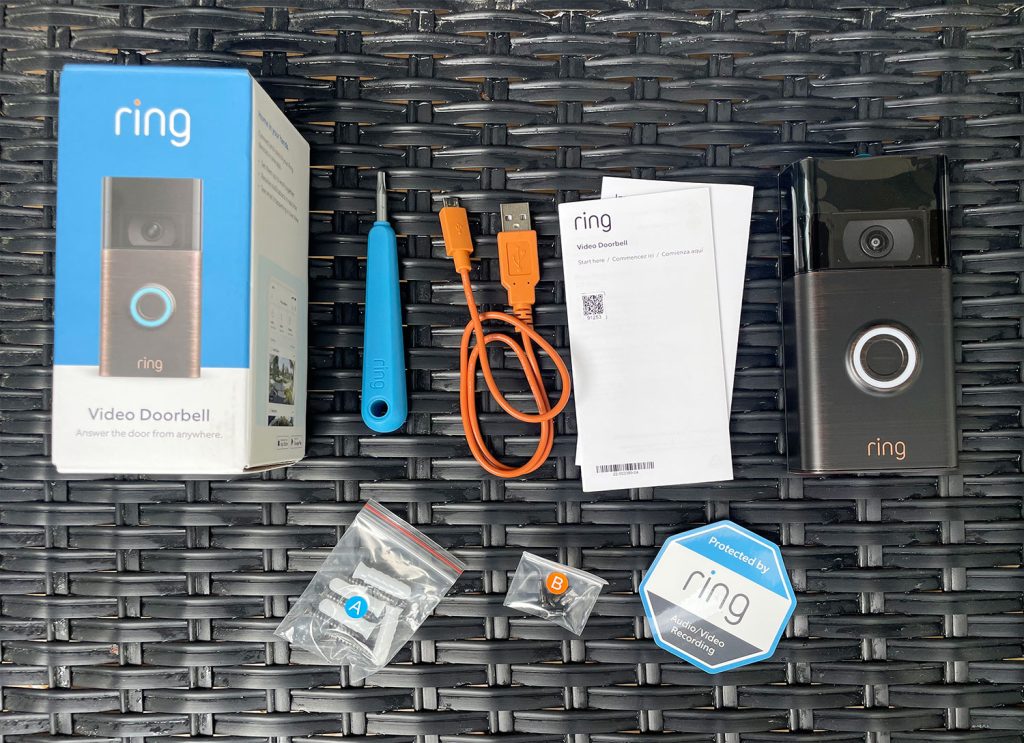
When you unbox your new Ring device, you’ll typically find the main unit (doorbell, camera, etc.), mounting hardware (screws, anchors, sometimes a mounting bracket), a screwdriver, and a user manual. However, depending on the specific Ring product, you might also find a charging cable (for battery-powered models), a power adapter, or even a Pro Power Kit for wired installations.
Beyond the included items, it’s essential to gather a few tools and resources to ensure a seamless installation:
- A Smartphone or Tablet: This is non-negotiable. You’ll need it to download the Ring app, connect your device to your Wi-Fi network, and manage its settings. Ensure your device is running a compatible operating system (iOS or Android).
- Wi-Fi Network Access: Your Ring device needs a stable Wi-Fi connection to function. Make sure you know your Wi-Fi network name (SSID) and password. A strong Wi-Fi signal at the intended installation location is also paramount for reliable performance.
- A Drill (Optional but Recommended): For most installations, especially those involving drilling into exterior walls, a drill will significantly speed up the process and ensure a secure mount. You’ll likely need a drill bit appropriate for your wall material (wood, brick, stucco, etc.).
- A Level: To ensure your Ring device is mounted straight and looks aesthetically pleasing.
- A Pencil: For marking drilling points.
- A Ladder (if needed): For reaching higher installation points.
- Safety Glasses: Always a good idea when drilling or working with tools.
The Ring App: Your Digital Command Center
The Ring app is the heart of your Ring ecosystem. It’s where you’ll set up your device, customize its features, view live feeds, receive motion alerts, and communicate with visitors.
Steps to download and set up the Ring app:
- Download the App: Search for “Ring” in your device’s app store (Apple App Store or Google Play Store) and download the official Ring app.
- Create an Account or Log In: If you’re new to Ring, you’ll need to create an account. This involves providing your email address and setting a secure password. If you already have a Ring account, simply log in.
- Add a Device: Once logged in, you’ll see an option to “Set Up a Device.” Tap this and select the type of Ring device you have (e.g., Video Doorbell, Security Camera).
- Scan the QR Code: Most Ring devices have a QR code on the device itself or within the packaging. The app will prompt you to scan this code. This links your device to your account.
- Follow In-App Instructions: The app will then guide you through connecting your Ring device to your Wi-Fi network, naming your device, and configuring basic settings.
This initial setup process within the app is critical. It establishes the digital connection and allows you to control your Ring device remotely, which is fundamental to its functionality.
Installing Your Ring Device: Step-by-Step Guidance
The actual physical installation of a Ring device can vary depending on whether you’re installing a battery-powered model or a wired one, and the specific type of device. However, the general principles remain consistent.
Battery-Powered Ring Doorbell/Camera Installation
Battery-powered Ring devices offer the most flexibility in terms of placement, as they don’t require existing wiring.
Installation Steps:
- Charge the Battery: Before you begin, ensure the rechargeable battery pack is fully charged. Most Ring doorbells come with a pre-charged battery, but it’s good practice to confirm. The charging cable usually connects to a USB port.
- Choose a Location: Select a suitable location. For doorbells, this is typically on your door frame or wall next to your existing doorbell wiring (if you choose not to connect to it). For cameras, consider vantage points that offer the best coverage of your desired areas. Ensure the location has a strong Wi-Fi signal.
- Mark Drilling Points: Hold the Ring device (or its mounting bracket) against the wall in the desired position. Use a pencil to mark the screw holes. If you’re using a mounting bracket, mark the holes for the bracket first.
- Drill Pilot Holes (if necessary): Use a drill with an appropriate drill bit to create pilot holes at your marked points. For hard surfaces like brick or concrete, you’ll need to use masonry drill bits and wall anchors.
- Mount the Bracket/Device:
- With Mounting Bracket: Screw the mounting bracket securely to the wall using the provided screws and anchors.
- Direct Mount: If your device doesn’t use a separate bracket, you’ll screw the device directly into the wall using the provided screws.
- Attach the Ring Device: Slide the Ring device onto the mounting bracket or screw it directly into the wall. Ensure it’s firmly attached.
- Insert the Battery: Once the device is mounted, insert the fully charged battery pack. It usually clicks into place.
- Test the Device: Open the Ring app, and you should see your device online. Test the motion detection by walking in front of it and check the live view to ensure the image and audio are clear.
Wired Ring Doorbell Installation (Replacing an Existing Doorbell)
For a more permanent and seamless installation, especially for video doorbells, wiring them to your existing doorbell system is often preferred. This eliminates the need for regular battery charging.
Installation Steps:
- Turn Off Power: This is a critical safety step. Locate your home’s circuit breaker and turn off the power to your existing doorbell. Test your current doorbell to confirm the power is off.
- Remove Existing Doorbell: Unscrew your old doorbell button from the wall. Gently pull it away from the wall to reveal the wires connected to it.
- Disconnect Wires: Carefully disconnect the wires from your old doorbell. Note which wire was connected to which terminal (usually marked as “Front” and “Trans”).
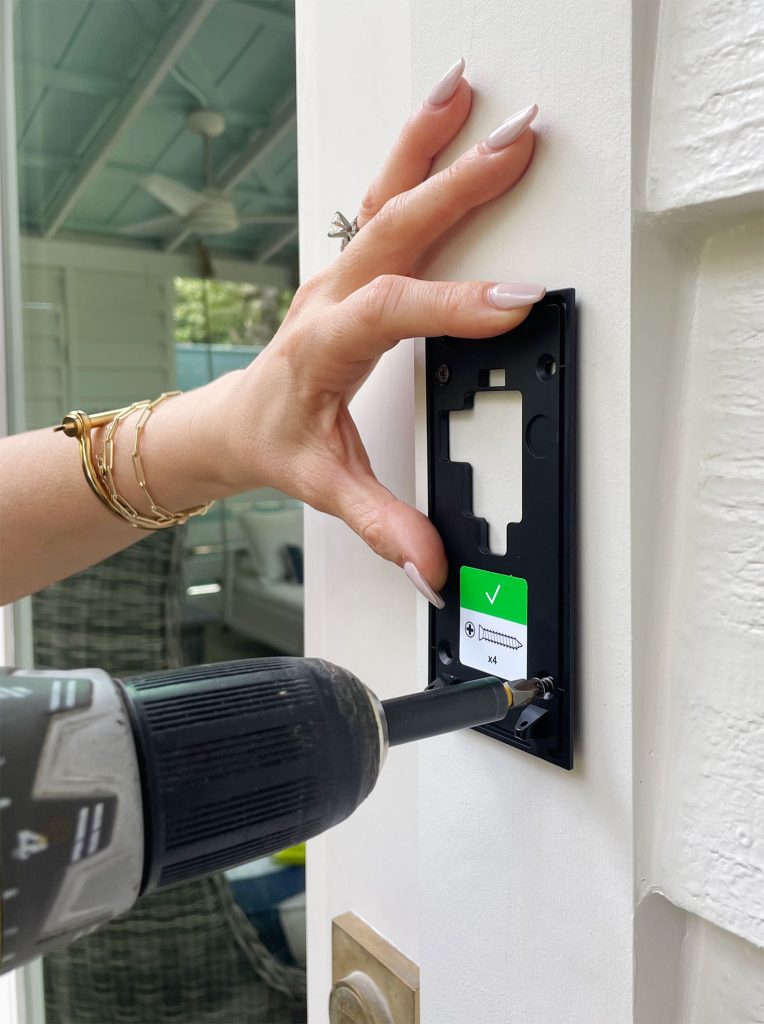
- Mount the Ring Mounting Bracket: Thread the existing doorbell wires through the center of the Ring mounting bracket. Position the bracket on the wall and mark the screw holes. Drill pilot holes and secure the bracket with screws and anchors.
- Connect the Wires: Connect the wires from your wall to the corresponding terminals on the back of your Ring doorbell. Usually, one wire connects to each terminal. It doesn’t typically matter which wire goes to which terminal for most Ring doorbells.
- Secure the Ring Doorbell: Push the wires back into the wall and then carefully slide the Ring doorbell onto the mounting bracket. It should click securely into place.
- Restore Power: Go back to your circuit breaker and turn the power back on to your doorbell circuit.
- Configure in the Ring App: Open the Ring app. Your doorbell should now be online. Follow the app’s instructions to complete the setup, including Wi-Fi connection and device naming. Test the doorbell by pressing it and checking the live view.
Important Note on Wired Installations: If your existing doorbell system uses a transformer with insufficient voltage or amperage, you may need to replace it. The Ring app will often indicate if there’s a power issue. Ring typically requires a transformer rated between 8-24 VAC and 40-50/60Hz, with a minimum of 10VA.
Advanced Setup and Integration: Enhancing Your Smart Security
Once your Ring device is physically installed and connected, the real power of your smart home security comes to life through app configuration and integration with other smart devices.
Customizing Your Ring Device Settings for Optimal Security
The Ring app offers a wealth of customization options to tailor your device’s behavior to your specific needs and preferences.
- Motion Zones: Define specific areas within the camera’s view where you want to detect motion. This helps reduce false alerts from passing cars or swaying trees. You can draw these zones directly on the live feed.
- Motion Sensitivity: Adjust how sensitive the device is to motion. Lowering sensitivity can reduce alerts from minor movements, while increasing it ensures that even subtle movements are detected.
- Motion Scheduling: Set specific times when you want motion detection to be active. For example, you might only want notifications during work hours or at night.
- Notification Preferences: Choose how and when you want to receive alerts. You can opt for push notifications, email alerts, or even phone calls for critical events.
- Ring Alerts vs. Motion Alerts: Understand the difference. Ring alerts are triggered by pressing the doorbell button, while motion alerts are triggered by detected movement. You can customize how each type of alert functions.
- Privacy Zones: Similar to motion zones, privacy zones allow you to block out specific areas of the camera’s view that you don’t want to record, such as a neighbor’s window.
Integrating Ring with Your Smart Home Ecosystem
Ring devices are designed to work within a broader smart home landscape. Integrating them can unlock new levels of convenience and security.
- Alexa Integration: If you have an Amazon Echo device, you can link your Ring account to Alexa. This allows you to:
- See your Ring doorbell feed on compatible Echo Show devices.
- Ask Alexa to show you your camera feed.
- Receive voice alerts when motion is detected or the doorbell is pressed.
- Communicate with visitors through your Ring device via Alexa.
- Google Assistant Integration: Similar to Alexa, Ring devices can be integrated with Google Assistant-enabled devices. You can ask Google to show your Ring camera feed on your Google Nest Hub or display.
- Ring Alarm System: If you have the Ring Alarm security system, your Ring cameras and doorbells can work in tandem with it. For example, if the alarm is triggered, your cameras can automatically start recording.
- Third-Party Integrations: Ring also offers integrations with other smart home platforms and devices, allowing for more complex automation scenarios.
Understanding Ring Protect Plans: Unlocking the Full Potential
While you can install and use a Ring device without a subscription, subscribing to a Ring Protect plan is highly recommended to unlock its full functionality, particularly regarding video storage and advanced features.
- Video Recording and Storage: Without a Ring Protect plan, you can only view live streams and receive real-time alerts. To record and store video footage, you’ll need a subscription. Plans vary in cost and features, often offering storage for a set number of days.
- Rich Notifications: These notifications provide a snapshot or short video clip of the event directly in the alert, allowing you to see what’s happening without opening the app.
- Professional Monitoring (with Ring Alarm): For Ring Alarm users, a higher-tier Ring Protect plan offers 24/7 professional monitoring, where trained agents can dispatch emergency services if an alarm is triggered.
- Extended Warranties: Many Ring Protect plans include extended warranties for your Ring devices.
Financial Consideration: When budgeting for smart home security, it’s essential to factor in the ongoing cost of a Ring Protect plan. While the initial hardware investment is a one-time purchase, the subscription is a recurring expense. Carefully consider the features you need and choose a plan that fits your budget and security requirements. This aligns with the “Money” aspect of the website’s main topics, where understanding recurring costs and the value proposition of a service is key.
In conclusion, installing a Ring device is a straightforward process that empowers homeowners with enhanced security and convenience. By carefully following the steps, preparing adequately, and utilizing the extensive features within the Ring app, you can transform your home’s security. Furthermore, understanding the integration possibilities and the value of Ring Protect plans allows you to maximize the benefits of your smart security investment, seamlessly blending technology with your personal brand of home safety and financial prudence.
aViewFromTheCave is a participant in the Amazon Services LLC Associates Program, an affiliate advertising program designed to provide a means for sites to earn advertising fees by advertising and linking to Amazon.com. Amazon, the Amazon logo, AmazonSupply, and the AmazonSupply logo are trademarks of Amazon.com, Inc. or its affiliates. As an Amazon Associate we earn affiliate commissions from qualifying purchases.