Welcome to the exciting world of Node.js! If you’re looking to dive into modern web development, backend services, or even build powerful command-line tools, Node.js is an indispensable technology in your arsenal. This guide will walk you through every step of installing Node.js, ensuring you’re set up for success, regardless of your operating system or experience level. Beyond the technical setup, we’ll also explore how mastering Node.js can significantly boost your tech career, enhance your personal brand, and open new avenues for financial growth.
Node.js isn’t just another programming language; it’s a versatile, open-source runtime environment that allows you to execute JavaScript code outside of a web browser. This means you can use the same language for both your frontend and backend, streamlining development, boosting productivity, and leveraging a massive ecosystem of tools and libraries through npm (Node Package Manager).

Understanding Node.js: The Foundation of Modern Web Development
Before we delve into the “how,” let’s briefly touch upon the “why.” What exactly is Node.js, and why has it become such a pivotal technology in the modern digital landscape? At its core, Node.js is built on Chrome’s V8 JavaScript engine, offering blazing-fast execution of JavaScript code. What truly sets it apart is its event-driven, non-blocking I/O model, making it incredibly efficient for handling concurrent connections and I/O-bound operations. This architecture makes Node.js ideal for real-time applications, APIs, microservices, and serverless functions that power many of today’s most dynamic applications.
From small startups to tech giants, Node.js powers a diverse range of applications, from streaming services and chat applications to complex enterprise systems. Its popularity stems from its scalability, performance, and the sheer volume of readily available modules and tools. The ability to write full-stack JavaScript means developers can leverage a single language and skill set across an entire application, leading to faster development cycles and more cohesive teams.
Why Node.js is Indispensable for Tech Innovation
In today’s rapidly evolving tech environment, staying ahead means embracing tools that foster innovation and efficiency. Node.js is a prime example of such a tool. Its asynchronous nature is perfect for building high-performance APIs that serve mobile apps, web applications, and even AI tools. Many cutting-edge AI services and machine learning models require robust backend infrastructure to handle data processing and serve predictions, and Node.js often forms the backbone of these systems due to its speed and ease of integration.
Beyond raw performance, Node.js significantly contributes to productivity. The vast npm ecosystem offers pre-built solutions for almost any challenge, from database connectors to authentication modules, saving countless hours of development time. This translates into quicker market entry for new apps and features, a critical advantage in competitive markets. For anyone interested in Technology Trends, Software development, or building innovative Apps, Node.js is not just a skill; it’s a superpower that accelerates the journey from concept to reality, while also strengthening your Digital Security posture by promoting the use of well-vetted and regularly updated packages.
Choosing Your Installation Path: Methods and Considerations
Installing Node.js isn’t a one-size-fits-all process. There are several methods, each with its own advantages, catering to different needs and operating systems. Understanding these options will help you choose the best approach for your specific development environment. Whether you’re a beginner looking for the simplest path or an experienced developer needing flexible version management, this section has you covered.
Using Official Installers: The Straightforward Approach
For many newcomers, the official Node.js installer is the easiest way to get started. These installers provide a user-friendly graphical interface (GUI) that guides you through the process, setting up Node.js and npm (Node Package Manager) on your system automatically.
- Pros: Extremely easy for beginners, minimal command-line interaction required, ensures all necessary components are installed.
- Cons: Can be challenging to manage multiple Node.js versions later if you need to work on projects requiring different versions. Updates typically require downloading and running a new installer.
- When to use: Ideal for individual developers working on a single project or learning Node.js for the first time.
To use this method, simply visit the official Node.js website (nodejs.org), download the recommended LTS (Long Term Support) version for your operating system, and follow the on-screen prompts.
Leveraging Package Managers: Efficiency Across Platforms
Package managers offer a more integrated and often preferred way to install and manage software on your system, including Node.js. They handle dependencies, updates, and uninstallation seamlessly, making them a popular choice for developers.
- Pros: Easy updates, integration with your OS’s package management system, simple command-line installation.
- Cons: May not always provide the absolute latest version immediately; sometimes requires additional steps to get specific Node.js versions.
- When to use: Great for developers who prefer command-line tools and want a streamlined way to manage system-wide software.
Here are popular package managers for different operating systems:
- Windows (Chocolatey): Chocolatey is a package manager for Windows that simplifies software installation.
- Installation:
choco install nodejs-lts(for the LTS version) orchoco install nodejs(for the current version).
- Installation:
- macOS (Homebrew): Homebrew is the de facto package manager for macOS.
- Installation:
brew install node
- Installation:
- Linux (apt, yum, dnf): Depending on your Linux distribution, you’ll use
apt(Debian/Ubuntu),yum(older RHEL/CentOS), ordnf(newer RHEL/Fedora).- Basic installation:
sudo apt install nodejs npm(for Debian/Ubuntu, might install an older version). For the latest versions, you’ll often need to add a specialized repository like NodeSource, which we’ll cover in the OS-specific sections.
- Basic installation:
Version Managers: The Professional’s Choice
For professional developers, especially those working on multiple projects with varying Node.js version requirements, a version manager is indispensable. Tools like NVM (Node Version Manager), Volta, and fnm allow you to install and switch between different Node.js versions effortlessly. This prevents conflicts and ensures each project runs with its intended Node.js environment, a crucial aspect of maintaining Productivity and avoiding deployment headaches.
- Pros: Seamlessly switch between Node.js versions, project-specific version control, avoids global package conflicts. Essential for maintainability and collaboration.
- Cons: Slightly more complex initial setup compared to official installers.
- When to use: Highly recommended for any developer working on more than one Node.js project or contributing to open-source projects that may require specific Node.js versions. It’s a hallmark of a robust developer workflow.
Popular version managers include:
- NVM (Node Version Manager): Popular on macOS and Linux.
- Installation:
curl -o- https://raw.githubusercontent.com/nvm-sh/nvm/v0.39.1/install.sh | bash(check NVM’s GitHub for the latest installation script). - Usage:
nvm install node(installs the latest LTS),nvm use node,nvm install 16,nvm use 16.
- Installation:
- Volta: Cross-platform, fast, and integrates with
package.jsonfor automatic version switching.- Installation:
curl https://get.volta.sh | bash(Linux/macOS) or download the Windows installer. - Usage:
volta install node,volta install node@16,volta pin node@18(sets project version).
- Installation:
- fnm (Fast Node Manager): Another fast and simple alternative, cross-platform.
- Installation:
curl -fsSL https://fnm.vercel.app/install | bash - Usage:
fnm install --lts,fnm use --lts.
- Installation:
Step-by-Step Installation Guides for Major Operating Systems
Now that you understand the different approaches, let’s get down to the practical steps for installing Node.js on Windows, macOS, and Linux. Choose the section relevant to your operating system and preferred installation method.
Installing Node.js on Windows
Method 1: Using the Official Node.js Installer (Recommended for Beginners)
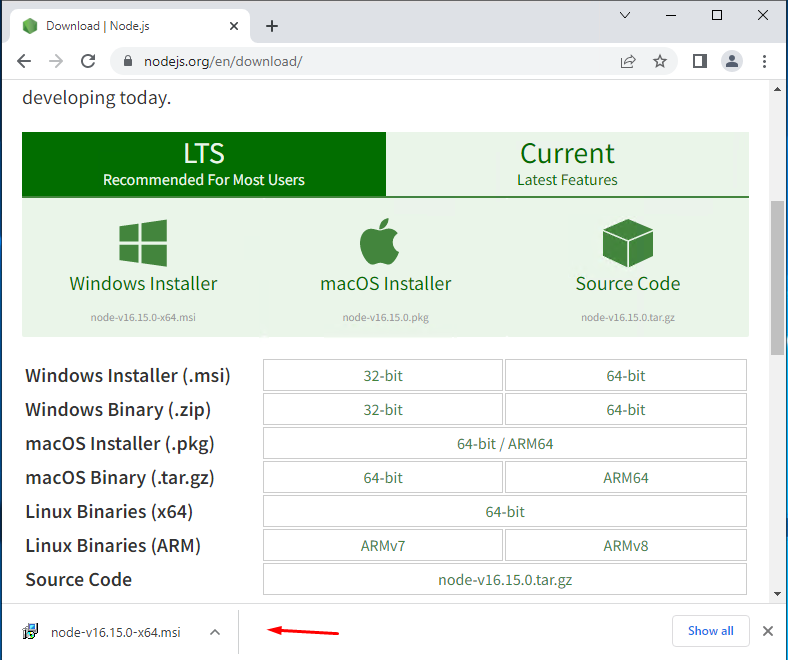
- Download: Go to nodejs.org and download the “LTS Recommended For Most Users” Windows Installer (.msi).
- Run Installer: Double-click the downloaded
.msifile. - Follow Prompts: Click “Next” through the wizard. Accept the license agreement. Choose a destination folder (the default is usually fine).
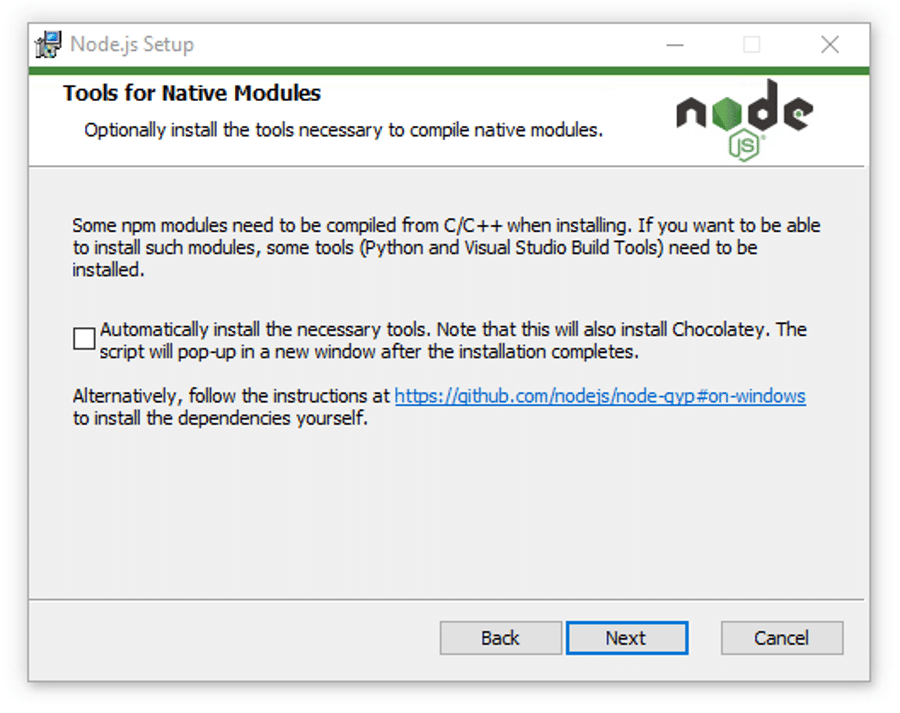
- Custom Setup (Optional): Ensure “Node.js runtime” and “npm package manager” are selected. The “Tools for Native Modules” option is useful if you plan to compile C++ add-ons, but it’s not strictly necessary for basic Node.js development.
- Install: Click “Install” and wait for the process to complete.
- Finish: Click “Finish.”
Method 2: Using Chocolatey (Windows Package Manager)
- Install Chocolatey (if you haven’t already): Open PowerShell as Administrator and run the command from chocolatey.org.
- Install Node.js: Once Chocolatey is installed, open a new PowerShell (as Administrator) or Command Prompt and run:
bash

choco install nodejs-lts
This will install the latest LTS version of Node.js and npm. If you want the current stable version, usechoco install nodejs.
Method 3: Using Volta (Cross-Platform Version Manager)
- Install Volta: Download the Windows installer from volta.sh. Run it and follow the prompts. Volta will add itself to your PATH.
- Install Node.js: Open a new Command Prompt or PowerShell and run:
bash

volta install node
This installs the latest LTS version. You can install specific versions withvolta install node@16.
Installing Node.js on macOS
Method 1: Using Homebrew (Recommended)
- Install Homebrew (if you haven’t already): Open Terminal and run:
bash

/bin/bash -c "$(curl -fsSL https://raw.githubusercontent.com/Homebrew/install/HEAD/install.sh)"
Follow the on-screen instructions, which may include installing Xcode Command Line Tools. - Install Node.js: Once Homebrew is installed, run:
bash

brew install node
This will install the latest stable version of Node.js and npm.
Method 2: Using NVM (Node Version Manager) (Recommended for Professionals)
- Install NVM: Open Terminal and run the NVM installation script (check NVM’s GitHub for the very latest version, as it might update):
bash

curl -o- https://raw.githubusercontent.com/nvm-sh/nvm/v0.39.1/install.sh | bash
After installation, you’ll need to close and reopen your terminal or runsource ~/.bashrc(or~/.zshrcif you use Zsh) for NVM to be available. - Install Node.js:
bash

nvm install node    # Installs the latest LTS version

nvm use node        # Sets the latest LTS as the default for the current session

nvm alias default node # Sets it as the default for new sessions
You can install specific versions likenvm install 16and switch withnvm use 16.
Method 3: Using the Official Node.js Installer
Similar to Windows, download the macOS Installer (.pkg) from nodejs.org and follow the graphical prompts. This method is simpler but less flexible for managing multiple versions.
Installing Node.js on Linux
Method 1: Using NodeSource PPA (Recommended for Debian/Ubuntu for Latest Versions)
The default Node.js packages in Debian/Ubuntu repositories can be outdated. NodeSource provides up-to-date packages.
- Add NodeSource PPA: Open Terminal and run the following for the latest LTS version (e.g., Node.js 18 LTS):
bash

curl -fsSL https://deb.nodesource.com/setup_lts.x | sudo -E bash -
(Replacesetup_lts.xwithsetup_18.xorsetup_20.xfor specific versions if desired) - Install Node.js:
bash

sudo apt-get install -y nodejs
This command will also installnpm.
Method 2: Using NVM (Node Version Manager) (Recommended for Professionals)
Similar to macOS, NVM is a robust choice for Linux users.
- Install NVM: Open Terminal and run the NVM installation script:
bash

curl -o- https://raw.githubusercontent.com/nvm-sh/nvm/v0.39.1/install.sh | bash
After installation, close and reopen your terminal or runsource ~/.bashrc(or your shell’s equivalent). - Install Node.js:
bash

nvm install node    # Installs the latest LTS version

nvm use node        # Sets the latest LTS as the default for the current session

nvm alias default node # Sets it as the default for new sessions
Method 3: Using Distribution-Specific Package Managers (e.g., dnf for RHEL/CentOS/Fedora)
For RHEL-based systems:
sudo dnf module install nodejs:lts
This installs the LTS version of Node.js and npm via the dnf module stream.
Verifying Your Installation and Essential Next Steps
After following the installation steps, it’s crucial to verify that Node.js and npm have been installed correctly and are accessible from your command line.
Confirming Node.js and npm Installation
Open your terminal or command prompt and run the following commands:
- Check Node.js version:
bash

node -v
You should see a version number printed (e.g.,v18.17.1). - Check npm version:
bash

npm -v
You should see an npm version number printed (e.g.,9.6.7).
If both commands return version numbers, congratulations! You have successfully installed Node.js and npm. If you encounter “command not found” errors, it likely means your system’s PATH environment variable isn’t correctly configured, or you need to restart your terminal.
Your First Node.js Project: A Quick Start
To truly solidify your installation and get a feel for Node.js, let’s create a tiny “Hello World” application.
- Create a Project Directory:
bash

mkdir my-node-app

cd my-node-app
- Initialize npm:
bash

npm init -y
This command creates apackage.jsonfile, which is crucial for managing your project’s metadata and dependencies. The-yflag answers “yes” to all prompts, creating a default file. - Create Your Application File:
Create a file namedapp.js(orindex.js) in yourmy-node-appdirectory and add the following code:
javascript

// app.js

console.log("Hello Node.js! This is my first app.");
- Run Your Application:
In your terminal, while still in themy-node-appdirectory, execute:
bash

node app.js
You should see “Hello Node.js! This is my first app.” printed to your console.
This simple exercise confirms that Node.js is correctly executing your JavaScript files. From here, you can start exploring npm to install external libraries like Express.js for web servers, React for frontend, or various tools that enhance your development workflow.
Troubleshooting Common Installation Issues
Even with careful steps, you might encounter issues. Here are some common problems and solutions:
- ‘node’ or ‘npm’ command not found:
- Solution: Ensure your system’s PATH environment variable includes the directory where Node.js and npm executables are located. Restarting your terminal/command prompt or even your computer often resolves this after an installation. If using NVM/Volta, ensure you’ve sourced the configuration script (e.g.,
source ~/.bashrc).
- Solution: Ensure your system’s PATH environment variable includes the directory where Node.js and npm executables are located. Restarting your terminal/command prompt or even your computer often resolves this after an installation. If using NVM/Volta, ensure you’ve sourced the configuration script (e.g.,
- Permission errors during global package installation (
npm install -g package-name):- Problem: This often happens on Linux/macOS if you didn’t use a version manager and are trying to install globally into a system-protected directory.
- Solution:
- Use a version manager (NVM, Volta): This is the best long-term solution as it isolates global packages to your user directory.
- Fix npm’s default directory: Follow npm’s official guide to change its default directory to a user-owned path without using
sudo. Search for “Fixing npm permissions” on npm’s documentation. - Avoid
sudowithnpm install -g: Whilesudo npm install -gmight work, it’s generally discouraged as it can lead to security vulnerabilities and permission conflicts later on.
- Node.js or npm not updating:
- Solution: If you used an official installer, download and run the new installer. If you used a package manager, use its update command (e.g.,
brew upgrade node,choco upgrade nodejs-lts). If using a version manager, install the new version (nvm install node,volta install node@latest) and switch to it.
- Solution: If you used an official installer, download and run the new installer. If you used a package manager, use its update command (e.g.,
- Proxy issues:
- Problem: If you’re behind a corporate proxy,
npmmight struggle to fetch packages. - Solution: Configure npm to use your proxy:
bash

npm config set proxy http://proxy.company.com:8080

npm config set https-proxy http://proxy.company.com:8080
Replace with your actual proxy details.
- Problem: If you’re behind a corporate proxy,
Node.js and Your Journey: From Tech Skills to Brand and Money
Installing Node.js is just the first step. The real value lies in how you leverage this powerful technology to build, innovate, and grow. For professionals navigating the interconnected worlds of Tech, Brand, and Money, Node.js is far more than a runtime environment; it’s a strategic asset.
Elevating Your Tech Prowess and Digital Security
Mastering Node.js immediately places you in a high-demand category within the technology sector. It signifies an understanding of modern backend architectures, asynchronous programming, and efficient resource management. As you delve deeper, you’ll learn about building scalable APIs, managing databases, and integrating various services, all critical skills for today’s complex applications.
Furthermore, working with Node.js inherently enhances your understanding of Digital Security. npm, with its vast repository of packages, also comes with the responsibility of dependency management. Learning to audit your project for vulnerabilities (npm audit), choosing reputable packages, and understanding security best practices for Node.js applications (e.g., input validation, authentication, authorization) are vital. This knowledge not only protects your applications but also elevates your profile as a security-conscious developer. Regularly updating Node.js and its packages isn’t just about getting new features; it’s about patching security vulnerabilities and maintaining a robust, secure application ecosystem.
Building Your Personal Brand with Node.js Expertise
In the competitive digital landscape, a strong Personal Branding strategy is essential for developers. Proficiency in Node.js is a significant differentiator. By building projects with Node.js – whether it’s a personal portfolio site, a backend for a mobile app, or contributing to an open-source project – you create tangible evidence of your skills. These projects become talking points in interviews, showcase items on your GitHub profile, and form the core of your professional identity.
Actively engaging with the Node.js community, sharing your knowledge through blog posts (like this one!), or participating in forums further solidifies your expertise. Companies, especially those focused on innovation and agility, actively seek developers with strong Node.js skills, recognizing its efficiency and scalability. Being known as a go-to person for Node.js problems or solutions can significantly boost your reputation, attract collaborators, and open doors to exciting career opportunities, ultimately shaping a compelling Corporate Identity for yourself as a developer.
Unlocking Financial Opportunities Through Node.js Development
The intersection of technology and finance is more prominent than ever, and Node.js stands at a lucrative crossroads. The demand for skilled Node.js developers is consistently high, translating into competitive salaries and abundant job opportunities in both full-time roles and freelance markets. Companies value Node.js for its speed in development and production, which directly impacts their business finance and return on investment.
For those interested in Online Income and Side Hustles, Node.js offers a powerful toolkit. You can build and sell APIs, create automation scripts for businesses, develop backend systems for SaaS (Software as a Service) products, or even launch your own web applications. Its efficiency allows for rapid prototyping and deployment, making it an excellent choice for Minimum Viable Products (MVPs) and entrepreneurial ventures. The ability to quickly iterate and deliver value can lead to significant financial independence. Moreover, for those interested in Investing in their skills, learning Node.js is an investment with a high potential return, opening doors to highly paid contract work, consulting gigs, and the creation of profitable digital assets.
Conclusion
Installing Node.js is a foundational step in becoming a proficient modern developer. Whether you choose the simplicity of an official installer, the efficiency of a package manager, or the flexibility of a version manager, the goal is the same: to equip yourself with a powerful runtime environment that fuels innovation. We’ve covered the different methods for Windows, macOS, and Linux, ensuring you have the knowledge to set up your development environment correctly.
But this journey doesn’t end with installation. Node.js is a gateway to a world of endless possibilities, impacting not just your technical capabilities but also your personal brand and financial prospects. By embracing Node.js, you’re not just learning a technology; you’re investing in a skill set that will keep you at the forefront of the Tech industry, empower you to build a reputable Brand, and open numerous pathways to Financial success. Now that Node.js is installed, the next exciting step is to start building. The digital world awaits your creations!
aViewFromTheCave is a participant in the Amazon Services LLC Associates Program, an affiliate advertising program designed to provide a means for sites to earn advertising fees by advertising and linking to Amazon.com. Amazon, the Amazon logo, AmazonSupply, and the AmazonSupply logo are trademarks of Amazon.com, Inc. or its affiliates. As an Amazon Associate we earn affiliate commissions from qualifying purchases.