
In the rapidly evolving world of technology, efficient collaboration and robust version control are no longer luxuries but absolute necessities. For developers, data scientists, project managers, and even content creators, managing changes to files over time is critical for productivity, integrity, and seamless teamwork. At the heart of this capability lies Git, the most widely adopted distributed version control system (DVCS) in the world.
Git allows individuals and teams to track every modification made to their codebase or project files, revert to previous versions, branch out to develop new features independently, and merge changes back into the main project without conflict. It’s the backbone of modern software development, underpinning everything from open-source projects to enterprise-level applications, and a fundamental tool for anyone working with code or complex digital assets.
This comprehensive tutorial will guide you through the process of installing Git on various operating systems, ensuring you’re ready to harness its power for your projects. We’ll delve into the “why” behind Git’s dominance, explore the specific steps for Windows, macOS, and Linux, and walk you through the essential initial configuration. By the end of this guide, you’ll not only have Git successfully installed but also a foundational understanding of its importance in fostering productivity, enhancing digital security through robust change tracking, and streamlining your development workflow.
Why Git is Indispensable for Modern Development
Before we dive into the installation process, it’s crucial to understand why Git has become such an integral part of the tech ecosystem. Its impact extends far beyond mere file storage, touching upon collaboration, code integrity, and overall project efficiency.
The Core Power of Version Control
At its fundamental level, Git provides a sophisticated system for tracking changes to files. Imagine working on a complex document or a large software project. Without version control, making changes can be perilous. A wrong edit, an accidental deletion, or a desire to revert to an earlier state might lead to significant data loss or hours of painstaking recovery. Git eliminates this risk by creating a complete history of every change made.
Each “commit” in Git is a snapshot of your project at a specific point in time, meticulously recording who made the change, when it was made, and what the change entailed. This granular history allows you to:
- Rollback to Previous Versions: Easily revert individual files, specific changes, or even the entire project to any prior state. This is invaluable for undoing mistakes or exploring different approaches without fear.
- Understand Project Evolution: Analyze the history of your project, understanding how features were added, bugs were fixed, and designs evolved. This knowledge is critical for onboarding new team members and maintaining long-term projects.
- Experiment Safely: Create “branches” to develop new features, experiment with radical changes, or fix bugs in isolation from the main codebase. If an experiment fails, you can simply discard the branch without affecting the stable version of your project.
Collaboration and Code Integrity
The “distributed” aspect of Git is particularly powerful for team environments. Unlike centralized version control systems, where a single server holds the authoritative version of the project, Git allows every developer to have a complete copy of the repository on their local machine. This decentralization offers several key advantages:
- Offline Work: Developers can work on their projects even without an internet connection, committing changes locally and pushing them to a central server (like GitHub or GitLab) once connectivity is restored. This significantly boosts productivity, especially for remote or mobile teams.
- Seamless Merging: Git provides sophisticated tools for merging changes from different branches or developers. While conflicts can arise, Git offers powerful mechanisms to identify and resolve them efficiently, ensuring that everyone’s contributions are integrated smoothly.
- Enhanced Digital Security: By maintaining a full history and allowing multiple copies of the repository, Git significantly reduces the risk of data loss. If a central server fails, or a local copy is corrupted, other team members still have complete, functional copies of the project. Furthermore, the ability to review every change before merging (code reviews) enhances code quality and security by catching potential vulnerabilities early.
- Transparent Workflows: Git promotes transparent and auditable workflows. Every change is attributed to a specific user, fostering accountability and making it easier to track the origin of bugs or features.
Beyond Code: Diverse Applications of Git
While Git is most commonly associated with software development, its utility extends to any project involving collaborative document creation and version tracking. Technical writers use Git to manage documentation, designers might use it for design assets (though binary file handling has caveats), and even researchers use it for scientific data and manuscripts. Its principles of branching, merging, and historical tracking are universally beneficial for managing any evolving set of files. For these reasons, Git is a foundational tool for enhancing productivity across various digital domains, making its installation a crucial step for anyone navigating the modern tech landscape.
Pre-Installation Checks and Considerations
Before you embark on the Git installation journey, a few preliminary checks and considerations can smooth the process and prevent common hurdles. Understanding these aspects will help you choose the most appropriate installation method for your system and ensure a seamless setup.
System Requirements and Best Practices
Git is remarkably lightweight and has minimal system requirements. It runs efficiently on virtually any modern computer, regardless of its processing power or memory. However, there are a few general best practices to consider:
- Operating System: Ensure your operating system (Windows, macOS, or Linux) is up-to-date. While Git typically supports older versions, the latest updates often include security patches and improved compatibility that can benefit your overall system and development environment.
- Administrative Privileges: You’ll likely need administrative rights on your computer to install software, especially if you’re installing Git globally or using package managers. Make sure you have these permissions or can acquire them temporarily.
- Internet Connection: An active internet connection is essential for downloading the Git installer or fetching packages via your operating system’s package manager.
- Command Line Interface (CLI) Familiarity: While GUI tools for Git exist, Git’s primary interface is the command line. A basic understanding of navigating directories, executing commands, and working with your system’s terminal (Command Prompt, PowerShell, Terminal.app, Bash) will be beneficial.
Choosing the Right Installation Method
The method you choose for installing Git will primarily depend on your operating system and your preference for managing software.
- Official Installers: For Windows, the official “Git for Windows” installer is the most common and recommended approach. It bundles Git with a Git Bash terminal emulator and other useful tools.
- Package Managers: For macOS and Linux, package managers are the preferred method. These tools simplify software installation and updates by handling dependencies and providing a centralized way to manage applications.
- Homebrew (macOS): A popular package manager for macOS, making it easy to install a wide range of open-source tools, including Git.
apt,yum,dnf(Linux): These are common package managers for various Linux distributions (e.g.,aptfor Debian/Ubuntu,yum/dnffor Fedora/CentOS/RHEL). They provide a reliable and secure way to install and manage system-level software.
- Xcode Command Line Tools (macOS): If you’re a macOS developer, you might already have or can easily install Xcode Command Line Tools, which include Git. This can be a quick way to get Git if you don’t want to use Homebrew.
- Building from Source: For advanced users or specific requirements (e.g., needing the very latest, unreleased version of Git or optimizing for a niche system), Git can be compiled from its source code. However, this is generally not recommended for most users due to its complexity and the availability of pre-built packages.
For most users, opting for the official installer on Windows and a package manager on macOS or Linux will provide the easiest and most robust installation experience.
Step-by-Step Git Installation Guides
Now, let’s get down to the practical steps for installing Git on the three major operating systems. Follow the instructions relevant to your environment.
Installing Git on Windows
Installing Git on Windows is straightforward thanks to the official “Git for Windows” installer, which provides a self-contained environment including Git Bash, a powerful command-line interface.
-
Download the Installer:
- Navigate to the official Git website: https://git-scm.com/download/win
- The website should automatically detect your operating system and suggest the correct 32-bit or 64-bit installer. Click the download link.
-
Run the Installer:
- Once the download is complete, locate the
.exefile (e.g.,Git-2.xx.x-64-bit.exe) and double-click it to start the installation wizard. - You might be prompted by User Account Control (UAC); click “Yes” to allow the app to make changes to your device.
- Once the download is complete, locate the
-
Follow the Installation Wizard:
- License Information: Click “Next.”
- Select Destination Location: The default path (
C:Program FilesGit) is usually fine. Click “Next.” - Select Components:
- The default components are generally sufficient. Ensure “Git Bash Here,” “Git GUI Here,” and “Git LFS (Large File Support)” are selected. “Associate .git* configuration files with the default text editor” can be useful. Click “Next.”
- Select Start Menu Folder: Keep the default, then click “Next.”
- Choosing the Default Editor used by Git:
- Git needs a text editor for tasks like writing commit messages.
Vimis the default, which can be challenging for beginners. We recommend selecting a more user-friendly option if you have one installed, likeVisual Studio Code(if you’re a VS Code user),Notepad++, or simply stick withNotepadif you prefer simplicity. Select your preferred editor from the dropdown and click “Next.”
- Git needs a text editor for tasks like writing commit messages.
- Adjusting your PATH environment:
- This is a crucial step. Choose “Git from the command line and also from 3rd-party software” (Recommended). This option adds Git to your system’s PATH, allowing you to use
gitcommands from any terminal (Git Bash, Command Prompt, PowerShell). Click “Next.”
- This is a crucial step. Choose “Git from the command line and also from 3rd-party software” (Recommended). This option adds Git to your system’s PATH, allowing you to use
- Choosing HTTPS transport backend:
- “Use the OpenSSL library” is generally recommended for security and compatibility. Click “Next.”
- Configuring the line ending conversions:
- “Checkout Windows-style, commit Unix-style line endings” (Recommended for cross-platform projects). This ensures consistent line endings, preventing issues when collaborating between Windows and Linux/macOS users. Click “Next.”
- Configuring the terminal emulator to use with Git Bash:
- “Use MinTTY (the default terminal of MSYS2)” (Recommended). It offers a better terminal experience than the standard Windows Console. Click “Next.”
- Choose the default behavior of
git pull:- “Default (fast-forward or merge)” is often sufficient for beginners. Click “Next.”
- Choose a credential helper:
- “Git Credential Manager” (Recommended) simplifies authentication with services like GitHub by securely storing your credentials. Click “Next.”
- Configuring extra options:
- “Enable file system caching” can improve performance.
- “Enable symbolic links” can be useful for advanced scenarios. Keep defaults or adjust as needed. Click “Next.”
- Configuring experimental options:
- You can typically leave these unchecked unless you have a specific need. Click “Install.”
-
Complete Installation:
- The installer will extract and install files. Once complete, you can optionally view the Release Notes. Click “Finish.”
Installing Git on macOS
For macOS users, Homebrew is the most popular and convenient method for installing Git, though you can also get it via Xcode Command Line Tools.
Method 1: Using Homebrew (Recommended)
-
Install Homebrew (if not already installed):
- Open your Terminal application (found in
Applications/Utilities/Terminal.app). - Paste the following command and press Enter:
bash

/bin/bash -c "$(curl -fsSL https://raw.githubusercontent.com/Homebrew/install/HEAD/install.sh)"
- Follow the on-screen prompts, which might include entering your password and installing Xcode Command Line Tools if they are not present.
- Open your Terminal application (found in
-
Install Git using Homebrew:
- Once Homebrew is installed, simply run:
bash

brew install git
- Homebrew will download and install the latest stable version of Git, along with any necessary dependencies.
- Once Homebrew is installed, simply run:
Method 2: Via Xcode Command Line Tools
If you prefer not to use Homebrew, or if you already have Xcode installed, Git is included with the Xcode Command Line Tools.
- Open Terminal.
- Install Command Line Tools:
- Execute the following command:
bash

xcode-select --install
- A software update window will appear. Click “Install” and agree to the terms.
- This will download and install the Command Line Tools package, which includes Git.
- Execute the following command:

Installing Git on Linux
Linux users typically install Git using their distribution’s native package manager. This ensures a stable, well-integrated installation that receives regular updates.
For Debian/Ubuntu (and derivatives):
- Update Package List:
- Open your terminal.
- First, update your local package index to ensure you get the latest version of Git available:
bash

sudo apt update
- Install Git:
- Now, install Git:
bash

sudo apt install git
- The system will prompt you to confirm the installation and any required dependencies. Type
Yand press Enter.
- Now, install Git:
For Fedora/CentOS/RHEL:
-
For Fedora (using DNF):
- Open your terminal.
- Install Git using
dnf:
bash

sudo dnf install git
- Confirm the installation when prompted.
-
For CentOS/RHEL (using YUM or DNF):
- Older CentOS/RHEL versions (using
yum):
bash

sudo yum install git
- Newer CentOS/RHEL versions (using
dnf):
bash

sudo dnf install git
- Confirm the installation when prompted.
- Older CentOS/RHEL versions (using
Other Linux Distributions:
Most other Linux distributions will have Git available through their respective package managers (e.g., pacman for Arch Linux, zypper for openSUSE). Consult your distribution’s documentation for the precise command.
Verifying Your Git Installation and Initial Configuration
After successfully running the installer or package manager, it’s crucial to verify that Git is correctly installed and then perform some essential first-time configurations. These steps ensure Git functions as expected and properly attributes your contributions.
Confirming Git’s Presence
To check if Git has been installed correctly and is accessible from your command line, open a new terminal or command prompt window (Git Bash on Windows) and type:
git --version
You should see output similar to this, indicating the installed version of Git:
git version 2.39.2.windows.1
or
git version 2.40.1
If you receive an error message like “git is not recognized as an internal or external command,” it means Git’s executable path might not be correctly added to your system’s PATH environment variable. On Windows, this usually happens if you didn’t select “Git from the command line and also from 3rd-party software” during installation. On Linux/macOS, it’s less common with package managers but could indicate a problem with the installation process or your shell’s configuration. In such cases, revisiting the installation steps or consulting specific troubleshooting guides for your OS might be necessary.
Essential First-Time Setup
Before you start using Git for your projects, you need to tell it who you are. This information is embedded in every commit you make, providing crucial context for collaboration and auditing.
-
Set Your User Name:
- In your terminal, run the following command, replacing
"Your Name"with your actual name:
bash

git config --global user.name "John Doe"
- The
--globalflag ensures that this setting applies to all your Git repositories on this machine. If you need a different name for a specific project, you can run this command without--globalinside that project’s directory.
- In your terminal, run the following command, replacing
-
Set Your User Email:
- Similarly, configure your email address. It’s often recommended to use the same email address that you use for services like GitHub, GitLab, or Bitbucket.
bash

git config --global user.email "john.doe@example.com"
- Again, the
--globalflag makes this your default for all projects.
- Similarly, configure your email address. It’s often recommended to use the same email address that you use for services like GitHub, GitLab, or Bitbucket.
-
Verify Configuration (Optional):
- To confirm that your name and email have been set correctly, you can list all your global Git configurations:
bash

git config --list --global
- You should see
user.nameanduser.emailentries with the values you just set.
- To confirm that your name and email have been set correctly, you can list all your global Git configurations:
These two configuration settings are fundamental. Without them, Git will warn you every time you try to make a commit, and your commits won’t be properly attributed, which can complicate team collaboration and impact your project’s history.
Beyond user.name and user.email, you might also want to configure your default text editor for Git (if you didn’t during the Windows installation or want to change it). For example, to set Visual Studio Code as your default editor for Git commit messages:
git config --global core.editor "code --wait"
Or for nano on Linux:
git config --global core.editor "nano"
With Git installed and your initial configuration complete, you’re now fully equipped to begin your journey into version control.
Troubleshooting Common Installation Issues and Next Steps
Even with detailed instructions, sometimes things don’t go exactly as planned. This section addresses some common issues you might encounter during or after Git installation and points you towards effectively utilizing Git in your projects.
Addressing Installation Hurdles
-
“Git not recognized” Error (PATH Issue):
- Symptom: You type
git --versionin Command Prompt or PowerShell (Windows) and get an error that Git is not recognized. In Linux/macOS, it might be acommand not founderror. - Solution (Windows): During the “Adjusting your PATH environment” step of the Git for Windows installer, ensure you selected “Git from the command line and also from 3rd-party software.” If you didn’t, you might need to re-run the installer and select this option, or manually add Git’s
bindirectory (e.g.,C:Program FilesGitcmdandC:Program FilesGitusrbin) to your system’s PATH environment variable. Remember to restart your terminal after modifying PATH. - Solution (Linux/macOS): This is less common with package managers. Ensure the installation completed without errors. If you manually installed or compiled Git, ensure its executable is in a directory listed in your system’s PATH, or add it.
- Symptom: You type
-
Permission Denied Errors:
- Symptom: You encounter errors related to permissions during installation (especially on Linux/macOS with package managers).
- Solution: Ensure you are using
sudo(for Linux/macOS) when installing packages or running commands that modify system-wide files. On Windows, ensure you run the installer as an administrator.
-
Old Git Version:
- Symptom:
git --versionshows an older version than expected, especially after installing a new one. - Solution: This can happen if you have multiple Git installations or if your system’s PATH points to an older executable. On Linux/macOS, ensure your package manager is updated and try
sudo apt update && sudo apt upgrade gitorbrew upgrade git. On Windows, ensure you uninstalled any previous Git for Windows installations before running the new one, or check your PATH variable.
- Symptom:
-
Network or Download Issues:
- Symptom: Installation fails because the installer or package manager can’t download files.
- Solution: Check your internet connection. Temporarily disable any VPNs or firewalls that might be interfering. Try again after some time, as it might be a temporary server issue.
Beyond Installation: Diving Deeper into Git
With Git successfully installed and configured, you’re now at the starting line of a powerful journey in version control. The next steps involve learning how to actually use Git to manage your projects effectively.
-
Learn Basic Git Commands:
- Start with the fundamentals:
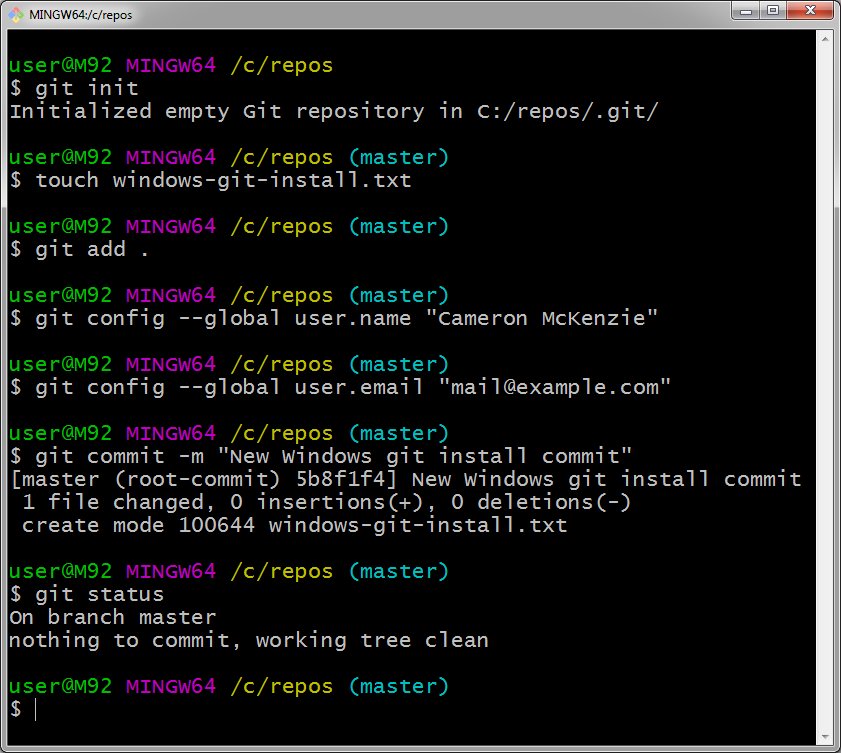
git init: Initialize a new Git repository.git clone [URL]: Copy an existing repository from a remote server.git add [file]: Stage changes for the next commit.git commit -m "Your commit message": Record staged changes to the repository history.git status: See the status of your working directory and staged changes.git log: View the commit history.git branch [branch-name]: Create a new branch.git checkout [branch-name]: Switch to a different branch.git merge [branch-name]: Integrate changes from one branch into another.git push: Upload local repository changes to a remote repository.git pull: Fetch and download content from a remote repository and immediately update the local repository to match that content.
- Numerous excellent online resources, interactive tutorials, and books are available to help you master these commands.
- Start with the fundamentals:
-
Explore Git GUI Clients:
- While the command line offers the most control and flexibility, many developers find graphical user interface (GUI) clients helpful for visualizing repository history, managing branches, and resolving merge conflicts. Popular options include:
- Sourcetree (free, cross-platform)
- GitKraken (free tier, cross-platform)
- GitHub Desktop (free, cross-platform, good for GitHub users)
- Integrated Git features in IDEs like VS Code, IntelliJ IDEA, Eclipse, etc.
- While the command line offers the most control and flexibility, many developers find graphical user interface (GUI) clients helpful for visualizing repository history, managing branches, and resolving merge conflicts. Popular options include:
-
Utilize Remote Hosting Services:
- To truly leverage Git’s collaborative power, you’ll want to use a remote repository hosting service. These platforms provide a central hub for your team to share code, perform code reviews, manage issues, and implement continuous integration/continuous deployment (CI/CD) pipelines.
- GitHub: The most popular platform for open-source projects and private repositories.
- GitLab: Offers extensive features for the entire DevOps lifecycle, from project planning to security and deployment.
- Bitbucket: Popular for private repositories and integrates well with Atlassian products.
- To truly leverage Git’s collaborative power, you’ll want to use a remote repository hosting service. These platforms provide a central hub for your team to share code, perform code reviews, manage issues, and implement continuous integration/continuous deployment (CI/CD) pipelines.
-
Connect to Broader Tech Trends:
- Understanding Git is your gateway to modern software development practices. It is foundational for:
- DevOps: Automating and streamlining the software delivery process.
- CI/CD: Continuously integrating and deploying code changes.
- Agile Methodologies: Supporting iterative development and rapid feedback cycles.
- Cloud-Native Development: Managing infrastructure as code and deploying applications to cloud environments.
- Understanding Git is your gateway to modern software development practices. It is foundational for:
By thoroughly understanding Git’s installation and actively learning its usage, you empower yourself with a critical skill that enhances your productivity, strengthens your projects’ digital security, and positions you squarely within the best practices of contemporary technology. Welcome to the world of efficient version control!
aViewFromTheCave is a participant in the Amazon Services LLC Associates Program, an affiliate advertising program designed to provide a means for sites to earn advertising fees by advertising and linking to Amazon.com. Amazon, the Amazon logo, AmazonSupply, and the AmazonSupply logo are trademarks of Amazon.com, Inc. or its affiliates. As an Amazon Associate we earn affiliate commissions from qualifying purchases.