
In an era dominated by rapid technological advancements, operating systems serve as the bedrock of our digital lives. While Windows 11 has certainly captured headlines with its sleek interface and new features, Windows 10 remains an incredibly popular, robust, and reliable choice for millions worldwide. Its stability, broad compatibility, and familiar user experience make it a go-to for new PC builds, system upgrades, or simply refreshing an aging machine with a clean installation. A fresh installation of Windows 10 can breathe new life into your computer, resolve persistent software issues, or provide a clean slate for improved performance and security.
This comprehensive guide will walk you through every essential step of installing Windows 10, from initial preparation to post-installation optimization. Whether you’re a seasoned tech enthusiast or a first-time installer, we’ll ensure you have all the necessary information to complete the process smoothly and efficiently. We’ll cover critical preparatory steps, a detailed walkthrough of the installation process itself, crucial post-installation tasks, and practical troubleshooting tips to address common issues. By the end of this article, you’ll be well-equipped to get your Windows 10 system up and running flawlessly.
Before You Begin: Essential Preparations for a Smooth Installation
A successful Windows 10 installation hinges significantly on thorough preparation. Skipping these initial steps can lead to data loss, compatibility issues, or a frustrating installation experience. Taking the time to prepare properly will save you headaches down the line and ensure your new system is ready to perform optimally.
Check System Requirements
Before you even think about installing Windows 10, it’s crucial to confirm that your computer meets the minimum hardware specifications. Attempting to install it on an underpowered machine will result in poor performance and an unsatisfactory user experience. Microsoft has provided clear guidelines, which are quite modest by today’s standards, but still essential to acknowledge:
- Processor: 1 Gigahertz (GHz) or faster compatible processor or System on a Chip (SoC). This essentially means any modern CPU from Intel or AMD released in the last decade will likely suffice.
- RAM: 1 Gigabyte (GB) for 32-bit or 2 GB for 64-bit. While 2GB might technically allow the OS to run, we highly recommend at least 4GB for any reasonable usability, and 8GB or more for a smooth multitasking experience.
- Hard Disk Space: 16 GB for 32-bit OS or 32 GB for 64-bit OS. Again, these are minimums. For practical use, including applications and personal files, a solid-state drive (SSD) of at least 250GB is highly recommended for speed and ample storage.
- Graphics Card: DirectX 9 or later with WDDM 1.0 driver. Most integrated graphics solutions in modern CPUs meet this requirement.
- Display: 800×600 resolution.
- Internet Connection: Required for updates and some features.
Verifying these specifications ensures your hardware is capable of running Windows 10 efficiently, providing a stable foundation for your computing tasks.
Back Up Your Important Data
This is arguably the most critical step in the entire process. A clean installation of Windows 10 will completely erase everything on the drive where you install the operating system. If you do not back up your personal files, documents, photos, videos, and any other crucial data, it will be permanently lost.
There are several reliable methods for backing up your data:
- External Hard Drive: A simple and effective solution. Copy and paste your important folders (Documents, Pictures, Videos, Music, Desktop) to an external drive.
- Cloud Storage: Services like Microsoft OneDrive, Google Drive, Dropbox, or Apple iCloud offer convenient ways to synchronize and store your files online. Make sure you have enough storage space and that all your critical files are synced before proceeding.
- Network Attached Storage (NAS): If you have a home network server, this can be an excellent option for large-scale backups.
- USB Flash Drives: Suitable for smaller collections of files.
Take your time with this step and double-check that everything you want to save is safely stored elsewhere before proceeding.
Gather Your Product Key
If you are performing a clean installation on a new PC or a PC that previously had a non-activated version of Windows, you will need a Windows 10 product key. This is a 25-character alphanumeric code that activates your copy of Windows, ensuring it is genuine and fully functional.
- New Purchase: If you bought a retail copy of Windows 10, the key will be on a sticker inside the box or provided digitally.
- Pre-built PC: Many pre-built PCs come with the key embedded in the motherboard’s firmware (UEFI). In such cases, Windows 10 will often activate automatically once connected to the internet.
- Digital License: If you previously upgraded from an activated Windows 7/8/8.1 to Windows 10, or purchased a digital license, your activation is linked to your Microsoft account. You can sign in with that account during or after installation, and Windows should activate automatically.
- Finding an existing key: If you need to reinstall and can still access your current Windows installation, tools like ProduKey or Magical Jelly Bean Keyfinder can sometimes retrieve your existing product key.
It’s wise to write down your product key or save it in a secure location before you start the installation.
Create Windows 10 Installation Media
To install Windows 10, you’ll need bootable installation media, typically a USB flash drive or a DVD. The most straightforward method to create this is by using Microsoft’s official Media Creation Tool.
- Download the Media Creation Tool: Visit the official Microsoft Windows 10 download page and download the tool.
- Run the Tool: Execute the downloaded file. Accept the license terms.
- Select “Create installation media (USB flash drive, DVD, or ISO file) for another PC”: This option allows you to make the bootable drive.
- Choose Language, Edition, and Architecture: The tool will usually recommend settings based on your current PC, but you can deselect “Use the recommended options for this PC” to choose specific settings (e.g., 64-bit architecture, which is recommended for most modern systems).
- Select Media Type:
- USB Flash Drive: This is the most popular and recommended option. You’ll need a USB drive with at least 8GB of free space. Warning: All data on the USB drive will be erased.
- ISO File: If you want to burn it to a DVD later or use it with a virtual machine, you can download the ISO file and then burn it using a third-party tool.
- Follow On-Screen Instructions: The tool will download the necessary files and create the bootable media. This process can take some time depending on your internet speed.
Once the tool finishes, you’ll have your bootable Windows 10 installation media ready. Keep it safe as you’ll need it for the next steps.
The Step-by-Step Windows 10 Installation Process
With your preparations complete, you’re ready to dive into the actual installation. This section details each stage of the process, ensuring you navigate the setup wizard effectively.
Booting from Installation Media
The first step is to instruct your computer to boot from the USB drive or DVD you just created, rather than its existing operating system.
- Insert Media: Plug the bootable USB drive into an available port or insert the DVD into your optical drive.
- Restart Your Computer: As your computer starts up, you need to access either the Boot Menu or the BIOS/UEFI settings.
- Boot Menu: This is generally easier. Look for a message on the screen during startup (e.g., “Press F12 for Boot Menu,” “Press ESC to select boot device”). Common keys include F2, F8, F10, F11, F12, or Del, but they vary by manufacturer (e.g., Dell, HP, Lenovo, ASUS).
- BIOS/UEFI Settings: If there’s no boot menu option, you’ll need to enter your BIOS/UEFI settings (usually F2 or Del) and change the boot order to prioritize your USB drive or DVD drive. Save and exit the settings.
- Boot from Media: Your computer should now boot from the installation media. You might see a “Press any key to boot from CD or DVD…” message. If so, press a key quickly.
Initial Setup: Language, Time, and Keyboard
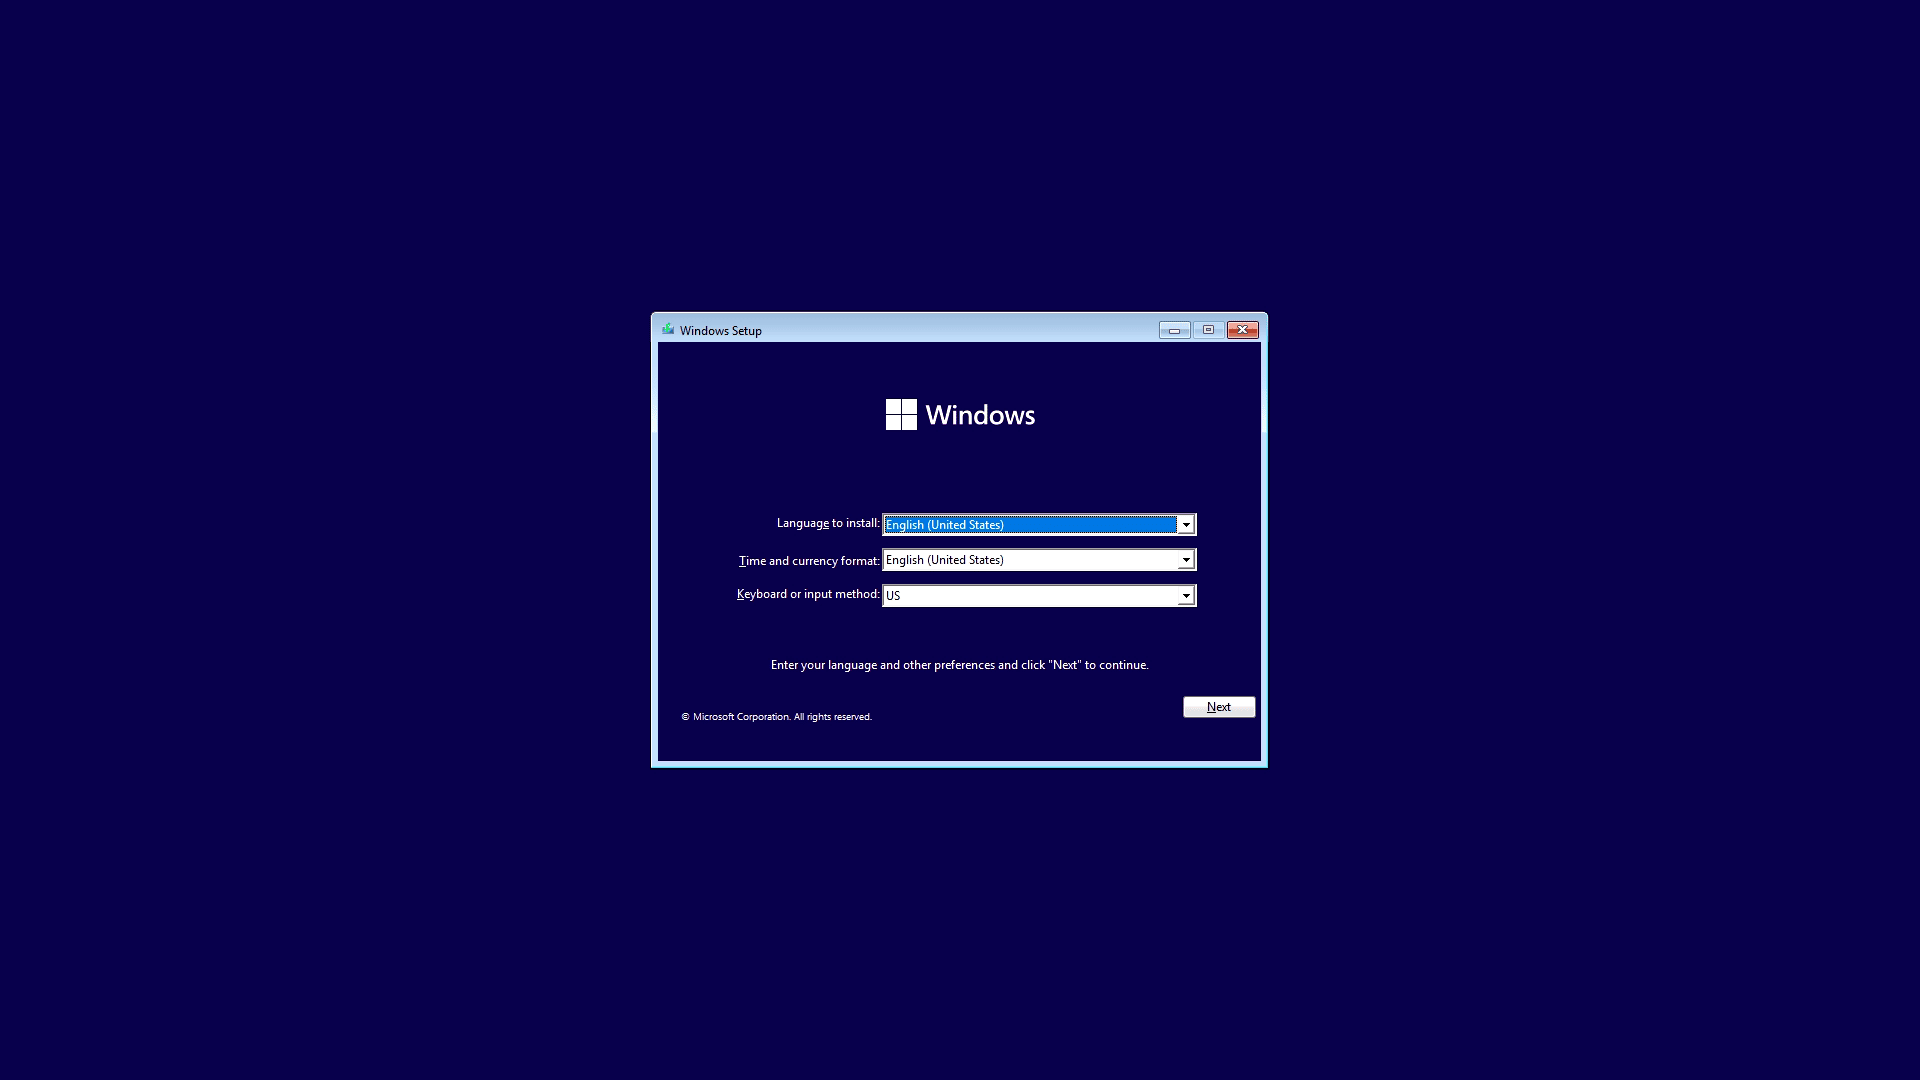
Once Windows setup loads, you’ll be presented with the initial configuration screen:
- Language to install: Choose your preferred language (e.g., English (United States)).
- Time and currency format: Select your regional settings (e.g., English (United States)).
- Keyboard or input method: Choose your keyboard layout (e.g., US).
- Click Next.
- Click Install now.
Entering Your Product Key
The setup wizard will prompt you to enter your Windows 10 product key.
- Enter Key: Type in your 25-character product key and click Next.
- Skip Option: If you’re reinstalling Windows 10 on a computer that previously had an activated copy (especially if it has a digital license linked to your Microsoft account or an embedded key in the UEFI firmware), you can click “I don’t have a product key”. Windows will typically activate automatically once it’s connected to the internet after installation.
- Accept License Terms: Read through the Microsoft Software License Terms and check the “I accept the license terms” box. Click Next.
Choosing Installation Type: Upgrade or Custom (Clean Install)
This is a critical decision point that determines how Windows 10 is installed.
- Upgrade: Install Windows and keep files, settings, and applications: This option is primarily used when upgrading from an older version of Windows (e.g., Windows 7 or 8.1) to Windows 10, or when performing an in-place upgrade to a newer version of Windows 10 while keeping your existing data. For a clean installation, you should NOT choose this option.
- Custom: Install Windows only (advanced): This is the option you want for a clean installation. It allows you to partition and format your hard drive, ensuring a fresh start. Select this option.
Partitioning Your Hard Drive
This step is where you manage your storage drives. Be extremely careful here, as incorrect actions can lead to data loss.
- Identify Target Drive: You’ll see a list of drives and partitions. Identify the drive where you want to install Windows 10. This is usually your primary SSD or HDD. If you have multiple drives, ensure you select the correct one.
- Delete Existing Partitions (for a truly clean install):
- Select each partition on your target drive (e.g., “Drive 0 Partition 1,” “Drive 0 Partition 2,” etc.) and click Delete.
- Crucial Warning: Deleting partitions will erase ALL data on them. Confirm you have backed up everything before proceeding.
- Once all partitions on your target drive are deleted, you’ll be left with “Drive 0 Unallocated Space.”
- Create New Partition:
- Select the “Unallocated Space” and click New.
- Windows will suggest a maximum size. You can adjust this if you want to create multiple partitions (e.g., one for Windows and one for data). For most users, using the maximum size is fine.
- Click Apply. Windows will create the necessary system partitions (e.g., Recovery, EFI, MSR) and your primary partition.
- Format (Optional but recommended): Select your primary partition (the largest one, usually labeled “Primary”) and click Format. This ensures the partition is clean and ready.
- Select Primary Partition: Ensure the primary partition (where Windows will be installed) is highlighted. Click Next.
Copying Windows Files
After selecting the target partition, Windows will begin the installation process:
- Copying Windows files: The setup wizard will copy all necessary files from your installation media to your hard drive.
- Getting files ready for installation: This phase expands and prepares the files.
- Installing features: Essential Windows components are installed.
- Installing updates: Any preliminary updates are integrated.
- Finishing up: The final touches of the installation are applied.
This process involves several reboots. Do NOT press any keys when prompted to “Press any key to boot from CD or DVD…” during these reboots. Let the system restart on its own to continue the installation from the hard drive.

Initial Configuration: Account Setup, Privacy Settings
After the main installation is complete and the system reboots for the final time, you’ll be guided through the Out-of-Box Experience (OOBE) to configure your personal settings:
- Region and Keyboard Layout: Confirm your country/region and keyboard layout. You can add a second keyboard layout if needed.
- Network Connection: Connect to a Wi-Fi network or plug in an Ethernet cable. An internet connection is crucial for updates and signing in with a Microsoft account.
- Account Setup:
- Microsoft Account: Microsoft strongly encourages using a Microsoft account. Sign in with your existing account or create a new one. This links your digital license, OneDrive, and other Microsoft services.
- Offline Account (Local Account): If you prefer not to use a Microsoft account, look for an option like “Offline account” or “Domain join instead” (the wording changes with different Windows 10 versions). This will let you create a local user account.
- Create a PIN: For faster and more secure login, Windows will suggest creating a PIN.
- Privacy Settings: Microsoft presents several privacy options (Location, Diagnostic data, Tailored experiences, etc.). Review each one carefully and adjust them according to your preferences. You can typically turn off most of these if you prioritize privacy.
- Cortana Setup (Optional): You can choose to enable or disable Cortana, Microsoft’s digital assistant.
- Windows Hello (Optional): If your device supports it (e.g., fingerprint reader, facial recognition), you’ll be prompted to set up Windows Hello.
After completing these steps, Windows 10 will finalize its setup, and you’ll be presented with your brand-new desktop!
Post-Installation Essentials and Optimization
Installing Windows 10 is only the first step. To ensure your system is secure, performs optimally, and is ready for daily use, several post-installation tasks are crucial.
Install Device Drivers
Drivers are essential software components that allow your operating system to communicate with your hardware (graphics card, sound card, network adapter, chipset, etc.). While Windows 10 often includes generic drivers, installing manufacturer-specific drivers is vital for optimal performance and stability.
- Check Device Manager: Right-click the Start button, select “Device Manager.” Look for any devices with a yellow exclamation mark, indicating a missing or problematic driver.
- Manufacturer Websites: Visit the support section of your computer’s manufacturer (e.g., Dell, HP, Lenovo) or individual component manufacturers (e.g., NVIDIA, AMD, Intel, Realtek). Download the latest drivers for your specific model and operating system version.
- Install Drivers: Install them one by one, usually starting with chipset drivers, then graphics, audio, and network drivers. Restart your PC as prompted.
Run Windows Updates
Windows Updates deliver critical security patches, bug fixes, and feature enhancements. Keeping your system up-to-date is paramount for security and performance.
- Go to Settings: Click the Start button, then Settings (gear icon).
- Navigate to Update & Security: Select “Update & Security.”
- Check for Updates: Click “Check for updates.” Windows will download and install any pending updates. This process might take a while and require multiple restarts. Continue checking for updates until no more are found.
Activate Windows 10
While you might have skipped entering the product key during installation, it’s essential to confirm that your copy of Windows 10 is activated.
- Go to Settings: Click the Start button, then Settings.
- Navigate to Update & Security > Activation: Check the “Activation” status.
- Troubleshoot Activation (if needed): If Windows isn’t activated, and you believe you have a valid license (especially a digital license linked to your Microsoft account), click “Troubleshoot” or “Change product key” to re-enter it or connect to your Microsoft account.
Install Essential Software
Now that your system is stable and updated, it’s time to install the applications you need for work and play.
- Web Browser: If you don’t prefer Microsoft Edge, download and install Google Chrome, Mozilla Firefox, or another browser of your choice.
- Antivirus Software: While Windows Defender provides good basic protection, you might opt for a third-party antivirus solution for enhanced security.
- Office Suite: Install Microsoft Office, LibreOffice, or other productivity software.
- Utilities: Consider tools for file compression (7-Zip), media playback (VLC), or system monitoring.
- Creative Software: If you’re a designer or editor, install your preferred creative applications.
Always download software from official sources to avoid malware.
Restore Your Data
Finally, restore the important files and folders you backed up earlier to their original locations on your newly installed Windows 10 system. Ensure they are correctly placed in your Documents, Pictures, Videos, and other personal folders.
Common Issues and Troubleshooting Tips
Even with careful planning, sometimes things don’t go as expected. Here are some common issues you might encounter during or after Windows 10 installation, along with basic troubleshooting steps.
“No Boot Device Found” or Boot Loop
- Problem: Your computer isn’t booting from the installation media, or it enters a loop during setup.
- Solution:
- Check Boot Order: Ensure your BIOS/UEFI settings are correctly configured to boot from the USB drive or DVD first.
- Recreate Media: The installation media might be corrupted. Try creating it again on a different USB drive or DVD.
- Try Different USB Port: Some USB ports might be faulty or incompatible with bootable media.
- Disable Secure Boot/Fast Boot: In some BIOS/UEFI configurations, disabling “Secure Boot” or “Fast Boot” can resolve boot issues, especially with older hardware or certain USB drives.
Driver Problems After Installation
- Problem: Certain hardware components aren’t working (e.g., no sound, Wi-Fi not working, low-resolution display).
- Solution:
- Device Manager: Check for yellow exclamation marks in Device Manager.
- Manufacturer Websites: Download and install the latest drivers directly from the component or PC manufacturer’s website. Generic Windows drivers are often not sufficient.
- Windows Update: Sometimes, Windows Update can find and install missing drivers automatically.
Activation Errors
- Problem: Windows 10 is not activating, even after entering a product key or signing in with a Microsoft account.
- Solution:
- Check Internet Connection: Ensure your PC is connected to the internet.
- Verify Product Key: Double-check the product key for typos.
- Troubleshooter: Use the “Troubleshoot” option in Settings > Update & Security > Activation.
- Microsoft Account: If you have a digital license, ensure you’re signed in with the correct Microsoft account that the license is linked to.
- Contact Microsoft Support: If all else fails, contact Microsoft support directly; they can often help resolve activation issues.
Slow Performance
- Problem: Your newly installed Windows 10 feels sluggish.
- Solution:
- Update Drivers: Ensure all device drivers are up-to-date, especially chipset and graphics drivers.
- Run Windows Updates: Install all pending Windows updates.
- Check Background Apps: Go to Settings > Privacy > Background apps and turn off apps you don’t need running in the background.
- Disk Usage: Open Task Manager (Ctrl+Shift+Esc) and check the “Disk” column. If it’s consistently at 100%, it might indicate a failing drive or a problematic application. Consider upgrading to an SSD if you’re still using an HDD.
- System Files: Run
sfc /scannowin an elevated Command Prompt to check for and repair corrupted system files.
Why Windows 10 Remains a Solid Choice
Despite the advent of Windows 11, Windows 10 continues to be a highly relevant and viable operating system, particularly for those with specific hardware needs or preferences. Its widespread adoption means a vast ecosystem of support and compatibility that will endure for years to come.
Stability and Maturity
Windows 10 has been refined over many years since its initial release in 2015. This long development cycle has resulted in an incredibly stable and mature operating system. Most bugs have been ironed out, and its performance is predictable and reliable. For users who prioritize consistency and dependability over the latest visual changes, Windows 10 offers a thoroughly tested and robust platform.
Broad Hardware and Software Compatibility
One of Windows 10’s greatest strengths is its exceptional compatibility. It runs smoothly on a vast range of hardware, from older machines that might not meet Windows 11’s stricter requirements to brand-new high-performance systems. Furthermore, its extensive lifespan means that virtually all legacy software and peripherals are compatible, making it an ideal choice for businesses and individuals who rely on specific applications or hardware that might not yet have full Windows 11 support.
Continued Security Updates
Microsoft has committed to supporting Windows 10 with regular security updates until at least October 14, 2025. This means users can continue to enjoy a secure computing environment without worrying about immediately upgrading to Windows 11. These ongoing updates protect against new threats and ensure the operating system remains resilient against vulnerabilities, making it a safe choice for personal and professional use.

Conclusion
Installing Windows 10 is a foundational task for any PC user, whether you’re building a new system, performing an essential upgrade, or simply seeking a fresh start. By diligently following the preparation steps—checking requirements, backing up data, acquiring your product key, and creating reliable installation media—you lay the groundwork for success. The step-by-step installation process, from booting to initial configuration, becomes manageable and clear with the right guidance.
Remember, a clean installation offers significant benefits, including improved performance, enhanced security, and a system free from accumulated digital clutter. Don’t forget the crucial post-installation tasks like driver updates, running Windows Update, and activating your system to ensure everything functions perfectly. And if you encounter any bumps along the road, the troubleshooting tips provided should help you navigate common issues.
While Windows 11 beckons with its innovations, Windows 10 stands as a testament to reliability, broad compatibility, and a mature user experience. It remains a powerful and secure platform, supported for years to come. By following this guide, you can confidently install and optimize Windows 10, setting yourself up for a smooth and productive computing journey. Enjoy your refreshed and revitalized system!
aViewFromTheCave is a participant in the Amazon Services LLC Associates Program, an affiliate advertising program designed to provide a means for sites to earn advertising fees by advertising and linking to Amazon.com. Amazon, the Amazon logo, AmazonSupply, and the AmazonSupply logo are trademarks of Amazon.com, Inc. or its affiliates. As an Amazon Associate we earn affiliate commissions from qualifying purchases.