
Embarking on the journey of setting up a brand-new PC is an exciting prospect, filled with the promise of enhanced performance, cutting-edge features, and a fresh digital environment. At the heart of this experience lies the operating system, the very foundation upon which your digital life will be built. For many, the natural choice for a modern computing experience is Windows 11, Microsoft’s latest iteration of its ubiquitous operating system. Whether you’ve just unboxed a pre-built machine or assembled your own custom rig, the process of installing Windows 11 is a crucial step that, while perhaps appearing daunting to some, is remarkably straightforward with the right guidance.
This comprehensive guide aims to demystify the installation process, breaking it down into manageable steps. We’ll cover everything you need to know, from ensuring your hardware is ready to navigating the setup wizard, all while keeping in mind the broader context of technology, smart financial decisions, and effective brand building that often accompanies such a significant technological upgrade.
Preparing Your New PC for Windows 11 Installation
Before you can even think about booting into the Windows 11 installer, it’s imperative to ensure your new PC is adequately prepared. This preparation phase is where the foundation for a smooth and successful installation is laid. It involves understanding the system requirements, gathering the necessary tools, and making a few crucial decisions that can impact your computing experience.
Understanding Windows 11 System Requirements
Microsoft has specific hardware requirements for Windows 11, designed to leverage its new features and security enhancements. Failing to meet these can lead to an unsuccessful installation or a system that doesn’t perform optimally.
- Processor: A compatible 64-bit processor with at least 1 GHz clock speed and 2 or more cores. Most modern CPUs from Intel and AMD will meet this requirement.
- RAM: A minimum of 4 GB of RAM is needed. For a smoother experience, especially with multitasking and demanding applications, 8 GB or more is highly recommended.
- Storage: At least 64 GB of available storage space is required for Windows 11. This is crucial for the OS itself, updates, and your applications.
- System Firmware: UEFI (Unified Extensible Firmware Interface) with Secure Boot capability is a must. This is a modern replacement for the older BIOS and provides enhanced security features.
- TPM: Trusted Platform Module (TPM) version 2.0 is a critical security component that Windows 11 relies on. Most motherboards manufactured in the last few years will have TPM 2.0 support, though it might need to be enabled in the UEFI/BIOS settings.
- Graphics Card: Compatible with DirectX 12 or later with WDDM 2.0 driver.
- Display: High definition (720p) display that is greater than 9 inches diagonally, 8 bits per color channel.
You can use Microsoft’s PC Health Check app to easily verify if your system meets these requirements. It’s a valuable tool that will save you time and potential frustration.
Essential Tools and Resources
To perform a clean installation of Windows 11, you’ll need a few key items:
- A USB Flash Drive: A USB drive with at least 8 GB of storage is required to create the bootable Windows 11 installation media. Ensure any important data on the USB drive is backed up, as it will be formatted during the creation process.
- Internet Connection: A stable internet connection is necessary to download the Windows 11 Media Creation Tool and subsequently, to download updates and drivers after the installation is complete.
- Windows 11 Product Key (Optional but Recommended): If you are upgrading from a previously activated version of Windows 10, Windows 11 will often activate automatically using your digital license. However, for a completely new installation or if you purchased a new license, you’ll need a valid Windows 11 product key. You can also choose to skip entering the product key during installation and activate later.
- Another Working Computer: You’ll need access to another computer with internet access to download the Media Creation Tool and create the bootable USB drive.
Creating Bootable Windows 11 Installation Media
The most common and recommended method for installing Windows 11 on a new PC is by creating a bootable USB drive. This allows you to boot your new computer directly from the USB and initiate the installation process.
- Download the Media Creation Tool: Visit the official Microsoft website and download the “Windows 11 Disk Image (ISO)” or the “Media Creation Tool for Windows 11”. The Media Creation Tool is generally more user-friendly for creating bootable media directly.
- Run the Media Creation Tool: Once downloaded, run the tool. Accept the license terms.
- Select “Create installation media (USB flash drive, DVD, or ISO file) for another PC.” Click Next.
- Choose Language, Edition, and Architecture: The tool will usually suggest the recommended options for your current PC. For a new PC installation, it’s often best to uncheck “Use the recommended options for this PC” and manually select “Windows 11” as the edition, and ensure the correct language and architecture (usually 64-bit) are chosen.
- Select “USB flash drive.” Click Next.
- Select Your USB Drive: Choose the USB flash drive you wish to use from the list. Ensure you’ve selected the correct one, as all data on it will be erased.
- Wait for the Process to Complete: The tool will now download the Windows 11 files and create the bootable USB drive. This can take some time depending on your internet speed.
Once the process is finished, you will have a bootable USB drive ready to install Windows 11.

Installing Windows 11 on Your New PC
With your bootable USB drive prepared and your PC meeting the system requirements, you’re ready to proceed with the actual installation. This involves booting your computer from the USB drive and following the on-screen prompts.
Booting from the USB Drive
This is a critical step that requires you to tell your PC to start from the USB drive instead of its internal storage.
- Insert the USB Drive: Plug the bootable Windows 11 USB drive into a USB port on your new PC.
- Access the Boot Menu or UEFI/BIOS: Turn on your new PC. Immediately after powering it on, you’ll need to press a specific key to access the boot menu or the UEFI/BIOS settings. The key varies by manufacturer, but common keys include
F2,F10,F12,Del, orEsc. You’ll usually see a message on the screen during the initial startup indicating which key to press. - Select the USB Drive as the Boot Device:
- Boot Menu: If you access the boot menu, you’ll see a list of available boot devices. Select your USB drive (it might be listed by its brand name or as a generic USB device) and press Enter.
- UEFI/BIOS: If you access the UEFI/BIOS settings, navigate to the “Boot” or “Boot Order” section. Change the boot priority so that the USB drive is listed as the first boot device. Save your changes and exit the UEFI/BIOS. The computer will then restart.
Your PC should now boot from the USB drive, and you’ll see the Windows 11 setup screen.
Navigating the Windows Setup Wizard
The Windows 11 setup wizard is designed to be intuitive, guiding you through the installation process with clear instructions.
- Language and Regional Settings: On the first screen, select your preferred language, time and currency format, and keyboard layout. Click “Next.”
- Install Now: Click the “Install now” button.
- Enter Product Key (or Skip): If you have a Windows 11 product key, enter it now. If you don’t have one or want to activate later, click “I don’t have a product key.”
- Select Operating System Edition: If prompted, choose the edition of Windows 11 you wish to install (e.g., Windows 11 Home, Windows 11 Pro). Ensure this matches any product key you have. Click “Next.”
- Accept License Terms: Read the Microsoft license terms and check the box to accept them. Click “Next.”
- Choose Installation Type: You will be presented with two options:
- Upgrade: This option is for upgrading an existing Windows installation. It’s not suitable for a new PC.
- Custom: Install Windows only (advanced): This is the option you want for a new PC. It allows for a clean installation. Select this option.
- Select Installation Location: This is a crucial step. You’ll see a list of drives and partitions on your PC.
- For a brand new PC with no data: You’ll likely see one or more “Unallocated Space” entries. Select the largest unallocated space (this will be your primary drive) and click “New.” Windows will automatically create the necessary partitions. Then, select the primary partition and click “Next.”
- If you’ve previously formatted or partitioned the drive: You might see existing partitions. You can delete them to create unallocated space or select an existing partition to format (which will erase all data on that partition). For a clean install on a new PC, it’s generally best to let Windows create its own partitions on the unallocated space.
- Windows Installation: The installation process will now begin. This involves copying files, installing features, and installing updates. Your PC will restart several times during this phase. Do not remove the USB drive until prompted or until the initial setup screens appear after the restarts.
Completing the Windows 11 Setup and Post-Installation Steps
After the core Windows files are installed and your PC has restarted several times, you’ll be guided through the Out-of-Box Experience (OOBE) to personalize your Windows 11 setup. This is where you’ll configure your user account, privacy settings, and connect to the internet.
Initial Setup and Personalization (OOBE)
- Region and Keyboard Layout: Confirm your region and keyboard layout settings.
- Connect to a Network: Connect to your Wi-Fi network or plug in an Ethernet cable. This is important for downloading updates and setting up your Microsoft account.
- Name Your Device: Give your new PC a descriptive name.
- Sign in with a Microsoft Account: You’ll be prompted to sign in with your Microsoft account. This links your PC to services like OneDrive, the Microsoft Store, and allows for syncing settings across devices. You can create a new account if you don’t have one. For local accounts, the process can be a bit more hidden during setup, often requiring you to disconnect from the internet temporarily before the option to create a local account appears.
- Set Up a PIN: For easier and more secure login, you’ll be asked to create a PIN.
- Privacy Settings: Review and configure your privacy settings, deciding what information you want to share with Microsoft.
- Customize Your Experience (Optional): You might be offered options to customize your PC for gaming, creativity, or school. Choose what best suits your intended use.
- Final Touches: Windows 11 will finalize your settings, and you’ll eventually be presented with your new Windows 11 desktop.

Essential Post-Installation Tasks
Once you’re on the desktop, the journey isn’t quite over. There are a few critical steps to ensure your PC is running optimally and securely.
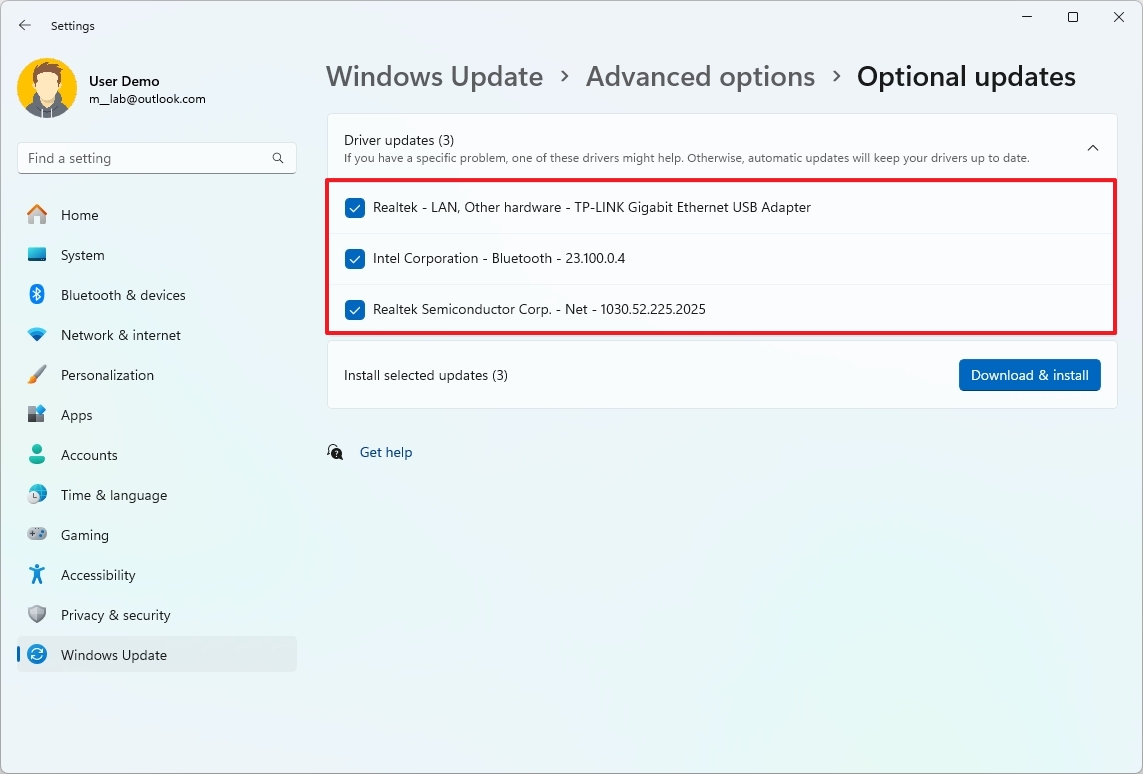
- Windows Update: The very first thing you should do is run Windows Update. Go to
Settings > Windows Updateand click “Check for updates.” Install all available updates, including optional ones. This will ensure you have the latest security patches and feature improvements. - Install Drivers: While Windows 11 often installs generic drivers, it’s highly recommended to install the latest drivers for your specific hardware, especially for your graphics card, motherboard chipset, network adapter, and audio. You can usually find these on the manufacturers’ websites (e.g., NVIDIA, AMD, Intel, or your motherboard manufacturer’s support page). Outdated or incorrect drivers can lead to performance issues or instability.
- Install Essential Software: Now is the time to install your must-have applications: your web browser of choice, productivity software (like Microsoft Office or alternatives), antivirus software (if you prefer one over Windows Security), media players, and any other programs you frequently use.
- Activate Windows (if not already done): If you skipped product key entry during setup, navigate to
Settings > System > Activationto enter your product key and activate Windows. - Explore and Customize: Take some time to explore the new features of Windows 11, like the redesigned Start menu and Taskbar, Snap Layouts, and Widgets. Customize your desktop wallpaper, themes, and display settings to your liking.
By following these steps diligently, you’ll ensure a smooth and successful installation of Windows 11 on your new PC, setting you up for a productive and enjoyable computing experience. The world of technology, personal branding, and financial management is at your fingertips, ready to be explored on your fresh, powerful machine.
aViewFromTheCave is a participant in the Amazon Services LLC Associates Program, an affiliate advertising program designed to provide a means for sites to earn advertising fees by advertising and linking to Amazon.com. Amazon, the Amazon logo, AmazonSupply, and the AmazonSupply logo are trademarks of Amazon.com, Inc. or its affiliates. As an Amazon Associate we earn affiliate commissions from qualifying purchases.