The Sims 3, a beloved life simulation game, continues to captivate players with its open-world gameplay and the endless possibilities for customization. While the base game offers a rich experience, the true magic of The Sims 3 often lies in the vibrant community of modders who create content that expands the game’s universe. From new careers and traits to intricate objects and graphical enhancements, mods can breathe fresh life into your game, making it feel brand new. However, for newcomers to the modding scene, the process of installing these enhancements can seem daunting. This comprehensive guide, drawing from the core principles of tech tutorials and the importance of clear, step-by-step instructions, will demystify the process of installing Sims 3 mods, ensuring you can confidently personalize your gameplay.

Understanding Sims 3 Mods and Their Impact
Before diving into the installation process, it’s crucial to understand what mods are and why they are so popular within The Sims 3 community. Mods, short for modifications, are user-created content that alters or adds to the existing game. This can range from small tweaks that improve user experience to massive overhauls that introduce entirely new gameplay mechanics.
The Power of Community-Driven Enhancement
The Sims 3 modding community is a testament to the passion and creativity of its players. These dedicated individuals invest countless hours into developing and refining mods, often driven by a desire to fill perceived gaps in the official game or to simply express their unique ideas. The result is an ever-growing library of content that can:
- Expand Gameplay Options: Introduce new careers, skills, traits, and aspirations that offer fresh challenges and objectives. Want your Sim to be a renowned sushi chef or a daring mountain climber? There’s likely a mod for that.
- Enhance Visuals: Improve the game’s graphics with custom lighting, textures, and visual effects, making your Sims’ world more vibrant and realistic.
- Add Custom Content (CC): Introduce a plethora of new clothing, hairstyles, furniture, and decorative items, allowing for unparalleled personalization of your Sims and their homes.
- Fix Bugs and Improve Performance: Some mods are designed to address known issues in the game or to optimize performance, leading to a smoother and more stable gaming experience.
- Introduce New Interactions and Systems: Mods can add complex social interactions, complex relationship dynamics, or even entirely new ways for Sims to engage with their environment.
The sheer diversity of mods available means that no two Sims 3 games will ever be exactly alike. This empowers players to tailor their experience precisely to their preferences, fostering a deeper connection with the game.
Essential Tools for Modding
While the installation process itself is relatively straightforward, there are a few essential tools that will make your modding journey much smoother and more organized. These are generally free and readily available, aligning with the “Tech” pillar’s focus on productivity and utilizing helpful software.
The Sims 3 Package and Sims3Launcher
The Sims 3 utilizes .package files for many of its custom content and mods. These are the primary file types you’ll encounter. The game also comes with a built-in tool called the Sims3Launcher, which can be a helpful, albeit sometimes finicky, way to manage certain types of mods and installed content.
The Sims 3 Mods Folder: Your Digital Sanctuary
Every mod you install will ultimately reside within a specific folder structure on your computer. This is your “Mods Folder,” and understanding its location and organization is paramount. Think of it as the central hub for all your custom content.
- Windows: Typically found in
DocumentsElectronic ArtsThe Sims 3ModsPackages - Mac: Typically found in
Users/[Your Username]/Library/Application Support/Electronic Arts/The Sims 3/Mods/Packages
Within this Packages folder, you’ll create subfolders to keep your mods organized. This is a crucial step for troubleshooting and preventing conflicts, reflecting good digital organization practices. Common subfolders include Overrides (for mods that change existing game files) and NewContent (for items like clothing, hair, or objects).
Resource.cfg: The Game’s Instruction Manual
This often-overlooked but vital file, Resource.cfg, acts as a configuration file that tells The Sims 3 how to read and load mods. When you install mods, you might need to ensure this file is correctly configured. Fortunately, most modding guides will either provide a pre-configured Resource.cfg or explain how to create one. This file is a prime example of how understanding the underlying tech can enhance your user experience.
Step-by-Step Installation Guide
Now that you understand the basics of Sims 3 mods and the tools involved, let’s get to the practical steps of installing them. This section will guide you through the entire process, from downloading to enjoying your newly enhanced game.
Downloading Mods: Where to Find Your Treasures
The Sims 3 modding community thrives on various websites and forums. When searching for mods, always prioritize reputable sources. Some of the most popular and well-regarded platforms include:
- Mod The Sims (MTS): A long-standing and highly respected community site with a vast collection of mods and custom content, meticulously organized and vetted.
- The Sims Resource (TSR): Another massive repository of custom content, including a significant amount of Sims 3 CC.
- Tumblr and SimFileShare: Many individual modders and creators share their work on these platforms. Be sure to check their blogs and download links carefully.
When downloading, pay close attention to:
- File Type: Mods typically come as
.packagefiles or. Sims3Packfiles. This guide primarily focuses on.packagefiles, which are more common for gameplay mods and extensive CC.. Sims3Packfiles are usually installed through the Sims3Launcher. - Compatibility: Ensure the mod is compatible with your version of The Sims 3 and any expansion packs you have installed. Mod creators usually specify this in their download descriptions.
- Dependencies: Some mods require other mods or specific game packs to function correctly. Always read the installation instructions thoroughly for any required dependencies.
Installing .package Mods: The Core Process
This is the most common and generally recommended method for installing Sims 3 mods.
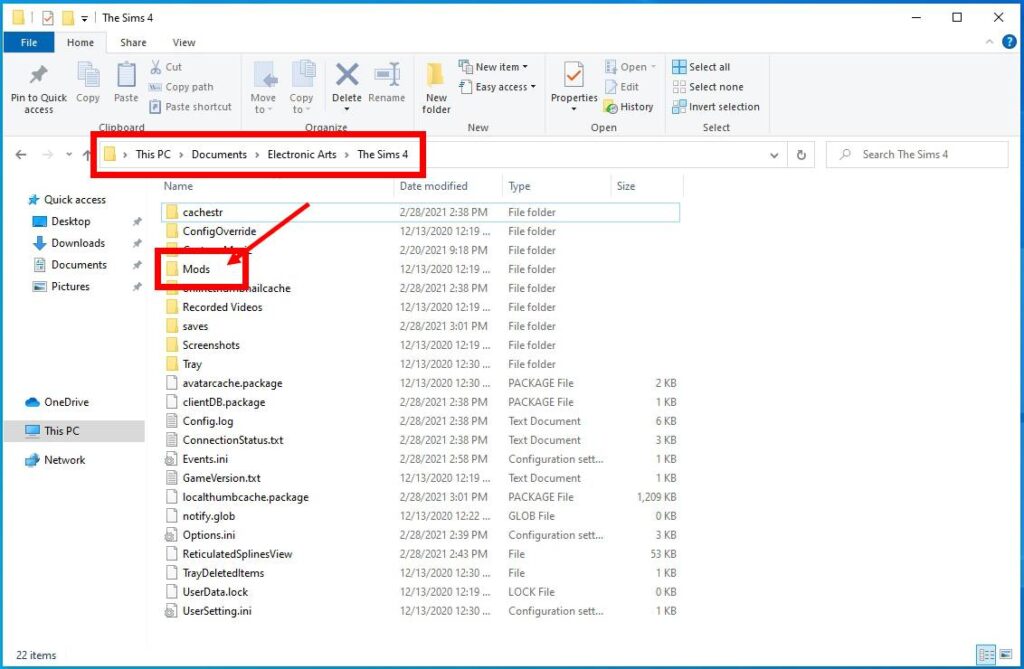
Step 1: Prepare Your Mods Folder
- Navigate to your Sims 3 game directory:
- Windows:
DocumentsElectronic ArtsThe Sims 3 - Mac:
Users/[Your Username]/Library/Application Support/Electronic Arts/The Sims 3
- Windows:
- Inside the
The Sims 3folder, locate or create a folder namedMods. - Inside the
Modsfolder, locate or create a folder namedPackages. - Inside the
Packagesfolder, it’s highly recommended to create subfolders to organize your mods. For example, you might create folders like:Gameplay ModsClothingHairObjectsTuning(for mods that alter game tuning files)Overrides(for mods that replace existing game files)
Step 2: Configure Your Resource.cfg File
This is a critical step. The Resource.cfg file tells The Sims 3 which folders to look in for mods. If you don’t have one, or if yours is outdated, you’ll need to obtain a correct version.
- Where to get it: Many modding guides and mod downloads will either provide a
Resource.cfgfile or instructions on how to create one. A common and reliable approach is to search for “Sims 3 Resource.cfg download” and follow instructions from reputable sources like Mod The Sims. - Placement: The
Resource.cfgfile should be placed directly inside theThe Sims 3Modsfolder (the same folder that contains yourPackagesfolder). - Content Example (for common setups):
Priority 500

PatchFile

{

    // This is a comment. Lines starting with // are ignored.

    // This folder will be scanned for packages.

    // The order matters! This specifies the path relative to the Sims 3 installation folder.

    // In the case of mods, it should be relative to your Documents folder.

    // Example: if you have packages in DocumentsThe Sims 3ModsPackages,

    // then the path below should be $OriginGamesThe Sims 3GameBin

    // Correct path for mods in DocumentsThe Sims 3ModsPackages:

    DirectoryFiles "ModsPackages*" 0x01

    // If you are using mods in subfolders within Packages, like $OriginGamesThe Sims 3GameBinDataWorld

    // then you would add more lines like the one above.

    // For example, to scan subfolders:

    DirectoryFiles "ModsPackages*?*" 0x02

    DirectoryFiles "ModsPackages*?*?*" 0x03

    DirectoryFiles "ModsPackages*?*?*?*" 0x04

    DirectoryFiles "ModsPackages*?*?*?*?*" 0x05

}
Important Note: The exact content of yourResource.cfgmight vary depending on how you organize your mods and if you’re using older or newer modding frameworks. Always refer to the instructions provided with the mods you download.
Step 3: Place Your Downloaded Mods
- Once you’ve downloaded a mod (usually a
.packagefile), extract it from its compressed folder (like .zip or .rar) if necessary. - Place the
.packagefile into the appropriate subfolder within yourThe Sims 3ModsPackagesdirectory. For example, if you downloaded a new dress, you might put it inThe Sims 3ModsPackagesClothing. If it’s a gameplay mod, you might put it inThe Sims 3ModsPackagesGameplay Mods.
Step 4: Launch The Sims 3 and Test
- Start The Sims 3.
- Enter your game and navigate to a household or create a new one.
- Check if the mod is working as intended. This might involve looking for new options in Create-a-Sim, new interactions in the game, or new objects in Buy Mode.
Installing .Sims3Pack Mods: Using the Launcher
.Sims3Pack files are typically used for installing custom content like individual outfits, hairstyles, or objects that the game bundles into a single installer.
- Locate the Sims3Launcher: You can usually find this by searching for “Sims 3 Launcher” in your computer’s applications or by navigating to your Sims 3 installation directory (e.g.,
Program Files (x86)Electronic ArtsThe Sims 3GameBin). - Open the Sims3Launcher: Launch the application.
- Navigate to the “Downloads” Tab: Within the launcher, click on the “Downloads” tab.
- Install Content: Click the “Install” button. A file explorer window will open. Navigate to and select the
.Sims3Packfile you wish to install. - Confirm Installation: The Sims3Launcher will process the file. Once it’s done, you should see the content listed in the “Downloads” tab. It may show as “installed” or require another click to confirm.
- Launch The Sims 3: Start your game. The installed
.Sims3Packcontent should now appear in your game, typically accessible in Create-a-Sim or Buy Mode depending on the type of content.
Note: The Sims3Launcher can sometimes be unreliable. If you experience issues, it’s often recommended to convert .Sims3Pack files to .package files using tools like the Sims3Pack Multi-Installer (though this is an advanced step).
Troubleshooting Common Modding Issues
Even with careful installation, you might encounter problems. Modding is akin to any technical endeavor; sometimes, things don’t work as expected. Fortunately, most issues have straightforward solutions.
My Game Crashes or Freezes
This is a common symptom of mod conflicts or corrupted files.
- The 50/50 Method: This is the most effective troubleshooting technique.
- Remove all your installed mods from the
DocumentsElectronic ArtsThe Sims 3ModsPackagesfolder and move them to a temporary location on your desktop. - Place half of the mods back into the
Packagesfolder. - Launch the game.
- If the game works, the problematic mod is in the other half. If it crashes, the problematic mod is in the half you just reinstalled.
- Repeat this process, dividing the problematic group in half, until you isolate the specific mod(s) causing the issue.
- Remove all your installed mods from the
- Check for Updates: Ensure all your mods are up-to-date for your current game version. Outdated mods are a frequent cause of instability.
- Remove Outdated Mods: Delete any mods that are no longer supported or have been superseded by newer versions.
- Corrupted Downloads: Re-download the mod from its original source in case the initial download was incomplete or corrupted.
My Custom Content Isn’t Appearing
If your newly installed CC isn’t showing up in the game, consider these points:
- Correct Folder: Double-check that you’ve placed the
.packagefiles in the correctDocumentsElectronic ArtsThe Sims 3ModsPackagesfolder and its subfolders. Resource.cfgIssues: Ensure yourResource.cfgfile is correctly placed and configured within theThe Sims 3Modsfolder.- Game Updates: Sometimes, game patches can break compatibility with older custom content. Ensure your CC is compatible with your latest game version.
- Multiple
.Sims3PackInstallations: If you’ve installed multiple.Sims3Packfiles, try installing them one by one to see if a specific one is causing an issue.
Mods Are Conflicting
When two or more mods try to alter the same part of the game, they can conflict, leading to unexpected behavior or crashes.
- Identify the Conflicting Mods: The 50/50 method is also useful here. Once you’ve identified the problematic mods, try to find updated versions that are compatible with each other, or choose to use only one of them.
- Read Descriptions Carefully: Mod creators often list known conflicts with other popular mods. Always read the mod description thoroughly.
- Mod Priority: In some cases, the order in which mods are loaded can matter. The
Resource.cfgfile can sometimes be configured to prioritize certain mods over others, but this is an advanced technique.
Using the Sims 3 Package Viewer
For advanced users, the Sims 3 Package Viewer is a powerful tool that allows you to inspect the contents of .package files. It can help you identify which mods are making specific changes to the game and can be invaluable for pinpointing conflicts.

Conclusion: Elevating Your Sims 3 Experience
Installing Sims 3 mods can seem like a technical hurdle, but with a clear understanding of the process and the right tools, it becomes an accessible and incredibly rewarding aspect of playing the game. By following these steps, organizing your mods effectively, and knowing how to troubleshoot common issues, you can unlock a universe of new possibilities. The world of Sims 3 modding is a vibrant ecosystem of creativity, offering endless opportunities to personalize your gameplay, from introducing complex new careers to simply adding that perfect piece of furniture for your Sim’s dream home. Embrace the power of mods, and transform your Sims 3 experience into something truly unique.
aViewFromTheCave is a participant in the Amazon Services LLC Associates Program, an affiliate advertising program designed to provide a means for sites to earn advertising fees by advertising and linking to Amazon.com. Amazon, the Amazon logo, AmazonSupply, and the AmazonSupply logo are trademarks of Amazon.com, Inc. or its affiliates. As an Amazon Associate we earn affiliate commissions from qualifying purchases.