In today’s data-driven world, the ability to analyze, visualize, and interpret information is no longer a niche skill; it’s a fundamental asset across numerous professional domains. Whether you’re a budding data scientist, a marketer looking to understand campaign performance, a financial analyst seeking deeper insights, or even a researcher in a non-tech field, R stands out as a remarkably powerful and versatile tool. This open-source programming language and statistical environment has become the de facto standard for many, offering unparalleled flexibility and a vast ecosystem of packages to tackle almost any data-related challenge.
But the journey into the world of R, like any powerful tool, begins with a crucial first step: installation. For newcomers, this process might seem a little daunting, especially when presented with technical jargon. However, fear not! This comprehensive guide will demystify the installation of R, breaking down the process into manageable steps and ensuring you’re up and running in no time. We’ll cover the essential components, guide you through the operating system specific installations, and even touch upon the crucial companion, RStudio, which elevates your R experience from functional to truly productive.
Understanding the Core Components: R and RStudio
Before we dive into the installation itself, it’s important to understand what you’re installing. You’ll typically encounter two primary software components when working with R:
-
R (The Base System): This is the engine. R itself is a command-line-driven programming language and software environment. It’s where the actual computations, statistical analyses, and data manipulations happen. When you write R code, you’re interacting directly with this base system. It’s a powerful, albeit sometimes stark, interface for those who prefer pure coding.
-
RStudio (The Integrated Development Environment – IDE): Think of RStudio as the cockpit for your R airplane. While you can use R without RStudio, it’s akin to flying blind. RStudio provides a user-friendly graphical interface that dramatically enhances your productivity. It includes features like:
- Source Editor: For writing and managing your R scripts.
- Console: Where R commands are executed and output is displayed.
- Environment/History Pane: To view your loaded data, variables, and command history.
- Files/Plots/Packages/Help Pane: For navigating your file system, viewing plots, managing installed packages, and accessing documentation.
For most users, especially those new to R, installing and using RStudio is highly recommended. It makes the learning curve much gentler and the overall workflow significantly more efficient. This guide will focus on installing both R and RStudio.
Step 1: Installing R – The Foundation
The first and most critical step is to install R itself. The installation process varies slightly depending on your operating system (Windows, macOS, or Linux).
Installing R on Windows
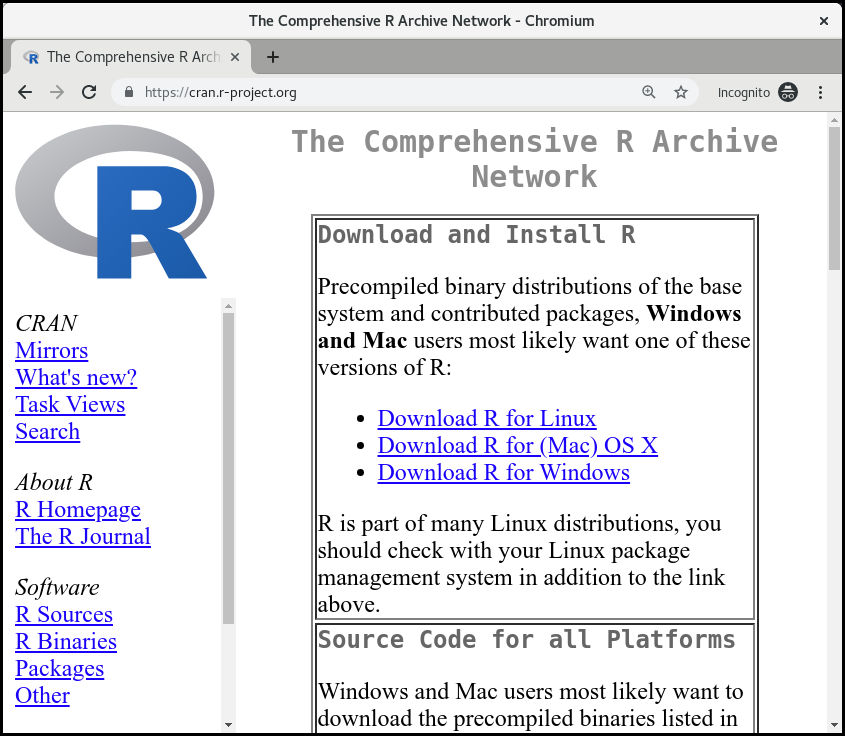
- Visit the CRAN Website: Open your web browser and navigate to the Comprehensive R Archive Network (CRAN) website. The primary download site for R is usually
https://cran.r-project.org/. - Select Your Operating System: On the CRAN homepage, you’ll see links for different operating systems. Click on “Download R for Windows.”
- Download the Latest Release: You’ll be presented with a link to the latest release. Click on it. This will typically download a
.exefile (e.g.,R-4.3.1-win.exe). Save this file to a location you can easily find, like your Downloads folder. - Run the Installer: Locate the downloaded
.exefile and double-click it to run the installer. - Follow the Installation Wizard:
- Language Selection: Choose your preferred language for the installation process.
- License Agreement: Read and accept the GNU General Public License.
- Installation Location: The installer will suggest a default location (usually
C:Program FilesRR-x.x.x, wherex.x.xis the version number). It’s generally recommended to stick with the default unless you have a specific reason to change it. - Component Selection: You can typically accept the default components. These include R for 32-bit and 64-bit systems. Unless you have very old hardware, the 64-bit version is what you’ll want.
- Startup Options: The installer may ask if you want to customize startup options. For most users, the default settings are fine.
- Start Menu Folder: Choose where you want the R shortcuts to be placed in your Start Menu.
- Additional Tasks: You might be asked about creating desktop shortcuts. This is a matter of personal preference.
- Complete Installation: Click “Install” and let the wizard finish the process. Once it’s done, you’ll have R installed on your Windows machine.
Installing R on macOS
- Visit the CRAN Website: Go to
https://cran.r-project.org/. - Select Your Operating System: Click on “Download R for macOS.”
- Download the Latest Release: You’ll see links for different macOS versions. Download the installer for the latest release that’s compatible with your macOS version. This will typically be a
.pkgfile. - Run the Installer: Locate the downloaded
.pkgfile and double-click it. - Follow the Installation Wizard:
- Introduction, Read Me, License: Click “Continue” through these initial screens after reviewing the information.
- Destination Select: Choose where to install R. The default location is usually appropriate.
- Installation Type: You can typically use the “Standard Install” option.
- Installation: Click “Install” and you may be prompted to enter your administrator password.
- Complete Installation: The installer will proceed. Once finished, R will be installed and accessible from your Applications folder.
Installing R on Linux
Linux installations are typically done via your distribution’s package manager, which is generally the easiest and recommended method.
- Open a Terminal: Launch your terminal application.
- Update Package Lists: It’s always a good practice to update your package lists before installing new software. The command for this depends on your Linux distribution:
- Debian/Ubuntu:
sudo apt update - Fedora:
sudo dnf update - CentOS/RHEL:
sudo yum update
- Debian/Ubuntu:
- Install R: Now, use your package manager to install R.
- Debian/Ubuntu:
sudo apt install r-base r-base-dev(Ther-base-devpackage is useful for compiling R packages from source). - Fedora:
sudo dnf install R - CentOS/RHEL:
sudo yum install R
- Debian/Ubuntu:
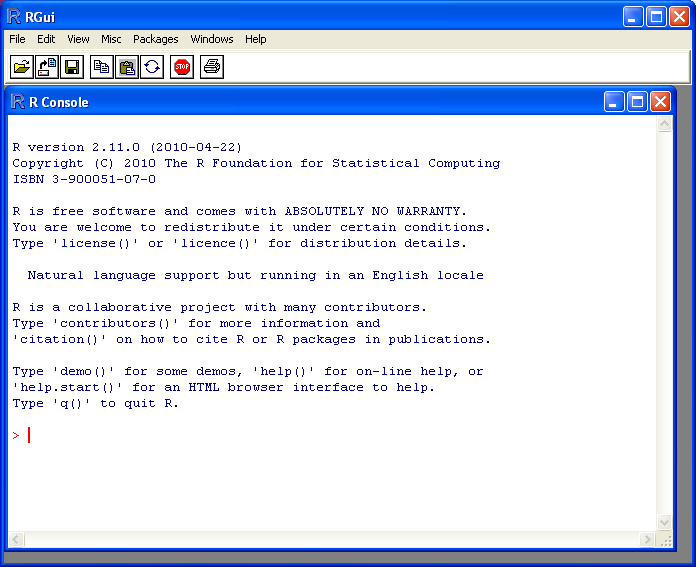
- Verify Installation: After installation, you can verify it by typing
Rin the terminal. This should launch the R console. To exit the R console, typequit()and press Enter.
Step 2: Installing RStudio – The Productivity Powerhouse
With R installed, it’s time to enhance your experience with RStudio. This step is highly recommended for all users.
-
Visit the RStudio Website: Go to the official RStudio download page, typically found at
https://posit.co/download/rstudio-desktop/. (Note: RStudio is now part of Posit). -
Download RStudio Desktop: Scroll down to find the RStudio Desktop section. You’ll see download buttons for Windows, macOS, and Linux. Click the appropriate button for your operating system.
-
Run the Installer:
- Windows: The downloaded file will be an
.exeinstaller. Run it and follow the simple installation wizard, accepting the default options for most of the steps. - macOS: The downloaded file will be a
.dmgimage. Open it and drag the RStudio application icon into your Applications folder. - Linux: The download will likely be a
.deb(for Debian/Ubuntu) or.rpm(for Fedora/CentOS/RHEL) package.- For
.debfiles:sudo dpkg -i rstudio-*-amd64.deb(replace*with the version number) - For
.rpmfiles:sudo rpm -i rstudio-*.x86_64.rpm(replace*with the version number)
Alternatively, you can often install RStudio using your distribution’s package manager if it’s available in the repositories.
- For
- Windows: The downloaded file will be an
-
Launch RStudio: Once installed, you can find RStudio in your Applications folder or by searching for it in your system’s application launcher.
Step 3: Launching R and RStudio and First Steps
Now that everything is installed, let’s see it in action.
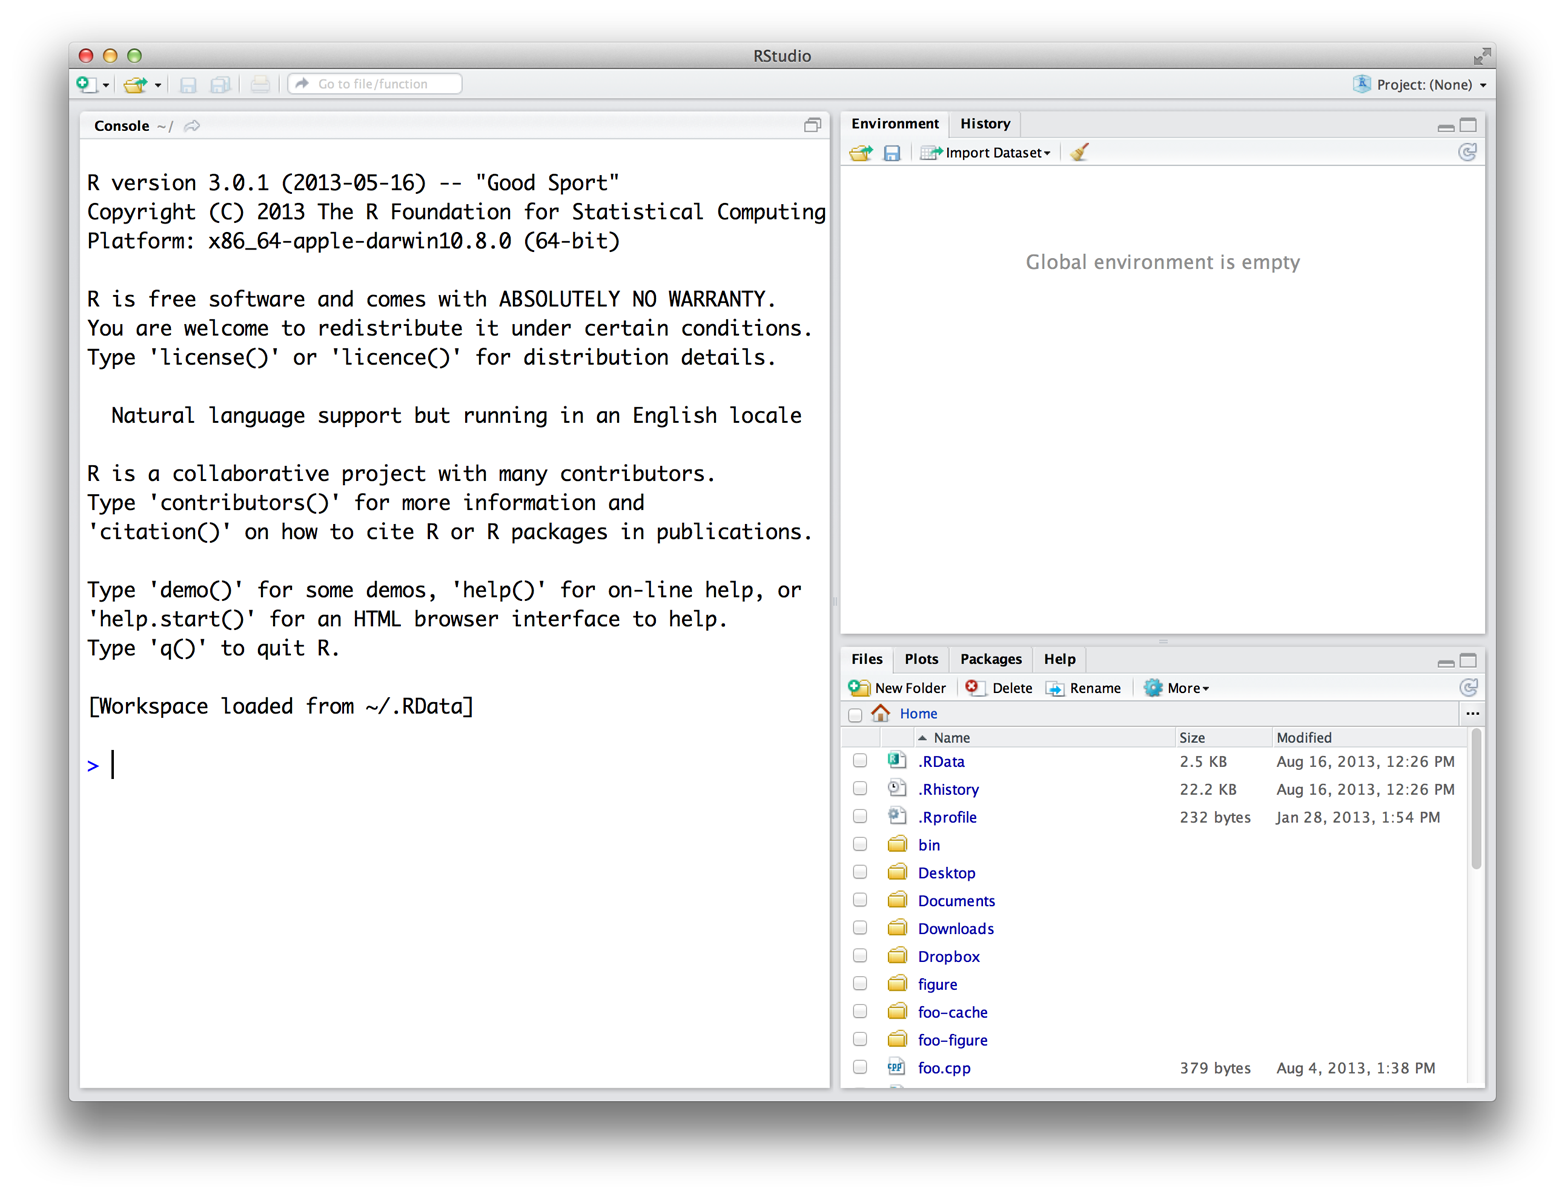
- Launch RStudio: Open RStudio. You should see a layout with several panes. If R was installed correctly, RStudio will automatically detect it.
- The R Console: In the bottom-left pane, you’ll see the R Console. This is where you can type commands directly and see their output. For example, try typing:
R

print("Hello, R!")
and press Enter. You should see “Hello, R!” printed below your command. - Basic Calculation: Try a simple calculation:
R

2 + 2
You’ll see[1] 4as the output. - Creating a Script: To start writing your own R programs, click on
File > New File > R Script(or use the shortcutCtrl+Shift+Non Windows/Linux orCmd+Shift+Non macOS). This will open a new tab in the top-left pane where you can write and save your R code. - Running Code from a Script: Type some code into your script (e.g.,
my_variable <- 10,print(my_variable * 5)). To run a specific line or a selection of lines, place your cursor on that line or highlight the code and pressCtrl+Enter(Windows/Linux) orCmd+Enter(macOS). The code will be sent to the R Console for execution. - Installing Packages: R’s power lies in its extensive package ecosystem. Packages are collections of functions and data that extend R’s capabilities. To install a package, you can use the
install.packages()function in the R Console:
R

install.packages("ggplot2")
ggplot2is a very popular package for data visualization. You’ll be prompted to choose a CRAN mirror (a download server) if you haven’t done so before. Once installed, you can load the package into your current R session using thelibrary()function:
R

library(ggplot2)
This makes all the functions from theggplot2package available for use.
Troubleshooting Common Installation Issues
While the installation process is generally straightforward, here are a few common issues and their solutions:
- “R is not recognized as an internal or external command” (Windows): This error usually means that R’s installation directory is not added to your system’s PATH environment variable. The R installer typically handles this, but if it fails, you might need to add it manually. Search online for “how to add R to PATH Windows” for detailed instructions.
- Permissions Errors: On macOS and Linux, you might encounter permission errors if you’re not running the installer with administrator privileges. Ensure you’re using
sudofor Linux commands or have administrator rights for macOS installations. - Outdated R Version: Always try to download the latest stable version of R from CRAN. Older versions might have compatibility issues with newer RStudio versions or packages.
- RStudio Not Finding R: If RStudio can’t find your R installation, it might be because R was installed in a non-standard location. You can usually tell RStudio where to find R through its global options (
Tools > Global Options > Generalon Windows/Linux,RStudio > Preferences > Generalon macOS). - Internet Connectivity: Package installations require an internet connection to download from CRAN. Ensure your network is stable.
Conclusion
Congratulations! You’ve successfully navigated the installation of R and RStudio. This is a significant step towards unlocking the vast potential of data analysis, statistical modeling, and visualization. With R and RStudio at your fingertips, you’re equipped to explore datasets, uncover trends, build predictive models, and communicate your findings effectively.
Remember that the R community is incredibly active and supportive. When you encounter challenges, don’t hesitate to consult the official R documentation, the RStudio support pages, or online forums like Stack Overflow. The journey of learning R is ongoing, filled with exciting discoveries and continuous skill development. Now, it’s time to dive in and start exploring the world of data!
aViewFromTheCave is a participant in the Amazon Services LLC Associates Program, an affiliate advertising program designed to provide a means for sites to earn advertising fees by advertising and linking to Amazon.com. Amazon, the Amazon logo, AmazonSupply, and the AmazonSupply logo are trademarks of Amazon.com, Inc. or its affiliates. As an Amazon Associate we earn affiliate commissions from qualifying purchases.