The prospect of installing new windows in your home can feel daunting, conjuring images of complex carpentry, precision measurements, and the potential for costly mistakes. However, with the right preparation and a methodical approach, what might seem like an overwhelming DIY project can become a rewarding endeavor. This guide will break down the process of installing new windows into manageable steps, covering everything from initial planning and preparation to the final sealing and finishing touches. Whether you’re looking to improve your home’s energy efficiency, enhance its aesthetic appeal, or replace damaged panes, understanding the “how-to” empowers you to tackle this significant home improvement with confidence.
I. Understanding Your Windows: The Crucial First Steps
Before you even think about reaching for a toolbelt, a thorough understanding of your existing windows and the new ones you plan to install is paramount. This foundational phase sets the stage for a successful installation and prevents costly errors down the line. It involves assessing your current situation, identifying the types of windows that best suit your needs and home, and ensuring you have the right tools and materials.
A. Assessing Your Current Windows and Needs
The first step in “how to install new windows” is a critical evaluation of your existing window situation. Why are you replacing them? Are they old and drafty, contributing to high energy bills? Have they been damaged by weather or time? Are you simply looking for an aesthetic upgrade?
- Energy Efficiency: Modern windows offer significant improvements in insulation, helping to reduce heat loss in winter and heat gain in summer. This translates directly to lower energy bills and a more comfortable living environment. Look for features like double or triple-paned glass, low-emissivity (low-E) coatings, and gas fills (like argon or krypton) between the panes.
- Aesthetics and Style: Windows are a significant architectural feature of your home. Consider how new windows will complement your home’s existing style. Are you aiming for a traditional look, a modern minimalist aesthetic, or something in between? This will influence your choice of frame materials, colors, and window types.
- Functionality: Think about how you use each room. Do you need windows that open easily for ventilation? Are there areas where privacy is a concern, requiring frosted or obscure glass? Consider the ease of operation, especially for windows in hard-to-reach places.
- Maintenance: Different window materials require varying levels of upkeep. Vinyl windows are generally low-maintenance, while wood windows may require regular painting or staining. Fiberglass offers durability and low maintenance, and aluminum is strong but can be prone to condensation.
- Budget: Establishing a clear budget upfront is crucial. This will guide your choices regarding window type, material, brand, and whether you’ll be doing the installation yourself or hiring a professional.
B. Choosing the Right Window Types and Materials
With your needs clearly defined, you can now explore the diverse world of window options. The “how to install new windows” journey involves making informed decisions about the types and materials that will best serve your home.
-
Window Types:
- Double-Hung Windows: These are classic and popular, featuring two sashes that slide vertically. Both sashes can typically be opened for ventilation, and many modern designs allow both to tilt inwards for easy cleaning.
- Casement Windows: These windows crank outwards and are sealed tightly when closed, making them highly energy-efficient and excellent for preventing drafts. They offer unobstructed views when open.
- Awning Windows: Hinged at the top and opening outwards, awning windows are excellent for allowing ventilation even during light rain. They are often installed above or below other window types.
- Slider Windows: These operate horizontally, sliding open from side to side. They are a good choice for wide openings and are often found in contemporary homes.
- Picture Windows: Non-opening windows designed to frame views. They are often used in conjunction with other operable windows to maximize light and visual appeal.
- Bay and Bow Windows: These project outwards from the house, creating a more spacious interior feel and often adding a decorative architectural element. Bay windows typically have three panels, while bow windows have more, creating a curved appearance.
-
Frame Materials:
- Vinyl: The most popular choice due to its affordability, energy efficiency, and low maintenance. Vinyl windows are durable and resistant to rot and corrosion.
- Wood: Offers a classic, warm aesthetic and is an excellent insulator. However, wood requires regular maintenance (painting or staining) and can be susceptible to moisture damage if not properly cared for.
- Fiberglass: A highly durable and energy-efficient option. Fiberglass frames are strong, stable, and resistant to warping, cracking, and corrosion. They can be painted and are a good alternative to wood.
- Aluminum: Strong and durable, often used in commercial buildings or contemporary homes. However, aluminum can be a poor insulator and may lead to condensation issues unless it has a thermal break.
C. Essential Tools and Materials Checklist
Before embarking on the physical installation, ensure you have all the necessary tools and materials. This preparatory step is crucial for a smooth and efficient “how to install new windows” process.
-
Tools:
- Tape measure
- Level (4-foot and torpedo)
- Screwdriver set (Phillips and flathead)
- Utility knife
- Pry bar
- Hammer
- Caulking gun
- Putty knife
- Sander (orbital or block)
- Drill and assorted drill bits
- Saw (reciprocating saw or hand saw for trimming)
- Safety glasses
- Work gloves
- Sturdy ladder
- Screws (exterior grade, appropriate length)
- Shims (wood or composite)
- Insulating foam sealant
- Caulk (exterior grade, paintable)
- Underlayment or flashing tape
- New windows (obviously!)
- Stud finder (optional, but helpful)
- Wood filler or epoxy (for minor repairs)
-
Materials:
- New windows (correct size and type)
- Exterior grade screws (galvanized or stainless steel)
- Wood or composite shims
- Expanding foam sealant (low-expansion, low-expansion for windows and doors)
- Exterior grade caulk (silicone or acrylic latex)
- Window flashing tape or liquid flashing
- Primer and paint (if needed for frame touching up)
- Drop cloths or tarps to protect floors and furniture
- Trash bags for debris
II. The Installation Process: Step-by-Step Guide
With thorough preparation complete, it’s time to get hands-on. This section details the practical steps involved in removing old windows and installing new ones, ensuring a secure and weather-tight fit. The “how to install new windows” process requires patience and attention to detail at each stage.
A. Removing Old Windows
The first major physical step in “how to install new windows” is the careful removal of your existing window units. This process can vary slightly depending on the type of window, but the general principles remain the same.
- Preparation: Lay down drop cloths or tarps to protect your flooring and furniture from dust and debris. If working on an upper floor, ensure the area below is clear.
- Remove Sashes: For double-hung windows, carefully pry off the trim around the window. Then, detach the sashes by cutting any glazing compound or caulk, and often by removing pivot pins or special clips. For casement or slider windows, the process may involve removing the crank mechanism or entire sash.
- Cut Glazing and Trim: Use a utility knife to score any paint or caulk lines around the interior and exterior trim. This helps prevent damage to the surrounding wall.
- Remove Trim: Carefully pry off the interior trim (casing) around the window. Start at the center and work your way outwards to minimize damage. If the trim is painted or caulked, you may need to re-score to break the seal.
- Extract the Window Frame: Once the sashes and trim are removed, you’ll be left with the window frame itself. This is often secured to the wall studs by nails or screws. Use a pry bar to gently work the frame loose, starting from the top and working your way down. Be mindful of any wiring or plumbing that might be present. If the frame is stubborn, you may need to cut through some of the securing nails with a reciprocating saw.
- Clean the Opening: After the old window frame is out, thoroughly clean the rough opening. Remove any remaining nails, staples, old caulk, or debris. Inspect the opening for any signs of rot or damage to the studs and sill. Make any necessary repairs before proceeding. A clean, sound opening is critical for a proper seal with the new window.
B. Preparing the Opening for the New Window
A well-prepared opening is fundamental to a successful “how to install new windows” project. This stage ensures a watertight and airtight seal, which is vital for energy efficiency and preventing moisture damage.
- Inspect and Repair: Examine the rough opening for any signs of rot, insect damage, or structural weakness. Repair any damaged wood with wood filler or epoxy. Ensure the opening is plumb (vertically level) and level (horizontally level). Use a level to check the sill and jambs.
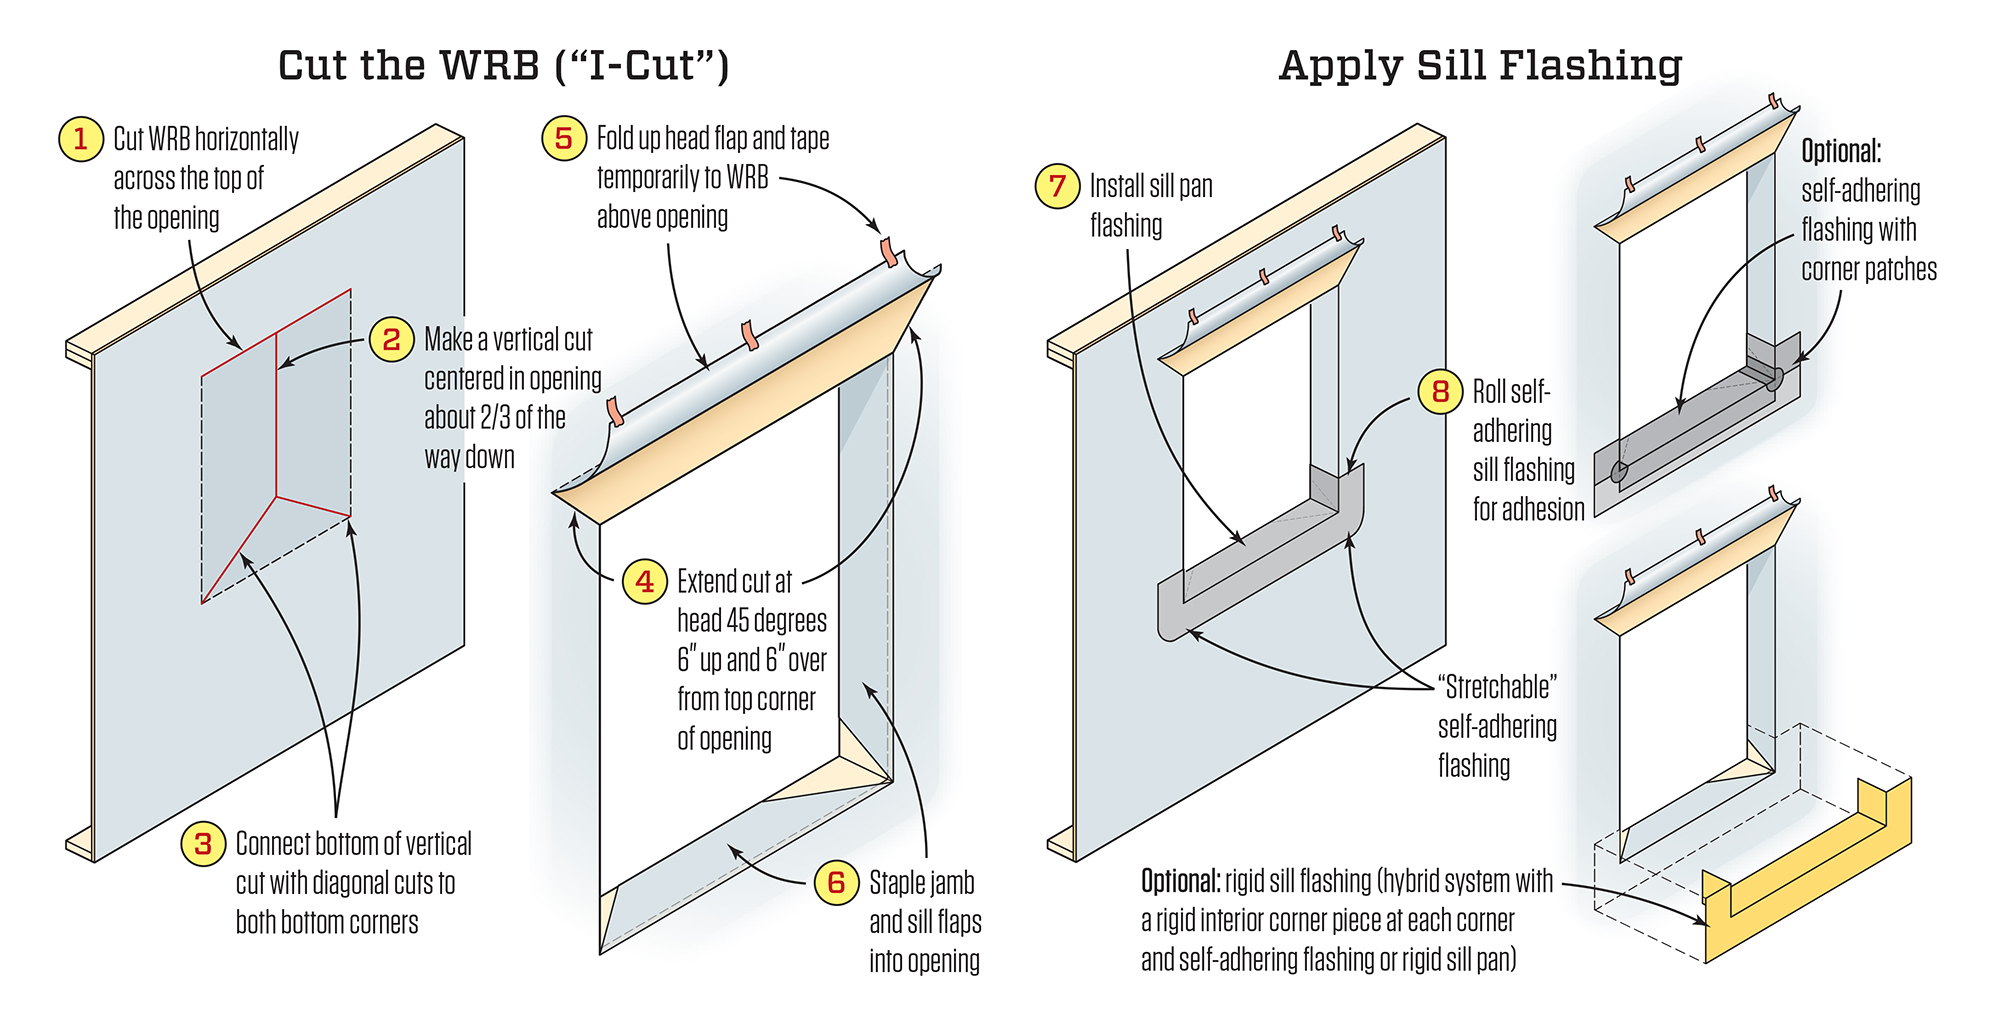
- Apply Flashing: This is a critical step for preventing water intrusion. Apply a layer of flashing tape or liquid flashing around the entire perimeter of the rough opening, including the sill, jambs, and header. Overlap the tape at the corners and ensure it adheres well to the sheathing. This creates a waterproof barrier that directs water away from the window opening and into the drainage plane of the wall.
- Install a Sill Pan (Optional but Recommended): For added protection against water damage, especially in areas with heavy rainfall or where condensation is a concern, consider installing a sill pan. This is a pre-formed pan or a piece of flashing material that fits into the bottom of the opening, extending up the jambs slightly. It catches any water that might get past the window and directs it outwards.
C. Installing the New Window
With the opening prepped and protected, you’re ready to set the new window in place. This is the core of the “how to install new windows” process, requiring precision and careful securing.
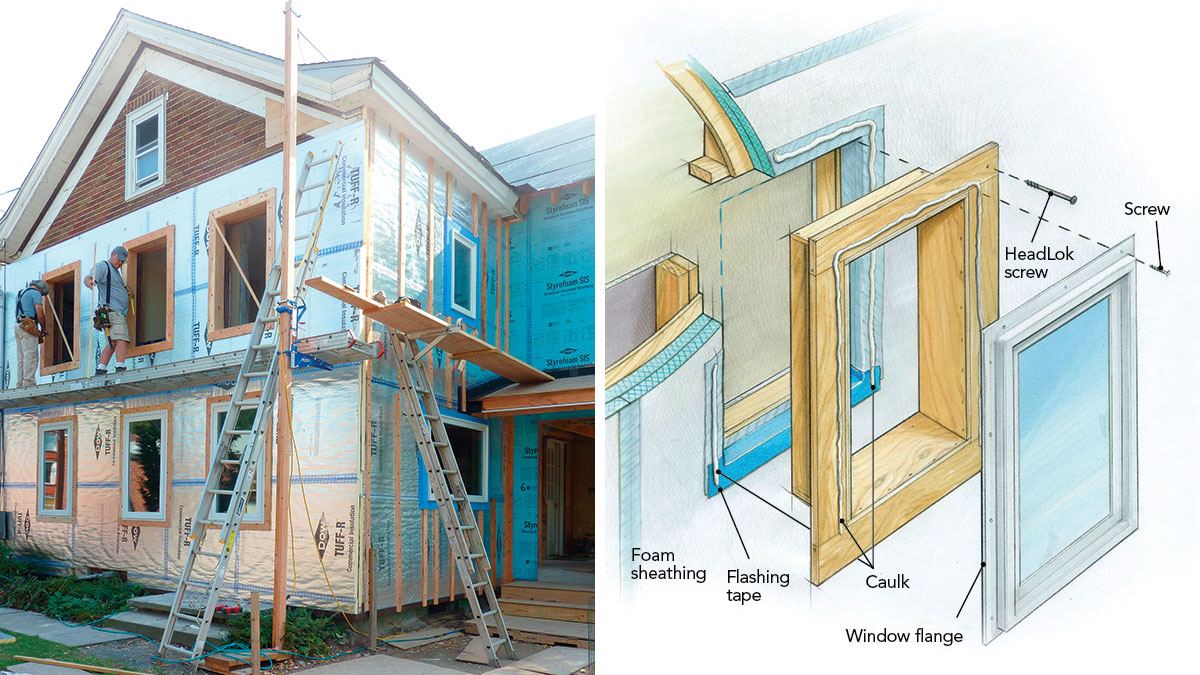
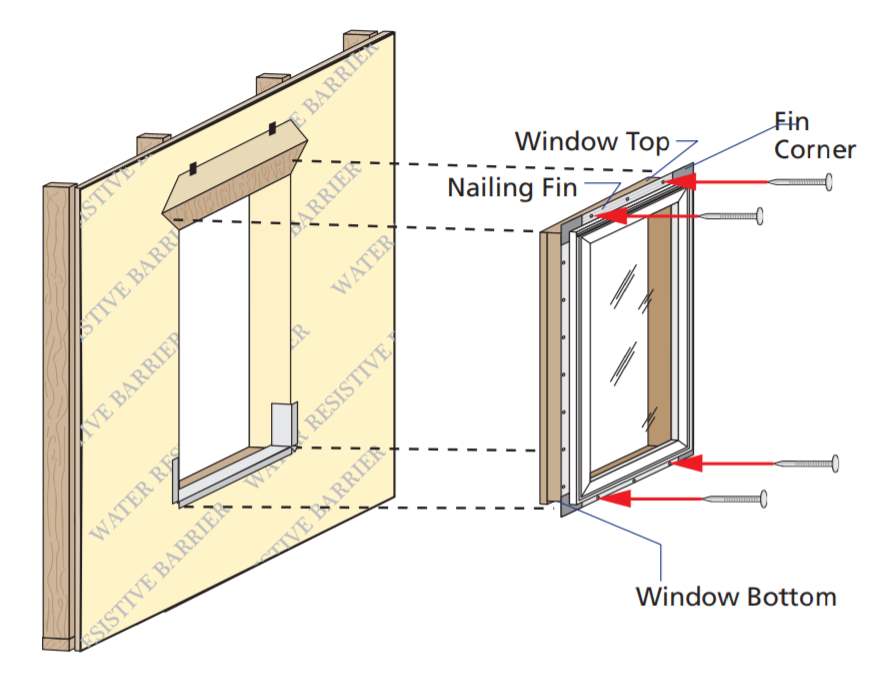
- Position the Window: Carefully lift the new window unit into the rough opening. Ensure it’s centered and that there are even gaps around the frame. Use shims to adjust the window’s position and ensure it is perfectly plumb and level. This is a crucial step for the window to operate correctly and seal properly.
- Secure the Frame: Once the window is plumb and level, begin securing it to the wall studs. Drive exterior-grade screws through the pre-drilled holes in the window flange or frame, into the studs. Use shims on either side of the screws to maintain the window’s plumbness and levelness as you drive them. Avoid over-tightening, which can warp the frame.
- Check Operation: Before proceeding with interior finishing, open and close the new window to ensure it operates smoothly and without binding. If it sticks or is difficult to operate, you may need to slightly adjust the shims or screws.
- Insulate the Gap: Once the window is securely installed and operating correctly, you’ll need to insulate the gap between the window frame and the rough opening. Use a low-expansion foam sealant specifically designed for windows and doors. Apply the foam in a continuous bead around the perimeter, filling the gap but not overfilling it, as it will expand. Overfilling can warp the window frame.
- Install Interior Trim: Once the foam sealant has cured, re-install the interior trim (casing) around the new window. Cut the trim pieces to size and attach them using finishing nails or screws. Fill any nail holes with wood filler and sand smooth.
III. Sealing and Finishing: The Final Touches
The installation isn’t complete until the window is properly sealed and finished, both inside and out. This final stage is crucial for weatherproofing, energy efficiency, and a polished appearance.
A. Exterior Sealing and Flashing
Proper exterior sealing is the last line of defense against water intrusion and air leaks. This part of the “how to install new windows” process ensures long-term durability.
- Apply Exterior Caulk: Apply a continuous bead of high-quality exterior-grade caulk around the perimeter of the window frame, where it meets the siding. Ensure the caulk is applied smoothly and creates a watertight seal. Smooth the caulk with a wet finger or a caulk-finishing tool.
- Final Flashing Check: Double-check that all exterior flashing and any sealant around the window are intact and properly applied. This is especially important around the head of the window to prevent water from running down behind it.
- Paint or Stain (if applicable): If your window frames or trim require it, now is the time to paint or stain them. Ensure you use appropriate exterior-grade products and follow the manufacturer’s instructions.
B. Interior Finishing and Protection
The interior finishing completes the visual transformation and ensures a comfortable living space.
- Touch-Up Paint: Apply primer and paint to any areas of the interior trim or wall that may have been scuffed or damaged during the installation. Match the existing paint colors as closely as possible for a seamless look.
- Clean Up: Thoroughly clean up any dust, debris, and paint drips from the installation process. Remove drop cloths and dispose of them properly.
- Test and Inspect: Open and close the window one last time to ensure everything is functioning correctly. Inspect the interior and exterior for any gaps or areas that may require additional sealing.
By following these steps diligently, you can successfully install new windows in your home, enhancing its comfort, energy efficiency, and aesthetic appeal. This comprehensive guide provides the knowledge and confidence needed to tackle this rewarding home improvement project.
aViewFromTheCave is a participant in the Amazon Services LLC Associates Program, an affiliate advertising program designed to provide a means for sites to earn advertising fees by advertising and linking to Amazon.com. Amazon, the Amazon logo, AmazonSupply, and the AmazonSupply logo are trademarks of Amazon.com, Inc. or its affiliates. As an Amazon Associate we earn affiliate commissions from qualifying purchases.