In an increasingly digital world, where the demands on our personal computers grow with every new application, game, and workflow, system performance is paramount. Lagging software, sluggish multitasking, and frustrating slowdowns can cripple productivity and diminish the enjoyment of your digital experience. While many factors contribute to a PC’s overall speed, one of the most impactful and often overlooked components is Random Access Memory, or RAM. Upgrading your PC’s memory is a relatively straightforward process that can yield significant performance improvements, extending the lifespan of your current machine and saving you the considerable expense of purchasing a brand-new system.
This comprehensive guide will walk you through everything you need to know about installing memory in your PC, from understanding the basics of RAM to troubleshooting common issues. Whether you’re a seasoned tech enthusiast or a complete novice looking to empower yourself with practical skills, this tutorial, deeply rooted in the “Tech” ethos of our platform, will demystify the process and equip you with the confidence to enhance your computer’s capabilities. We’ll delve into the nuances of compatibility, highlight the “Money” aspect of cost-effective upgrades, and even touch upon how selecting reliable “Brand” components contributes to a stable and high-performing system.
Understanding RAM: The Foundation of Performance
Before diving into the installation process, it’s crucial to understand what RAM is, why it’s so vital, and the different types available. This foundational knowledge will ensure you make informed decisions when upgrading, preventing compatibility headaches and ensuring you get the most “Money” for your investment.
What is RAM and Why is it Important?
RAM is your computer’s short-term memory. Unlike your hard drive (HDD) or Solid State Drive (SSD), which store data long-term, RAM holds data that your CPU (Central Processing Unit) needs to access quickly and frequently. Imagine your desk: your long-term storage (HDD/SSD) is like your filing cabinet, where everything is stored. Your RAM is the actual surface of your desk, where you lay out the documents, applications, and files you’re actively working on. The more space you have on your desk (more RAM), the more tasks and applications you can have open simultaneously without constantly going back and forth to the filing cabinet, which is a much slower process.
This temporary storage is volatile, meaning that any data stored in RAM is lost when the computer is turned off. However, its speed is unparalleled, making it essential for virtually every operation your PC performs, from browsing the web and editing documents to running complex photo and video editing software or the latest demanding video games. A lack of sufficient RAM often manifests as stuttering, freezing, slow application launch times, and an overall sluggish user experience, forcing your system to rely more heavily on slower virtual memory stored on your drive.
Types of RAM: DDR Generations and Form Factors
The world of RAM can seem daunting with its various acronyms and numbers, but understanding the basics is relatively simple. The most common type of RAM used in modern PCs is DDR (Double Data Rate) SDRAM. The “DDR” prefix is followed by a number indicating its generation, each representing advancements in speed, efficiency, and technology.
- DDR3: An older generation, still found in some legacy systems.
- DDR4: The standard for most PCs built between roughly 2014 and 2021. It offers improved bandwidth and lower power consumption compared to DDR3.
- DDR5: The latest generation, emerging as the new standard for modern high-performance PCs. DDR5 boasts even higher speeds and greater efficiency than DDR4.
Crucially, DDR generations are not cross-compatible. A motherboard designed for DDR4 will only accept DDR4 RAM, and you cannot mix DDR3, DDR4, or DDR5 modules on the same motherboard. Each generation has a different notch position on the module, physically preventing incorrect installation.
Beyond generations, RAM also comes in different form factors:
- DIMM (Dual In-line Memory Module): This is the standard size for desktop computers, typically about 133mm long.
- SODIMM (Small Outline Dual In-line Memory Module): This is a smaller form factor, commonly used in laptops, mini-PCs, and some all-in-one systems due to space constraints.
Always check your computer’s specifications or motherboard manual to determine the correct DDR generation and form factor before purchasing new RAM. This diligence prevents wasted “Money” and ensures a smooth upgrade.
Decoding RAM Specifications: Speed, Latency, and Capacity
When looking at RAM modules, you’ll encounter several specifications beyond the DDR generation:
- Capacity (GB): This is the most straightforward specification, indicating how much data the module can hold. Common capacities include 4GB, 8GB, 16GB, and 32GB per stick. Most users find 16GB to 32GB sufficient for general use and gaming, while professional workloads might benefit from 64GB or more.
- Speed (MHz/MT/s): This refers to the data transfer rate of the RAM, measured in megahertz (MHz) or megatransfers per second (MT/s). Higher numbers generally mean faster RAM, which can improve overall system responsiveness, especially in CPU-intensive tasks and gaming. Common speeds for DDR4 might be 2400MHz, 3200MHz, while DDR5 can range from 4800MHz upwards.
- Latency (CL Timings): Often expressed as “CL” followed by a number (e.g., CL16, CL18), latency refers to the delay before the RAM can respond to a request from the CPU. Lower CL numbers indicate lower latency and thus faster response times. While speed is often prioritized, lower latency can also contribute to snappier performance.
When upgrading, it’s generally best to match the speed and latency of any existing RAM if you’re adding modules, or to purchase a new kit with modules designed to work together at their advertised speed. Reputable “Brand” manufacturers like Corsair, Kingston, G.Skill, Crucial, and TeamGroup engineer their RAM kits to function optimally, often with pre-tested speeds and latencies, offering a reliable choice for your “Tech” upgrade. Investing in a well-regarded brand often equates to better stability and longevity, ultimately saving you “Money” on potential replacements.
Preparing for Your RAM Upgrade: Essential Steps Before Installation
Proper preparation is the key to a successful RAM installation. Rushing this stage can lead to compatibility issues, damaged components, or a frustrating experience. Taking the time to perform these essential steps will save you significant hassle and ensure your “Money” is well-spent.
Compatibility Check: The Golden Rule
This is arguably the most critical step. Installing incompatible RAM is a common mistake that can prevent your computer from booting or lead to instability.
- Identify Your Current RAM:
- Windows: Open Task Manager (Ctrl+Shift+Esc), go to the “Performance” tab, and click on “Memory.” You’ll see current RAM capacity, speed, and how many slots are used. For more detail, use a free utility like CPU-Z, which provides precise information on your existing RAM (type, size, speed, timings) and your motherboard.
- macOS: Go to “About This Mac” from the Apple menu, then “Memory” or “System Report” > “Memory.”
- Determine Motherboard Compatibility: Your motherboard is the brain of your system in terms of component compatibility.
- Motherboard Manual: The most reliable source. It will list the supported RAM types (DDR generation), maximum capacity, supported speeds (and whether XMP/DOCP is supported for higher speeds), and the number of RAM slots.
- Online Configurators: Websites like Crucial.com and Kingston.com offer RAM configurators where you can select your computer’s make and model, or your motherboard model, and they will recommend compatible RAM modules. This is an excellent resource for ensuring “Brand” compatibility and peace of mind.
- Visual Inspection (Desktops): Open your PC case and look at the motherboard. The motherboard model number is usually printed clearly on the board itself, often near the CPU socket or PCIe slots.
When selecting new RAM, aim to match the DDR generation exactly. If adding to existing RAM, try to match the speed and capacity as closely as possible to ensure stable operation and optimal performance in dual or quad-channel configurations. While mixing speeds can work, the system will typically default to the speed of the slowest module.
Sourcing the Right Modules
Once you know what RAM you need, it’s time to purchase it.
- Reliable Retailers: Buy from reputable online retailers (Amazon, Newegg, Best Buy, etc.) or local computer stores. This ensures you receive genuine products and have recourse if there’s an issue.
- Read Reviews: Check product reviews, especially from other users with similar system configurations. This can provide insights into real-world compatibility and performance.
- Consider Kits: For optimal performance and stability, especially when installing multiple modules, purchase RAM sold as a kit (e.g., 2x8GB, 4x16GB). These modules are tested together by the “Brand” manufacturer to ensure compatibility and stability when running at their advertised speeds and timings. This can prevent unforeseen “Tech” issues down the line.
- Beware of Bargains: While everyone loves a deal, be wary of unusually low-priced, unbranded RAM. Quality and reliability can vary significantly, potentially leading to instability or premature failure, which ultimately costs you more “Money” in the long run.
Gathering Your Tools
You’ll only need a few basic tools:
- Phillips Head Screwdriver: For opening the PC case.
- Anti-Static Wrist Strap (Recommended): This is highly recommended to protect your components from electrostatic discharge (ESD), which can permanently damage sensitive electronics. If you don’t have one, regularly touch a grounded metal object (like an unpainted metal part of your PC case) before and during the installation to discharge any static electricity from your body.
- Flashlight or Headlamp: For better visibility inside the often-dark confines of a PC case.
- Small Container: To hold screws so they don’t get lost.
Safety First: Power Down and Ground Yourself
Before you even think about opening your PC, prioritize safety:
- Power Down Completely: Shut down your computer fully, don’t just put it to sleep.
- Unplug All Cables: Disconnect the power cable from the wall outlet and the back of your PC. Also, unplug any peripherals (monitor, keyboard, mouse, USB devices).
- Hold Power Button: Press and hold the power button on your PC for 5-10 seconds. This drains any residual power from the system, making it safer to work on.
- Move to a Clean, Flat Surface: Work on a stable, well-lit surface, preferably without carpet, which can generate static electricity.
- Ground Yourself: If using an anti-static wrist strap, attach it to your wrist and clip the other end to an unpainted metal part of your PC case. If not using a strap, frequently touch a metal part of the case before touching any internal components.
These precautions are essential for protecting both yourself and your valuable “Tech” components from damage.
The Step-by-Step Installation Process
With all preparations complete, you’re ready to physically install the new RAM. This is a delicate but straightforward process. Take your time, be gentle, and follow these steps carefully.
Opening Your PC Case
- Lay the PC Down: Gently lay your desktop PC on its side on your clean, flat workspace, with the side panel facing up.
- Remove Side Panel: Most PC cases have two or more screws on the back that secure the side panel. Unscrew these (often thumb screws, which can be removed by hand), then slide the panel backward and lift it off. If unsure, consult your PC’s manual or look for videos specific to your case model. Place the panel and screws in your container.
- Locate the Motherboard: With the side panel off, you’ll see the internal components. The large circuit board taking up most of the space is your motherboard.
Locating the RAM Slots
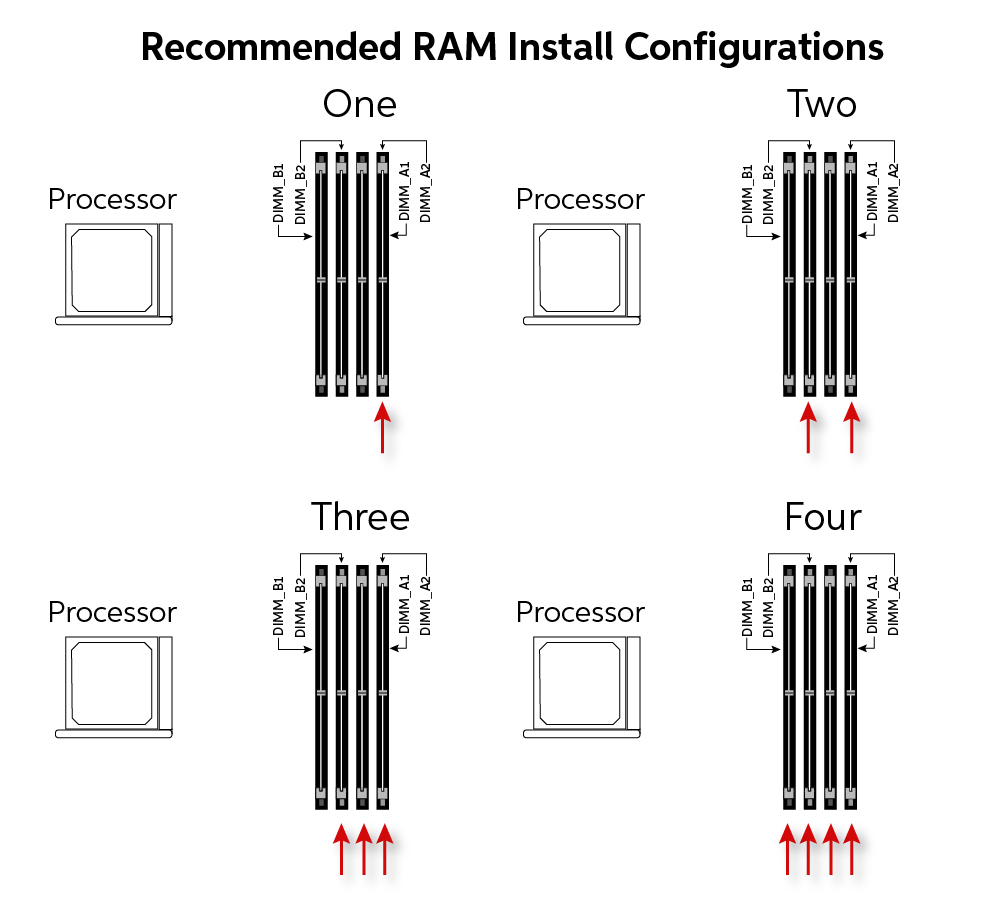
- Identify RAM Slots: The RAM slots (also known as DIMM slots) are long, narrow slots typically located to one side of the CPU cooler. They usually come in pairs (often color-coded) or sets of four.
- Understand Dual-Channel Configuration: Most consumer motherboards support dual-channel memory, which allows the CPU to access two RAM modules simultaneously, significantly boosting performance. For optimal performance, when using two RAM sticks, they should be installed in specific slots (e.g., slots 2 and 4, or 1 and 3) as indicated by your motherboard manual. If you have four slots and two modules, using the correct pair will ensure you benefit from dual-channel mode. Always refer to your motherboard manual for the precise slot configuration.
Removing Old RAM (If Applicable)
If you’re replacing existing RAM, you’ll need to remove it first:
- Open Retention Clips: Each RAM slot has small plastic clips on either end. Gently push these clips outwards away from the RAM module.
- Remove Module: Once the clips are open, the RAM stick should slightly pop up. Gently grasp the module by its edges (avoid touching the gold contacts) and pull it straight out of the slot. Place the old RAM in an anti-static bag or a safe place.
Installing New RAM Modules
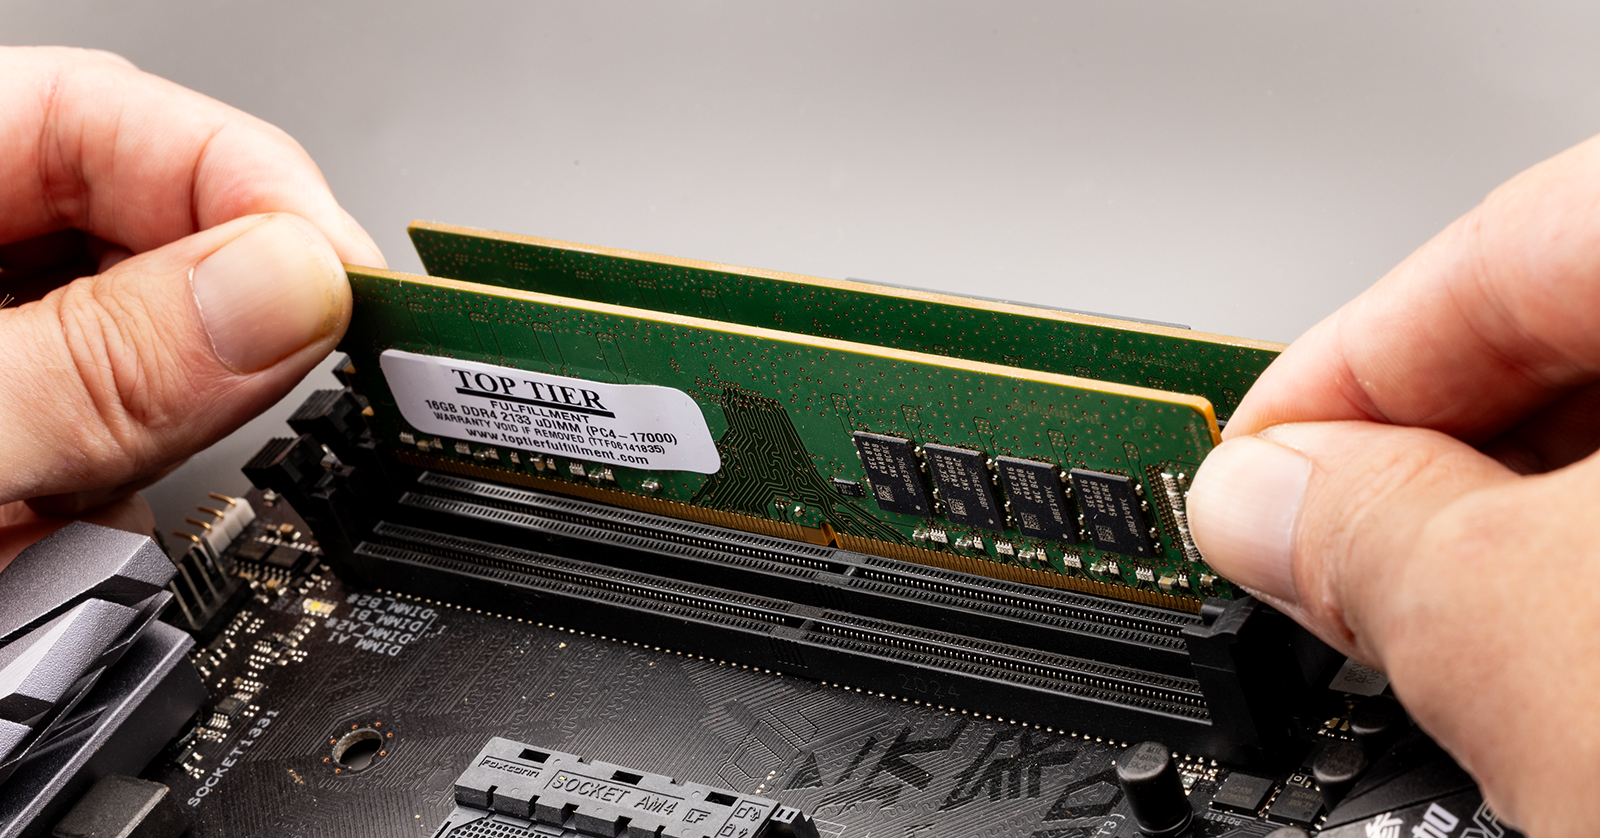
This is the main event. Remember to handle the RAM by its edges to avoid static damage and fingerprints on the gold contacts.
- Open Retention Clips: Ensure the retention clips on the target RAM slots are fully open.
- Align the Notch: Look at the new RAM module. You’ll see a notch on the bottom edge (the gold contacts). Align this notch with the corresponding key in the RAM slot on the motherboard. This ensures the module is inserted in the correct orientation. Do not force it. If it doesn’t align easily, you might have it backward, or it might be the wrong DDR generation.
- Insert and Press Firmly: Once aligned, place the module evenly into the slot. Using both thumbs, press down firmly and evenly on both ends of the RAM stick until the retention clips snap back into place, securing the module. You should hear an audible click. Visually inspect both ends to ensure the clips are fully engaged and the module is seated squarely in the slot. The gold contacts should be fully within the slot, with no gold visible.
- Repeat for Additional Modules: If you have multiple modules, repeat the process for each, ensuring they are placed in the correct slots for dual-channel operation as per your motherboard manual.
Reassembling Your PC
- Close the Case: Carefully place the side panel back onto your PC, ensuring it aligns correctly. Slide it forward until it locks into place, then re-insert and tighten the screws.
- Reconnect Cables: Reconnect all power cables, monitor cables, and peripherals.
Post-Installation Checks and Optimization
Once your new RAM is physically installed, there are a few crucial steps to confirm everything is working correctly and to optimize your “Tech” investment for maximum performance.
Verifying RAM Recognition
- Boot Up Your PC: Turn on your computer. If it boots successfully, that’s a great sign.
- Check in BIOS/UEFI: As your computer starts, enter your motherboard’s BIOS/UEFI settings (usually by pressing DEL, F2, F10, or F12 during startup, depending on your motherboard “Brand”). In the BIOS/UEFI, navigate to the system information or memory section. Here, you should see the total amount of installed RAM and potentially its speed. This is the most reliable initial check.
- Check in Operating System:
- Windows: Once logged in, open Task Manager (Ctrl+Shift+Esc), go to the “Performance” tab, and select “Memory.” It should display the newly installed total RAM capacity. You can also right-click “This PC” (or “My Computer”), select “Properties,” and look for “Installed RAM.”
- macOS: Go to “About This Mac” from the Apple menu. The overview will show the total installed RAM.
If your PC fails to boot, emits a series of beeps (a “beep code” indicating a memory issue), or doesn’t recognize the full amount of RAM, power down, unplug, and re-check the RAM seating. Ensure all modules are firmly clicked into place and that you’ve used the correct slots.
Running Stability Tests
While your PC might boot, it’s wise to perform a quick stability test to ensure the new RAM is working flawlessly.
- MemTest86: This is the gold standard for memory testing. It’s a free, open-source program that runs before your operating system boots, thoroughly checking your RAM for errors. You’ll need to create a bootable USB drive with MemTest86 on it. Running it for at least one full pass can catch subtle memory errors that could lead to crashes or data corruption over time. This is a critical “Tech” step for long-term system stability.
Maximizing Performance: XMP/DOCP Profiles
Modern RAM often comes with advertised speeds higher than the motherboard’s default base speed (e.g., DDR4-3200MHz RAM might run at 2133MHz by default). To unlock the full potential of your new RAM and ensure you get the “Money’s” worth out of its performance capabilities, you may need to enable its XMP (Extreme Memory Profile) for Intel systems or DOCP (Direct Overclock Profile) for AMD systems.
- Enter BIOS/UEFI: Reboot your PC and enter the BIOS/UEFI settings.
- Locate XMP/DOCP Setting: Look for an “Overclocking,” “AI Tweaker,” “Advanced Memory Settings,” or similar section. You should find an option to enable XMP or DOCP.
- Select Profile: Choose the profile that matches your RAM’s advertised speed (e.g., “Profile 1” for 3200MHz).
- Save and Exit: Save your changes and exit the BIOS/UEFI. Your PC will restart, and the RAM should now be running at its full speed.
If enabling XMP/DOCP causes instability, you may need to manually adjust RAM timings or voltages, or revert to default settings. This is where researching your specific motherboard and RAM “Brand” can be helpful.

Conclusion
Upgrading your PC’s memory is one of the most cost-effective and impactful ways to breathe new life into your system. By following this comprehensive guide, you’ve not only learned “how to install memory in PC” but also gained a deeper understanding of RAM, its various specifications, and the crucial steps involved in a successful and stable upgrade. From meticulous compatibility checks that save you “Money” to ensuring proper installation and post-upgrade optimization, you’ve equipped yourself with valuable “Tech” knowledge.
The satisfaction of improving your computer’s performance with your own hands is immense. Faster application loading, smoother multitasking, and an overall more responsive computing experience await you. This empowerment is at the core of our “Tech” tutorials, enabling you to take control of your digital tools and maximize their potential. Remember, a well-chosen RAM upgrade from a reputable “Brand” is an investment that pays dividends in enhanced productivity and an extended, more enjoyable lifespan for your PC.
aViewFromTheCave is a participant in the Amazon Services LLC Associates Program, an affiliate advertising program designed to provide a means for sites to earn advertising fees by advertising and linking to Amazon.com. Amazon, the Amazon logo, AmazonSupply, and the AmazonSupply logo are trademarks of Amazon.com, Inc. or its affiliates. As an Amazon Associate we earn affiliate commissions from qualifying purchases.