In an increasingly digital world, the importance of robust cybersecurity cannot be overstated. From protecting personal data to safeguarding corporate infrastructure, the tools and knowledge required for effective digital security are paramount. Among the most potent resources available to cybersecurity professionals, ethical hackers, and even ambitious tech enthusiasts is Kali Linux. This specialized Debian-derived Linux distribution comes pre-loaded with an extensive array of tools designed for penetration testing, digital forensics, security auditing, and reverse engineering.
For anyone serious about understanding the intricacies of network security, ethical hacking, or simply having a powerful toolkit at their fingertips, installing Kali Linux is often a foundational step. It’s not just an operating system; it’s a dedicated environment built for deep dives into system vulnerabilities and security analysis. This comprehensive guide will walk you through every step of installing Kali Linux, ensuring you can set up your own secure and powerful testing platform, aligning perfectly with our focus on Technology Trends, Software, Tutorials, and Digital Security.
Laying the Groundwork: Essential Pre-Installation Steps
Before diving into the actual installation, a well-prepared setup can save you a significant amount of time and frustration. This initial phase involves understanding what Kali Linux is designed for, ensuring your hardware meets its requirements, and gathering the necessary software and media.
Understanding Kali Linux and Its Requirements
Kali Linux, developed and maintained by Offensive Security, is an open-source project that bundles hundreds of tools geared towards various information security tasks. It’s the go-to platform for many in the cybersecurity field because of its comprehensive nature and active community support. However, to run it effectively, your system needs to meet certain specifications.
Minimum System Requirements:
- RAM: At least 2GB (4GB or more is highly recommended for a smoother experience, especially when running multiple tools or virtual machines).
- CPU: A 1GHz processor (multi-core processors are better for performance).
- Disk Space: A minimum of 20GB of free hard disk space (50GB or more is recommended for tool expansion, updates, and general use).
- Bootable Media: A USB drive with at least 8GB of space.
- Internet Connection: Required for downloading the ISO, updates, and additional packages.
While these are minimums, consider that cybersecurity tasks can be resource-intensive. Running a virtual machine, compiling code, or performing complex penetration tests will benefit immensely from more RAM and a faster processor. Investing in a system that exceeds these minimums will significantly enhance your productivity and learning experience.
Acquiring the Kali Linux ISO Image
The heart of your Kali Linux installation is the ISO image, which contains all the necessary files for the operating system.
- Visit the Official Kali Linux Website: Always download the ISO from the official source:
kali.org/get-kali. This ensures you receive an authentic, untampered-with image. Beware of third-party downloads, as they could contain malicious modifications, compromising your system from the outset – a crucial aspect of digital security. - Choose Your Image: On the download page, you’ll find various images. For a direct installation onto your hardware (known as “bare metal”), select the “Installer” image, typically labeled
Kali Linux 64-Bitor32-Bitdepending on your processor architecture. Most modern computers are 64-bit. There are also specific images for virtual machines, ARM devices, and live boots, but for a full installation, the “Installer” is what you need. - Verify the Download Integrity (Crucial for Security): After the download completes, it is absolutely critical to verify the integrity of the ISO file. Kali Linux provides SHA256 checksums for each download.
- How to Verify:
- On Linux/macOS: Open your terminal and navigate to the directory where you downloaded the ISO. Run the command:
sha256sum <your-kali-iso-filename.iso>. - On Windows: You can use PowerShell. Open PowerShell and run:
Get-FileHash -Algorithm SHA256 <your-kali-iso-filename.iso>.
- On Linux/macOS: Open your terminal and navigate to the directory where you downloaded the ISO. Run the command:
- Compare the output hash with the one listed on the Kali download page. If they don’t match, the file is corrupted or, worse, potentially tampered with. Do NOT proceed with an unverified or mismatched ISO, as this is a fundamental step in ensuring the digital security of your new operating system.
- How to Verify:
Preparing Your Bootable Media
Once you have a verified Kali Linux ISO, you’ll need to transfer it to a USB drive to make it bootable. This USB drive will act as the installation medium for your computer.
- USB Drive Selection: Use a USB drive with at least 8GB of storage. Ensure it contains no important data, as the process of making it bootable will erase all existing content.
- Bootable USB Creation Software: You’ll need a utility to write the ISO image to the USB drive in a bootable format.
- Balena Etcher: Recommended for its cross-platform compatibility (Windows, macOS, Linux) and user-friendly graphical interface.
- Rufus (Windows Only): A popular and powerful tool for Windows users, offering more advanced options.
ddcommand (Linux/macOS): For command-line enthusiasts, theddutility is a highly effective way to create bootable media, though it requires precision to avoid data loss.
For this guide, we will focus on Balena Etcher due to its simplicity and broad compatibility, making it accessible for most users.
Crafting Your Installation Media: Creating a Bootable USB
Creating a bootable USB drive is a straightforward process with the right tools. We’ll use Balena Etcher as our primary example.
Using Balena Etcher for Cross-Platform Simplicity
Balena Etcher simplifies the process into three easy steps: Select image, Select drive, and Flash!
- Download Balena Etcher: Go to
balena.io/etcherand download the version compatible with your current operating system (Windows, macOS, or Linux). Install it like any other application. - Launch Etcher: Open the Balena Etcher application. You’ll be greeted with a clean, intuitive interface.
- Select Your Kali Linux ISO: Click on “Flash from file” and navigate to where you saved your Kali Linux ISO image. Select the ISO file.
- Select Your USB Drive: Click on “Select target.” Etcher will automatically detect connected USB drives. Carefully choose the correct USB drive. Selecting the wrong drive can lead to permanent data loss on your hard drive or another storage device.
- Start the Flashing Process: Once you’ve selected both the ISO and the USB drive, click the “Flash!” button. Etcher will begin writing the ISO image to the USB drive. This process can take several minutes, depending on the speed of your USB drive and your computer. Etcher will show a progress bar and notify you when it’s complete, including a validation step to ensure the data was written correctly.
Once Etcher reports “Flash Complete!” (and validation successful), your bootable Kali Linux USB drive is ready. You can now safely remove the USB drive from your computer.
Initiating the Installation: BIOS/UEFI Configuration and Booting
With your bootable USB ready, the next step is to instruct your computer to boot from it instead of your existing operating system. This involves accessing your computer’s BIOS or UEFI settings.
Accessing Your System’s BIOS/UEFI Settings
The method to enter BIOS/UEFI varies widely between computer manufacturers. Generally, you need to press a specific key repeatedly immediately after powering on your computer.
- Common BIOS/UEFI Keys:
- Dell: F2, F12
- HP: F10, Esc
- Lenovo: F1, F2, Fn+F2
- Acer: F2, Del
- ASUS: F2, Del
- Microsoft Surface: Press and hold Volume Up
- Other: Look for on-screen prompts during startup, or consult your computer’s manual or manufacturer’s website.
Once you press the correct key, you’ll enter the BIOS (Basic Input/Output System) or UEFI (Unified Extensible Firmware Interface) setup utility. UEFI is the newer standard, offering a more graphical interface and advanced features like Secure Boot.
Setting the Boot Priority and Disabling Secure Boot
Inside the BIOS/UEFI, you’ll need to make two critical adjustments:
- Disable Secure Boot: Secure Boot is a UEFI feature designed to prevent malicious software from loading during startup. While beneficial for Windows systems, it often prevents Linux distributions (including Kali) from booting. Look for a “Secure Boot” option, typically found under “Boot,” “Security,” or “Authentication” tabs, and disable it.
- Set Boot Priority: Navigate to the “Boot Options” or “Boot Order” section. You need to change the boot sequence so that your USB drive (which might be labeled “USB HDD,” “USB-ZIP,” or by the brand of your USB drive) is listed before your primary hard drive (HDD/SSD).
- Save and Exit: After making these changes, save them (usually by pressing F10 or selecting “Save and Exit”) and restart your computer.
Your computer should now attempt to boot from the Kali Linux USB drive.
Starting the Kali Linux Installer
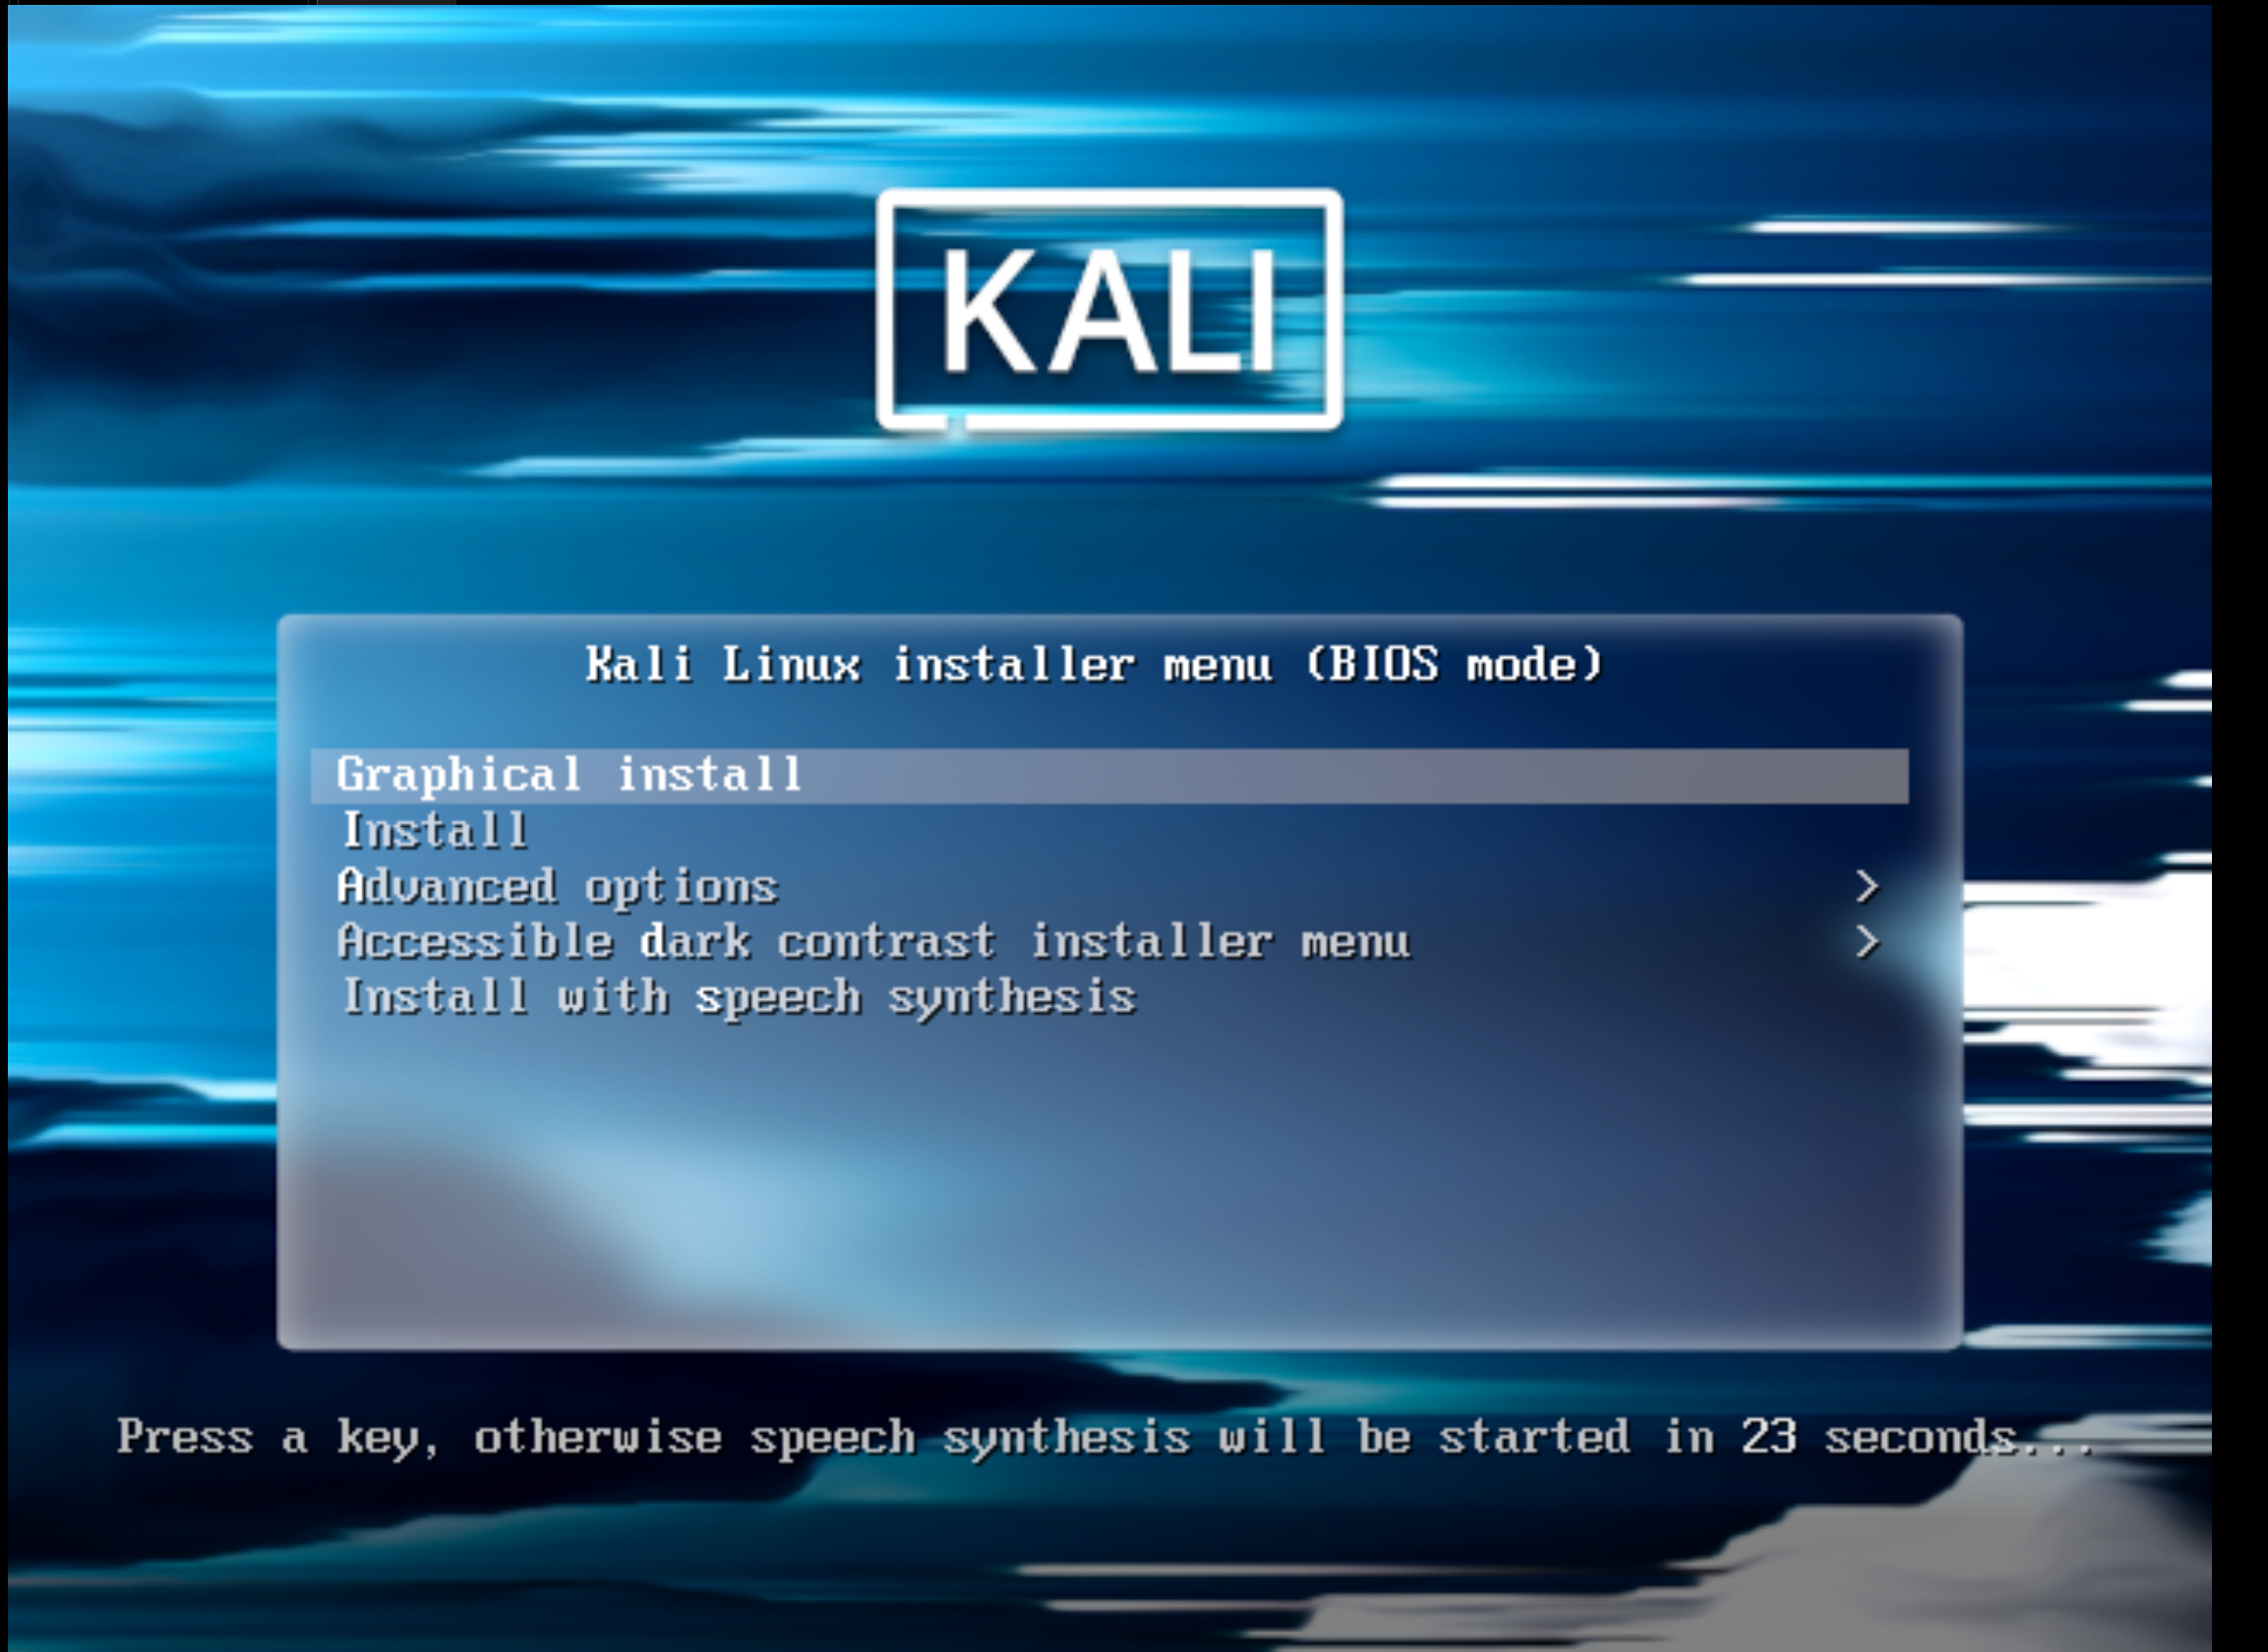
If everything is configured correctly, your computer will boot from the USB drive, and you’ll be presented with the Kali Linux GRUB boot menu.
- GRUB Boot Menu Options:
- Live: Boots Kali Linux directly from the USB drive without installing it, allowing you to try it out.
- Graphical Install: This is the recommended option for most users, providing a user-friendly graphical installer.
- Install: A text-based installer, suitable for advanced users or systems with minimal graphics capabilities.
- Forensic Mode: A live boot option that attempts to avoid mounting internal hard drives to preserve evidence, useful for digital forensics.
Select “Graphical Install” and press Enter to begin the installation process.
The Core Installation Process: Navigating the Kali Linux Installer
The graphical installer is intuitive and guides you through each step. Pay close attention to the details, especially when partitioning disks.
Language, Location, and Keyboard Layout Configuration
The first few screens will ask you to:
- Select your preferred language: This will be used for the installer and the default system language.
- Select your location: This helps set up your system’s time zone and locale.
- Configure the keyboard layout: Choose the layout that matches your physical keyboard.
Network Configuration and Hostname Assignment
The installer will attempt to configure your network automatically.
- Hostname: You’ll be prompted to enter a hostname for your system. This is a unique name that identifies your computer on a network (e.g.,
kali-machine,pentest-rig). - Domain Name (Optional): You can leave this blank for most home or personal setups. It’s typically used in corporate network environments.
Creating User Accounts and Strong Passwords
Crucial for Digital Security: Kali Linux, by default, no longer uses the root user for daily operations. It’s a best practice to create a non-root user for your day-to-day tasks and only use sudo for administrative privileges. This significantly enhances the security posture of your system.
- Full name for the new user: Enter your name or a descriptive name.
- Username for your account: This will be the login name (e.g.,
kaliuser). - Password: Choose a strong, unique password. A strong password combines uppercase and lowercase letters, numbers, and symbols, and is at least 12 characters long. This is fundamental for protecting your system from unauthorized access.
Disk Partitioning Strategies
This is one of the most critical stages. Incorrect partitioning can lead to data loss on your other operating systems or render your system unbootable.
-
Guided – Use the entire disk (Recommended for Beginners): This option is the simplest. The installer will automatically create all necessary partitions on the selected drive. Use this if you are dedicating the entire disk to Kali Linux and don’t have another operating system you wish to preserve.
-
Guided – Use entire disk and set up encrypted LVM: For enhanced digital security, this option encrypts your entire disk using LUKS. While more secure, it adds a layer of complexity and a slight performance overhead.
-
Manual (For Advanced Users): This option provides granular control, allowing you to create custom partitions. If you’re dual-booting with Windows or another Linux distribution, or if you want specific partition schemes (e.g., separate
/home,/var,/tmp), you must use manual partitioning.Manual Partitioning Considerations:
/(Root Partition): This is where the main operating system files reside. Allocate at least 20-30GB./home: Stores user data, configurations, and documents. Keeping this separate makes it easier to reinstall Kali without losing your personal files.swap: Acts as virtual RAM. A general rule of thumb is to allocate swap space equal to your RAM, or double it if you have less than 4GB RAM. If you plan to use hibernation, it should be at least equal to your RAM./boot: Contains the Linux kernel and GRUB bootloader files. Usually, a small partition (500MB-1GB) is sufficient./var: Stores variable data like logs, databases, and website files. Useful to separate if/varis expected to grow large.
For beginners, sticking with “Guided – Use the entire disk” is generally the safest approach if you’re installing Kali as the sole operating system.
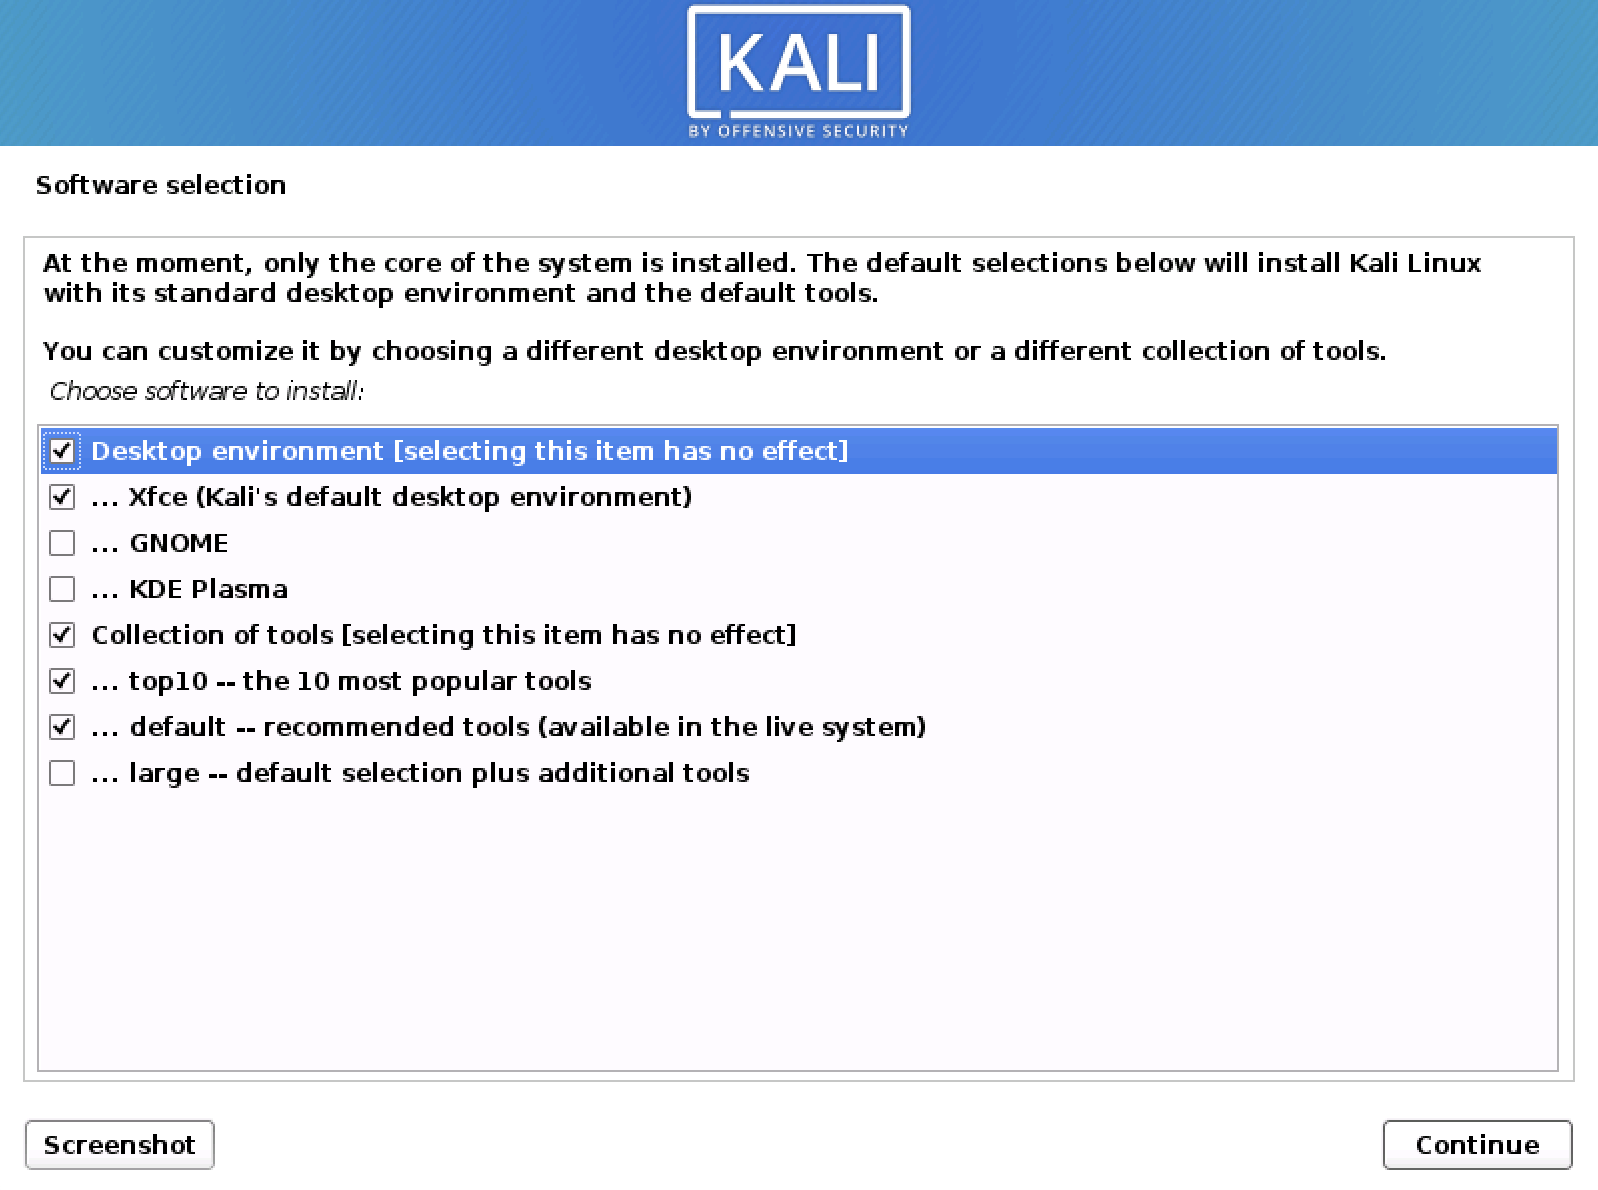
Software Selection and GRUB Installation
- Software Selection: The installer will ask you to select the desktop environment (e.g., GNOME, KDE Plasma, XFCE) and collections of tools you want to install. By default, Kali installs the GNOME desktop and the “default – recommended tools” package. For a comprehensive toolkit, ensure “default – recommended tools” is checked.
- Install the GRUB Boot Loader: This is crucial. GRUB (GRand Unified Bootloader) is responsible for booting your operating system. The installer will ask you where to install GRUB.
- Select the primary hard drive where Kali Linux is being installed (e.g.,
/dev/sdaor/dev/nvme0n1), not a specific partition number like/dev/sda1. Installing GRUB to the correct location ensures your system can boot.
- Select the primary hard drive where Kali Linux is being installed (e.g.,
Finalizing the Installation and Reboot
After configuring GRUB, the installer will complete the remaining steps, which mainly involve copying files and setting up final configurations. This process can take some time. Once completed, you’ll receive a prompt indicating that the installation is finished and asking you to reboot your system. Remove your USB installation media when prompted, or after the system reboots.
Post-Installation: Securing and Optimizing Your Kali Environment
Congratulations! You have successfully installed Kali Linux. However, the journey doesn’t end there. A few crucial post-installation steps are necessary to ensure your system is secure, up-to-date, and optimized for your specific cybersecurity tasks. This phase directly relates to Digital Security and Productivity.
Initial System Updates and Upgrades
This is the very first thing you should do after logging into your new Kali Linux system. Updating ensures you have the latest security patches, bug fixes, and software versions.
- Open a Terminal: You can usually find the terminal application in your desktop environment’s applications menu.
- Update Package Lists:
bash

sudo apt update
This command fetches the latest information about available packages from Kali’s repositories. You’ll need to enter the password for the user account you created during installation. - Upgrade Installed Packages:
bash

sudo apt full-upgrade -y
This command upgrades all installed packages to their newest versions, resolving dependencies where necessary. The-yflag automatically confirms prompts. This step is vital for digital security, as it ensures all your tools and system components are patched against known vulnerabilities.
Installing Essential Tools and Drivers
While Kali Linux comes with hundreds of tools, you might need specific ones not included in the default installation, or proprietary drivers for your hardware.
- Installing Additional Tools: Kali organizes its tools into categories. You can explore and install additional tools using
apt. For example, to install tools for a specific category like web application analysis, you might use:
bash

sudo apt install kali-tools-web
You can explore tool categories by searchingapt search kali-tools-. - Installing Proprietary Drivers: For optimal performance, especially with graphics cards or wireless adapters, you might need proprietary drivers. This process varies depending on your hardware. Generally, you’d search for “Kali Linux [your hardware model] driver installation” to find specific instructions. For example, some Wi-Fi adapters popular in penetration testing might require specific drivers to enable monitor mode or packet injection.
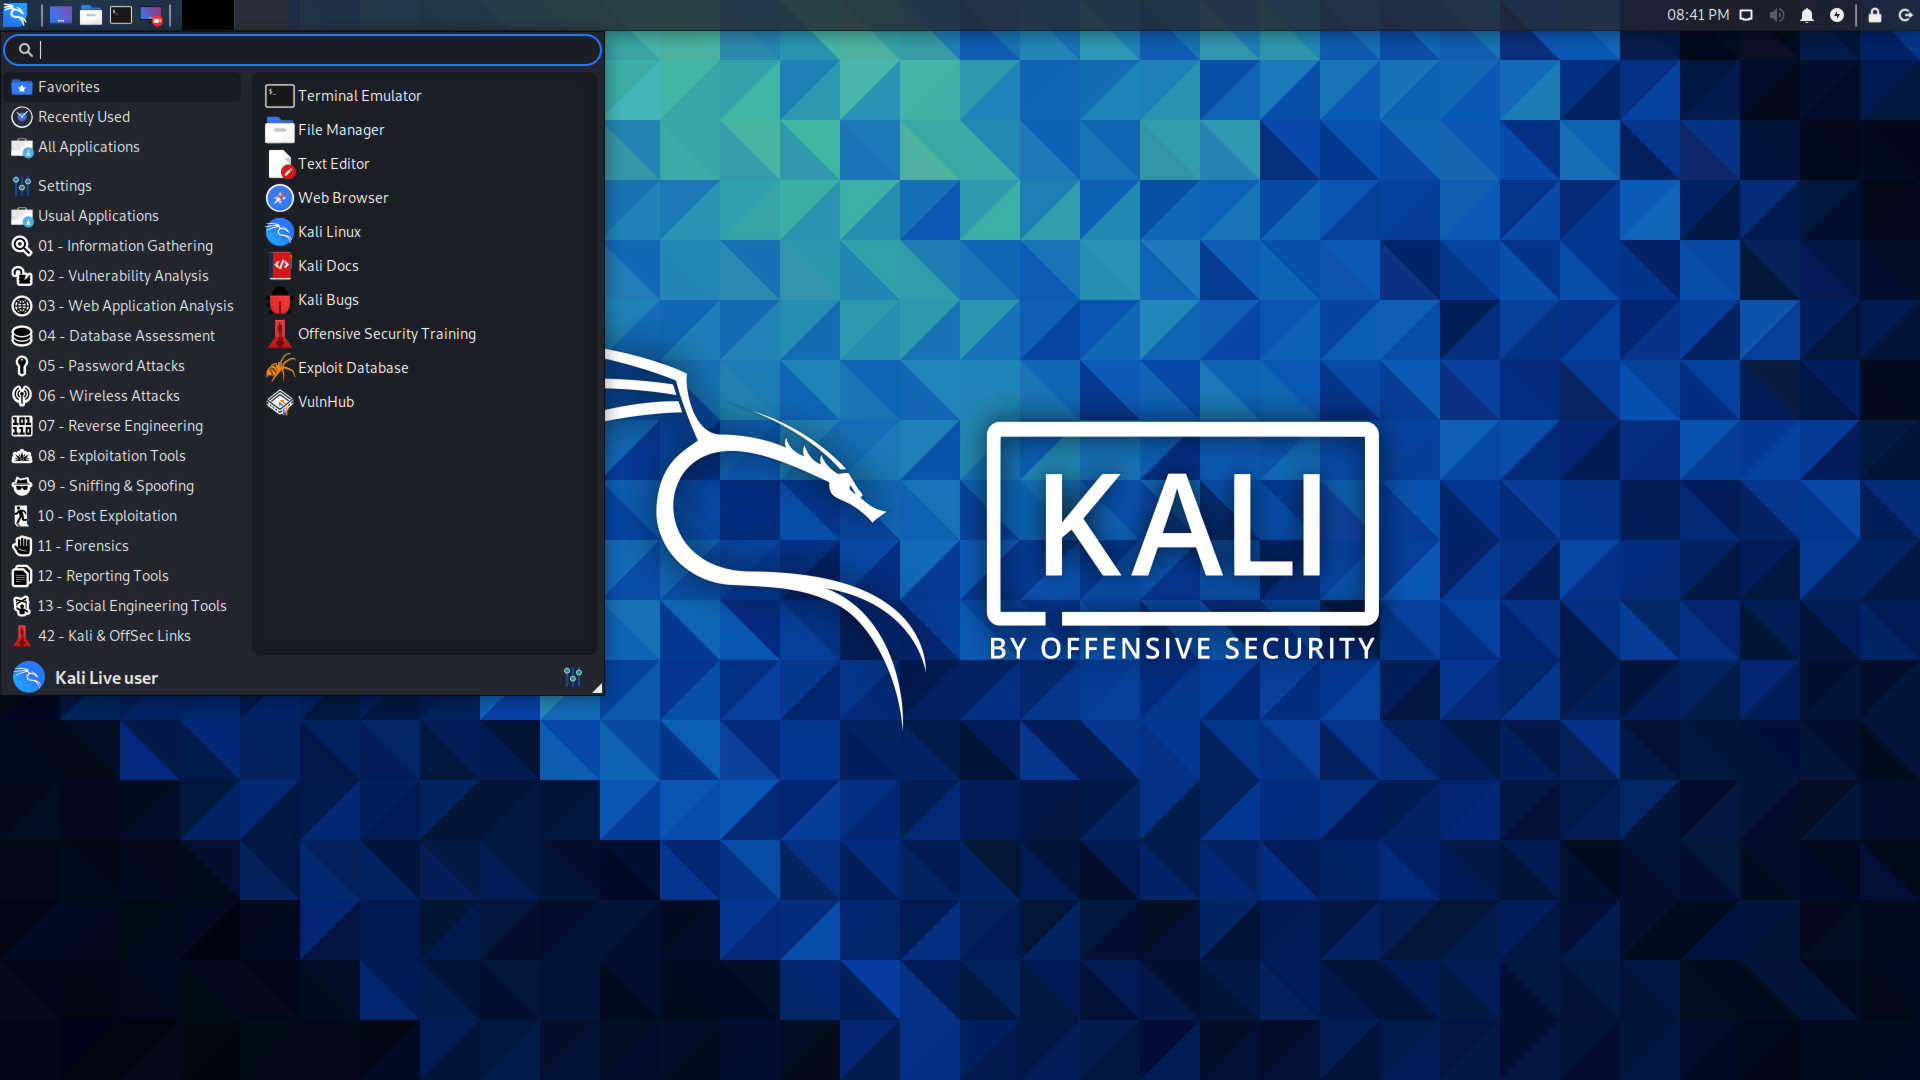
Customizing Your Kali Environment for Productivity
Tailoring your Kali environment to your workflow can significantly boost your productivity as a cybersecurity professional or enthusiast.
- Desktop Environment Customization: If you installed the default GNOME desktop, you can customize themes, icons, and fonts through “Settings.” Other desktop environments like XFCE or KDE Plasma offer similar or even more extensive customization options.
- Terminal Enhancements: The terminal is your primary interface in Kali. Consider installing a better terminal emulator (e.g., Terminator, Tilix), customizing your shell prompt (e.g., using Oh My Zsh for Zsh shell), or creating aliases for frequently used commands.
- IDE/Text Editors: Install your preferred code editor or IDE (e.g., VS Code, Sublime Text, Vim, Emacs) for scripting and development.
- VPN Configuration: For privacy and security, especially when conducting penetration tests, configure a reliable VPN client.
Maintaining Digital Security Best Practices
Remember that installing Kali Linux is just the beginning. Responsible use and continuous maintenance are key to leveraging its power effectively and securely.
- Regular Updates: Make
sudo apt update && sudo apt full-upgradea routine. - Strong Passwords: Never reuse passwords, and always use strong, unique combinations. Consider a password manager.
- Understand Legal & Ethical Boundaries: Kali Linux is a powerful tool. Always ensure you have explicit permission before performing any penetration testing or security assessments on systems you do not own or have authorization for. Ethical hacking is about improving security, not violating it.
- Backup Important Data: Regularly back up your
/homedirectory and any critical configuration files. - Responsible Tool Usage: Learn how each tool works before blindly running it. Understand its purpose, potential impact, and legal implications.
Conclusion
Installing Kali Linux is a significant step into the world of digital security, offering an unparalleled arsenal of tools for ethical hacking, penetration testing, and forensic analysis. This comprehensive guide has walked you through everything from preparing your system and creating bootable media to navigating the installer and performing essential post-installation configurations.
By successfully setting up Kali Linux, you’ve established a robust and versatile platform that aligns perfectly with the evolving landscape of technology trends and digital security. Whether you’re an aspiring cybersecurity professional, a seasoned expert, or simply a tech enthusiast keen on understanding system vulnerabilities, Kali Linux provides an invaluable learning and operational environment.
Remember, the power of Kali Linux lies not just in its tools, but in the knowledge and ethical practices of its user. Continue to explore, learn, and contribute responsibly to the cybersecurity community. For more insights into software, AI tools, digital security, and productivity-enhancing technologies, stay tuned to our website. The journey into cybersecurity is continuous, and your newly installed Kali Linux system is your gateway to deeper understanding and impactful contributions.
aViewFromTheCave is a participant in the Amazon Services LLC Associates Program, an affiliate advertising program designed to provide a means for sites to earn advertising fees by advertising and linking to Amazon.com. Amazon, the Amazon logo, AmazonSupply, and the AmazonSupply logo are trademarks of Amazon.com, Inc. or its affiliates. As an Amazon Associate we earn affiliate commissions from qualifying purchases.