In the digital realm, where visual communication reigns supreme, fonts are more than just text styles; they are integral elements of design, readability, and brand identity. For anyone using Windows 10 – from casual users personalizing their desktop to professional designers crafting compelling visuals – knowing how to effectively install and manage fonts is a fundamental skill. A well-chosen typeface can transform a bland document into a persuasive presentation, elevate a personal project, or solidify a corporate identity. This comprehensive guide will walk you through the essential methods of installing fonts on Windows 10, delve into advanced management techniques, troubleshoot common issues, and even explore the critical aspects of sourcing and licensing fonts – connecting directly to themes of technology, branding, and financial implications.
Windows 10, a cornerstone of modern computing, has continually evolved its user experience, and font management is no exception. While the operating system comes pre-loaded with a diverse collection of typefaces, the true power lies in the ability to customize and expand this library to suit specific creative, professional, or personal needs. Whether you’re aiming for a sleek, modern look for your business reports, a whimsical script for an invitation, or a specialized typeface for a coding environment, understanding the installation process is your first step towards unlocking a richer digital experience.
Essential Methods for Installing Fonts in Windows 10
Windows 10 offers several user-friendly approaches to integrating new fonts into your system. These methods cater to different preferences and scenarios, from the modern drag-and-drop interface to the classic Control Panel utility. Mastering each ensures you can confidently expand your font library.
Method 1: The Modern Fonts Settings Menu (Recommended)
This method leverages Windows 10’s updated Settings application, providing a streamlined and intuitive experience, particularly useful for installing multiple fonts or managing your existing collection. It represents Microsoft’s effort to consolidate system configurations into a more coherent, accessible interface.
- Acquire Your Font Files: The journey begins by obtaining the font files themselves. These typically come in
.ttf(TrueType Font) or.otf(OpenType Font) formats, which are the most common and widely supported. You can find fonts from a multitude of reputable sources, including free repositories like Google Fonts, Dafont, or Font Squirrel, or professional marketplaces like Adobe Fonts (if you have a Creative Cloud subscription) and MyFonts. Always prioritize trusted sources to avoid corrupted files or malware. - Extract Files (If Zipped): Most downloaded fonts, especially from online libraries, arrive compressed in a
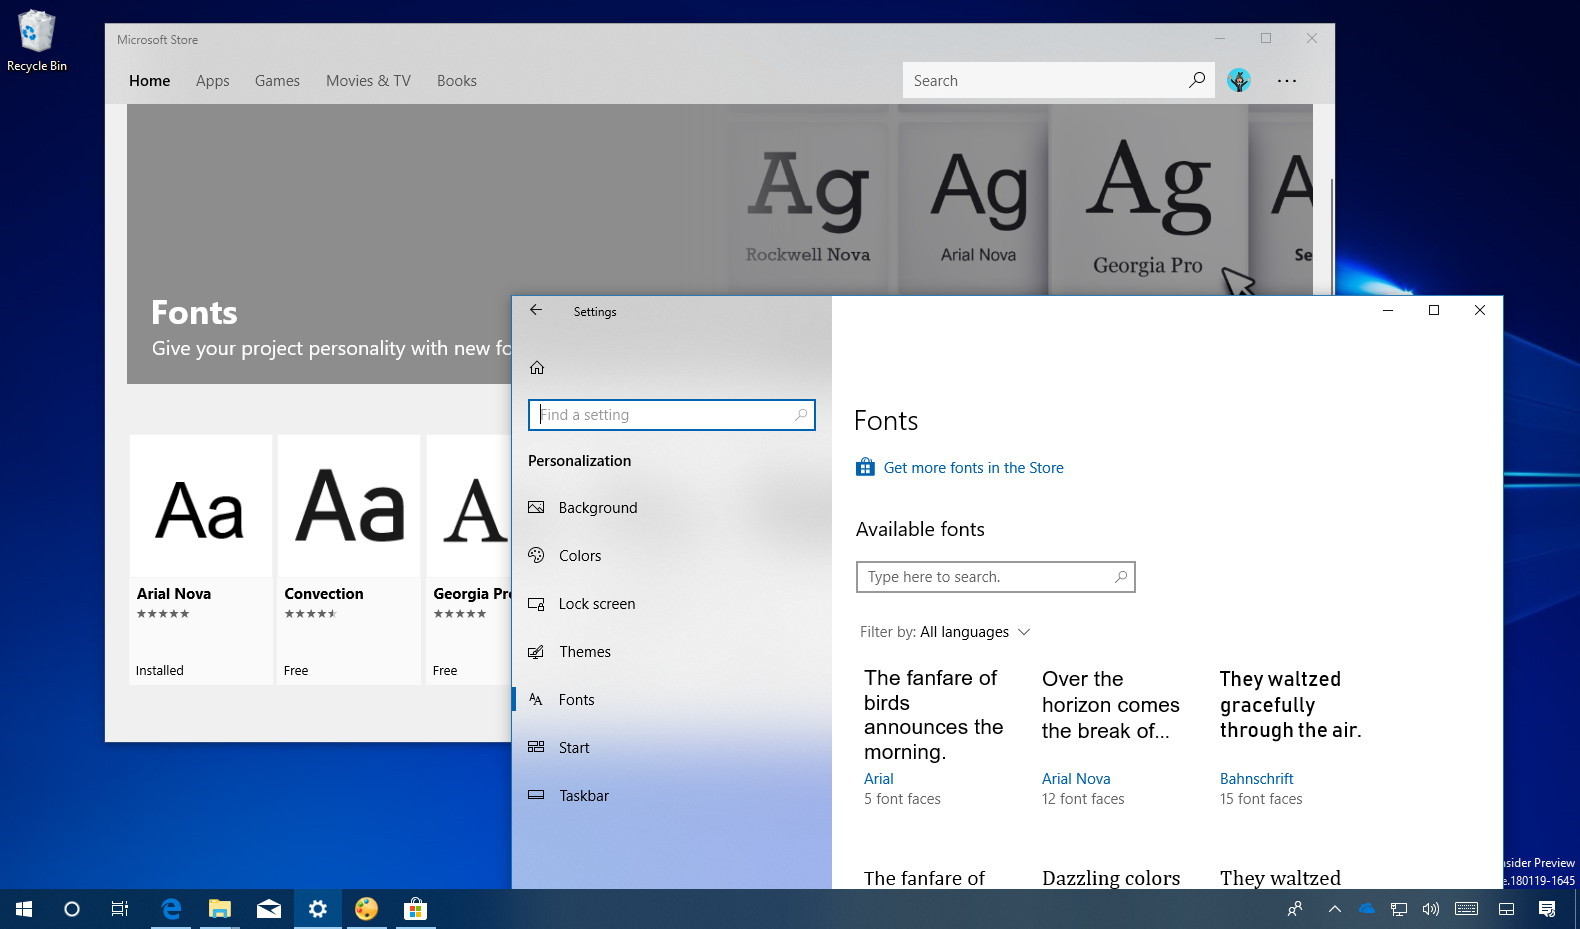
.zipfile. Before installation, these files must be extracted. Simply right-click the.zipfile and select “Extract All…” from the context menu. Follow the on-screen prompts to choose a destination for the extracted font files, which is usually a new folder within the download directory. - Navigate to Fonts Settings: To access the dedicated font management area, click the “Start” button, then select “Settings” (the gear icon). In the Settings window, click on “Personalization,” and from the left-hand menu, choose “Fonts.” This panel offers a comprehensive overview of your installed fonts and provides the modern installation interface.
- Drag and Drop for Installation: This is where the magic happens. With your Fonts settings window open, locate your extracted
.ttfor.otffont files. Select one or multiple files and simply drag them directly into the designated “Drag and drop to install” area within the Fonts settings window. Windows 10 will automatically begin the installation process. You’ll see a brief notification confirming the installation of each font. - Verify Installation Across Applications: Once installed, the font should immediately appear in the list of available fonts within the Settings panel. To confirm its functional availability, open any application that utilizes system fonts, such as Microsoft Word, Adobe Photoshop, Notepad, or your preferred browser (after restarting it). Check the font selection dropdown; your newly installed typeface should be present and ready for use. If it’s not, a simple restart of the application, or even your computer, might be necessary (more on troubleshooting later).
Method 2: The Convenient Right-Click and Install
For quick, individual font installations, especially when you have just one or two files, the right-click method is incredibly efficient and bypasses the need to open the Settings app explicitly. This method is a staple for many users due to its directness.
- Locate the Font File(s): Navigate using File Explorer to the folder containing your
.ttfor.otffont file(s). Ensure they are extracted from any.ziparchives. - Initiate Installation: Right-click directly on the font file you wish to install.
- Choose “Install”: From the context menu that appears, select “Install.” If your Windows 10 system has multiple user accounts, you might also see an option “Install for all users.” This is generally the preferred choice if you want the font to be accessible to everyone who uses the computer, not just your current user profile. Selecting “Install for all users” often requires administrator privileges.
- Administrator Prompt: If you chose “Install for all users” or if your system security settings require it, a User Account Control (UAC) prompt will appear, asking for administrator credentials. Provide these to proceed.
- Confirmation and Readiness: Windows will quickly process the installation. A small progress bar might briefly appear, and then the font will be installed and immediately available for use in most applications (after a restart of the application).
Method 3: Utilizing the Control Panel (Legacy but Functional)
While less commonly used in favor of the modern Settings app, the Control Panel method remains a viable option for installing and managing fonts. It provides a more traditional, folder-like interface, familiar to users of older Windows versions.
- Access the Control Panel: Use the Windows Search bar (next to the Start button) and type “Control Panel,” then click to open the application.
- Navigate to the Fonts Section: In the Control Panel window, change the “View by” option (usually in the top-right corner) to “Large icons” or “Small icons.” This will display all Control Panel items as individual icons. Locate and click on “Fonts.” This will open the classic Fonts folder, displaying all currently installed typefaces.
- Drag and Drop into the Fonts Folder: Similar to the Settings app, you can drag your extracted
.ttfor.otffont files directly into this open Fonts folder window. Windows will recognize the files as fonts and initiate the installation process. - Installation Confirmation: The font will be added to the list, and you can confirm its presence. While this method works, it lacks some of the modern management features found in the Settings app, such as the ability to hide fonts or view detailed information easily.
Managing Your Font Library: Beyond Installation
Installing fonts is only half the battle; effective management is crucial for maintaining system performance, decluttering application menus, and ensuring a streamlined workflow. A sprawling, unmanaged font collection can slow down design software, create visual noise, and hinder productivity.
Uninstalling Unused Fonts
Over time, you might accumulate fonts you no longer need. Uninstalling them is a good practice for system hygiene and can subtly improve the performance of font-heavy applications.
- Open Fonts Settings: Go to “Settings” > “Personalization” > “Fonts.”
- Select the Font: Scroll through the list or use the search bar to find the specific font you wish to remove. Click on it to expand its details.
- Initiate Uninstall: Within the font’s detail pane, you will see an “Uninstall” button. Click it. A confirmation dialog will appear, asking if you’re sure you want to uninstall. Confirm your choice. Be cautious when uninstalling system fonts, as removing essential ones can affect system stability or the display of certain applications. Windows usually prevents the uninstallation of critical system fonts.
Hiding Fonts for a Cleaner Workflow
Windows 10 introduces the useful feature of hiding fonts. This is particularly beneficial for decluttering font selection menus in applications like Word or Photoshop without permanently removing the fonts from your system. Many pre-installed fonts might not suit your aesthetic or professional needs, and hiding them keeps your frequently used typefaces front and center.
- Access Fonts Settings: Navigate to “Settings” > “Personalization” > “Fonts.”
- Choose a Font to Hide: Click on the font you want to hide from your application lists.
- Toggle Visibility: Within the font’s detail pane, look for an option that controls its visibility (often a toggle switch labeled “Hide” or “Show”). Toggle it off to hide the font. The font remains installed on your system but will no longer appear in most application font menus. You can always revert this action by toggling the visibility back on.
Organizing Fonts for Projects and Productivity
While Windows 10 doesn’t offer a built-in “project-based” font manager, adopting good organizational habits is key. Consider creating dedicated folders for project-specific fonts outside of the Windows font directory. Install these only when needed and uninstall them once the project is complete. For professionals, third-party font management software (like Adobe Fonts or specialized tools) can offer advanced features like activation/deactivation on demand, tagging, and previewing, significantly boosting productivity and brand consistency across various projects.

Troubleshooting Common Font Issues
Even with the most careful installation, font issues can occasionally arise. Understanding how to diagnose and resolve these common problems can save valuable time and frustration, maintaining your creative flow and productivity.
Font Not Appearing in Applications
This is arguably the most frequent issue users encounter. A newly installed font may show up in the Windows Fonts settings but remains absent from application menus.
- Restart Applications: The primary culprit is often application caching. Most programs load their font lists upon startup. To recognize newly installed fonts, you almost always need to close and then reopen the application (e.g., Word, Photoshop, email client).
- Restart Your PC: If restarting the specific application doesn’t resolve the issue, a full system reboot can often clear deeper caches and ensure all system processes recognize the new font.
- Check Font File Integrity: A corrupted font file will prevent proper installation or display. Try re-downloading the font from its original, trusted source. If the problem persists, it might indicate an issue with the file itself rather than your system.
- Verify Correct Installation Path: Double-check that you followed one of the installation methods correctly. Ensure the font was installed for “all users” if that’s your intention, as sometimes fonts installed only for the current user might not be accessible by certain applications or services.
Corrupted Font Files
A corrupted font can manifest in several ways: distorted characters, incorrect spacing, or even application crashes when attempting to use it.
- Re-download and Reinstall: The simplest solution is to uninstall the problematic font via the Fonts Settings menu, delete the original downloaded file, and then re-download it from a reliable source. Reinstall it using any of the methods described.
- System File Checker: In rare cases, fundamental Windows font components might be corrupted. Running the System File Checker (
sfc /scannowin Command Prompt as administrator) can help identify and repair core system files, including those related to fonts.
Font Permissions Issues
Occasionally, Windows 10’s robust security features can interfere with font installation or access, especially in multi-user environments or corporate settings with strict group policies.
- “Install for all users”: When using the right-click method, always opt for “Install for all users” if prompted, and ensure you provide administrator credentials. This guarantees broader system access to the font.
- Administrator Rights: Ensure you are logged in with an administrator account or can provide admin credentials when installing fonts. Without appropriate permissions, Windows might prevent the font files from being written to the protected system font directory.
- Antivirus/Security Software: Temporarily disable your antivirus or security software if you suspect it’s interfering with the font installation process. Remember to re-enable it immediately afterward.
Performance Impact of Too Many Fonts (Tech & Productivity)
While not a direct “issue” per se, installing an excessive number of fonts can impact system performance. Each font adds to the load when applications generate their font lists, and a vast collection can noticeably slow down professional design software, boot times for certain programs, and even the overall responsiveness of your Windows 10 system. This is a crucial consideration for maximizing productivity and leveraging your tech efficiently. Regularly review your font library and uninstall or hide those you rarely use to maintain a lean and efficient system.
Sourcing High-Quality Fonts: Where to Look and What to Consider
Finding the perfect typeface is an art in itself. The quality, style, and licensing of a font can significantly impact your project’s aesthetic, brand perception, and even its legality. Understanding where to source fonts responsibly is paramount for both personal branding and professional endeavors. This section ties directly into “Brand” and “Money” aspects, emphasizing quality, legal compliance, and value.
Free and Open-Source Font Libraries (Tech & Money-Saving)
- Google Fonts: A colossal library of free, open-source fonts, primarily designed for web use but also fully installable on desktop. Google Fonts are renowned for their high quality, broad language support, and ease of use. They are an excellent starting point for personal projects, new businesses on a budget, and web development, offering both versatility and peace of mind regarding licensing.
- Dafont / Font Squirrel: These popular platforms host vast collections of free fonts, often including unique, novelty, or experimental typefaces.
- Dafont: Offers a user-friendly interface with extensive categories. Crucially, always check the individual font’s license on Dafont, as many are free for personal use only and require a commercial license for business applications (connecting directly to “Money” and “Brand” legality).
- Font Squirrel: Specializes in hand-picked, high-quality fonts that are 100% free for commercial use. This makes it a go-to for designers and small businesses looking for robust, legally safe free options. They also provide webfont kits, crucial for modern web design (“Tech”).
Premium and Subscription-Based Fonts (Brand & Money-Value)
- Adobe Fonts (Creative Cloud): If you are an Adobe Creative Cloud subscriber, you gain access to an extensive, curated library of high-quality fonts that seamlessly integrate with Adobe applications. These are professional-grade fonts, often from renowned type foundries, and the subscription covers their commercial use. This offers immense value for designers and agencies, ensuring consistent branding across all creative outputs without additional per-font purchase costs.
- Commercial Font Marketplaces: Websites like MyFonts, Fontspring, and Creative Market are the go-to places for purchasing professional, licensed fonts. These platforms feature exclusive designs from independent type designers and large foundries. Investing in unique, high-quality commercial fonts can significantly differentiate a brand, enhance readability, and convey a specific message or aesthetic that generic free fonts might not achieve. This is a direct financial investment in your “Brand” equity.
Understanding Font Licensing (Critical for Brand & Money)
Before using any font, especially for commercial purposes, understanding its license is non-negotiable. This is where the intersection of “Brand” (legal compliance and professional image) and “Money” (avoiding fines, making smart investments) becomes critical.
- Personal Use vs. Commercial Use: Many free fonts are only licensed for personal projects (e.g., a hobby website, a personal letter). Using them for anything that generates income (e.g., a business logo, marketing materials, client work) without the proper commercial license can lead to legal issues.
- End-User License Agreements (EULAs): Commercial fonts come with EULAs that dictate how and where the font can be used (e.g., desktop use, web use, app embedding, number of users). Always read these carefully before purchasing to ensure the license covers your intended use case.
- Web Fonts vs. Desktop Fonts: A desktop font license typically allows you to install it on your computer for print and static graphic design. A web font license is required for embedding fonts on websites, as it involves different technological considerations and usage metrics.

Conclusion: Empowering Your Digital Creations
Learning how to install and manage fonts in Windows 10 is more than just a technical skill; it’s an empowerment. It enables you to personalize your operating system, infuse your documents with personality, elevate your creative projects, and maintain a consistent and professional brand identity across all your digital communications. From simplifying readability to conveying subtle emotions, the right font is a powerful tool.
By leveraging the latest technological conveniences of Windows 10’s Settings app, understanding the nuances of font types, and responsibly sourcing and managing your typography library, you transform your interaction with your computer. You move beyond basic functionality into a realm of enhanced productivity, distinct personal branding, and informed financial decisions regarding design assets. So go forth, explore the vast world of typography, and let your Windows 10 system truly reflect your unique style and professional aspirations.
aViewFromTheCave is a participant in the Amazon Services LLC Associates Program, an affiliate advertising program designed to provide a means for sites to earn advertising fees by advertising and linking to Amazon.com. Amazon, the Amazon logo, AmazonSupply, and the AmazonSupply logo are trademarks of Amazon.com, Inc. or its affiliates. As an Amazon Associate we earn affiliate commissions from qualifying purchases.