
The landscape of software emulation has evolved dramatically over the last decade, transitioning from niche experimental projects to sophisticated pieces of engineering that preserve gaming history. Among these, the Dolphin Emulator stands as a titan. As an open-source project designed to replicate the hardware of the Nintendo GameCube and the Wii, Dolphin offers users the ability to experience classic titles in high definition, often exceeding the visual fidelity of the original consoles. Whether you are a developer interested in software architecture or a gaming enthusiast looking to consolidate your library, mastering the installation and configuration of Dolphin is a quintessential tech skill.

This guide provides an exhaustive walkthrough for installing Dolphin Emulator, optimizing its technical performance, and ensuring a secure, high-quality digital experience across various platforms.
Understanding Dolphin: The Gold Standard of GameCube and Wii Emulation
Before diving into the installation process, it is essential to understand the technical foundations of Dolphin. Unlike many emulators that focus on low-resource requirements, Dolphin prioritizes accuracy and feature-rich environments. This means it requires a relatively modern computing architecture to function at peak performance.
Why Dolphin Stands Out
Dolphin is widely regarded as one of the most successful emulation projects in the world. Its success stems from its transition to a 64-bit architecture and its support for modern graphics APIs like Vulkan, DirectX 12, and OpenGL. The emulator does more than just play games; it enhances them. With Dolphin, users can implement “Ubershaders” to eliminate shader compilation stutter—a common technical hurdle in emulation—and apply texture packs that transform 480p classics into 4K modern masterpieces.
System Requirements and Hardware Compatibility
To ensure a fluid experience, your hardware must meet specific benchmarks. Emulation is a CPU-intensive task because the software must translate PowerPC instructions (the architecture of the Wii and GameCube) into x86 or ARM instructions in real-time.
- Processor (CPU): A modern Intel Core i5 or i7, or an AMD Ryzen 5 or 7, is highly recommended. High single-core clock speeds are more beneficial than a high number of cores.
- Graphics (GPU): A dedicated GPU from NVIDIA or AMD is preferred for high-resolution upscaling. While modern Intel Iris Xe or M1/M2 Apple Silicon chips perform admirably, integrated graphics on older laptops may struggle.
- Memory (RAM): 8GB is the baseline, though 16GB is ideal for multitasking and running heavy texture mods.
- Operating System: Windows 10/11 (64-bit), macOS (10.15 Catalina or higher), or Android (5.0 or higher).
A Step-by-Step Guide to Installing Dolphin on Modern Operating Systems
The installation process varies slightly depending on your platform of choice. However, the most critical step across all platforms is selecting the correct software build.
Downloading the Right Version: Stable vs. Development
When visiting the official Dolphin website, you will encounter different versions:
- Stable Versions: These are released every few years and are thoroughly tested. However, they lack the latest features and optimizations.
- Beta and Development Versions: Updated frequently (sometimes daily), these versions contain the most recent bug fixes and performance enhancements. For the modern tech user, Development versions are highly recommended, as they offer better compatibility with current drivers and hardware.
Installation Walkthrough for Windows and macOS
- Prerequisites for Windows: Before installing, ensure you have the 64-bit Visual C++ Redistributable for Visual Studio 2022 installed. Without this, Dolphin will likely fail to launch.
- Extraction: On Windows, Dolphin is typically downloaded as a 7z or Zip archive. Extract the folder using a tool like 7-Zip or WinRAR to a dedicated directory (e.g.,
C:GamesDolphin). - macOS Installation: The macOS version comes as a DMG file. Open the file and drag the Dolphin icon into your Applications folder. Note that on newer macOS versions, you may need to grant “Input Monitoring” permissions in System Settings to allow controller inputs.
Setting Up the Dolphin Mobile App for Android
Dolphin’s Android port has made significant strides in recent years. To install it:
- Download the APK directly from the official site or the Google Play Store.
- Enable “Install from Unknown Sources” in your Android security settings if downloading the APK directly.
- Note: Performance on mobile is strictly tied to your chipset. Devices with Snapdragon 800-series processors or higher are generally required for playable frame rates.
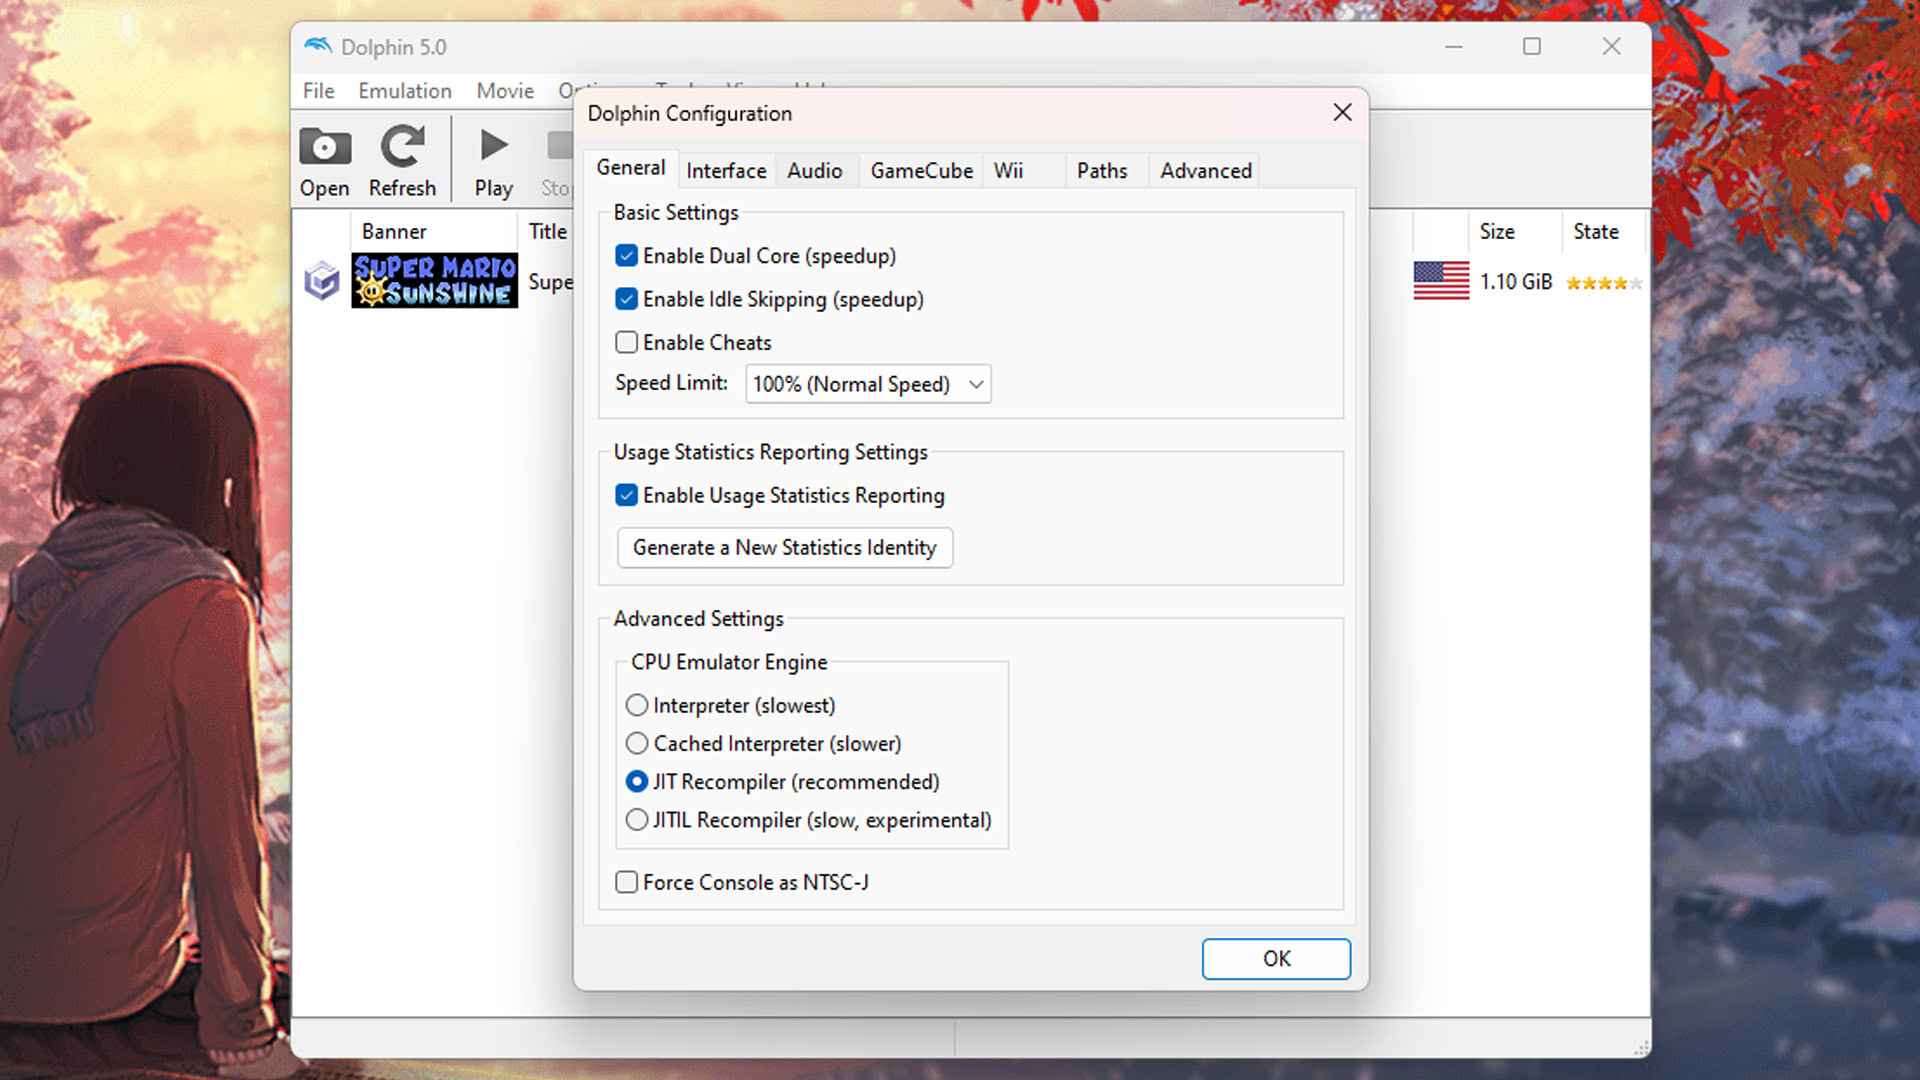
Configuring the User Interface and Initial Setup
Once the software is launched, the initial setup determines the efficiency of your workflow. Dolphin’s interface is minimalist but masks a deep array of technical menus.
Navigating the Global Settings
Upon opening Dolphin, navigate to the Config button. Here, you should enable “Enable Dual Core” to leverage multi-threaded CPUs, which significantly boosts speed. Under the “Interface” tab, you can customize the look and feel, but the “Paths” tab is where the technical organization happens.
Managing Your Game Library and ISOs
Dolphin does not come with games. Users must provide their own “ISO” or “RVZ” files—digital backups of discs they physically own.
- Directory Mapping: In the “Paths” tab, click “Add” and select the folder where your game files are stored. Dolphin will then populate your main window with a list of games, complete with banners, IDs, and file sizes.
- File Formats: While ISO is the standard, the RVZ format is superior for modern users. It uses lossless compression to save significant disk space while remaining fully compatible with Dolphin’s read-speed requirements.
Optimization and Graphic Enhancements
The true power of Dolphin lies in its ability to push hardware beyond its original limits. This section focuses on the technical tweaks that define high-end emulation.
Choosing the Right Graphics Backend (Vulkan vs. OpenGL)
In the Graphics Settings, the “Backend” dropdown is the most important toggle.
- Vulkan: This is generally the best choice for modern Windows and Android users. It offers high performance and reduced driver overhead.
- DirectX 12: Often provides the best stability for users with NVIDIA GPUs on Windows.
- Metal: The exclusive choice for macOS users, optimized for Apple Silicon.
- OpenGL: A reliable fallback if other backends cause graphical artifacts, though it is often slower.
Enhancing Visuals with Internal Resolution and Anti-Aliasing
Standard GameCube games output at 480p. On a 4K monitor, this looks pixelated. Navigate to the Enhancements tab to modify these parameters:
- Internal Resolution: Set this to 3x (1080p) or 4x (1440p) depending on your GPU. This increases the 3D rendering resolution, making edges sharp and clean.
- Anti-Aliasing (MSAA): Smoothes out “jaggies” on edges. 4x MSAA is usually the sweet spot for performance and visual quality.
- Anisotropic Filtering: Set this to 16x. It improves the clarity of textures when viewed at an angle with negligible performance cost.
Input Mapping and Controller Configuration
Dolphin supports a wide range of input devices. You can use a standard Xbox or PlayStation controller by navigating to Controllers and selecting “Standard Controller” -> “Configure.”
For the most authentic experience, users can purchase a GameCube Controller Adapter for PC. Dolphin features a “Direct Connection” mode that bypasses Windows’ standard driver layer, allowing the emulator to communicate directly with the adapter for zero-latency input and native rumble support.
Advanced Features and Technical Troubleshooting
For the power user, Dolphin offers features that extend the functionality of the original consoles, such as online play and advanced debugging tools.
Netplay: Online Multiplayer in Local Games
Dolphin’s “Netplay” feature allows you to play local multiplayer games (like Super Smash Bros. Melee) over the internet. Unlike traditional online gaming, Netplay synchronizes the state of the emulator across multiple instances.
- Setup: One player hosts a room, and others join via an IP address or a unique Room Code.
- Tech Tip: For Netplay, all players must use the same version of Dolphin and the same game revision to avoid “Desyncs,” where the game state becomes inconsistent between players.
Troubleshooting Common Performance Bottlenecks
Even with high-end hardware, software conflicts can occur.
- Shader Compilation Stutter: This happens when the GPU encounters a new effect for the first time. To fix this, go to Graphics Settings and enable “Hybrid Ubershaders” and “Compile Shaders Before Starting.” This pre-compiles the necessary shaders, ensuring a smooth framerate during gameplay.
- Audio Crackling: This usually indicates that the CPU is not maintaining 100% emulation speed. Ensure your laptop is plugged into a power source and that Windows is set to “High Performance” mode.
- Black Screen on Launch: This is often a driver issue. Update your GPU drivers to the latest version and ensure you are using the Vulkan backend.
The Importance of Digital Security
As with any software that handles external files, security is paramount. Always download Dolphin directly from dolphin-emu.org. Avoid third-party “repacks” or “portable” versions from untrusted forums, as these can contain malware or outdated, unstable code. Furthermore, ensure your game backups are verified for integrity using MD5 or SHA-1 hashes to prevent crashes caused by corrupted data.
Dolphin Emulator is a masterpiece of software engineering. By following this technical installation guide, you not only unlock a library of legendary games but also gain a deeper appreciation for the complexities of hardware abstraction and digital preservation. With the right configuration, Dolphin provides a premium gaming experience that bridges the gap between the nostalgic past and the high-performance present.
aViewFromTheCave is a participant in the Amazon Services LLC Associates Program, an affiliate advertising program designed to provide a means for sites to earn advertising fees by advertising and linking to Amazon.com. Amazon, the Amazon logo, AmazonSupply, and the AmazonSupply logo are trademarks of Amazon.com, Inc. or its affiliates. As an Amazon Associate we earn affiliate commissions from qualifying purchases.