In an increasingly connected world, the demand for faster, more reliable internet is paramount. From streaming ultra-high-definition content and engaging in real-time online gaming to supporting multiple smart home devices and facilitating remote work, our digital lives hinge on robust connectivity. Enter fiber optic internet – a technology lauded as the gold standard for its unparalleled speed, stability, and future-proofing capabilities. But while many aspire to harness its power, the question often remains: “How is fiber internet installed?”
This comprehensive guide will demystify the entire process, taking you from the initial decision to the final, high-speed connection humming in your home or office. We’ll delve into the underlying technology, the essential preparation steps, the intricate dance of outdoor and indoor installation, and what to expect once your fiber internet is up and running. Understanding these steps not only provides peace of mind but also empowers you to make informed decisions as you upgrade your digital backbone.
Understanding Fiber Optics: The Backbone of Modern Connectivity
Before we dive into the nuts and bolts of installation, it’s crucial to grasp what makes fiber optic internet so revolutionary and why it stands head and shoulders above traditional copper-based connections like DSL or cable.
What is Fiber Optic Technology?
At its core, fiber optic technology transmits data not through electrical signals, but through pulses of light. Hair-thin strands of incredibly pure glass or plastic, known as optical fibers, act as conduits, guiding these light signals over vast distances with minimal signal degradation. Each light pulse can represent a bit of data, allowing for incredibly fast and efficient transmission. This fundamental difference from electrical signals eliminates electromagnetic interference, a common culprit behind slower speeds and instability in traditional networks.
Imagine data traveling at the speed of light – that’s essentially what fiber optics enables. This optical transmission allows for symmetrical speeds (upload and download speeds that are nearly identical), incredibly low latency (minimal delay in data transmission), and massive bandwidth capacity, making it ideal for the most demanding internet users and emerging technologies.
Why Choose Fiber? The Undeniable Advantages
The benefits of fiber internet extend far beyond just raw speed, though that is undoubtedly a primary driver for many.
- Blazing Fast Speeds: Fiber can deliver gigabit (1,000 Mbps) speeds, and even multi-gigabit speeds, making downloads instantaneous, streaming seamless, and online interactions lag-free.
- Superior Reliability: Since light signals are immune to electrical interference and less susceptible to environmental factors like temperature changes or adverse weather (unless the physical line is damaged), fiber connections are remarkably stable and less prone to outages.
- Low Latency: The near-instantaneous transmission of light pulses results in significantly lower latency. This is critical for competitive online gaming, real-time video conferencing, and other applications where even milliseconds of delay can impact performance.
- Symmetrical Speeds: Unlike most cable internet, fiber typically offers symmetrical upload and download speeds. This is a huge advantage for tasks like cloud backups, large file uploads, video calls, and content creation, which often demand robust upload capabilities.
- Future-Proofing: The inherent capacity of fiber optic cables means they can handle exponentially higher bandwidth requirements as technology evolves. Investing in fiber now means you’re building a digital foundation that will serve you well for decades to come, reducing the need for frequent infrastructure upgrades.
These advantages collectively paint a clear picture of why fiber is the preferred choice for anyone serious about their internet experience, setting the stage for the installation process.
The Pre-Installation Journey: Preparing for Your Fiber Future
Before a single cable is laid or a technician steps foot on your property, a crucial preliminary phase ensures that the transition to fiber internet is as smooth as possible. This involves checking availability, scheduling, and understanding the preparatory steps.
Checking Availability: Is Fiber Coming to Your Neighborhood?
The first and most critical step is to determine if fiber optic internet is even available at your specific address. While fiber networks are expanding rapidly, they are not yet universally deployed, especially in certain rural areas or older urban developments where the cost of trenching new lines can be prohibitive.
- ISP Websites: The easiest way to check is by visiting the websites of major internet service providers (ISPs) that offer fiber in your region. Most will have a prominent “Check Availability” tool where you simply enter your address.
- Local Initiatives: Sometimes, local municipalities or community groups drive fiber infrastructure projects. Checking local news or government websites might reveal ongoing or planned deployments.
- Word of Mouth: Neighbors who already have fiber internet can be a good indicator, though availability can sometimes vary even within the same block depending on the existing infrastructure.
If fiber is not yet available, don’t despair. Many ISPs are continually expanding their networks. You might be able to sign up for notifications or express interest, which can sometimes influence future build-outs in your area.
Scheduling and Site Survey: What to Expect Before Installation Day
Once availability is confirmed, the next step is to select a plan and schedule your installation. The ISP will typically provide a range of dates and time windows for the technician’s visit.
- Ordering Service: You’ll choose your desired speed tier and any bundled services (phone, TV) and complete the sign-up process.
- Pre-Installation Communication: The ISP will often send confirmation emails or texts, potentially outlining what you need to do to prepare your home.
- Potential Site Survey: In some cases, especially for more complex installations or new build-outs, an initial site survey might be conducted a few days before the main installation. This allows the technician to assess the best entry points, identify potential obstacles, and plan the most efficient routing for the fiber line. This proactive step helps minimize surprises on installation day.
Preparation on your end usually involves ensuring clear access to areas where equipment might be installed (e.g., utility boxes, interior walls for the router) and making sure someone over 18 is present to authorize the work.
The Installation Process: Bringing Light into Your Home
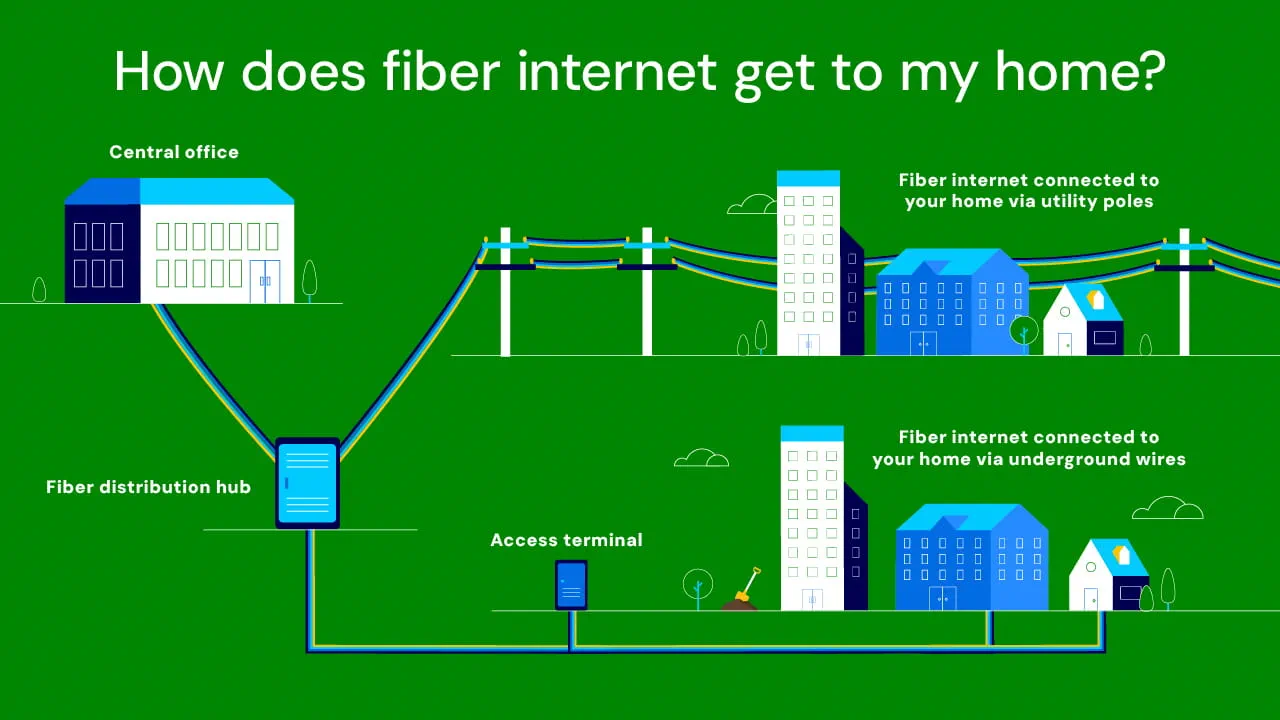
This is where the magic happens – the physical connection of your home to the fiber optic network. The installation process typically involves two main phases: outdoor work to bring the fiber to your property and indoor work to set up your home network.
Outdoor Installation: The Last Mile Connection
The “last mile” refers to the final stretch of the network that connects the main fiber backbone to your specific residence. This can be achieved in a couple of primary ways, depending on the existing infrastructure in your neighborhood.

-
Trenching or Boring (Underground Fiber):
- Process: If utilities in your area are buried, the fiber line will likely be installed underground. This involves digging a shallow trench (usually 6-12 inches deep) from the nearest fiber distribution point (often a pedestal or handhole on your property line or sidewalk) to the side of your house. In some cases, directional boring might be used to tunnel under obstacles like driveways or landscaping without extensive trenching.
- Considerations: Technicians must be careful to avoid existing underground utilities (gas, water, electrical). Utility locate services (e.g., “Call Before You Dig” in the U.S.) are typically engaged beforehand to mark these lines.
- Termination: The fiber line is then routed to a small outdoor junction box or Network Interface Device (NID) mounted on an exterior wall of your home. This NID protects the delicate fiber optic splice and acts as the official entry point for the fiber into your dwelling.
-
Aerial Drops (Overhead Fiber):
- Process: In neighborhoods with overhead utility poles, the fiber optic cable will be strung aerially from the nearest utility pole (where a fiber distribution terminal is located) directly to your home. This process is generally quicker and less disruptive than trenching.
- Considerations: The technician will ensure the cable is securely fastened, maintains adequate clearance from the ground and other structures, and is aesthetically routed.
- Termination: Similar to underground installations, the aerial fiber line will also terminate at an outdoor NID or entry point on the side of your house.
Once the outdoor fiber line is in place and secured at the NID, the technician will test the signal strength to ensure a clean, strong connection from the street to your home’s exterior.
Indoor Installation: Setting Up Your Fiber Network
With the fiber safely brought to the exterior of your home, the next steps focus on establishing your internal network.
-
Running the Fiber Line Inside:
- Entry Point: The technician will identify the most suitable point to bring the fiber optic cable from the outdoor NID into your home. This often involves drilling a small, discreet hole through an exterior wall near an existing utility entry or a convenient location for the indoor equipment.
- Routing: The internal fiber line, which is much thinner and more flexible than outdoor-rated cable, will be carefully routed from the entry point to the desired location for the Optical Network Terminal (ONT). The technician will aim to conceal the cable as much as possible, running it along baseboards, behind furniture, or through existing conduit where feasible.
-
Mounting and Powering the Optical Network Terminal (ONT):
- What is the ONT? The ONT is a critical piece of equipment that converts the optical light signals from the fiber optic cable into electrical signals (Ethernet) that your router and other devices can understand. Think of it as the “modem” for fiber internet.
- Placement: The ONT is typically mounted on an interior wall, often near an electrical outlet, as it requires continuous power. Common locations include utility closets, offices, or living rooms – ideally in a central location that’s also easily accessible to your Wi-Fi router.
- Connection: The indoor fiber line is carefully connected to the ONT, which also usually has indicator lights to show power, signal status, and connection activity.
-
Connecting the Router/Gateway:
- Ethernet Connection: An Ethernet cable is run from the ONT’s Ethernet port to the WAN (Wide Area Network) or Internet port on your Wi-Fi router or gateway. The router is the device that distributes the internet connection throughout your home, via both Wi-Fi and additional Ethernet ports.
- Router Placement: The technician will typically place the router in a central location, elevated and free from obstructions, to optimize Wi-Fi coverage throughout your home.
- Power and Configuration: The router is powered on, and the technician will access its settings to configure the connection to the ISP’s network. This often involves activating the service, setting up initial Wi-Fi network names (SSID) and passwords, and ensuring all services are communicating correctly.
-
Testing and Verification:
- Signal Strength and Speed Tests: Once all equipment is connected and configured, the technician will perform a series of tests. This includes verifying the optical signal strength at the ONT, conducting speed tests (both wired and wireless) to confirm you’re receiving the advertised speeds, and checking for proper functionality of any bundled services.
- User Demonstration: The technician will typically demonstrate the working internet connection, show you how to connect your devices, and answer any questions you might have. They’ll ensure you can browse the web, stream content, and perform basic tasks before they leave.
Essential Equipment: What Your Installer Will Set Up
Beyond the cables themselves, several key pieces of hardware are integral to a fiber internet installation.
- Optical Network Terminal (ONT): As mentioned, this is the device that translates light signals from the fiber into electrical signals for your home network. It’s usually provided and owned by the ISP.
- Wi-Fi Router/Gateway: This device takes the internet signal from the ONT and distributes it wirelessly (Wi-Fi) and via Ethernet cables to your devices. ISPs often provide a compatible router, though you may have the option to use your own.
- Fiber Optic Cables: Both outdoor-rated and indoor-rated fiber cables are used. These are specialized cables designed to protect the delicate glass strands within.
- Power Over Ethernet (PoE) Injector (Less Common but Possible): In some setups, if the ONT is placed in a location without a convenient power outlet, a PoE injector might be used to send power to the ONT over the Ethernet cable, simplifying wiring.
Post-Installation & Troubleshooting: Enjoying Your New Speed
Once the installation is complete and the technician has left, you’re ready to experience the full power of fiber internet. However, a few tips can help you maximize your experience and know what to do if issues arise.
Initial Speed Tests and Verification
After the technician departs, it’s a good practice to run your own speed tests on various devices, both wired and wireless, at different times of the day.
- Wired Test: Connect a computer directly to your router using an Ethernet cable. This will give you the most accurate reading of the speed reaching your router, bypassing potential Wi-Fi limitations.
- Wireless Test: Test on your Wi-Fi-connected devices (laptops, smartphones). Be aware that Wi-Fi speeds can vary greatly depending on distance from the router, interference, and the capabilities of your device’s Wi-Fi adapter.
- Use Reliable Speed Test Sites: Websites like Speedtest.net by Ookla, Fast.com (Netflix), or your ISP’s own speed test tool are good options.
If your wired speeds consistently fall significantly below your subscribed plan, it might warrant a call to your ISP.
Common Issues and What to Do
While fiber is highly reliable, occasional issues can occur.
- No Internet Connection:
- Check Power: Ensure the ONT and router are both powered on and their indicator lights are behaving normally (refer to your device manual for specific light patterns).
- Cable Connections: Verify all cables (fiber into ONT, Ethernet from ONT to router, power cables) are securely plugged in.
- Reboot: Power cycle both the ONT and router by unplugging them for 30 seconds and then plugging them back in, starting with the ONT first.
- ISP Outage: Check your ISP’s status page or social media for any reported outages in your area.
- Slow Speeds:
- Wired vs. Wireless: First, determine if the slow speeds are specific to Wi-Fi or if they also occur on wired connections. If it’s only Wi-Fi, consider router placement, interference, or upgrading your router.
- Network Congestion: If multiple devices are actively streaming, downloading, or gaming, your total bandwidth might be saturated.
- Device Issues: Sometimes, a specific device (e.g., an old laptop) might be the bottleneck, not your internet connection.
- Contacting Support: If basic troubleshooting doesn’t resolve the issue, contact your ISP’s technical support. Be prepared to describe the problem in detail, steps you’ve already taken, and any relevant indicator light patterns on your equipment.
Maximizing Your Fiber Experience
To truly get the most out of your fiber internet, consider these tips:
- Optimal Router Placement: Place your Wi-Fi router in a central, open location in your home, away from thick walls, large metal objects, and other electronics that can cause interference.
- Wired Connections for Critical Devices: For devices like gaming consoles, desktop PCs, and smart TVs that demand the most stable and fastest connection, use Ethernet cables whenever possible.
- Regular Router Firmware Updates: Keep your router’s firmware updated to ensure optimal performance, security, and access to new features.
- Network Security: Use a strong, unique password for your Wi-Fi network, enable WPA3 (if your router supports it), and regularly review connected devices to prevent unauthorized access.
- Consider Mesh Wi-Fi: For larger homes or those with dead zones, a mesh Wi-Fi system can extend your fiber-backed Wi-Fi coverage seamlessly throughout your entire property.

Conclusion
The installation of fiber internet is a multi-faceted process that brings a powerful, future-proof connection directly to your doorstep. From the initial availability checks to the meticulous outdoor and indoor cabling, and finally to the activation and testing of your blazing-fast network, each step is crucial. Understanding this journey not only demystifies the technology but also prepares you for what to expect, ensuring a smooth transition to a superior internet experience.
While the technical details might seem intricate, the end result – unparalleled speed, reliability, and low latency – fundamentally transforms how you interact with the digital world. By choosing fiber, you’re not just upgrading your internet; you’re investing in the digital backbone of your home or business, ready to tackle the demands of today and tomorrow’s technology trends with seamless connectivity and robust performance. Embrace the light-speed future that fiber optic internet delivers.
aViewFromTheCave is a participant in the Amazon Services LLC Associates Program, an affiliate advertising program designed to provide a means for sites to earn advertising fees by advertising and linking to Amazon.com. Amazon, the Amazon logo, AmazonSupply, and the AmazonSupply logo are trademarks of Amazon.com, Inc. or its affiliates. As an Amazon Associate we earn affiliate commissions from qualifying purchases.