In the vast digital landscape of today, where visual communication reigns supreme, fonts are far more than just arbitrary collections of characters; they are the silent architects of our digital experiences, shaping readability, conveying emotion, and establishing brand identity. From crafting a compelling resume to designing a stunning website, or even just personalizing your operating system, the ability to install and manage custom fonts is a fundamental skill for anyone interacting with digital content. This guide will demystify the process, providing you with clear, step-by-step instructions across major operating systems, alongside insights into managing your font library effectively.

Whether you’re a designer seeking the perfect typographic flourish, a content creator aiming for consistent branding, or simply an individual looking to inject more personality into your digital workspace, understanding how to install a font is a cornerstone of digital literacy. It empowers you to break free from the limitations of default system fonts and unlock a world of creative possibilities. Beyond mere aesthetics, the right font can dramatically enhance user experience, improve information retention, and even subtly influence perception – making this seemingly simple task a powerful tool in your digital arsenal. In the context of our website’s main topics, installing fonts directly impacts the “Tech” sphere by enhancing software capabilities and productivity, and significantly contributes to “Brand” by providing the visual elements for strong corporate and personal identities.
Understanding Font Files and Formats
Before we dive into the installation process, it’s crucial to understand what fonts are from a technical perspective and the various formats they come in. Knowing this will help you identify legitimate font files, understand their capabilities, and troubleshoot potential issues. Fonts are essentially software files that contain vector data defining the appearance of characters, along with metadata about kerning, leading, and other typographic properties.
Common Font Formats
The digital world has seen several font formats evolve over time, each with its own advantages and specific use cases. Understanding these will help you make informed decisions when acquiring new fonts.
- TrueType Font (TTF): Developed by Apple in the late 1980s and later adopted by Microsoft, TTF is one of the most common and widely supported font formats. It’s an older standard but still incredibly prevalent, especially for desktop publishing and general system use. TTF fonts are single files that contain both screen and print outline data, making them versatile for a wide range of applications. They are generally well-suited for everyday use and are compatible with virtually all operating systems and software.
- OpenType Font (OTF): A more advanced format co-developed by Microsoft and Adobe, OTF is essentially an extension of TTF. It offers significant advantages over TTF, primarily its ability to store a much larger character set and support advanced typographic features like ligatures, contextual alternates, small caps, and old-style figures within a single font file. This makes OTF the preferred choice for professional designers who require sophisticated typographic control. OTF fonts are also cross-platform, meaning they behave identically on Windows and macOS. Their robust feature set makes them invaluable for complex design projects, directly impacting the “Brand” aspect of consistency and sophisticated visual communication.
- Web Open Font Format (WOFF/WOFF2): These formats were specifically developed for use on the web. WOFF (Web Open Font Format) is a wrapper around TrueType or OpenType fonts, compressed to allow for faster loading times on websites. WOFF2 is an even more efficient iteration, offering better compression than WOFF. These formats are not typically installed on your operating system for general use but are instead embedded directly into web pages via CSS. They are crucial for maintaining brand consistency online, ensuring your chosen typography displays correctly across different browsers and devices, thus playing a key role in digital “Brand” strategy.
- Embedded OpenType (EOT): An older, proprietary web font format developed by Microsoft. While still supported by some older versions of Internet Explorer, its use has largely been superseded by WOFF and WOFF2 due to better cross-browser support and open standards.
- Scalable Vector Graphics (SVG) Fonts: Another web font format where the glyphs are defined as SVG paths. While supported by some browsers, they are generally less efficient and less commonly used than WOFF formats.
Where to Find Fonts
The source of your fonts is just as important as the format. Acquiring fonts from reputable sources ensures they are free from malware and correctly licensed for your intended use.
- Free Font Websites: There are numerous websites offering free fonts for personal and sometimes commercial use. Popular options include Google Fonts, Font Squirrel (which often provides licenses for commercial use), DaFont, and 1001 Free Fonts. Always check the licensing agreement for each font, as “free” often comes with restrictions, especially for commercial projects.
- Paid Font Marketplaces: For professional quality, extensive character sets, and comprehensive licensing, paid font marketplaces are the go-to. Adobe Fonts (included with Creative Cloud subscriptions), MyFonts, Fontspring, and Envato Elements offer vast libraries of high-quality fonts. Investing in professionally designed fonts, while a “Money” consideration, often pays dividends in brand consistency and legal compliance, especially for commercial entities.
- Bundled with Software: Many design applications and operating systems come bundled with a selection of fonts. Adobe Creative Suite, for example, integrates seamlessly with Adobe Fonts, providing a huge library accessible directly within applications.
- Custom-Designed Fonts: For organizations with significant branding needs, commissioning a custom font designer can create a unique and proprietary typographic identity, a significant “Brand” investment.
When downloading fonts, always look for files with .ttf or .otf extensions, or compressed archives (.zip, .rar) containing these files. Be wary of suspicious sources and always scan downloaded files with antivirus software, a critical “Tech” security practice.
Installing Fonts on Different Operating Systems
The core process of installing a font involves placing the font file into a specific system directory or using a dedicated font management utility. While the underlying principle is similar, the exact steps vary slightly between operating systems.
Installing Fonts on Windows
Windows offers a straightforward approach to font installation, with methods suitable for both quick additions and more managed environments.
-
Direct Installation (Easiest Method):
- Locate the Font File: After downloading, navigate to the folder where you saved the font file(s). You’ll typically find
.ttfor.otffiles. - Right-Click and Install: Right-click on the font file. In the context menu, you will see an option that says “Install” or “Install for all users.”
- “Install” typically installs the font only for your current user account.
- “Install for all users” requires administrative privileges and makes the font available to all user accounts on that computer. This is generally the recommended option for broader accessibility.
- Confirmation: Windows will display a small window showing the installation progress. Once complete, the font should be available in your applications.
- Locate the Font File: After downloading, navigate to the folder where you saved the font file(s). You’ll typically find
-
Using Windows Settings (Windows 10/11):
- Open Settings: Click the Start button and select the gear icon to open “Settings,” or press
Win + I. - Navigate to Personalization: In the Settings window, click on “Personalization.”
- Go to Fonts: In the left-hand pane, select “Fonts.”
- Drag and Drop: You can directly drag and drop your font files (TTF, OTF) into the “Drag and drop to install” area in this window. Windows will automatically install them.
- Browse for Fonts (Optional): Below the drag-and-drop area, you might see a link to “Get more fonts in Microsoft Store.” This allows you to explore and install fonts directly from the Microsoft Store, some of which might be free, others paid.
- Open Settings: Click the Start button and select the gear icon to open “Settings,” or press
-
Using Control Panel (Older Windows Versions / Alternative for All Users):
- Open Control Panel: Search for “Control Panel” in the Start menu and open it.
- Navigate to Fonts: Set the “View by” option to “Large icons” or “Small icons” and then click on “Fonts.”
- Install New Font: In the Fonts window, go to “File” > “Install New Font…” (If you don’t see the menu bar, press
Altto reveal it). - Browse and Install: In the “Add Fonts” dialog box, navigate to the folder where your font files are located. Select the font(s) you want to install and click “Install.” This method also installs fonts for all users.
After installation, it’s often necessary to restart any open applications (like Word, Photoshop, or your browser) for the new fonts to appear in their font lists.
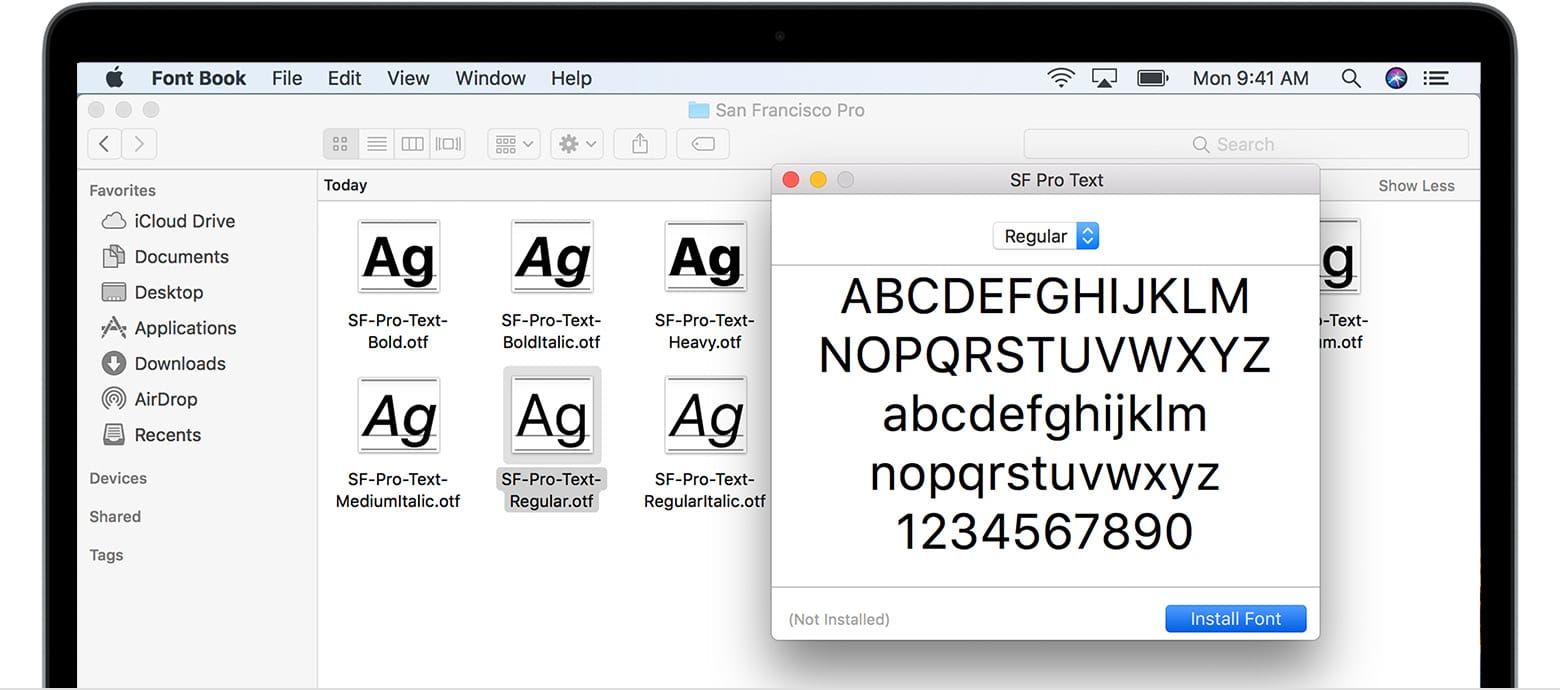
Installing Fonts on macOS
macOS, known for its strong design capabilities, provides an intuitive and powerful way to manage fonts through its built-in Font Book application.
-
Direct Installation (Simplest Method):
- Locate the Font File: Navigate to the folder containing your downloaded font files (
.ttfor.otf). - Double-Click: Simply double-click on the font file.
- Font Book Preview: Font Book, the macOS font utility, will open and display a preview of the font.
- Install Font: Click the “Install Font” button at the bottom of the Font Book window.
- Validation: Font Book will perform a quick validation check. If any issues are found (e.g., corrupt file, duplicates), it will alert you. If the validation passes, the font will be added to your font library.
- Locate the Font File: Navigate to the folder containing your downloaded font files (
-
Using Font Book (For Multiple Fonts or Advanced Management):
- Open Font Book: You can find Font Book in your Applications folder, or by searching for it using Spotlight (
Command + Space). - Drag and Drop: Once Font Book is open, you can simply drag one or multiple font files from a Finder window directly into the Font Book window. You can drop them into the “All Fonts” section, or into a specific collection you’ve created for organization.
- Add Font Button: Alternatively, click the “Add Font” button (the
+icon) in the Font Book toolbar. Navigate to your font files, select them, and click “Open.” - Validation and Installation: Similar to the direct method, Font Book will validate and install the fonts.
- Open Font Book: You can find Font Book in your Applications folder, or by searching for it using Spotlight (
User vs. System Fonts on macOS:
By default, fonts installed via Font Book are placed in your user’s Fonts folder (~/Library/Fonts/), making them available only to your user account. If you need to install a font for all users on the Mac, you can drag the font file directly into the main System Fonts folder (/Library/Fonts/). However, Font Book is generally the recommended way, as it handles permissions and validation more gracefully. For “Brand” consistency across multiple users or profiles on a shared Mac, installing for all users is beneficial.
Installing Fonts on Linux
Linux offers flexibility in font installation, ranging from graphical methods to command-line approaches, accommodating different distributions and user preferences. The most common distributions (Ubuntu, Fedora, Debian, Mint) share similar methods.
-
Graphical Installation (User Fonts – Recommended for most users):
- Locate the Font File: Navigate to the directory where your font files (
.ttfor.otf) are located using your file manager (e.g., Nautilus for GNOME, Dolphin for KDE). - Double-Click: Double-click on the font file.
- Font Viewer/Installer: A font viewer application (like GNOME Fonts or KDE Font Viewer) will open, displaying a preview of the font.
- Install Button: Click the “Install” or “Install Font” button within this application. The font will be installed into your user-specific fonts directory, typically
~/.local/share/fonts/or~/.fonts/(if it exists). These fonts are only available to your user account.
- Locate the Font File: Navigate to the directory where your font files (
-
Manual Installation (User Fonts – For Multiple Fonts or when graphical fails):
- Create User Fonts Directory: If it doesn’t already exist, create a
.fontsdirectory in your home directory. Open a terminal (Ctrl + Alt + T) and type:
bash

mkdir -p ~/.fonts
(Thepflag ensures that parent directories are created if they don’t exist). - Copy Font Files: Copy your downloaded font files into this newly created directory:
bash

cp /path/to/your/downloaded/fonts/*.ttf ~/.fonts/

cp /path/to/your/downloaded/fonts/*.otf ~/.fonts/
Replace/path/to/your/downloaded/fonts/with the actual path to your font files. - Update Font Cache: After copying, it’s good practice to update the font cache so applications recognize the new fonts:
bash

fc-cache -fv
This command forces a rebuild of the font information caches, ensuring your applications see the newly installed fonts.
- Create User Fonts Directory: If it doesn’t already exist, create a
-
System-Wide Installation (For All Users – Requires Administrative Privileges):
- Create System Fonts Directory (if needed): Fonts for all users are typically placed in
/usr/local/share/fonts/. If a specific subdirectory for your new fonts doesn’t exist, you can create one for better organization (e.g.,sudo mkdir -p /usr/local/share/fonts/my_new_fonts). - Copy Font Files: Copy the font files to the system-wide fonts directory using
sudo(for administrative privileges):
bash

sudo cp /path/to/your/downloaded/fonts/*.ttf /usr/local/share/fonts/my_new_fonts/

sudo cp /path/to/your/downloaded/fonts/*.otf /usr/local/share/fonts/my_new_fonts/
- Set Permissions (Important): Ensure the permissions are correct for all users to read the fonts:
bash

sudo chmod -R 644 /usr/local/share/fonts/my_new_fonts/

sudo chown -R root:root /usr/local/share/fonts/my_new_fonts/
- Update Font Cache: Update the system font cache:
bash

sudo fc-cache -fv
- Reboot/Log Out: For system-wide changes to take full effect, sometimes a system reboot or at least logging out and back in is recommended.
- Create System Fonts Directory (if needed): Fonts for all users are typically placed in
Linux’s flexibility means you can tailor font management to your specific needs, whether for personal customization or system-wide deployment, crucial for a consistent “Tech” environment.
Troubleshooting Common Font Installation Issues
Even with clear instructions, you might occasionally run into problems. Here are some common issues and their solutions:
Font Not Appearing in Applications
This is perhaps the most frequent issue. You’ve installed the font, but it’s nowhere to be found in Photoshop, Word, or your text editor.
- Restart Applications: Most applications load their font lists when they start up. If an application was open during the font installation, it won’t recognize the new font until it’s restarted. Close and reopen all relevant applications.
- Restart Your System: In some rare cases, especially after system-wide font installations or on Linux, a full system restart might be necessary to refresh the font cache completely.
- Check Font Name: Sometimes, the font name listed in an application might differ slightly from the file name. For example, a file named “mycoolfont.otf” might appear as “My Cool Font Regular” in the application’s font menu. Look carefully.
- Corrupt Font Cache: On macOS, you can try resetting the font cache using Font Book (File > Validate Fonts, or sometimes third-party tools are needed for a full clear). On Linux,
fc-cache -fvhelps. On Windows, you might need to delete theFNTCACHE.DATfile (found inC:WindowsSystem32) and then restart, but this is a more drastic step.
Corrupt or Invalid Font Files
If a font refuses to install or causes an error during installation, it might be damaged or improperly created.
- Re-download the Font: The simplest solution is to delete the problematic file and download it again from the original source. A network interruption during download can sometimes corrupt the file.
- Try an Alternative Source: If re-downloading from the same source doesn’t work, try finding the font (or a similar one) from a different reputable website.
- Font Validation: Font Book on macOS automatically validates fonts. On Windows, you can right-click a font file and select “Show details” or “Properties” to check for basic information, or use third-party font validation tools.
Permissions Issues
Especially when trying to install fonts for all users on Windows or Linux, you might encounter permission errors.
- Run as Administrator (Windows): If right-clicking and selecting “Install for all users” fails, try running the application (e.g., Control Panel, or a file explorer window from which you’re dragging) as an administrator.
- Use
sudo(Linux): As demonstrated in the Linux section, installing fonts into system-wide directories requiressudoprivileges for copying files and updating the cache. Ensure you’re usingsudocorrectly.
Too Many Fonts / Performance Impact
While not strictly an installation issue, having an excessive number of active fonts can slow down your system and applications, impacting “Tech” productivity.
- Font Management Software: This leads us directly to the next section. Professional font managers allow you to activate and deactivate fonts on demand, ensuring only the necessary fonts are loaded, significantly improving performance.
- Deactivate Unused Fonts: If not using a font manager, manually uninstall fonts you rarely use. On Windows, go to “Settings > Personalization > Fonts” and click on an installed font to see the “Uninstall” option. On macOS, use Font Book to select a font and click “Remove.”
Managing Your Font Library for Optimal Productivity and Branding
As your collection grows, simply installing fonts becomes insufficient. Effective font management is key to maintaining a streamlined workflow, ensuring consistency across your projects, and upholding your “Brand” identity.
The Importance of Font Management
Without proper management, a large font library can quickly become a chaotic mess. You might find yourself scrolling endlessly through application menus, struggling to locate the right typeface, or encountering performance bottlenecks. Beyond mere organization, font management directly impacts your productivity and the integrity of your visual “Brand.”
- Enhanced Productivity: A well-organized font library saves time. You can quickly find, preview, and activate fonts, avoiding frustrating searches. This is a core “Tech” benefit, streamlining workflows for designers and content creators.
- Brand Consistency: For businesses and personal brands, consistent typography is paramount. It reinforces identity, builds recognition, and conveys professionalism. A managed font library ensures that the correct brand fonts are always accessible and used appropriately across all collateral, from marketing materials to internal documents. This is a critical aspect of “Brand” strategy.
- System Performance: As noted earlier, too many active fonts can bog down your system and applications. Font managers allow you to activate fonts only when needed, minimizing system resource consumption.
- License Compliance: Professional font managers often help track font licenses, which is crucial for legal compliance, especially for commercial projects. This touches upon the “Money” aspect, as violating font licenses can lead to costly legal disputes.
Font Managers and Their Benefits
Dedicated font management software goes far beyond the basic installation features of operating systems, offering advanced functionalities for organizing, previewing, and activating fonts.
- Centralized Library: A single interface to view and manage all your installed and uninstalled fonts.
- Tagging and Categorization: Assign keywords, tags, or categories to fonts for easier searching and filtering (e.g., “serif,” “modern,” “branding,” “project X”).
- Activation/Deactivation on Demand: Turn fonts on or off without permanently uninstalling them. This is the cornerstone of performance optimization, ensuring only necessary fonts are loaded. Some managers even offer temporary activation, ideal for client projects.
- Automatic Activation: Integrate with design software (like Adobe Creative Suite) to automatically activate fonts when you open a document that uses them.
- Font Comparison and Preview: Side-by-side comparisons and customizable preview texts help you choose the perfect font quickly.
- Conflict Resolution and Validation: Identify duplicate or corrupt fonts, and resolve conflicts where different versions of a font are present.
- Cloud Sync and Collaboration: Some advanced managers offer cloud synchronization, allowing you to access your font library across multiple devices or collaborate with team members, ensuring everyone uses the correct versions of brand fonts.
Popular Font Managers:
- Adobe Fonts (Creative Cloud): If you’re an Adobe Creative Cloud subscriber, Adobe Fonts is an invaluable resource. It integrates seamlessly with Adobe applications, offering a vast library of high-quality fonts that can be activated and deactivated with a click, directly from within Photoshop, Illustrator, InDesign, etc. This is a powerful “Tech” tool for design professionals.
- Font Base (Windows, macOS, Linux): A popular free (with a paid pro version) font manager that offers a clean interface, tagging, auto-activation for Adobe apps, and Google Fonts integration. It’s an excellent choice for individuals and small teams.
- Typeface (macOS): A highly regarded, aesthetically pleasing, and feature-rich font manager for macOS users, offering excellent previewing, tagging, and organization features.
- NexusFont (Windows): A free and portable font manager for Windows, allowing you to manage fonts without installation, which can be useful for testing new fonts.
- Suitcase Fusion / Connect Fonts (Cross-Platform): A professional-grade solution from Extensis, offering robust features for large organizations, including server-based font management for collaborative teams, ensuring “Brand” consistency at scale.
How Fonts Impact Branding and Design
Fonts are arguably the most crucial element of visual branding after a logo. They communicate tone, personality, and professionalism, playing a significant role in how a “Brand” is perceived.
- Conveying Personality: A playful script font conveys a different message than a minimalist sans-serif or a classic serif. Fonts evoke emotions and set the tone for your brand’s communication.
- Readability and Accessibility: Choosing a legible font that is appropriately sized and spaced is vital for user experience. A beautiful but unreadable font defeats its purpose and can alienate your audience. This impacts both “Tech” (user interface design) and “Brand” (customer perception).
- Consistency Across Platforms: Using consistent fonts across your website, marketing materials, social media, and product interfaces reinforces your brand identity. Font managers ensure that everyone involved in brand communication uses the approved typefaces.
- Differentiation: A unique or thoughtfully chosen font can help your brand stand out from competitors. Custom fonts are a significant “Brand” investment that can yield high returns in distinctiveness.
- Professionalism and Credibility: Sloppy typography or inconsistent font usage can undermine a brand’s credibility. Professional fonts, correctly applied, communicate attention to detail and a commitment to quality.
Considering the “Money” aspect, investing in a robust font library and a good font manager might seem like an added expense, but it’s an investment in your brand’s future. It ensures legal compliance, enhances productivity, and solidifies your visual identity, ultimately contributing to your bottom line through improved customer perception and reduced operational friction.

Conclusion
Installing a font is an initial step into a broader world of digital creativity and efficiency. While the process itself is generally straightforward across operating systems, mastering font management unlocks significant advantages for anyone involved in digital content creation, design, or professional communication.
From choosing the right font format to navigating the specific installation procedures on Windows, macOS, and Linux, you now have the foundational knowledge to expand your typographic toolkit. More importantly, understanding the nuances of troubleshooting and the profound benefits of dedicated font management software empowers you to maintain a high level of “Tech” productivity, ensure unwavering “Brand” consistency, and avoid potential “Money” pitfalls related to licensing or wasted time.
Embrace the power of typography. Experiment with different typefaces, discover how they can transform your projects, and leverage font management tools to keep your digital workspace organized and optimized. The right font, correctly applied and managed, is not just a stylistic choice; it’s a strategic asset that enhances readability, strengthens your message, and solidifies your presence in the digital world.
aViewFromTheCave is a participant in the Amazon Services LLC Associates Program, an affiliate advertising program designed to provide a means for sites to earn advertising fees by advertising and linking to Amazon.com. Amazon, the Amazon logo, AmazonSupply, and the AmazonSupply logo are trademarks of Amazon.com, Inc. or its affiliates. As an Amazon Associate we earn affiliate commissions from qualifying purchases.