Ubuntu. The name itself evokes a sense of community, of open collaboration, and of powerful, free software. If you’re exploring the world of operating systems beyond the familiar, or if you’re a seasoned tech enthusiast looking to expand your horizons, you’ve likely encountered Ubuntu. But the question remains: “How can I install Ubuntu?” This comprehensive guide will walk you through the entire process, from understanding why you might choose Ubuntu to the final reboot, ensuring a smooth and successful installation.
Ubuntu, a free and open-source Linux distribution, has gained immense popularity for its user-friendliness, robust security, and incredible flexibility. Whether you’re a student needing a stable platform for your studies, a developer seeking a powerful coding environment, a creative professional looking for a system that respects your data, or simply someone who wants to break free from proprietary software, Ubuntu offers a compelling alternative. This article delves into the technical aspects of installation, but also touches upon the broader implications of choosing an operating system that aligns with your values and technological goals, a theme that resonates deeply within the “Tech” and even the “Brand” and “Money” sections of our website, hinting at the long-term benefits of adopting such a system.
Understanding Your Ubuntu Installation Journey
Before we dive into the nitty-gritty of the installation process, it’s crucial to understand what Ubuntu is and why so many people are making the switch. This section will lay the groundwork, addressing common questions and helping you prepare for a successful installation.
Why Choose Ubuntu? Beyond the “How”
The question “How can I install Ubuntu?” often stems from a desire for something different, something more controlled, or something more cost-effective. Ubuntu, developed by Canonical Ltd., is built upon the Debian Linux distribution, inheriting its stability and vast software repository. But what makes it stand out?
- Free and Open Source: This is perhaps the most significant draw. Ubuntu is free to download, use, and distribute. This means no expensive licensing fees, which can be a considerable saving, especially for businesses or educational institutions. This directly aligns with the “Money” aspect, offering tangible financial benefits. Furthermore, the open-source nature means the code is publicly available for scrutiny, fostering transparency and security.
- User-Friendly Interface: Gone are the days when Linux was perceived as solely for command-line wizards. Ubuntu boasts a polished and intuitive desktop environment (typically GNOME, though others are available) that is remarkably similar to other mainstream operating systems, making the transition for new users relatively painless. This addresses the “Tech” aspect of user experience and accessibility.
- Robust Security: Ubuntu has a strong reputation for security. Its open-source nature allows for rapid identification and patching of vulnerabilities. Regular updates and a focus on security best practices make it a secure choice for both personal and professional use. This is a core concern within the “Digital Security” sub-topic of “Tech.”
- Vast Software Repository: Ubuntu’s package management system (APT) provides access to tens of thousands of free software applications. From office suites like LibreOffice to creative tools like GIMP and Blender, and development tools like VS Code and Docker, you’ll find almost anything you need readily available. This empowers users with choice and avoids vendor lock-in, contributing to the “Productivity” and “Apps” areas of “Tech.”
- Community Support: A massive and active global community surrounds Ubuntu. If you encounter an issue, there’s a high probability that someone has faced it before and a solution exists on forums, wikis, and dedicated websites. This community aspect is also reminiscent of the collaborative spirit often discussed in “Brand” strategy and personal development.
Preparing for Installation: Essential Steps
Before you can install Ubuntu, a few preparatory steps will ensure a smooth and error-free process. Skipping these can lead to frustration down the line.
Assessing Your Hardware and System Requirements
While Ubuntu is designed to be efficient, it’s always good to ensure your hardware is up to the task. Generally, Ubuntu is quite forgiving and can run on older hardware, breathing new life into machines that might struggle with newer versions of proprietary operating systems.
- Minimum System Requirements (for Ubuntu Desktop LTS):
- 2 GHz dual-core processor or better
- 4 GB of RAM (system memory)
- 25 GB of hard-drive space
- A screen resolution of 1024×768
- A USB port or DVD drive for installation media
While these are the minimums, more RAM and storage will provide a snappier and more enjoyable experience, especially if you plan to run multiple applications or virtual machines. This preparation phase relates to understanding the technical specifications before undertaking a “Tech” implementation.
Choosing the Right Ubuntu Version
Ubuntu offers several versions, each catering to different needs. For most users, especially those new to Ubuntu, the Long-Term Support (LTS) version is highly recommended.
- LTS (Long-Term Support): These versions are released every two years and receive security updates and maintenance for five years. They are the most stable and reliable choice for most users, offering a predictable and secure computing experience. This focus on stability and long-term reliability can be seen as analogous to building a strong “Brand” or ensuring sustainable “Financial” health.
- Standard Releases: These are released every six months and are supported for nine months. They offer newer features and software but require more frequent upgrades. They are best suited for users who want the latest technology and are comfortable with frequent updates.
For this guide, we will focus on installing the latest LTS version, as it represents the most common and practical choice for new installers.
Downloading the Ubuntu ISO Image
The Ubuntu installation media is distributed as an ISO file, a disk image that contains the entire operating system. You’ll need to download this file from the official Ubuntu website.
- Visit the Ubuntu Download Page: Go to ubuntu.com/download/desktop.
- Select the LTS Version: Choose the latest LTS version (e.g., Ubuntu 22.04 LTS).
- Download the ISO: Click the download button. The file size can be substantial (several gigabytes), so ensure you have a stable internet connection.
This download is the digital “blueprint” for your new operating system, a crucial “Tech” asset.
Creating Bootable Installation Media
Once you have the ISO file, you need to transfer it to a bootable medium – typically a USB drive or a DVD. A USB drive is generally faster and more convenient.
-
For Windows: You can use a free tool like Rufus or balenaEtcher.
- Download and run the chosen tool.
- Select your downloaded Ubuntu ISO file.
- Select your USB drive (ensure it has at least 8GB of space and that all important data on it is backed up, as the process will erase its contents).
- Click “Start” or “Flash” to create the bootable USB.
-
For macOS and Linux: balenaEtcher is an excellent cross-platform option. The process is similar to the Windows instructions.
This bootable media is your “key” to unlocking the Ubuntu installation, a critical “Tech” step.
Backing Up Your Existing Data
This is perhaps the most critical step before any operating system installation, especially if you are dual-booting or overwriting an existing system.
- Identify Important Files: Documents, photos, videos, personal configurations, and any other data you cannot afford to lose.
- Use External Storage: Copy your important files to an external hard drive, a cloud storage service, or another reliable backup location.
- Consider a Full System Backup (Optional but Recommended): For added peace of mind, consider creating a full backup of your current operating system and data. This can be done using built-in tools or third-party backup software.
This proactive data management aligns with “Digital Security” principles and prudent “Personal Finance” habits – safeguarding your digital assets.
The Ubuntu Installation Process: Step-by-Step
With your preparation complete, you’re ready to embark on the installation. This section will guide you through the on-screen prompts and essential choices.
Booting from Installation Media
The first step is to tell your computer to start from the USB drive or DVD you created, rather than its usual hard drive.
- Insert the Bootable Media: Plug in your USB drive or insert your DVD into the computer.
- Restart Your Computer: Reboot your machine.
- Access the Boot Menu/BIOS/UEFI: As your computer starts up, you’ll need to press a specific key to enter the boot menu or BIOS/UEFI settings. The key varies by manufacturer, but common keys include
F2,F10,F12,Delete, orEsc. You’ll usually see a message on the screen during startup indicating which key to press. - Select Your Boot Device: In the boot menu, select your USB drive or DVD as the primary boot device.
- Save and Exit: Save your changes and exit the BIOS/UEFI. Your computer should now boot from the Ubuntu installation media.
This initial step is a crucial technical hurdle, requiring a basic understanding of your computer’s hardware initialization.
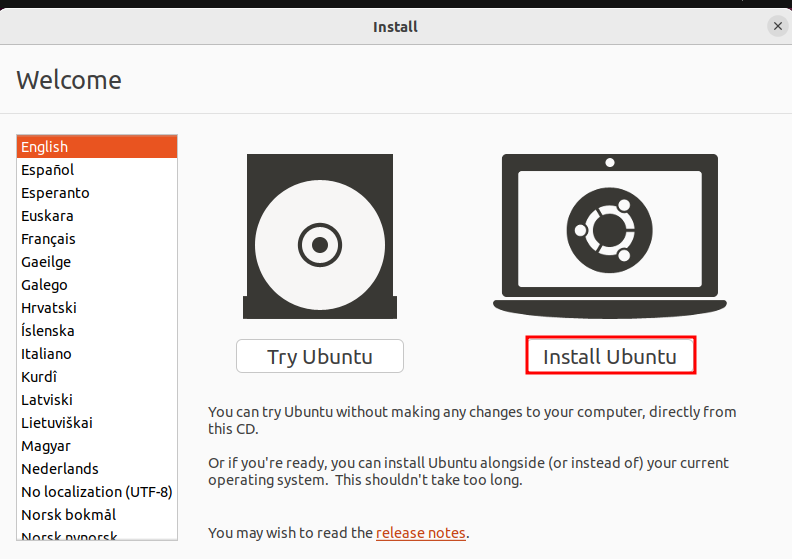
Choosing “Try Ubuntu” or “Install Ubuntu”
Once Ubuntu boots from the media, you’ll be presented with a welcome screen. You have two main options:
- Try Ubuntu: This is an excellent option for new users. It allows you to run Ubuntu directly from the USB drive or DVD without making any changes to your hard drive. You can explore the desktop, test your hardware compatibility, and get a feel for the operating system. This is a risk-free way to evaluate if Ubuntu is the right choice for you.
- Install Ubuntu: This option will begin the actual installation process, guiding you through partitioning your hard drive and setting up Ubuntu.
For this guide, we will proceed with “Install Ubuntu.”
Installation Type: Erase Disk and Install, Something Else, or Dual Boot

This is one of the most critical decisions during the installation. You’ll be presented with several options:
Option 1: Erase Disk and Install Ubuntu (Recommended for New Installations)
If you want Ubuntu to be the only operating system on your computer, and you’ve backed up all your data, this is the simplest and most straightforward option.
- Process: Ubuntu will automatically erase your entire hard drive and install Ubuntu. This is ideal if you’re installing Ubuntu on a brand-new computer or if you want to completely replace your current operating system.
- Caution: This will delete ALL data on the selected drive. Double-check that you have backed up everything important.
Option 2: Install Ubuntu alongside [Existing OS] (Dual Booting)
If you want to keep your current operating system (like Windows) and install Ubuntu alongside it, this is the option for you.
- Process: Ubuntu will attempt to detect your existing operating system and offer to resize its partition to make space for Ubuntu. You’ll be presented with a slider to allocate space for each OS.
- Benefits: This allows you to choose which operating system to boot into each time you start your computer.
- Considerations: Requires careful partition management. It’s crucial to have a good understanding of your disk partitioning before proceeding.
Option 3: Something Else (Manual Partitioning)
This advanced option gives you complete control over disk partitioning. You can create, delete, and modify partitions manually.
- When to Use: This is for experienced users who want to set up custom partition schemes, such as separate partitions for
/home,/var, or swap. - Complexity: This option has a steeper learning curve and is not recommended for beginners unless you understand Linux file system structures and partitioning.
For the purpose of this general guide, we will assume you are either choosing “Erase Disk and Install Ubuntu” or “Install Ubuntu alongside [Existing OS]” as these are the most common scenarios for new installers.
Setting Up Your Location, Keyboard Layout, and User Account
After selecting your installation type, Ubuntu will guide you through some basic configuration steps.
- Select Your Location: Choose your geographical location to set the correct time zone.
- Choose Your Keyboard Layout: Select your preferred keyboard layout. You can test it to ensure it’s correct.
- Create Your User Account:
- Your Name: Enter your full name.
- Your Computer’s Name: This is how your computer will be identified on a network (e.g., “my-ubuntu-pc”).
- Username: This is the name you will use to log in (e.g., “john.doe”).
- Password: Choose a strong, memorable password. You will be asked to confirm it.
- Login Options: You can choose to log in automatically or require your password. For better security, it’s recommended to require your password.
This setup is like creating your digital identity within the operating system, a key aspect of “Personal Branding” and digital security.
The Installation Begins: Waiting and Monitoring
Once you’ve completed these steps, Ubuntu will start copying files and configuring your system. This process can take anywhere from 15 minutes to over an hour, depending on your computer’s speed and the chosen installation options.
- What’s Happening: During this time, the installer is writing the operating system files to your hard drive, setting up system services, and installing essential applications.
- What You Can Do: The installer often displays a slideshow highlighting Ubuntu’s features. You can also relax and wait.
This is the core “Tech” implementation phase, where the digital blueprint is materialized onto your hardware.
Completing the Installation and Restarting
When the installation is finished, you will see a message indicating that the installation is complete. You’ll be prompted to restart your computer.
- Restart Your Computer: Click the “Restart Now” button.
- Remove Installation Media: You will be prompted to remove the USB drive or DVD. It’s crucial to do this before your computer boots again, otherwise, it might boot back into the installer.
- Boot into Your New Ubuntu System: Your computer will now boot into your newly installed Ubuntu operating system. If you dual-booted, you’ll see a boot menu where you can select either Ubuntu or your other operating system.
Post-Installation: Getting Started with Ubuntu
Congratulations! You’ve successfully installed Ubuntu. Now it’s time to explore your new operating system and get it set up to your liking.
First Boot and Initial Setup
Upon your first login, you might be greeted with a “Welcome to Ubuntu” screen. This screen offers helpful links to:
- Connect Online Accounts: Link services like Google, Microsoft, or social media accounts.
- Live Patch: A feature that allows some security updates to be applied without requiring a reboot.
- Set Up Live Session: This is related to “Try Ubuntu” and is less relevant after installation.
- Find More Apps: This directs you to the Ubuntu Software Center.
- Help Ubuntu: Learn how to contribute to Ubuntu.
This initial setup is akin to the first steps in defining your “Personal Brand” online and optimizing your “Productivity” tools.
Updating Your System
It’s crucial to ensure your system is up-to-date with the latest security patches and software versions.
- Open the Software Updater: You can find this by searching for “Software Updater” in the application menu.
- Check for Updates: The Software Updater will scan for available updates.
- Install Updates: Click “Install Now” to download and apply the updates. You may be prompted for your password.
Regular updates are fundamental to maintaining “Digital Security” and ensuring your “Tech” stack is robust.
Exploring the Ubuntu Software Center
The Ubuntu Software Center is your gateway to thousands of free and paid applications. It’s a user-friendly way to discover, install, and manage software.
- Browse Categories: Explore software by categories like Productivity, Graphics, Internet, Games, and more.
- Search for Applications: Use the search bar to find specific software.
- Install Applications: Click on an application and then click “Install.”
This empowers you with choice and access to a wealth of “Apps,” directly contributing to your “Productivity” and fulfilling various “Tech” needs.
Customizing Your Ubuntu Experience
Ubuntu offers extensive customization options to tailor your desktop to your preferences.
- Appearance Settings: Change your wallpaper, theme, icons, and font sizes through the “Settings” application.
- Dock and Dash: Configure the behavior of the dock (the sidebar with application icons).
- Notifications: Manage how and when applications notify you.
Customizing your environment enhances your “Productivity” and can even contribute to your sense of “Personal Branding” in the digital realm.

Embracing the Ubuntu Ecosystem
Installing Ubuntu is more than just putting an operating system on your computer; it’s about joining a movement towards open, secure, and user-centric technology. Whether you’re looking to save money, enhance your digital security, boost your productivity, or simply explore new technological frontiers, Ubuntu offers a compelling and rewarding experience. As you become more comfortable with Ubuntu, you’ll discover its vast potential, from powerful command-line tools for developers to a stable platform for creative endeavors. The journey of installing Ubuntu is the first step in unlocking a world of possibilities, one that aligns with the core values of our “Tech,” “Brand,” and “Money” focused discussions.
aViewFromTheCave is a participant in the Amazon Services LLC Associates Program, an affiliate advertising program designed to provide a means for sites to earn advertising fees by advertising and linking to Amazon.com. Amazon, the Amazon logo, AmazonSupply, and the AmazonSupply logo are trademarks of Amazon.com, Inc. or its affiliates. As an Amazon Associate we earn affiliate commissions from qualifying purchases.