For Mac users, diving into the vast world of PC gaming has never been easier, thanks to Steam. Valve’s digital distribution platform has become synonymous with modern gaming, offering an unparalleled library of titles, robust community features, and convenient digital purchases. While the Mac operating system has its own curated app store and a growing selection of native games, Steam unlocks a significantly larger universe of gaming experiences. Whether you’re a seasoned gamer looking to expand your library or a newcomer curious about what all the fuss is about, this comprehensive guide will walk you through the straightforward process of installing and setting up Steam on your Mac. We’ll cover everything from downloading the installer to launching your first game, ensuring a smooth and enjoyable experience.
Understanding Steam and Its Benefits for Mac Users
Before we jump into the installation process, it’s crucial to understand what Steam is and why it’s such a game-changer for Mac users. At its core, Steam is a digital storefront and gaming platform. Developed by Valve, it allows users to purchase, download, and play video games on their computers. However, its functionality extends far beyond mere game acquisition.
The Power of a Unified Gaming Ecosystem
One of the primary advantages of Steam is its unified gaming ecosystem. Instead of managing installations and updates from numerous individual developers or websites, Steam consolidates your entire game library in one convenient location. This means a single login grants you access to thousands of games, from AAA blockbusters to indie gems. For Mac users, this is particularly impactful because it bridges the gap between the Mac and Windows gaming worlds. While not every PC game is available on macOS, Steam’s compatibility layers and the increasing number of native Mac ports mean that a vast majority of popular titles are accessible.
Beyond Just Games: Community and Features
Steam isn’t just about buying and playing games; it’s a thriving community hub. It offers features like:
- Friend Lists and Chat: Connect with your friends, see what they’re playing, and invite them to join your games.
- User Reviews: Make informed purchasing decisions by reading reviews from fellow gamers.
- Workshop: For many games, the Steam Workshop allows players to create and share custom content, from new levels and items to gameplay modifications.
- Achievements: Track your progress and compete with friends by unlocking in-game achievements.
- Cloud Saves: Your game progress is automatically backed up to Steam’s cloud servers, allowing you to pick up where you left off on any Mac (or even a PC) with Steam installed.
- Regular Sales and Discounts: Steam is renowned for its frequent and deep discounts, especially during major seasonal sales events like the Summer Sale and Winter Sale. This makes acquiring games more affordable than ever.
Navigating Mac Compatibility
It’s important to acknowledge that while Steam is available on Mac, not every game on Steam is compatible with macOS. Developers must create specific versions of their games for Apple’s operating system. However, Valve and many third-party developers have made significant strides in bringing popular titles to Mac. You can easily filter the Steam store to show only macOS-compatible games, ensuring you only browse titles that will work on your machine. Furthermore, technologies like Proton, which allow Windows games to run on Linux, are being explored for potential future macOS compatibility, further expanding the possibilities.
Step-by-Step Guide to Installing Steam on Your Mac
Installing Steam on your Mac is a straightforward process, similar to installing any other application. The entire operation should take just a few minutes.
Downloading the Steam Installer
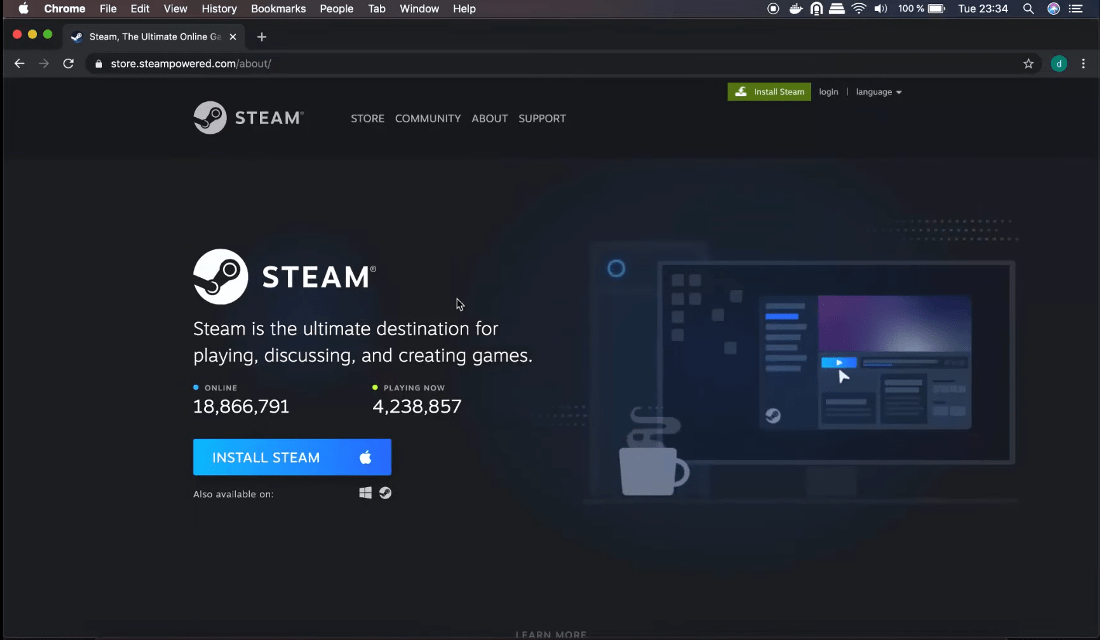
- Open Your Web Browser: Launch your preferred web browser (Safari, Chrome, Firefox, etc.) on your Mac.
- Navigate to the Official Steam Website: In the address bar, type
store.steampowered.comand press Enter. This will take you to the official Steam store. - Locate the Download Button: On the Steam store homepage, look for a prominent button or link that says “Install Steam.” It’s usually located in the top right corner of the page. Click on this button.
- Select the macOS Version: You will be directed to a download page. Here, you’ll see options for different operating systems. Click on the button that says “Install Steam” and explicitly mentions macOS or has an Apple logo.
- Download the
.dmgFile: This will initiate the download of a disk image file, typically namedSteamInstaller.dmg. Save this file to a location you can easily find, such as your Downloads folder.
Installing the Steam Application
Once the SteamInstaller.dmg file has finished downloading, you’re ready to proceed with the installation.
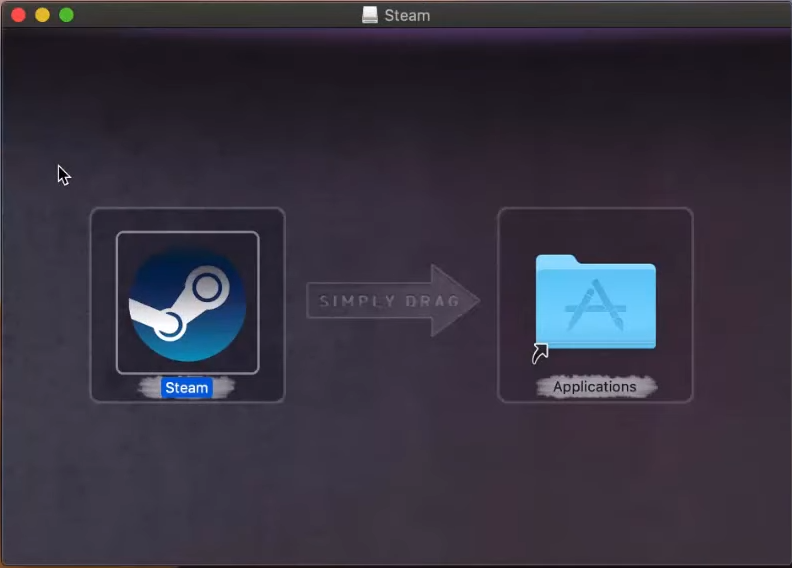
- Open the Downloaded
.dmgFile: Navigate to the folder where you savedSteamInstaller.dmgand double-click on it. This will mount the disk image, and a new window will appear on your desktop, resembling a virtual drive. - Drag the Steam Icon to Applications: Inside this new window, you’ll typically see the Steam application icon and a shortcut to your Applications folder. To install Steam, simply click and drag the Steam icon and drop it onto the Applications folder icon.
- Wait for the Copying Process: Your Mac will now copy the Steam application files to your Applications folder. This usually takes only a moment.
- Eject the Disk Image: Once the copying is complete, you can safely eject the Steam disk image. You can do this by dragging the Steam disk icon from your desktop to the Trash can (which will change to an eject symbol) or by right-clicking on the disk image icon and selecting “Eject.”
First Launch and Account Setup
The most crucial step is launching Steam for the first time and either logging into an existing account or creating a new one.
- Launch Steam: Open your Applications folder and double-click on the Steam icon.
- Initial Update: The first time you launch Steam, it will likely need to download updates to ensure you have the latest version of the client. This process is automatic. It might take a few minutes depending on your internet connection.
- Login or Create an Account: Once the updates are complete, the Steam login window will appear.
- Existing Account: If you already have a Steam account, enter your username and password in the respective fields and click “Login.”
- New Account: If you are new to Steam, click on the “Create a New Account…” link. You will be guided through a process that involves choosing a username, setting a password, providing an email address, and agreeing to the Steam Subscriber Agreement and Privacy Policy. Make sure to choose a strong, unique password and keep your account details secure.
- Steam Client Loads: After logging in, the main Steam client window will appear. You’re now ready to explore the store, manage your library, and connect with friends.
Exploring the Steam Interface and Your Game Library
With Steam successfully installed and your account logged in, you’re ready to explore its features and start building your game library. The Steam interface is designed to be intuitive, offering various sections to manage your gaming experience.
Navigating the Steam Interface
The main Steam window is divided into several key sections, accessible via tabs at the top:
- Store: This is where you can browse, search for, and purchase new games. You’ll find new releases, bestsellers, special offers, and curated lists. Remember to use the operating system filter to ensure you’re only seeing macOS-compatible titles.
- Library: This is your personal collection of games. Once you purchase a game, it will appear here. You can sort, filter, and search your library to quickly find the game you want to play. Each game entry provides access to its installation, launch, and update options.
- Community: This section connects you with the broader Steam community. Here, you can access forums, browse user-created content, participate in discussions, and check out community hubs for your favorite games.
- Profile: This is where you manage your personal Steam profile, view your achievements, friends list, and game statistics.
Installing Your First Game
Now for the exciting part – installing a game!
- Browse the Store: Navigate to the “Store” tab. You can use the search bar to look for a specific game, or you can browse categories like “New and Trending,” “Top Sellers,” or “Specials.”
- Select a Game: Click on a game that interests you. On the game’s product page, you’ll find descriptions, screenshots, videos, system requirements, and user reviews. Ensure the game lists macOS as a compatible platform.
- Purchase the Game: If you decide to buy the game, click the “Add to Cart” button. Follow the prompts to complete the purchase using your chosen payment method. Steam supports a variety of payment options, including credit cards, PayPal, and Steam Wallet funds.
- Go to Your Library: Once purchased, the game will appear in your “Library” tab.
- Install the Game: Click on the game title in your library. You will see an “Install” button. Click this button.
- Choose Installation Location: Steam will prompt you to choose an installation directory. For most users, the default location is perfectly fine. Click “Next” to begin the download and installation process.
- Download and Installation: The game will now download and install. You can monitor the progress in the “Downloads” section at the bottom of the Steam window.
- Play the Game: Once the download and installation are complete, the “Install” button in your library will change to a “Play” button. Click this to launch your newly installed game!

Managing Game Updates and Settings
Steam automatically handles game updates, but you have some control over the process.
- Automatic Updates: By default, Steam will automatically download and install updates for your games when they become available. This ensures your games are always up-to-date with the latest features and bug fixes.
- Manual Updates: You can also force an update by right-clicking on a game in your library and selecting “Update game.”
- Scheduled Updates: You can configure Steam to download updates only during specific times to avoid impacting your internet speed during peak usage. Go to
Steam > Preferences > Downloadsand look for the “Download Restrictions” section. - Game Settings: Within your library, you can often access game-specific settings, including graphics options, controller configurations, and language preferences.
By following these steps, you’ll have Steam up and running on your Mac, ready to provide you with an endless source of entertainment and a gateway to one of the largest gaming communities in the world. Happy gaming!
aViewFromTheCave is a participant in the Amazon Services LLC Associates Program, an affiliate advertising program designed to provide a means for sites to earn advertising fees by advertising and linking to Amazon.com. Amazon, the Amazon logo, AmazonSupply, and the AmazonSupply logo are trademarks of Amazon.com, Inc. or its affiliates. As an Amazon Associate we earn affiliate commissions from qualifying purchases.