
In the rapidly evolving landscape of technology, the ability to efficiently manage and deploy diverse computing environments is paramount. For individuals and businesses alike, the pursuit of robust, flexible, and cost-effective virtualization solutions is a constant. This is where Proxmox Virtual Environment (Proxmox VE) shines, offering a comprehensive, open-source platform for managing virtual machines (VMs) and containers. Whether you’re an IT professional looking to optimize server resources, a developer needing isolated testing environments, or a tech enthusiast keen on exploring the frontiers of home lab virtualization, understanding how to install Proxmox is your crucial first step.

This article will guide you through the entire process of installing Proxmox VE, demystifying each stage and equipping you with the knowledge to set up your own powerful virtualization server. We will delve into the essential prerequisites, the step-by-step installation procedure, and essential post-installation configurations. By the end of this tutorial, you’ll be well on your way to leveraging the full potential of Proxmox VE.
Understanding Proxmox VE: More Than Just Virtualization
Before we dive into the installation, it’s important to grasp what makes Proxmox VE a compelling choice. Proxmox VE isn’t just another hypervisor; it’s a feature-rich platform that consolidates KVM (Kernel-based Virtual Machine) for full virtualization and LXC (Linux Containers) for lightweight containerization within a single, intuitive web-based interface. This dual approach allows for unparalleled flexibility, enabling you to run a wide array of operating systems and applications with optimized resource utilization.
The open-source nature of Proxmox VE means it’s free to download and use, making it an incredibly attractive option for budget-conscious individuals and organizations. However, it also offers optional commercial support subscriptions, providing peace of mind and professional assistance when needed.
Key Benefits of Proxmox VE:
- Open-Source and Cost-Effective: Eliminate licensing fees and enjoy a powerful virtualization solution.
- Unified Management: Control VMs and containers through a single, user-friendly web interface.
- KVM and LXC Integration: Benefit from the power of full hardware virtualization and the efficiency of containerization.
- High Availability and Clustering: Easily set up resilient environments with features like live migration and clustering.
- Built-in Backup and Restore: Secure your data and configurations with robust backup tools.
- Storage Flexibility: Supports various storage technologies, including local storage, NFS, iSCSI, Ceph, and more.
- Active Community: Access a vast pool of knowledge and support from a vibrant user community.
Prerequisites for Proxmox VE Installation
A successful Proxmox VE installation hinges on proper preparation. Ensuring you meet the following prerequisites will significantly smoothen the process and prevent potential roadblocks.
1. Hardware Requirements
Proxmox VE is relatively lightweight but requires adequate hardware to run virtual machines and containers effectively.
- CPU: A 64-bit processor (x86-64) is mandatory. Modern multi-core processors are highly recommended for optimal performance, especially if you plan to run multiple VMs or resource-intensive applications.
- RAM: A minimum of 2GB of RAM is required for the Proxmox VE host itself. However, this is just the bare minimum. For running even a few basic VMs, you should aim for at least 8GB of RAM, with 16GB or more being ideal for serious virtualization workloads. Remember that the RAM allocated to your VMs and containers will also be consumed.
- Storage:
- For the Proxmox VE installation: You’ll need at least 32GB of free space on a storage device for the Proxmox VE operating system and its core components. A dedicated SSD is highly recommended for the OS drive for faster boot times and overall system responsiveness.
- For Virtual Machines and Containers: You will need additional storage for your virtual disks and container images. The amount required depends entirely on your intended use. Consider SSDs for performance-critical VMs, while HDDs can be suitable for less demanding workloads or bulk storage.
- Network Interface Card (NIC): At least one network interface card is essential for accessing the Proxmox VE web interface and for network connectivity of your VMs and containers. A second NIC is beneficial for dedicated management or storage network traffic.
- BIOS/UEFI Settings:
- Virtualization Support: Ensure that Intel VT-x (for Intel CPUs) or AMD-V (for AMD CPUs) is enabled in your system’s BIOS/UEFI settings. This is a critical requirement for Proxmox VE to function correctly. This setting is often found under CPU configuration or advanced settings.
- Boot Order: Configure the boot order in your BIOS/UEFI to prioritize the installation media (USB drive or DVD) you’ll be using.
2. Installation Media
You will need to create a bootable installation medium for Proxmox VE.
- Proxmox VE ISO Image: Download the latest stable ISO image from the official Proxmox website (https://www.proxmox.com/en/downloads). Choose the “No Subscription” version for a free installation.
- USB Drive (Recommended): A USB flash drive of at least 4GB is the most convenient way to create a bootable installer.
- DVD Drive (Optional): If you prefer, you can burn the ISO image to a DVD.
- ISO Writing Tool: You’ll need a tool to write the downloaded ISO image to your USB drive or DVD. Popular choices include:
- Rufus (Windows)
- balenaEtcher (Windows, macOS, Linux)
- dd command (Linux/macOS – use with extreme caution!)
Step-by-Step Proxmox VE Installation Guide
With your hardware prepared and your installation media ready, let’s walk through the installation process.
1. Booting from Installation Media
- Insert your bootable Proxmox VE USB drive into the target server.
- Restart or power on the server.
- Access your system’s BIOS/UEFI settings by pressing the appropriate key during boot (commonly
Del,F2,F10, orF12). - Navigate to the boot order settings and ensure your USB drive (or DVD drive) is set as the first boot device.
- Save your BIOS/UEFI changes and exit. The server should now boot from the Proxmox VE installation media.
2. The Proxmox VE Installer
Upon booting, you will be presented with the Proxmox VE installer menu.
-
Proxmox VE Installer: Select the first option, “Install Proxmox VE“.
-
End-User License Agreement (EULA): Carefully read and accept the terms of the GNU Affero General Public License. Click “I Agree“.
-
Target Hard Disk: This is where you select the storage device where Proxmox VE will be installed.
- Choose the hard drive where you want to install Proxmox VE.
- Warning: All data on the selected drive will be erased during installation. Double-check your selection!
- Click “Next“.
-
Country, Timezone, and Keyboard Layout:
- Select your Country.
- Choose your Timezone.
- Select your Keyboard Layout.
- Click “Next“.
-
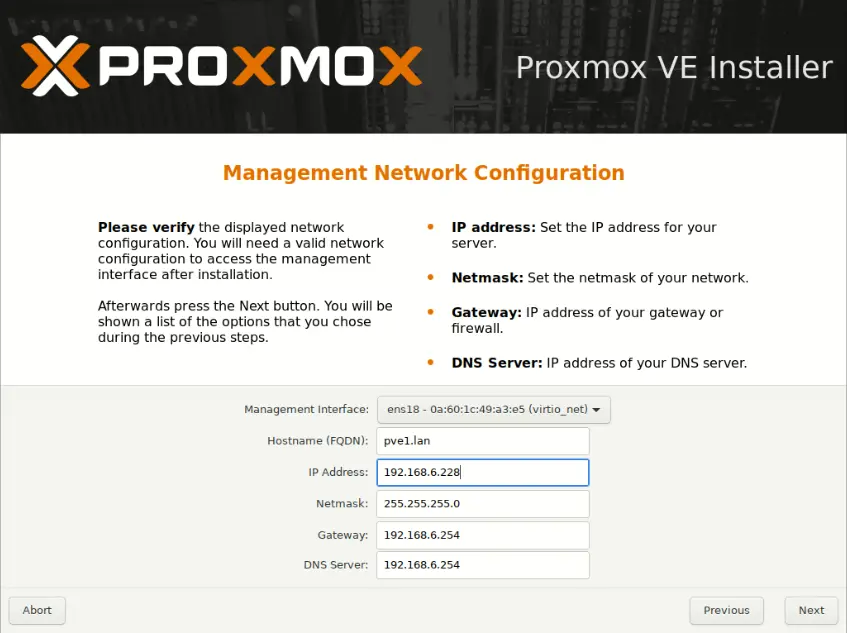
Proxmox VE Hostname and IP Address: This is a crucial configuration step.
- Hostname: Enter a fully qualified domain name (FQDN) for your Proxmox VE server. For example,
pve.yourdomain.localor simplypve. - IP Address: Assign a static IP address to your Proxmox VE server. This IP address will be used to access the web interface and for network communication.
- Netmask: Enter the subnet mask for your network (e.g.,
255.255.255.0). - Gateway: Provide the IP address of your network’s default gateway.
- DNS Server: Enter the IP address of your DNS server. You can often use your gateway’s IP or a public DNS server like
8.8.8.8. - Click “Next“.
- Hostname: Enter a fully qualified domain name (FQDN) for your Proxmox VE server. For example,
-
Root Password: Set a strong password for the
rootuser. This password will be used to log in to the Proxmox VE web interface and for administrative tasks via the command line. Do not forget this password!- Enter your password twice for confirmation.
- Click “Next“.
-
Installation Summary: Review all your chosen settings. If everything looks correct, click “Install“.
-
Installation Process: The installer will now proceed to install Proxmox VE onto your selected hard drive. This process can take several minutes.
-
Installation Complete: Once the installation is finished, you will see a message indicating that the installation is complete. You will be prompted to reboot your system.
-
Remove Installation Media: Before rebooting, remove the USB drive or DVD from the server. If you don’t, the system might boot from the installation media again.
3. First Boot and Web Interface Access
After rebooting, your Proxmox VE server will start up. You will see a text-based console interface with information about your server’s network configuration and a URL to access the Proxmox VE web interface.
- Accessing the Web Interface: Open a web browser on a computer connected to the same network as your Proxmox VE server. Navigate to the IP address you assigned during the installation, using
https://followed by the IP address. For example:https://192.168.1.100:8006. - Security Warning: You will likely receive a security warning from your browser because Proxmox VE uses a self-signed SSL certificate. This is normal for the initial setup. You can proceed by accepting the risk or adding an exception.
- Login: On the Proxmox VE login page, enter:
- Username:
root - Password: The password you set during the installation.
- Click “Login“.
- Username:
You are now logged into the Proxmox VE web interface, your central hub for managing your virtualization environment.
Essential Post-Installation Configuration
While Proxmox VE is functional immediately after installation, several post-installation steps are highly recommended to optimize its performance, security, and usability.
1. Updating Proxmox VE
Keeping your Proxmox VE installation up-to-date is crucial for security patches, bug fixes, and new features.
- In the Proxmox VE web interface, navigate to Node -> Updates.
- Click the “Refresh” button to check for available updates.
- If updates are found, click the “Upgrade” button.
- A console window will appear, showing the update process. Review the output and ensure there are no critical errors.
- It’s good practice to reboot your Proxmox VE node after significant updates.
2. Configuring Repositories (Sources)
Proxmox VE uses repositories to deliver updates and additional software. The default subscription repository requires a valid subscription. For free usage, you’ll typically use the “no-subscription” repository.
- Navigate to Node -> Repositories.
- You’ll likely see entries for
pve-enterprise(the subscription repository) andpve-no-subscription. - Disable
pve-enterprise: Select thepve-enterpriserepository and click “Disable“. This prevents errors if you don’t have a subscription. - Enable
pve-no-subscription: Ensure that thepve-no-subscriptionrepository is enabled. If it’s not present, you might need to add it manually. - Additional Repositories (Optional): For access to more software, you can enable the
cephandlocalrepositories if needed. - After making changes, click “Refresh” under the Updates tab to rescan for packages.
3. Network Configuration Refinement
While basic network settings are configured during installation, you might need to fine-tune them.
- Navigate to Node -> Network.
- Here you can view and edit your network interfaces.
- Bridge Network (vmbr0): This is typically your primary network bridge, used by VMs to access the network. You can adjust its IP address, netmask, and gateway here.
- Adding New Interfaces: You can add new network bridges or bonds to accommodate more complex network setups.
- Apply Changes: After making any network configuration changes, click “Apply Configuration” to activate them.
4. Storage Configuration
Proxmox VE needs storage to host your virtual disks and container images.
- Navigate to Node -> Storage.
- By default, you’ll likely have a local directory storage.
- Add New Storage: Click “Add” to configure different storage types:
- Directory: A simple folder on a local or mounted filesystem.
- LVM-Thin: A popular choice for flexible LVM volumes.
- Ceph: For distributed storage solutions.
- NFS/CIFS: For network-attached storage.
- iSCSI: For block-level storage over a network.
- ZFS: For advanced storage features.
- Configure the storage according to your needs, providing the necessary details like mount points, pool names, or IP addresses.
Conclusion
Congratulations! You have successfully navigated the process of installing Proxmox VE and are now ready to embark on your virtualization journey. From managing multiple virtual machines for development and testing to creating isolated environments for home lab projects or even deploying a robust cluster for high availability, Proxmox VE provides the tools and flexibility to meet your diverse needs.
Remember that this installation guide is just the beginning. The Proxmox VE ecosystem is rich with possibilities, including advanced features like clustering, high availability, live migration, backups, and sophisticated networking. As you become more familiar with the platform, explore these functionalities to further enhance your virtualization infrastructure. The power of Proxmox VE lies not only in its installation but also in its continuous evolution and the vibrant community that supports it. Happy virtualizing!
aViewFromTheCave is a participant in the Amazon Services LLC Associates Program, an affiliate advertising program designed to provide a means for sites to earn advertising fees by advertising and linking to Amazon.com. Amazon, the Amazon logo, AmazonSupply, and the AmazonSupply logo are trademarks of Amazon.com, Inc. or its affiliates. As an Amazon Associate we earn affiliate commissions from qualifying purchases.