In the fast-paced world of technology, where software demands are constantly increasing and multitasking is the norm, a sluggish PC can be a significant bottleneck. One of the most effective and often overlooked upgrades for improving your computer’s performance is increasing its Random Access Memory (RAM). RAM acts as your computer’s short-term memory, holding data that is actively being used by your applications. The more RAM you have, the more data your computer can access quickly, leading to smoother operation, faster application loading times, and improved responsiveness.
This guide will walk you through everything you need to know about installing more RAM on your PC, from understanding what RAM is and why it matters, to selecting the right modules and performing the installation yourself. Whether you’re a gamer looking for a competitive edge, a creative professional needing to handle large files, or simply someone tired of waiting for your computer to catch up, upgrading your RAM can be a game-changer.
Understanding RAM: The Foundation of PC Performance
Before we dive into the “how-to” of installation, it’s crucial to understand what RAM is and why it plays such a vital role in your PC’s overall performance. Think of your computer’s storage (like your hard drive or SSD) as a library. This is where all your programs and data are permanently stored. When you want to use an application, your computer “checks out” the necessary files from the library and brings them to your desk. This desk is your RAM.
The larger your desk (more RAM), the more books (data) you can have open and readily accessible at any given time. If your desk is too small, you’ll have to constantly put books away and retrieve them from the library, which significantly slows down your work. In PC terms, this translates to:
- Faster Application Loading: Programs that are loaded into RAM launch much quicker than those that need to be fetched from slower storage.
- Smoother Multitasking: Switching between multiple applications becomes seamless. With ample RAM, your PC can keep all your open programs in memory, eliminating the need to reload them each time you switch.
- Improved Gaming Performance: Games, especially modern ones, are incredibly demanding. They require large amounts of data to be accessed quickly for textures, models, and game logic. More RAM can reduce stuttering and improve frame rates.
- Enhanced Productivity: For tasks like video editing, graphic design, running virtual machines, or working with large datasets, sufficient RAM is essential to avoid slowdowns and crashes.
How Much RAM Do You Need?
The amount of RAM you need depends heavily on your typical usage patterns. Here’s a general guideline:
- 4GB RAM: This is the bare minimum for modern operating systems and basic tasks like web browsing and word processing. You’ll likely experience slowdowns if you try to multitask or run more demanding applications.
- 8GB RAM: This is a good sweet spot for general use, including moderate multitasking, casual gaming, and most productivity software. It offers a noticeable improvement over 4GB.
- 16GB RAM: This is the recommended amount for most users, including gamers, creative professionals, and power users. It provides ample headroom for demanding applications, extensive multitasking, and future-proofing.
- 32GB RAM and Beyond: This level of RAM is typically reserved for professionals working with extremely large datasets, complex simulations, high-end video editing, 3D rendering, or running multiple virtual machines simultaneously.
It’s important to note that simply having more RAM won’t magically make an old, slow processor run faster. RAM works in conjunction with your CPU and GPU. However, if your current RAM is a bottleneck, upgrading it will yield significant performance gains.
Preparing for the Upgrade: What You Need to Know Before You Buy
Before you rush out to buy new RAM modules, a little preparation can save you a lot of frustration and ensure you get the right components for your system. This involves understanding your current system’s specifications and compatibility.
Identifying Your Current RAM and Motherboard Compatibility
The most critical step is to determine what type of RAM your motherboard supports and what is currently installed. Not all RAM is created equal, and using incompatible modules can prevent your computer from booting or even damage components.
1. Checking Your Current RAM:
There are several ways to find out what RAM you currently have installed:
-
Task Manager (Windows):
- Press
Ctrl + Shift + Escto open Task Manager. - Go to the “Performance” tab.
- Click on “Memory” in the left-hand pane.
- Here, you’ll see the total amount of RAM, the speed (MHz), and the type (e.g., DDR4). You can also see how many slots are occupied.
- For more detailed information about the specific modules, you might need a third-party tool.
- Press
-
System Information (Windows):
- Press
Windows Key + R, typemsinfo32, and press Enter. - In the System Information window, expand “Components” and click on “Memory.” This will show you the total installed memory and often the speed and type.
- Press
-
Third-Party Software:
- CPU-Z: This free utility is highly recommended. Download and run CPU-Z. Navigate to the “Memory” tab for an overview of your current RAM configuration (type, size, timings, manufacturer). The “SPD” (Serial Presence Detect) tab will show you details about each individual RAM slot, including the type, size, and speed of the installed module.
- Speccy: Another excellent free tool that provides a comprehensive overview of your hardware, including detailed RAM information.
2. Identifying Your Motherboard Model:
Knowing your motherboard model is essential because it dictates the type of RAM (DDR3, DDR4, DDR5), the maximum speed it supports, and the number of RAM slots available.
-
Task Manager (Windows): In the Performance tab, if you click on “CPU,” you’ll often see your “Processor name,” which can indirectly help you find your motherboard if you know your CPU model and its corresponding motherboards. However, it’s not always explicit.
-
System Information (Windows): Look for the “BaseBoard Product” and “BaseBoard Manufacturer” under the “System Summary.” This will usually give you your motherboard’s model.
-
Command Prompt (Windows):
- Press
Windows Key + R, typecmd, and press Enter. - Type
wmic baseboard get product,Manufacturerand press Enter. This will display your motherboard’s product name and manufacturer.
- Press
-
Third-Party Software: CPU-Z’s “Mainboard” tab will clearly display your motherboard’s manufacturer and model.
3. Consulting Your Motherboard Manual or Manufacturer’s Website:
Once you have your motherboard model, the most reliable way to determine its RAM compatibility is to:
- Check the Manual: If you still have the physical manual that came with your motherboard, it will contain a section on memory specifications, listing supported RAM types (DDR generation), maximum speeds, and the total capacity supported.
- Visit the Manufacturer’s Website: Go to the support or product page for your specific motherboard model on the manufacturer’s website (e.g., ASUS, Gigabyte, MSI, ASRock). Look for the “Specifications” or “Support” section, which will detail memory compatibility.
Key things to look for in the specifications:
- RAM Type: DDR3, DDR4, DDR5. You must match this.
- RAM Speed: Measured in MHz (e.g., 2666MHz, 3200MHz). Your motherboard might support higher speeds, but it will run at the maximum speed it supports or the speed of the slowest module if you mix them.
- Maximum Capacity: The total amount of RAM your motherboard can handle (e.g., 64GB).
- Number of Slots: How many RAM sticks can you install?
Choosing the Right RAM Modules
With your system’s specifications in hand, you can now confidently select new RAM modules.
1. Matching the DDR Generation:
This is non-negotiable. DDR3 RAM will not fit into a DDR4 slot, and vice versa. You must purchase RAM that matches your motherboard’s DDR generation.
2. Matching or Exceeding RAM Speed:
It’s best to purchase RAM with a speed that your motherboard supports. If you’re adding RAM to existing modules, it’s ideal to match the speed of your current RAM. If you mix speeds, all modules will operate at the speed of the slowest module. However, purchasing faster RAM than your current modules is fine, as long as it’s within your motherboard’s supported range.
3. Choosing the Right Capacity:
Decide on the total amount of RAM you want. If you have two empty slots and currently have 8GB (2x4GB), you might opt for another 8GB (2x4GB) kit for a total of 16GB. Alternatively, you could buy a 16GB kit (2x8GB) to replace your existing RAM for a total of 32GB, if your motherboard supports it and you need that much.
4. Considering Dual-Channel vs. Single-Channel:
Most modern motherboards support dual-channel memory, which significantly boosts performance by allowing the memory controller to access two RAM modules simultaneously. To take advantage of dual-channel, you need to install RAM in matched pairs (e.g., two identical sticks) in the correct slots as indicated in your motherboard manual. If you have four slots, you can often run in dual-channel with two or four modules.
5. Buying Kits vs. Individual Modules:
It’s generally recommended to buy RAM in kits (e.g., a 2x8GB kit) because they are tested to work together, ensuring compatibility and optimal performance. If you’re adding to existing RAM, try to find modules with identical specifications (manufacturer, speed, latency, capacity) if possible. However, mixing modules is possible, but it’s safer and often more effective to buy a matched set.
6. Latency (CAS Latency – CL):
Latency refers to the delay between when the memory controller requests data and when it’s available. Lower CL numbers are generally better, but the difference is often marginal for most users. When comparing RAM, look at speed and capacity first, then consider latency. For example, DDR4-3200 CL16 is generally better than DDR4-3200 CL18.
The Installation Process: A Step-by-Step Guide
Once you have your new RAM modules, it’s time for the physical installation. This is a relatively straightforward process, but it requires a bit of care and attention to detail.
Safety First: Essential Precautions
Before you begin, it’s crucial to take a few safety precautions to protect yourself and your computer’s components:
- Power Off Completely: Shut down your PC completely and unplug the power cord from the wall outlet.
- Discharge Static Electricity: Static electricity is a major enemy of computer components. Before touching any internal parts, ground yourself by touching a metal object (like the unpainted part of your PC case) that is connected to the ground. You can also use an anti-static wrist strap, which is highly recommended for this task.
- Work on a Clean Surface: Ensure you are working on a clean, well-lit, and non-carpeted surface to minimize dust and static buildup.
- Handle RAM Carefully: Hold RAM modules by their edges, avoiding touching the gold connectors or the chips on the module.
Step-by-Step Installation
-
Open Your PC Case:
- Most PC cases have side panels that are secured by screws, usually at the back. Unscrew these and carefully slide or swing the side panel off to expose the internal components. Refer to your PC case manual if you’re unsure.
-
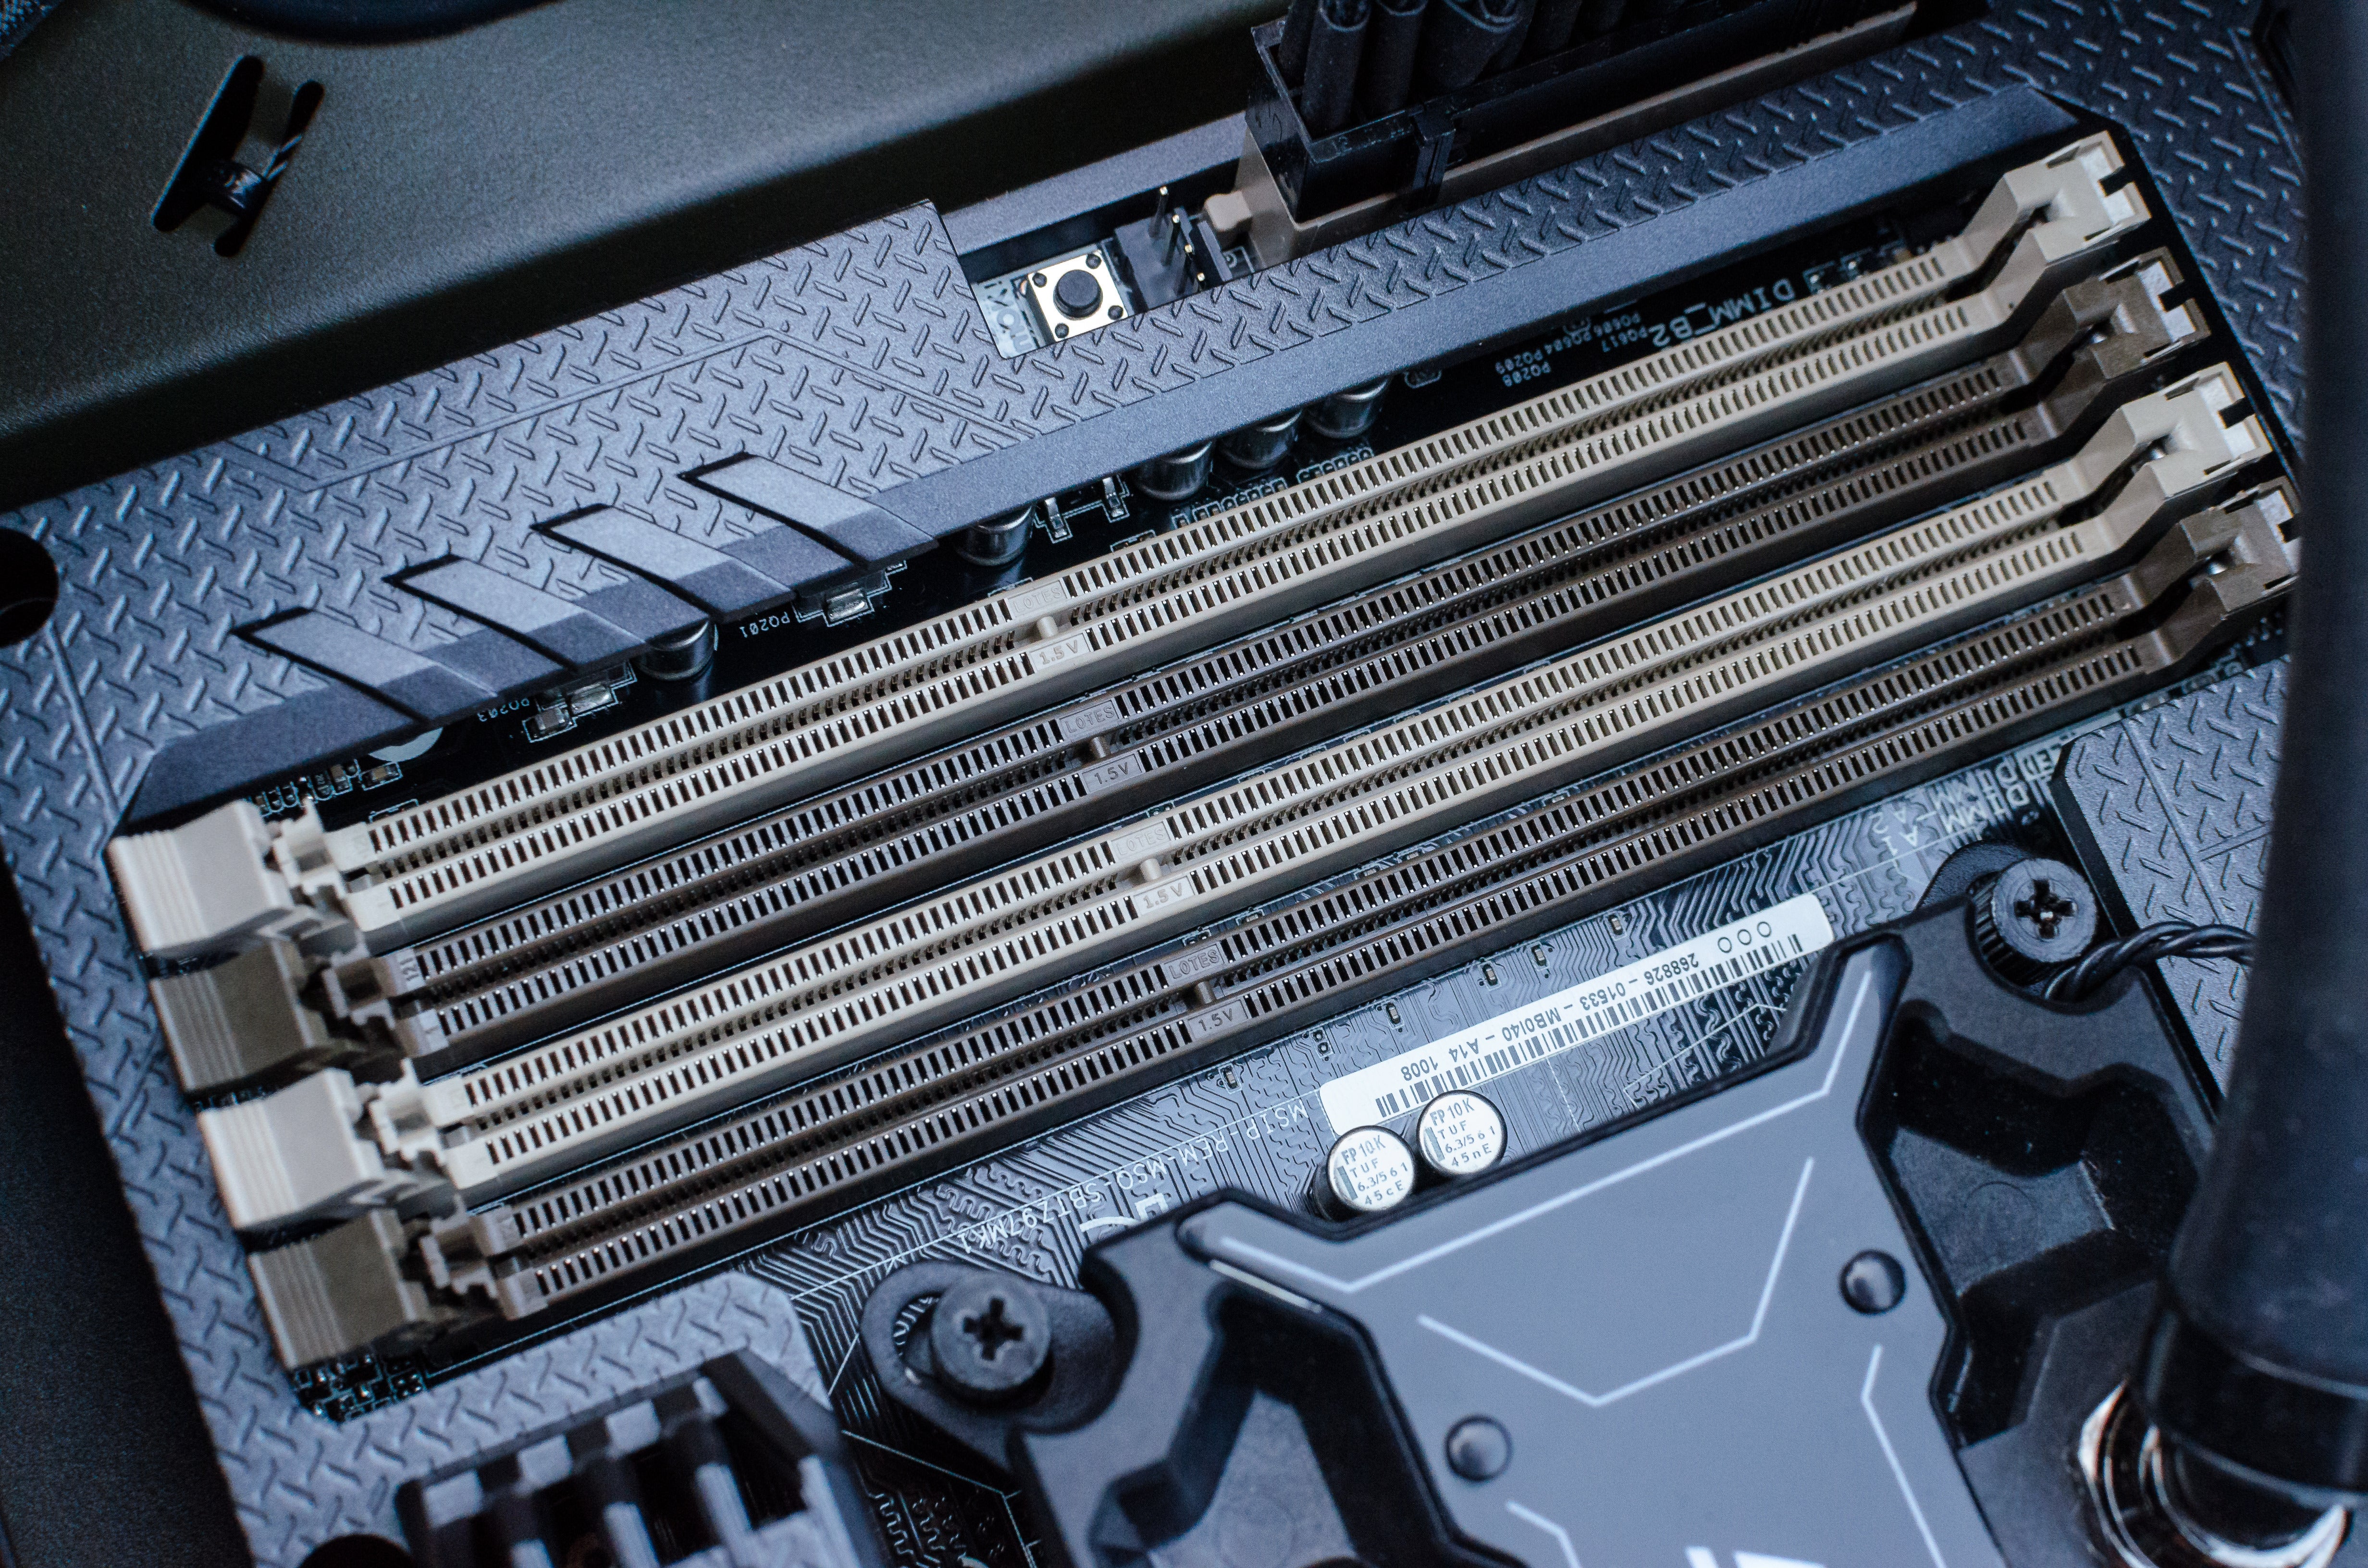
Locate the RAM Slots:
- RAM slots are long, thin slots, usually located near the CPU on the motherboard. They are typically color-coded in pairs for dual-channel operation (refer to your motherboard manual for the correct slots). They have small clips on either end.
-
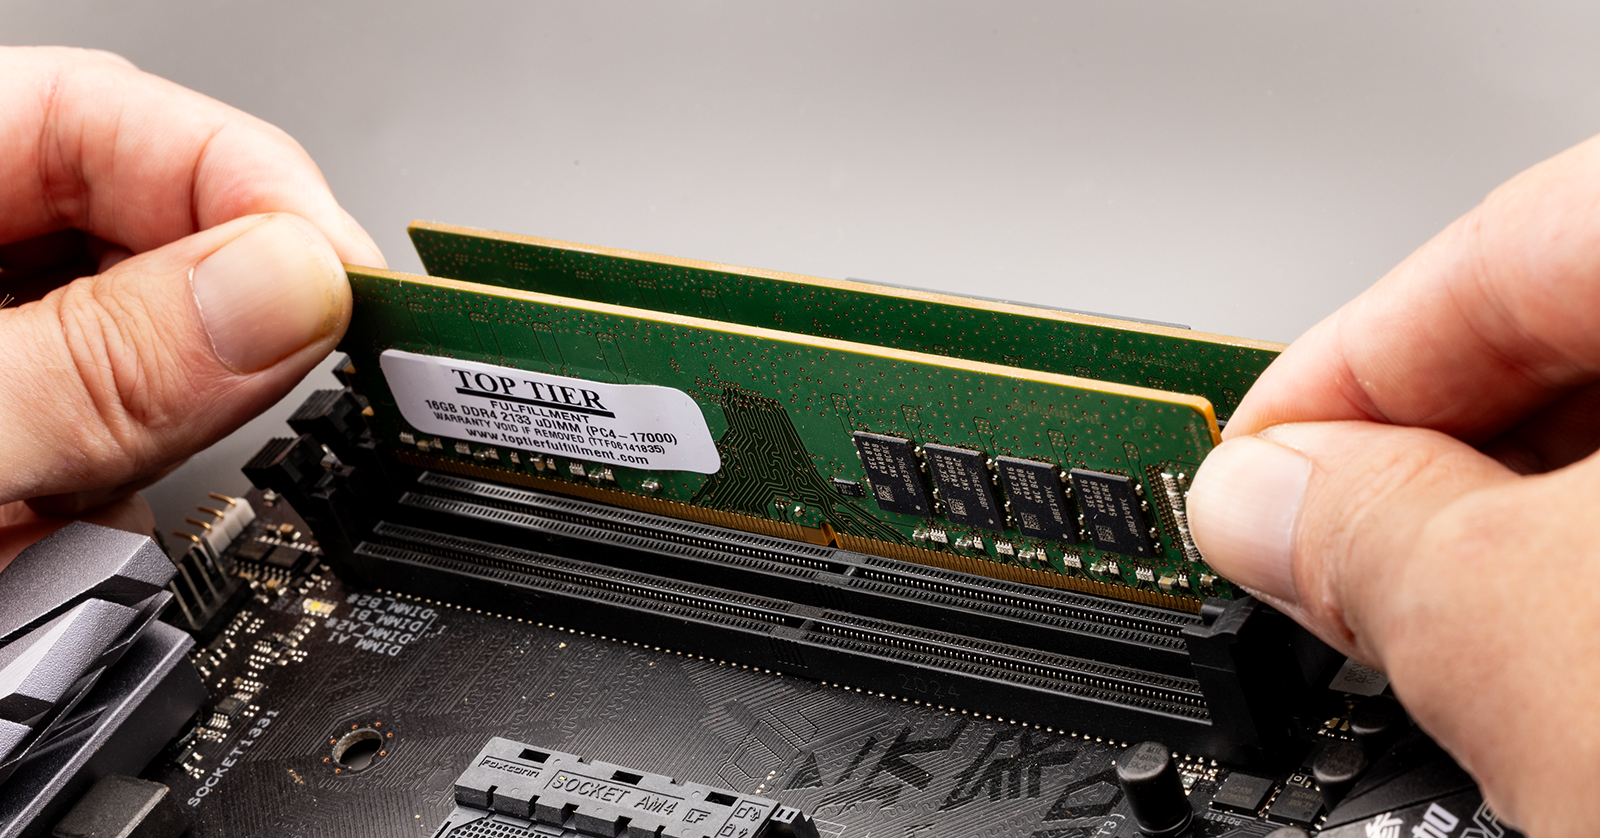
Remove Existing RAM (If Necessary):
- If you’re replacing existing RAM, or if you need to access slots occupied by RAM, gently push down on the clips at both ends of the RAM module. This will cause the module to pop up slightly.
- Carefully pull the RAM module straight out of the slot.
-
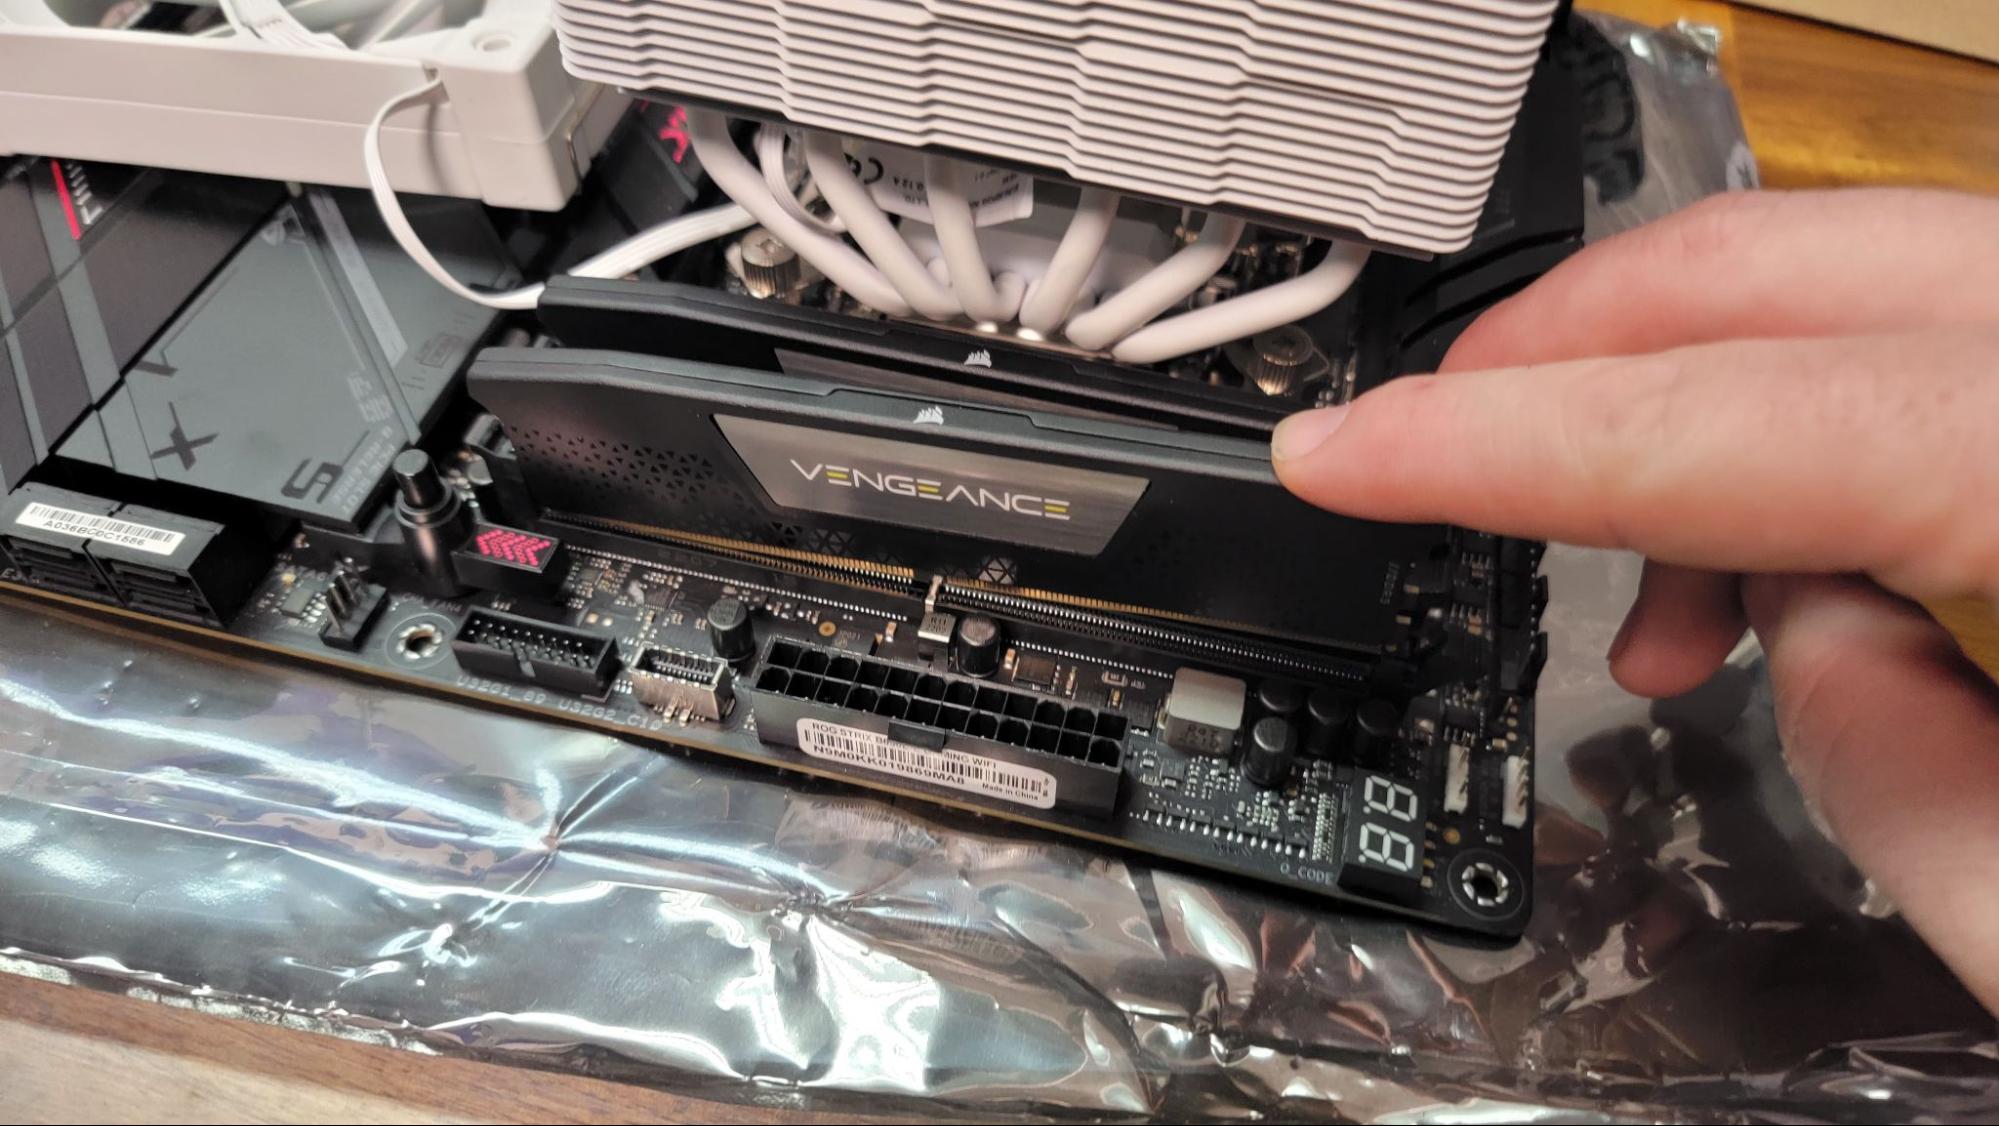
Install the New RAM Modules:
- Take your new RAM module and align the notch on the bottom edge of the module with the corresponding notch in the RAM slot. This ensures you’re inserting it in the correct orientation. Do not force it. If it doesn’t align easily, double-check the orientation.
- Once aligned, push down on both ends of the RAM module firmly and evenly. You should hear a “click” as the clips on the sides of the slot snap into place, securing the module. The module should sit flush in the slot.
- If you’re installing multiple modules, repeat this process for each stick, ensuring you use the correct slots for dual-channel operation (again, consult your motherboard manual).
-
Close Your PC Case:
- Once the RAM is securely installed, carefully reattach the side panel of your PC case and secure it with the screws.
-
Connect Peripherals and Power:
- Reconnect your monitor, keyboard, mouse, and any other peripherals.
- Plug the power cord back into the wall outlet and turn on your PC.
Post-Installation Checks
After powering on your computer, it’s essential to verify that the new RAM is recognized and functioning correctly.
- Booting Up: Your PC should boot up normally. If it fails to boot or you hear a series of beeps, turn it off immediately and double-check the RAM installation. Ensure modules are seated correctly and in the right slots.
- Checking in BIOS/UEFI: Upon startup, you can usually enter your BIOS or UEFI settings by pressing a specific key (often
Del,F2,F10, orF12) during the initial boot screen. In the BIOS/UEFI, you should see the total amount of installed RAM displayed. - Checking in Windows: Once your operating system loads, open Task Manager (as described in the preparation section) and go to the “Performance” tab > “Memory.” You should see the new total amount of RAM reflected here.
If your system doesn’t recognize the full amount of RAM, or if you experience instability, try reseating the RAM modules or testing them one at a time to identify if a particular module is faulty.
Maximizing Your Investment: Beyond the RAM Upgrade
Upgrading your RAM is a significant step towards a more powerful and responsive PC, but it’s not the only factor in overall system performance. To truly maximize your investment and ensure your PC continues to perform at its best, consider these additional points.
Optimizing Your System for Performance
Even with new RAM, a cluttered or inefficient operating system can hinder performance.
- Keep Software Updated: Ensure your operating system, drivers (especially graphics drivers), and frequently used applications are up-to-date. Updates often include performance improvements and bug fixes.
- Manage Startup Programs: Many applications automatically launch when you start your computer, consuming valuable RAM and processing power. Use Task Manager (Startup tab) to disable unnecessary startup programs.
- Disk Cleanup and Defragmentation: Regularly clean up temporary files and uninstall unused programs. For traditional Hard Disk Drives (HDDs), defragmentation can organize data for faster access. (Note: SSDs do not require defragmentation and can even be negatively impacted by it).
- Antivirus and Malware Scans: Ensure your security software is up-to-date and run regular scans to prevent malware from hogging resources.
Understanding RAM as an Investment in Productivity
From a Money perspective, upgrading your RAM can be seen as a shrewd investment in your productivity. If you’re a professional or a student who relies on your PC for work, delays and slowdowns translate directly to lost time and potential income. The cost of a RAM upgrade is often recouped quickly through increased efficiency.
For Brand awareness, especially for content creators or professionals showcasing their work, a well-performing PC ensures smooth operation during crucial tasks like video rendering or graphic design. This reliability can contribute to a professional image and avoid frustrating interruptions that might impact client perception.
From a Tech standpoint, RAM is a fundamental component. Understanding its role and how to upgrade it empowers you to maintain and improve your technology. It’s a tangible way to extend the life of your existing hardware and keep it competitive with the demands of new software and trends.
When to Consider Other Upgrades
While RAM is a powerful upgrade, it’s not always the sole solution for performance issues. If you’ve upgraded your RAM and still find your PC sluggish, consider other components:
- Solid State Drive (SSD): If your operating system and applications are still on a traditional Hard Disk Drive (HDD), upgrading to an SSD will provide the most dramatic speed improvement for boot times and application loading.
- Graphics Card (GPU): For gaming and graphically intensive tasks like video editing or 3D rendering, a more powerful GPU is essential.
- Processor (CPU): If your CPU is very old, it might be a bottleneck for newer software, even with ample RAM.
By understanding the role of RAM and following these steps, you can confidently enhance your PC’s capabilities, leading to a smoother, faster, and more enjoyable computing experience.
aViewFromTheCave is a participant in the Amazon Services LLC Associates Program, an affiliate advertising program designed to provide a means for sites to earn advertising fees by advertising and linking to Amazon.com. Amazon, the Amazon logo, AmazonSupply, and the AmazonSupply logo are trademarks of Amazon.com, Inc. or its affiliates. As an Amazon Associate we earn affiliate commissions from qualifying purchases.