
In today’s hyper-connected world, a reliable internet connection isn’t just a luxury; it’s a fundamental necessity for work, education, entertainment, and staying in touch. At the heart of most home and small office networks lies a crucial piece of hardware: the router. This unassuming device acts as the traffic controller, directing data between your internet service provider (ISP) and all your connected devices – laptops, smartphones, smart TVs, IoT gadgets, and more. While the prospect of installing a new router might seem daunting to some, it’s a straightforward process that anyone can accomplish with a little guidance. This comprehensive guide will walk you through every step, from understanding your router’s role to optimizing your network for peak performance and robust security.
Our aim is not just to show you how to connect wires, but to empower you with the knowledge to establish a secure, efficient, and future-proof home network. Whether you’re upgrading an old model, setting up a new service, or simply want to better understand your network’s core, mastering router installation is a foundational tech skill that pays dividends in productivity and digital peace of mind.
Understanding Your Network’s Core: Why a Router Matters
Before diving into the nuts and bolts of installation, it’s essential to grasp what a router does and why it’s such a critical component of your digital life. Many people confuse a router with a modem, or use the terms interchangeably. While they often come in a single unit (a modem-router combo), they serve distinct purposes.
The Router’s Role in Your Digital Ecosystem
Think of your internet connection as a highway. Your modem is the gateway that connects your home to this highway, translating the digital signals from your ISP (cable, fiber, DSL) into a language your devices can understand. However, a modem typically only provides a single internet connection. This is where the router comes in.
Your router acts as the traffic cop and central distribution hub for your local area network (LAN). It takes that single internet connection from the modem and shares it across multiple devices, both wirelessly (Wi-Fi) and via Ethernet cables. Here’s a breakdown of its key functions:
- IP Address Management: The router assigns a unique local IP address to each device on your network, allowing them to communicate with each other and with the internet.
- Packet Routing: It directs data packets to their correct destinations, ensuring that your request for a webpage goes to your laptop, not your smart fridge.
- Network Security: Modern routers come equipped with firewalls and encryption protocols (like WPA2/WPA3) to protect your network from unauthorized access and cyber threats.
- Wi-Fi Connectivity: Most importantly for many users, the router broadcasts a wireless signal, creating your Wi-Fi network that allows devices to connect without physical cables.
- Quality of Service (QoS): Many routers allow you to prioritize certain types of traffic (e.g., video streaming or online gaming) over others, ensuring a smoother experience for critical applications.
Without a router, you’d be limited to connecting just one device directly to your modem, severely hindering your ability to utilize multiple gadgets simultaneously. Its importance cannot be overstated in a world increasingly reliant on seamless, multi-device connectivity.
Choosing the Right Router for Your Needs
While this guide focuses on installation, a brief word on selection is pertinent, as the type of router you choose can significantly impact your experience. Routers come in various forms, each offering different features and performance levels. Considerations include:
- Speed & Standards: Look for routers supporting the latest Wi-Fi standards (e.g., Wi-Fi 6/802.11ax, Wi-Fi 6E), which offer faster speeds, greater capacity, and improved efficiency.
- Range & Coverage: For larger homes, a mesh Wi-Fi system might be more appropriate than a single router, eliminating dead zones and providing consistent coverage.
- Ports: Check the number of Ethernet ports if you plan to hardwire multiple devices.
- Security Features: Advanced routers offer robust parental controls, guest networks, and built-in antivirus/malware protection.
- Budget: Routers range widely in price, so balance your needs with what you’re willing to spend. Investing a bit more upfront can often lead to a much better long-term experience and a more future-proof network. Understanding these elements can help you make an informed decision, aligning your router choice with your specific “Tech” requirements.
Preparing for Installation: What You’ll Need
Proper preparation is the key to a smooth and hassle-free router installation. Gathering your tools and understanding the optimal placement before you begin can save you time and frustration.
Essential Tools and Components
Before you unbox your new router, ensure you have the following items readily available:
- Your New Router: Obviously, the star of the show!
- Modem: This is the device that connects your home to your ISP’s internet service. It might be a standalone unit or integrated into a modem-router combo.
- Ethernet Cables: You’ll typically need at least two: one to connect the modem to the router (often called the WAN or Internet cable) and potentially another to connect a computer directly to the router for initial setup, although wireless setup is now common. Most routers come with one.
- Power Adapters: For both your modem and your new router. Ensure they are the correct adapters to avoid damage.
- A Computer, Tablet, or Smartphone: For accessing the router’s configuration interface. A wired connection to a computer is often recommended for the initial setup for stability, but it’s increasingly feasible to use Wi-Fi with a mobile device.
- Your ISP Account Information: Sometimes required for activation, especially if you’re replacing an ISP-provided router.
- Router’s User Manual/Quick Start Guide: Contains specific instructions, default login credentials, and sometimes a QR code for easy app setup.
- Pen and Paper: To jot down new Wi-Fi names, passwords, and admin credentials.
Optimal Placement Considerations
The physical location of your router significantly impacts your Wi-Fi signal strength, speed, and overall network coverage. Strategic placement can make a world of difference.
- Central Location: The ideal spot is as close to the center of your home or office as possible. This allows the Wi-Fi signal to propagate evenly in all directions. Avoid placing it in a corner or against an exterior wall.
- Elevated Position: Wi-Fi signals tend to travel downwards. Placing your router on a high shelf, atop a cabinet, or even mounting it on a wall (if designed for it) can improve coverage, especially in multi-story buildings.
- Away from Obstacles and Interference:
- Thick Walls and Floors: Concrete, brick, and even water (like fish tanks) can attenuate Wi-Fi signals. Try to minimize the number of obstacles between your router and frequently used devices.
- Electronics: Keep your router away from other electronics that emit electromagnetic waves, such as microwaves, cordless phones, baby monitors, and large metal objects. These can cause significant interference.
- Mirrors: Believe it or not, mirrors contain a thin layer of metal that can reflect Wi-Fi signals, creating dead zones.
- Good Ventilation: Routers generate heat. Ensure it’s in an open area with good airflow to prevent overheating, which can impact performance and longevity.
- Proximity to Modem: While you want a central location, also ensure it’s close enough to your modem for a short, direct Ethernet connection.
Taking a few moments to choose the perfect spot can prevent frustration and ensure you get the most out of your new router’s performance.
Step-by-Step Router Installation Guide
Now that you’re prepared, let’s get into the core process of installing your new router. Following these steps carefully will ensure a smooth setup.
Disconnecting Your Old Setup (If Applicable)
If you’re replacing an existing router, it’s crucial to properly disconnect the old equipment first.
- Power Off Old Router & Modem: Unplug the power cables from both your old router and your modem.
- Disconnect Cables: Disconnect all Ethernet cables from the old router. Note which cable goes from the modem to the router’s “Internet” or “WAN” port – you’ll use a similar setup for the new one.
- Wait: Give your modem a minute or two to completely power down and clear its cache. This is a common troubleshooting step that often resolves connectivity issues when switching devices.
Connecting Your New Router to the Modem
This is the most critical physical connection.
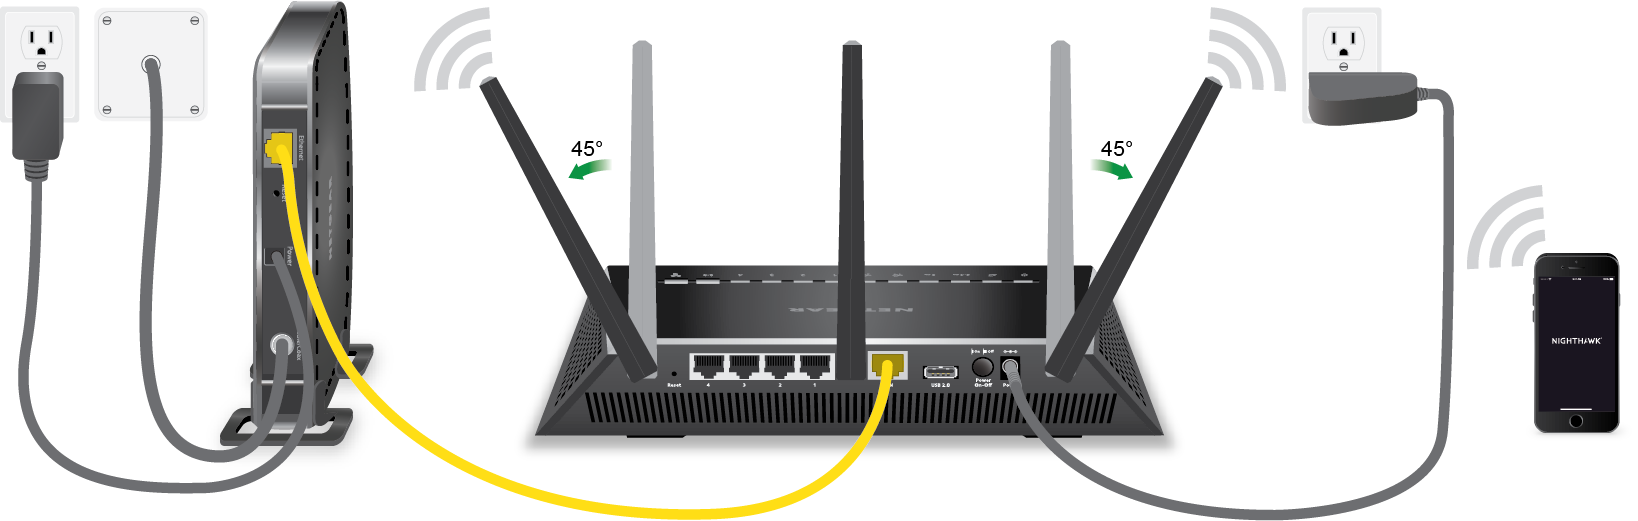
- Power On Modem: Plug in your modem’s power adapter and wait for it to fully boot up. This usually takes a few minutes, and you’ll see indicator lights stabilize (e.g., solid green for power, internet connection). Refer to your modem’s manual if you’re unsure what the lights mean.
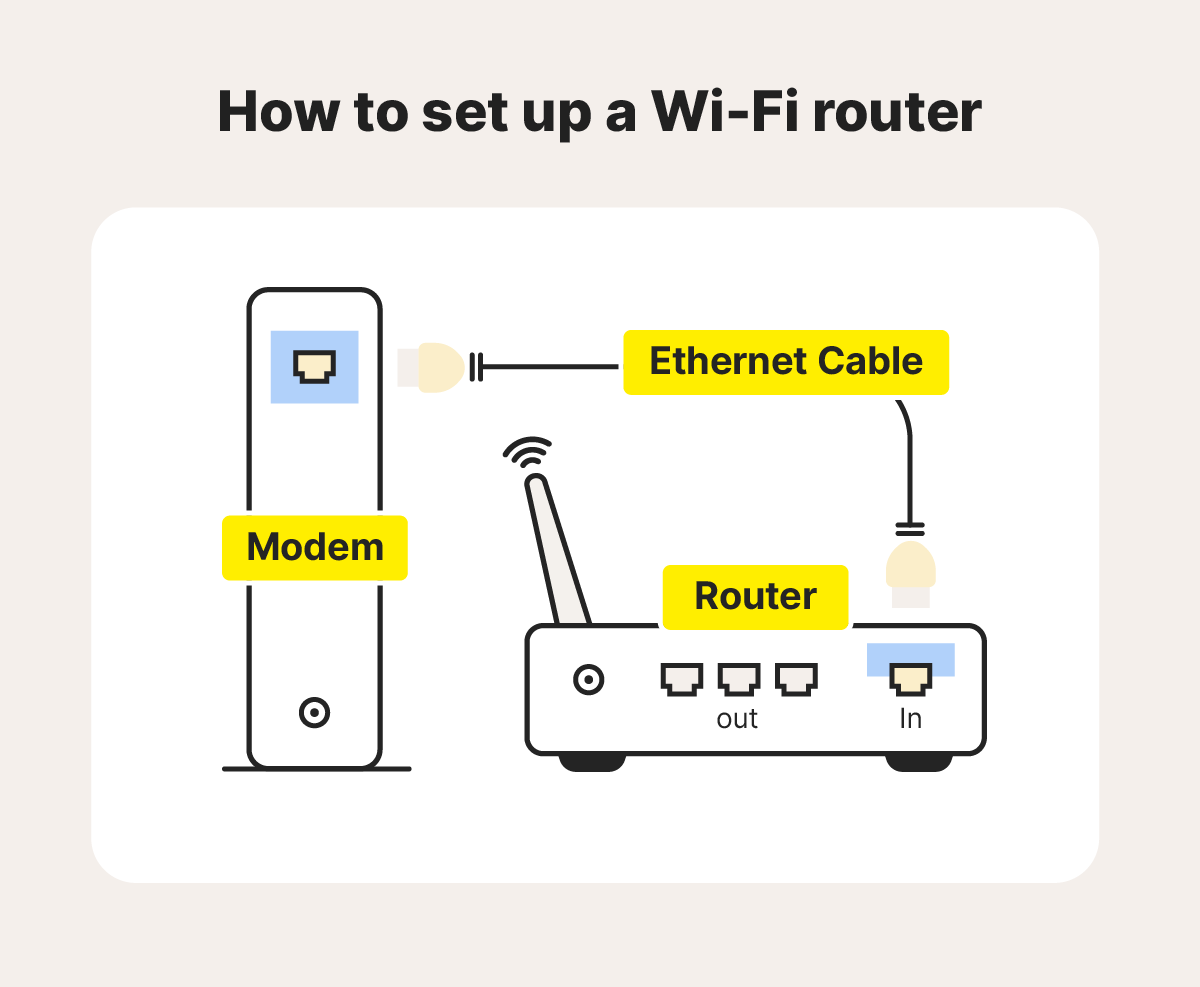
- Connect Ethernet Cable (Modem to Router): Take one end of an Ethernet cable and plug it into the “Ethernet” or “LAN” port on your modem.
- Connect to Router’s WAN Port: Plug the other end of that same Ethernet cable into the “WAN” (Wide Area Network) or “Internet” port on your new router. This port is usually a different color or clearly labeled to distinguish it from the “LAN” ports.
- Connect Power to Router: Plug in your new router’s power adapter and connect it to a power outlet.
Powering On and Initializing
Once all cables are connected, it’s time to bring your router to life.
- Power On Router: Press the power button on your new router (if it has one).
- Wait for Boot-Up: Allow your router several minutes to boot up and initialize. You should see various indicator lights illuminate and stabilize. Look for a light indicating an internet connection – this suggests the router is successfully communicating with your modem and receiving an internet signal.
- Check Status Lights: Consult your router’s manual to understand what each light indicates. Typically, you’d want to see solid green or blue lights for power, internet connectivity, and Wi-Fi.
Accessing the Router’s Web Interface
This is where you’ll configure your network settings.
- Connect a Device:
- Wired (Recommended for initial setup): Connect one end of an Ethernet cable to one of the numbered “LAN” ports on your router and the other end to your computer’s Ethernet port.
- Wireless: If your router has a default Wi-Fi network name (SSID) and password listed on a sticker (often on the bottom), connect your computer or mobile device to it.
- Open a Web Browser: Launch your preferred web browser (Chrome, Firefox, Edge, Safari).
- Enter Router’s IP Address: In the address bar, type your router’s default IP address. Common IP addresses include
192.168.1.1,192.168.0.1, or10.0.0.1. This information is typically found in the router’s manual or on a sticker on the device. - Login: You’ll be prompted for a username and password. The default credentials are also found in the manual or on the sticker (e.g.,
admin/adminoradmin/password). - Setup Wizard: Many modern routers will automatically launch a setup wizard, guiding you through the essential configurations.
Configuring Your Wi-Fi Network (SSID, Password, Security)
This is where you personalize and secure your wireless network.
- Change Default Admin Credentials: Crucially, the very first thing you should do is change the default administrator username and password for accessing the router’s interface. This is a critical security measure to prevent unauthorized access to your router’s settings. Choose a strong, unique password.
- Set Your Wi-Fi Name (SSID): This is the name you’ll see when searching for Wi-Fi networks. Choose something memorable but avoid using personal information. You can create separate SSIDs for different frequency bands (2.4 GHz and 5 GHz) if your router supports both, or use a single SSID if your router supports band steering.
- Create a Strong Wi-Fi Password (Passphrase): This is the key to your Wi-Fi network. Use a long, complex passphrase that combines uppercase and lowercase letters, numbers, and symbols. Avoid easily guessable information.
- Select Security Protocol: Always choose the strongest available security protocol, which is typically WPA3 (if supported) or WPA2-PSK (AES). Avoid older protocols like WEP or WPA/WPA-TKIP as they are vulnerable.
- Guest Network (Optional but Recommended): Many routers allow you to set up a separate guest network. This is a great security practice, isolating guests from your main network and protecting your personal data and devices.
Securing Your Router: Admin Credentials and Firmware Updates
Beyond the initial Wi-Fi setup, ongoing security measures are vital.
- Regular Firmware Updates: Router manufacturers frequently release firmware updates to fix bugs, improve performance, and patch security vulnerabilities. Regularly check your router’s interface or app for available updates and install them promptly. This is as important as updating your computer’s operating system.
- Disable Remote Management: Unless absolutely necessary, disable remote management features in your router’s settings. This prevents external access to your router’s configuration.
- Firewall Settings: Ensure your router’s built-in firewall is enabled and configured correctly. Most home routers have a basic NAT firewall that is sufficient.
- Review Connected Devices: Periodically check the list of connected devices in your router’s interface to ensure no unauthorized devices are accessing your network.
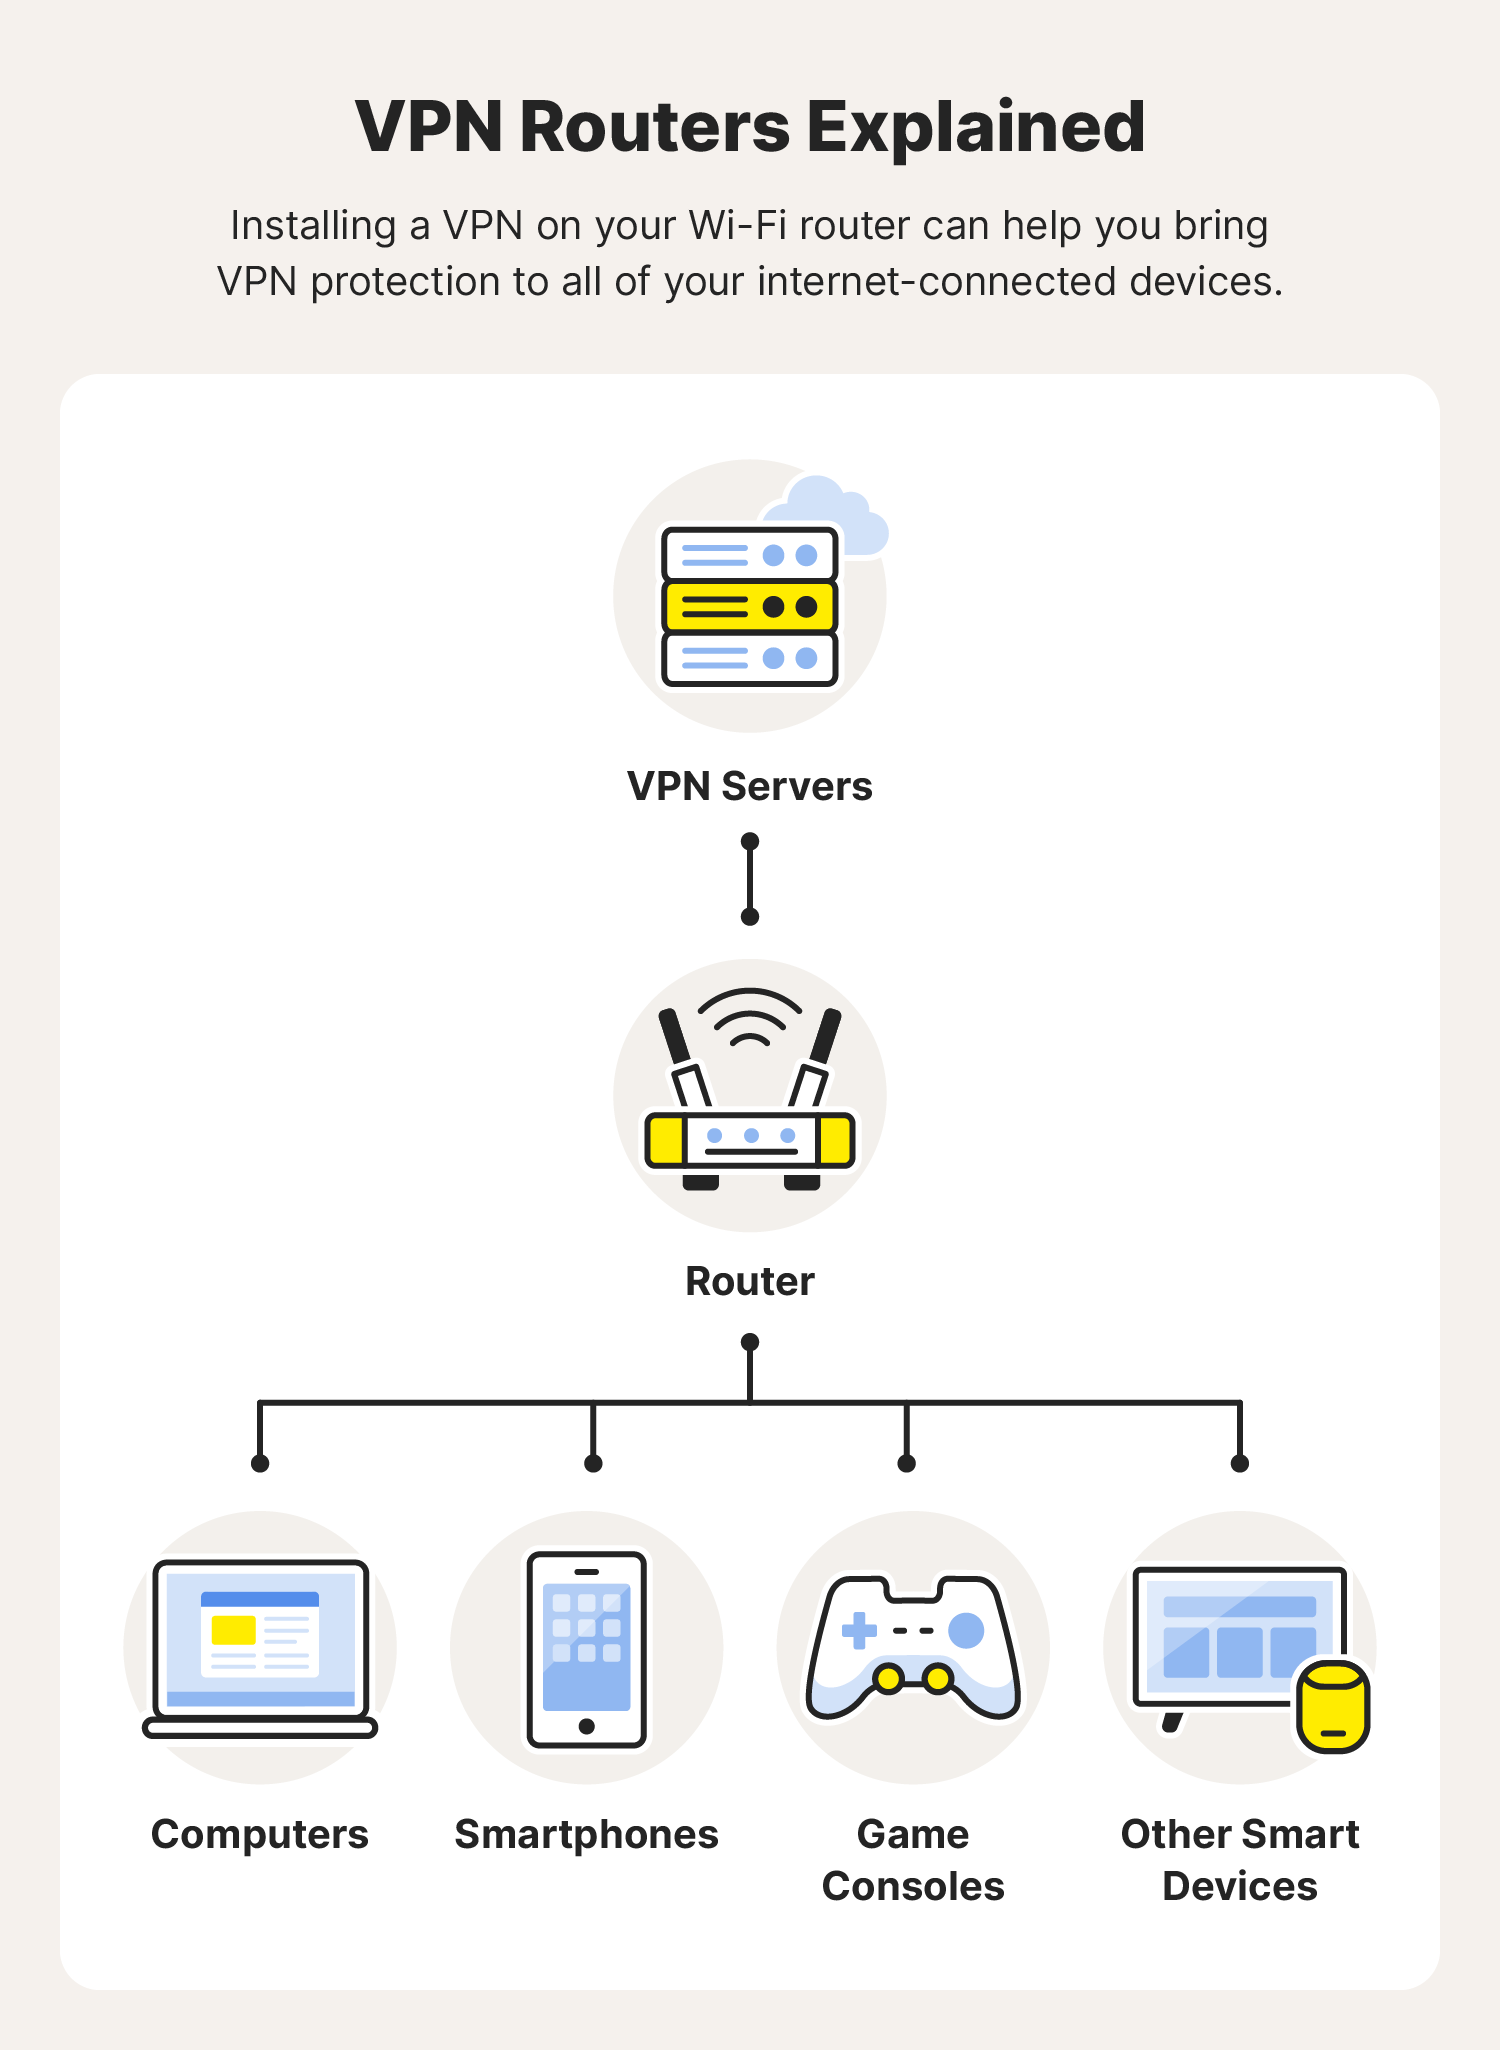
- Consider a VPN: For enhanced privacy and security, especially when accessing sensitive information or using public Wi-Fi, consider using a Virtual Private Network (VPN) on your devices. Some advanced routers even allow for VPN client setup directly on the router itself.
Post-Installation Optimization and Troubleshooting
Installing your router is just the first step. To ensure a consistently fast, reliable, and secure connection, ongoing optimization and the ability to troubleshoot common issues are invaluable.
Enhancing Network Performance and Coverage
Once your router is up and running, you can take further steps to fine-tune your network.
- Channel Optimization: Wi-Fi operates on specific channels. If many networks in your area use the same channel, it can cause interference and slow speeds. Use a Wi-Fi analyzer app (available for smartphones) to identify the least congested channels (usually 1, 6, or 11 for 2.4 GHz; various for 5 GHz) and manually set your router to use them. Many modern routers can automatically select the best channel.
- Band Steering: If your router supports dual-band (2.4 GHz and 5 GHz) and band steering, it can intelligently move devices between the two bands for optimal performance. The 2.4 GHz band offers wider coverage but slower speeds, while 5 GHz provides faster speeds but shorter range.
- Quality of Service (QoS): If you have specific bandwidth-intensive activities (e.g., online gaming, 4K streaming, video conferencing), explore your router’s QoS settings. This allows you to prioritize traffic for certain devices or applications, ensuring critical tasks run smoothly even when your network is busy. This directly impacts your “Productivity” and entertainment experience.
- Antenna Adjustment: If your router has external antennas, try adjusting their orientation. Often, positioning them perpendicular to each other can improve signal distribution.
- Firmware Updates (Ongoing): As mentioned earlier, regularly check for and install firmware updates. These updates often include performance enhancements and stability improvements in addition to security patches.
- Consider Extenders or Mesh Systems: If you still experience dead zones or weak signals in larger homes, consider Wi-Fi range extenders or, for a more seamless experience, a mesh Wi-Fi system. These systems use multiple access points to create a single, unified network with extensive coverage.
Common Issues and Quick Fixes
Even with perfect installation, you might occasionally encounter network issues. Here are some common problems and their simple solutions:
- No Internet Connection:
- Check Cables: Ensure all Ethernet cables (especially modem to router WAN port) are securely plugged in.
- Reboot Cycle: The classic fix. Unplug the power from your modem, then your router. Wait 30 seconds. Plug the modem back in and wait for its lights to stabilize (1-2 minutes). Then, plug the router back in and wait for its lights to stabilize (another 1-2 minutes). This often resolves temporary glitches.
- ISP Outage: Check with your ISP for any local outages.
- Modem Status: Check your modem’s indicator lights. If the internet status light is off or blinking unusually, the problem might be with your ISP or the modem itself.
- Slow Wi-Fi Speeds:
- Interference: Review optimal placement and check for interfering devices. Use a Wi-Fi analyzer to check for congested channels.
- Too Many Devices: Too many devices (especially older ones) can bog down your network.
- Distance/Obstacles: Move closer to the router or remove physical obstructions.
- Outdated Firmware: Ensure your router’s firmware is up to date.
- Bandwidth Hogs: Identify and limit bandwidth-intensive activities if QoS is not configured.
- Cannot Access Router Settings:
- Correct IP Address: Double-check you’re typing the correct default IP address.
- Default Credentials: If you changed the admin password and forgot it, you might need to perform a factory reset on your router (usually by pressing a recessed button for 10-15 seconds). Be aware this will erase all your settings.
- Wired Connection: Try connecting to the router via an Ethernet cable from your computer.
- Intermittent Connectivity (Wi-Fi Drops):
- Router Overheating: Ensure proper ventilation.
- Firmware Glitch: A reboot or firmware update can often help.
- Interference: High levels of interference can cause dropped connections.
- Device Issues: Rule out individual device problems by testing with other devices.
Advanced Security Practices
Beyond basic password protection, you can implement more robust security measures:
- Guest Networks: Always enable a guest network for visitors. This isolates them from your main network, protecting your personal files and smart devices.
- Firewall Configuration: While basic firewalls are usually sufficient, advanced users can delve into port forwarding (only if necessary for specific applications) and fine-tune firewall rules. Be cautious when adjusting these settings without understanding their implications.
- Parental Controls: Many routers offer built-in parental controls to block certain websites, restrict internet access during specific hours, or filter content for children. This is a valuable tool for “Digital Security” in a family setting.
- VPN Integration: Some high-end routers allow you to configure a VPN directly on the router. This encrypts all traffic originating from your network, offering a layer of privacy for every connected device without needing individual VPN software on each one.
- Disable WPS (Wi-Fi Protected Setup): While convenient, WPS can have security vulnerabilities. Consider disabling it in your router settings if you’re not using it.
By following this comprehensive guide, you’ve not only learned “how to install a router” but also gained a deeper understanding of network fundamentals, security best practices, and optimization techniques. A properly installed and configured router is the cornerstone of a fast, reliable, and secure digital environment, ensuring your connection remains robust for all your technological needs. Embrace the power of your home network, keeping it updated and optimized for peak “Productivity” and peace of mind.
aViewFromTheCave is a participant in the Amazon Services LLC Associates Program, an affiliate advertising program designed to provide a means for sites to earn advertising fees by advertising and linking to Amazon.com. Amazon, the Amazon logo, AmazonSupply, and the AmazonSupply logo are trademarks of Amazon.com, Inc. or its affiliates. As an Amazon Associate we earn affiliate commissions from qualifying purchases.