Ubuntu, a perennial favorite among Linux distributions, is celebrated for its user-friendliness, robust security, and a vast ecosystem of software. While the Ubuntu Software Center and package managers like apt handle the majority of your software installation needs with ease, there are times when you’ll encounter a .deb file directly. These files are the native package format for Debian-based systems, including Ubuntu, and represent a common way to distribute standalone applications or older versions of software not yet in the official repositories.
Whether you’re a seasoned Linux user looking to install a specific application or a newcomer curious about the inner workings of your operating system, understanding how to install .deb files is an essential skill. This guide will walk you through the process, from the simplest methods to more advanced command-line techniques, ensuring you can confidently install any .deb package on your Ubuntu system. We’ll cover why you might encounter .deb files, the tools available to install them, and important considerations for a smooth and secure installation.

Understanding the .deb Package Format
Before diving into the installation process, it’s beneficial to understand what a .deb file is. Think of it as a self-contained archive that holds all the necessary files and information for a particular application. This includes the program’s executable files, libraries it depends on, configuration files, and importantly, metadata about the package itself. This metadata tells your system how to install, upgrade, and remove the software correctly.
The .deb format is native to Debian, the parent distribution from which Ubuntu is derived. This means that any distribution based on Debian, including Ubuntu, Mint, Pop!_OS, and others, can natively understand and install .deb files. This standardized format simplifies software distribution and management significantly.
Why You Might Need to Install a .deb File
While Ubuntu’s official repositories are extensive and well-maintained, there are several scenarios where you might find yourself needing to install a .deb file directly:
- Software Not in Official Repositories: Some applications, especially proprietary software, niche utilities, or beta versions, may not be included in Ubuntu’s standard software sources. Developers often provide
.debfiles as a direct download for users of Debian-based systems. - Older or Newer Versions: You might need a specific older version of a program for compatibility reasons, or conversely, you might want to try a bleeding-edge release that hasn’t yet made its way into the stable repositories.
- Custom Software or Development: If you’re developing software or have received a custom-built application, it might be packaged as a
.debfile for easy deployment. - Offline Installations: In environments with limited or no internet access, downloading
.debfiles beforehand and installing them offline can be a practical solution. - Specific Hardware Drivers: Sometimes, manufacturers release drivers for their hardware in
.debformat to ensure compatibility with Ubuntu.
Methods for Installing .deb Packages
Ubuntu offers several user-friendly ways to install .deb files, catering to different preferences and technical skill levels.
1. Using the Ubuntu Software Center (GUI Method)
For most users, especially those new to Linux, the graphical method is the most intuitive and straightforward. Ubuntu’s default software management application, the Ubuntu Software Center (or simply “Software” in newer versions), makes installing .deb files as simple as clicking a button.
Steps:
- Download the .deb file: Locate the
.debfile you wish to install and download it to a known location on your computer (e.g., your Downloads folder). - Open the .deb file: Navigate to the folder where you saved the file. You can typically double-click the
.debfile. - Ubuntu Software Center Opens: The file should automatically open with the Ubuntu Software Center.
- Install Button: You will see an “Install” button within the Software Center’s window, along with information about the application.
- Authentication: Click the “Install” button. You will be prompted to enter your user password to authorize the installation. This is a security measure to ensure you have permission to install software on your system.
- Installation Progress: The Software Center will then proceed with the installation. You’ll see a progress bar indicating the status.
- Completion: Once the installation is complete, the “Install” button will change to an “Uninstall” or “Remove” button, indicating the software is successfully installed.
This method is excellent for its simplicity and provides a visual confirmation of the installation process. It also leverages Ubuntu’s robust dependency management, automatically fetching and installing any required libraries or packages that the .deb file depends on.
2. Using Gdebi (GUI Package Installer)
Gdebi is a small utility specifically designed to install local .deb packages. It’s often praised for its efficiency and its ability to resolve dependencies directly, even when they might not be readily available in the online repositories. While not always pre-installed, it’s a valuable tool to have.
Installation of Gdebi (if not already present):
- Open the Terminal (you can usually find it by searching for “Terminal” in the application menu, or by pressing
Ctrl + Alt + T). - Update your package list:
bash

sudo apt update
- Install Gdebi:
bash

sudo apt install gdebi
Enter your password when prompted.
Steps to Install a .deb file with Gdebi:
- Download the .deb file: As with the Software Center method, download the
.debfile to your desired location. - Open with Gdebi: Right-click on the
.debfile. In the context menu, select “Open With Other Application…” or a similar option. Choose “Gdebi Package Installer” from the list of applications. If Gdebi is your preferred default for.debfiles, you might even see it directly in the “Open With” submenu. - Review Package Information: Gdebi will open and display details about the package, including its name, version, and a description. Crucially, it will also check for and list any dependencies that need to be installed.
- Install the Package: Click the “Install Package” button.
- Authentication: You will be prompted for your password to grant administrative privileges.
- Dependency Resolution: Gdebi will then attempt to resolve and install any missing dependencies from your configured software repositories.
- Confirmation: Once the installation is complete, Gdebi will show a “Package installed successfully” message.
Gdebi is often preferred by slightly more advanced users because it directly checks for and handles dependencies, providing a clear overview before you commit to the installation.
3. Using the Command Line (Terminal)
For users who are comfortable with the terminal, the command line offers the most flexibility and control. The primary tool for managing packages on Ubuntu via the command line is dpkg (Debian Package Manager), and apt can also be used in conjunction with it.
Method 3.1: Using dpkg
dpkg is the foundational tool for installing, removing, and managing individual .deb packages.
Steps:
-
Open the Terminal: Press
Ctrl + Alt + Tor search for “Terminal”. -
Navigate to the Directory: Use the
cdcommand to navigate to the directory where you downloaded the.debfile. For example, if it’s in your Downloads folder:
bash

cd Downloads
-
Install the .deb file: Use the
dpkg -icommand followed by the name of the.debfile.sudo dpkg -i your_package_name.debReplace
your_package_name.debwith the actual name of the file.sudois used to run the command with administrator privileges.-istands for “install”.
-
Handling Dependencies: A common issue with
dpkg -iis that it will report errors if the package has unmet dependencies. It won’t automatically fetch them. If you encounter dependency errors, you can often fix them by running the following command:
bash

sudo apt --fix-broken install
This command tellsaptto try and resolve any broken dependencies, which often involves downloading and installing the missing packages from your repositories.
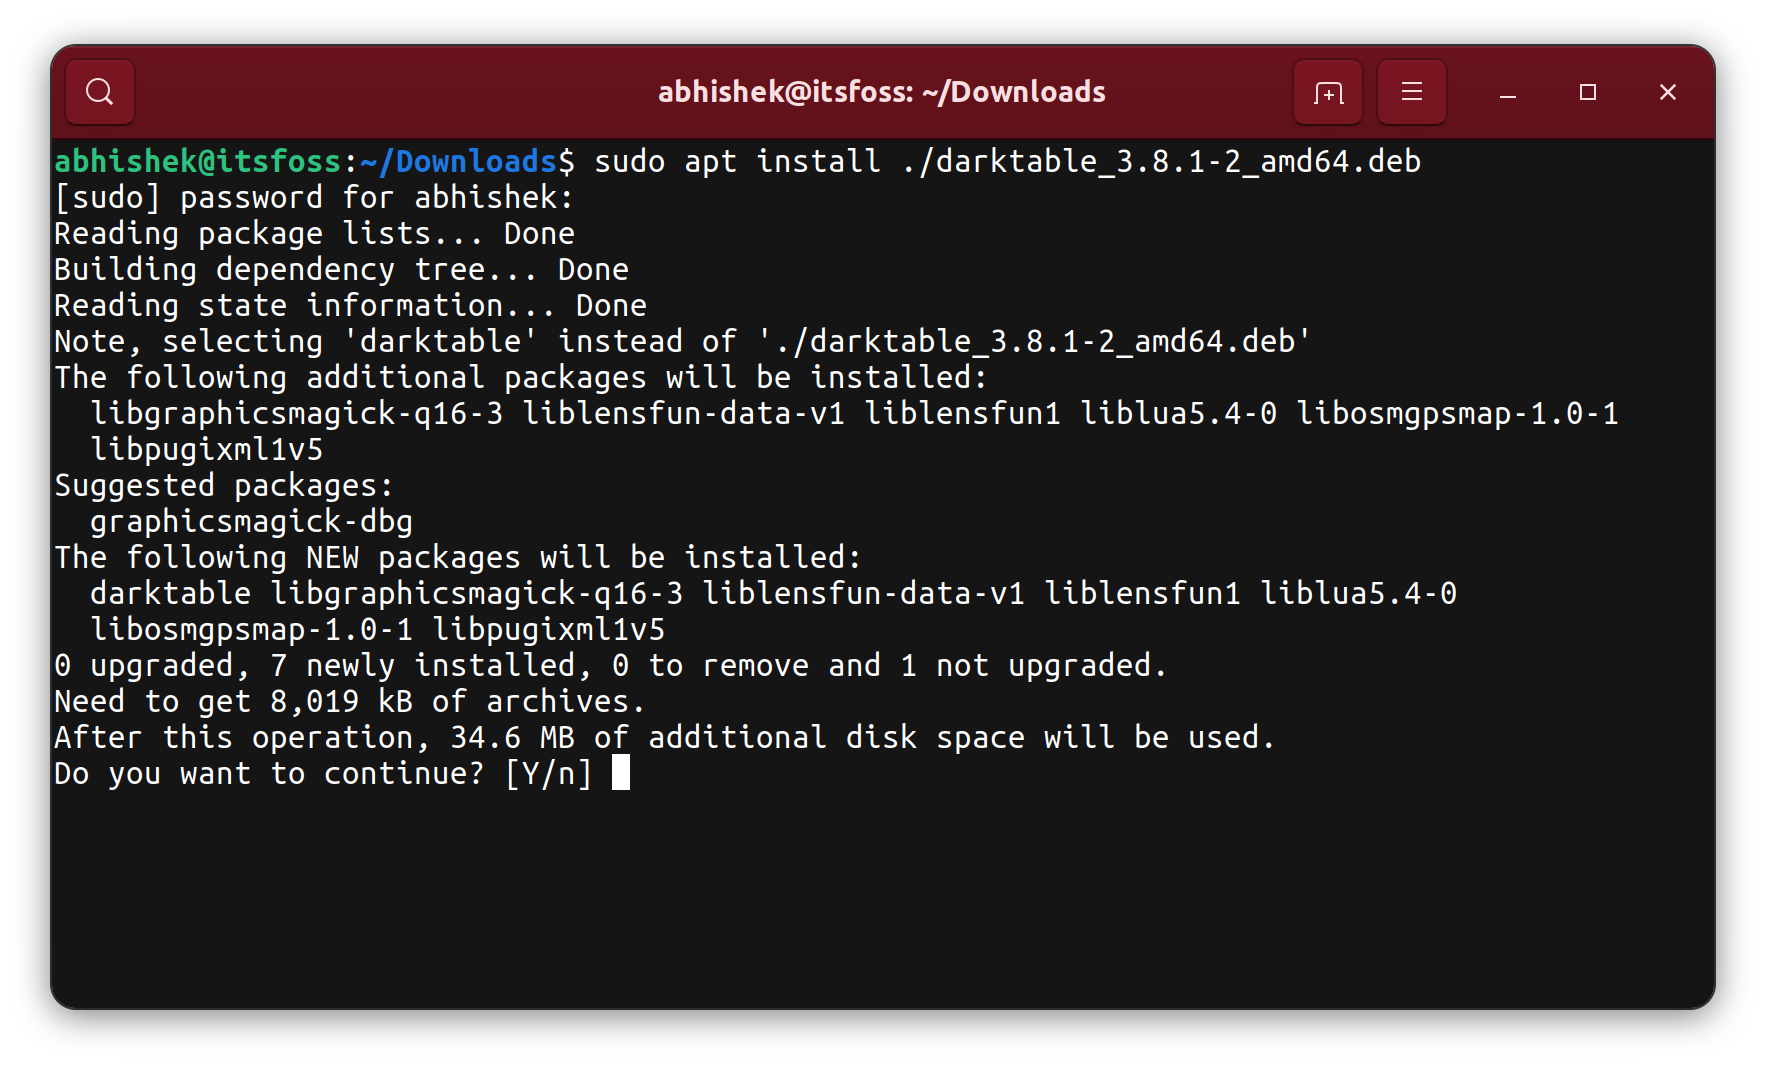
Method 3.2: Using apt
The apt command, which is the modern and preferred package manager on Ubuntu, can also directly install .deb files. This is generally the most recommended command-line method as it seamlessly handles dependency resolution.
Steps:
- Open the Terminal: Press
Ctrl + Alt + T. - Navigate to the Directory: Use
cdto go to the folder containing the.debfile.
bash

cd Downloads
- Install the .deb file: Use the
apt installcommand with the.prefix to indicate a local file.
bash

sudo apt install ./your_package_name.deb
Replaceyour_package_name.debwith the actual filename.- The
./is crucial here to tellaptthat you’re referring to a file in the current directory. aptwill automatically check for and install any necessary dependencies from your configured software sources.
- The
This method is highly recommended for command-line installations because it combines the ease of apt with the ability to install local files, all while ensuring that dependencies are met.
Important Considerations
While installing .deb files is generally straightforward, there are a few crucial points to keep in mind to ensure a smooth and secure experience:
Verifying the Source of .deb Files
This is arguably the most critical aspect of installing .deb files manually. Unlike software installed from Ubuntu’s official repositories, which are vetted for security and stability, .deb files downloaded from the internet come from a variety of sources, some of which may be untrustworthy.
- Download from Official Websites: Always prioritize downloading
.debfiles directly from the official website of the software developer. This minimizes the risk of downloading a tampered or malicious file. - Be Wary of Third-Party Repositories or Download Sites: While some third-party sites can be legitimate, others may host outdated or even malicious versions of software. Exercise extreme caution.
- Check for Digital Signatures: Some developers provide checksums (like MD5 or SHA256) or even GPG signatures for their
.debfiles. If available, verify these against the downloaded file to ensure its integrity and authenticity. Instructions for this are usually provided on the download page.
Understanding Dependencies
As mentioned, .deb files often rely on other software packages (libraries, utilities) to function correctly.
- Automatic Resolution: The Ubuntu Software Center, Gdebi, and
apt install ./file.debare designed to automatically resolve and install these dependencies from your configured software repositories. - Manual Resolution: If you use
dpkg -iand encounter dependency errors, you’ll need to usesudo apt --fix-broken installor manually identify and install the missing packages usingsudo apt install package_name.
Software Updates
Packages installed via .deb files, especially those not obtained from official repositories or added as a Personal Package Archive (PPA), might not automatically update when you run sudo apt update && sudo apt upgrade.
- PPAs (Personal Package Archives): For ongoing updates, developers often provide a PPA. Adding a PPA to your system integrates their software into your
aptsystem, allowing it to be updated alongside your other system packages. You’ll typically find instructions on how to add a PPA on the software’s download page. - Manual Reinstallation: If the software doesn’t use a PPA, you might need to periodically re-download the latest
.debfile from the developer’s website and reinstall it to get updates.
Removing .deb Packages
Just as you can install .deb packages, you can also remove them.
- Using Ubuntu Software Center: Open the Software Center, search for the installed application, and click the “Remove” or “Uninstall” button.
- Using Gdebi: Open Gdebi, search for the package within Gdebi, and the option to uninstall should be available.
- Using the Terminal: You can remove packages by their package name (not the
.debfilename) usingaptordpkg. For example:
bash

sudo apt remove package_name
or
bash

sudo dpkg -r package_name
You can find the exactpackage_nameby looking at the “Package” field in the Ubuntu Software Center when the application is selected, or by usingdpkg -l | grep search_term.

Conclusion
Installing .deb files on Ubuntu is a fundamental skill that unlocks a wider range of software possibilities beyond the standard repositories. Whether you opt for the simplicity of the graphical Ubuntu Software Center, the focused efficiency of Gdebi, or the powerful control of the command line with apt or dpkg, you now have the knowledge to manage these standalone packages with confidence.
Remember to always prioritize security by downloading files from trusted sources. By understanding the process and its nuances, you can effectively expand your Ubuntu experience, installing the applications that best suit your needs and workflow. With these methods at your disposal, you’re well-equipped to navigate the diverse landscape of Ubuntu software.
aViewFromTheCave is a participant in the Amazon Services LLC Associates Program, an affiliate advertising program designed to provide a means for sites to earn advertising fees by advertising and linking to Amazon.com. Amazon, the Amazon logo, AmazonSupply, and the AmazonSupply logo are trademarks of Amazon.com, Inc. or its affiliates. As an Amazon Associate we earn affiliate commissions from qualifying purchases.