In an ever-accelerating digital landscape where technology dictates the pace of productivity and creativity, the performance of your computer isn’t just a convenience – it’s a critical asset. For anyone using Windows 11, from the dedicated gamer and creative professional to the remote worker and small business owner, maintaining a fast, reliable, and secure system is paramount. Over time, even the most robust operating systems can accumulate digital clutter, unwanted software, and residual files that degrade performance, compromise stability, and potentially expose you to security risks. This is where the power of a “clean install” comes into play.
A clean install of Windows 11 is more than just a fresh start; it’s a complete system reset, wiping your primary drive clean and installing a pristine copy of the operating system. Think of it as spring-cleaning your digital life, but on a grand, foundational scale. Unlike a simple upgrade or a system refresh that retains some old data, a clean install purges all previous data, ensuring that your new Windows 11 environment is free from bloatware, lingering malware, and fragmented files that bog down your system. This guide will walk you through every step of this essential process, not just how to do it, but why it’s a smart strategic move for your tech, your brand, and even your finances.
Why a Clean Windows 11 Install is Your PC’s Best Friend
The decision to embark on a clean install might seem daunting, especially if you’re not deeply familiar with system operations. However, understanding the profound benefits can transform it from a chore into a strategic investment in your digital future.
The Performance and Stability Imperative
Imagine your computer as a high-performance vehicle. Over months or years, repeated software installations, uninstalls, driver updates, and general usage leave behind residual files, registry entries, and unnecessary startup programs. These act like digital grit and grime, slowly but surely eroding your system’s efficiency. A clean install is like taking that vehicle back to the factory floor, rebuilding it from the ground up with only the essential components. The result?
- Blazing Fast Boot Times: Experience the thrill of your PC starting up in mere seconds, unburdened by unnecessary startup applications.
- Responsive Applications: Programs launch faster, switch more smoothly, and perform their tasks with newfound agility.
- Enhanced System Stability: Say goodbye to frustrating crashes, freezes, and the dreaded “blue screen of death” often caused by conflicting software or corrupted system files. A clean slate minimizes these occurrences dramatically.
- Optimal Resource Utilization: Without background processes hogging CPU, RAM, and disk I/O, your system’s resources are freed up for the tasks that truly matter, whether it’s rendering a video, compiling code, or running multiple productivity apps simultaneously.
Eradicating Digital Clutter and Malware
Beyond performance, a clean install offers a deep cleanse for your digital environment.
- Bloatware Elimination: Many pre-built PCs come laden with manufacturer-installed software (bloatware) that you neither want nor need. A clean install allows you to bypass this, giving you a lean, mean operating system tailored to your preferences from day one. This contributes significantly to a more organized digital workspace and can prevent unnecessary resource drain.
- Malware Extermination: If you suspect your system has been compromised by stubborn viruses, spyware, or other malicious software that traditional antivirus scans can’t fully remove, a clean install is the ultimate solution. It acts as a digital exorcism, completely erasing any lurking threats from your primary drive. This is crucial for maintaining digital security and protecting sensitive data, an increasingly important aspect of personal and corporate branding.
Future-Proofing Your Digital Workspace and Personal Brand
For professionals, freelancers, and small business owners, a reliable computer is the backbone of their operations. A clean install directly contributes to:
- Enhanced Productivity: Fewer slowdowns and crashes mean more uninterrupted work time. This translates directly into higher output, faster client delivery, and ultimately, a more productive workflow.
- Professional Image: A smoothly running system reduces frustration and project delays, allowing you to present a more polished and professional image to clients and collaborators. Downtime due to technical issues can damage your reputation and brand perception.
- Cost-Effectiveness and Value Retention: By optimizing your existing hardware, a clean install can extend the lifespan of your current PC, delaying the need for expensive upgrades or replacements. This is a smart financial move, maximizing the return on your tech investment. Furthermore, if you ever decide to sell or gift your PC, a fresh install ensures your personal data is securely erased, and the new owner gets a device running at peak performance, increasing its resale value.
Essential Preparations: Setting the Stage for a Seamless Installation
The success of your Windows 11 clean install hinges on meticulous preparation. Skipping these crucial steps can lead to data loss, frustrating delays, or an incomplete setup. Consider this phase your mission briefing before embarking on the main operation.
The Critical Art of Data Backup
This is arguably the single most important step. A clean install will erase everything on the drive where Windows 11 is installed.
- Identify Critical Data: Go through your documents, photos, videos, music, project files, browser bookmarks, emails (if stored locally), and any other personal or professional data you cannot afford to lose.
- Choose Your Backup Method:
- External Hard Drive: A reliable and common method. Simply copy and paste your important folders.
- Cloud Storage: Services like OneDrive, Google Drive, Dropbox, or iCloud offer automated syncing and offsite storage, providing an extra layer of security against local drive failure.
- Network-Attached Storage (NAS): For those with home or small business networks, a NAS provides robust, centralized backup capabilities.
- System Imaging (Optional but Recommended): For advanced users, creating a full system image using tools like Macrium Reflect Free or even Windows’ built-in backup tools allows you to revert to your previous system state if needed. While a clean install is the goal, an image can be a safety net.
- Verify Your Backup: After backing up, take the time to actually open a few files from your external drive or cloud storage to ensure they are accessible and not corrupted. The peace of mind this provides is invaluable.
Gathering Your Digital Toolkit: Drivers and Product Keys
While Windows 11 includes many generic drivers, having the specific ones for your hardware can prevent post-installation headaches and ensure optimal performance.
- Download Essential Drivers: Visit your PC manufacturer’s website (for pre-built systems) or the individual component manufacturers (for custom builds) – especially for your motherboard (chipset, audio, network/Wi-Fi), graphics card, and any specialized peripherals. Download the latest Windows 11 compatible drivers to an external USB drive.
- Locate Your Windows 11 Product Key:
- Digital License: If your Windows 11 license is tied to your Microsoft account (most common for upgrades or purchases from Microsoft Store), you won’t need a key; it will reactivate automatically after signing in.
- Physical Key: If you bought a retail box, the key will be on a sticker or card.
- OEM Key (Pre-installed PCs): Often embedded in the BIOS/UEFI firmware, meaning Windows 11 should activate automatically without manual input.
- Using a Key Finder: Tools like NirSoft’s ProduKey can sometimes retrieve keys from your current installation, though this is less necessary with digital licenses.
- Other Software Installers: If you use specific applications (e.g., Microsoft Office, Adobe Creative Suite, specialized business software), ensure you have their installation files or know how to re-download them, along with any necessary product keys or account credentials.
Crafting Your Windows 11 Installation Media
You’ll need a bootable USB drive or DVD to start the clean install process. A USB drive (at least 8GB) is generally preferred due to speed and convenience.
- Download the Windows 11 Media Creation Tool: Visit the official Microsoft Windows 11 download page. This tool will simplify the process of downloading the ISO file and creating a bootable USB drive.
- Create the Bootable USB: Follow the on-screen instructions of the Media Creation Tool. Ensure you select the correct USB drive, as the tool will format it, erasing all its contents.
Pre-Installation System Checks and BIOS/UEFI Configuration
A few final checks will ensure a smooth transition.
- Check Hardware Compatibility: Ensure your PC meets Windows 11’s minimum system requirements (TPM 2.0, Secure Boot, compatible CPU, etc.). While you’re likely already running Windows 11, it’s a good mental check.
- Disable Secure Boot and TPM (Temporarily, if troubleshooting): While Windows 11 requires these, sometimes temporarily disabling them in your BIOS/UEFI (if you encounter issues during installation with a non-standard setup) can help, then re-enable them after the install for security. For a standard clean install, they should generally remain enabled.
- Set Boot Order: Restart your computer and enter your BIOS/UEFI settings (usually by pressing DEL, F2, F10, or F12 during startup). Navigate to the “Boot” section and set your USB drive as the primary boot device. Save changes and exit.
The Step-by-Step Clean Installation Process
With all your preparations complete, you’re ready to initiate the installation. This is where the digital slate gets wiped clean, and your new Windows 11 environment begins to take shape.
Booting from Your Installation Media
Once your boot order is configured and the USB drive is inserted, restart your computer.
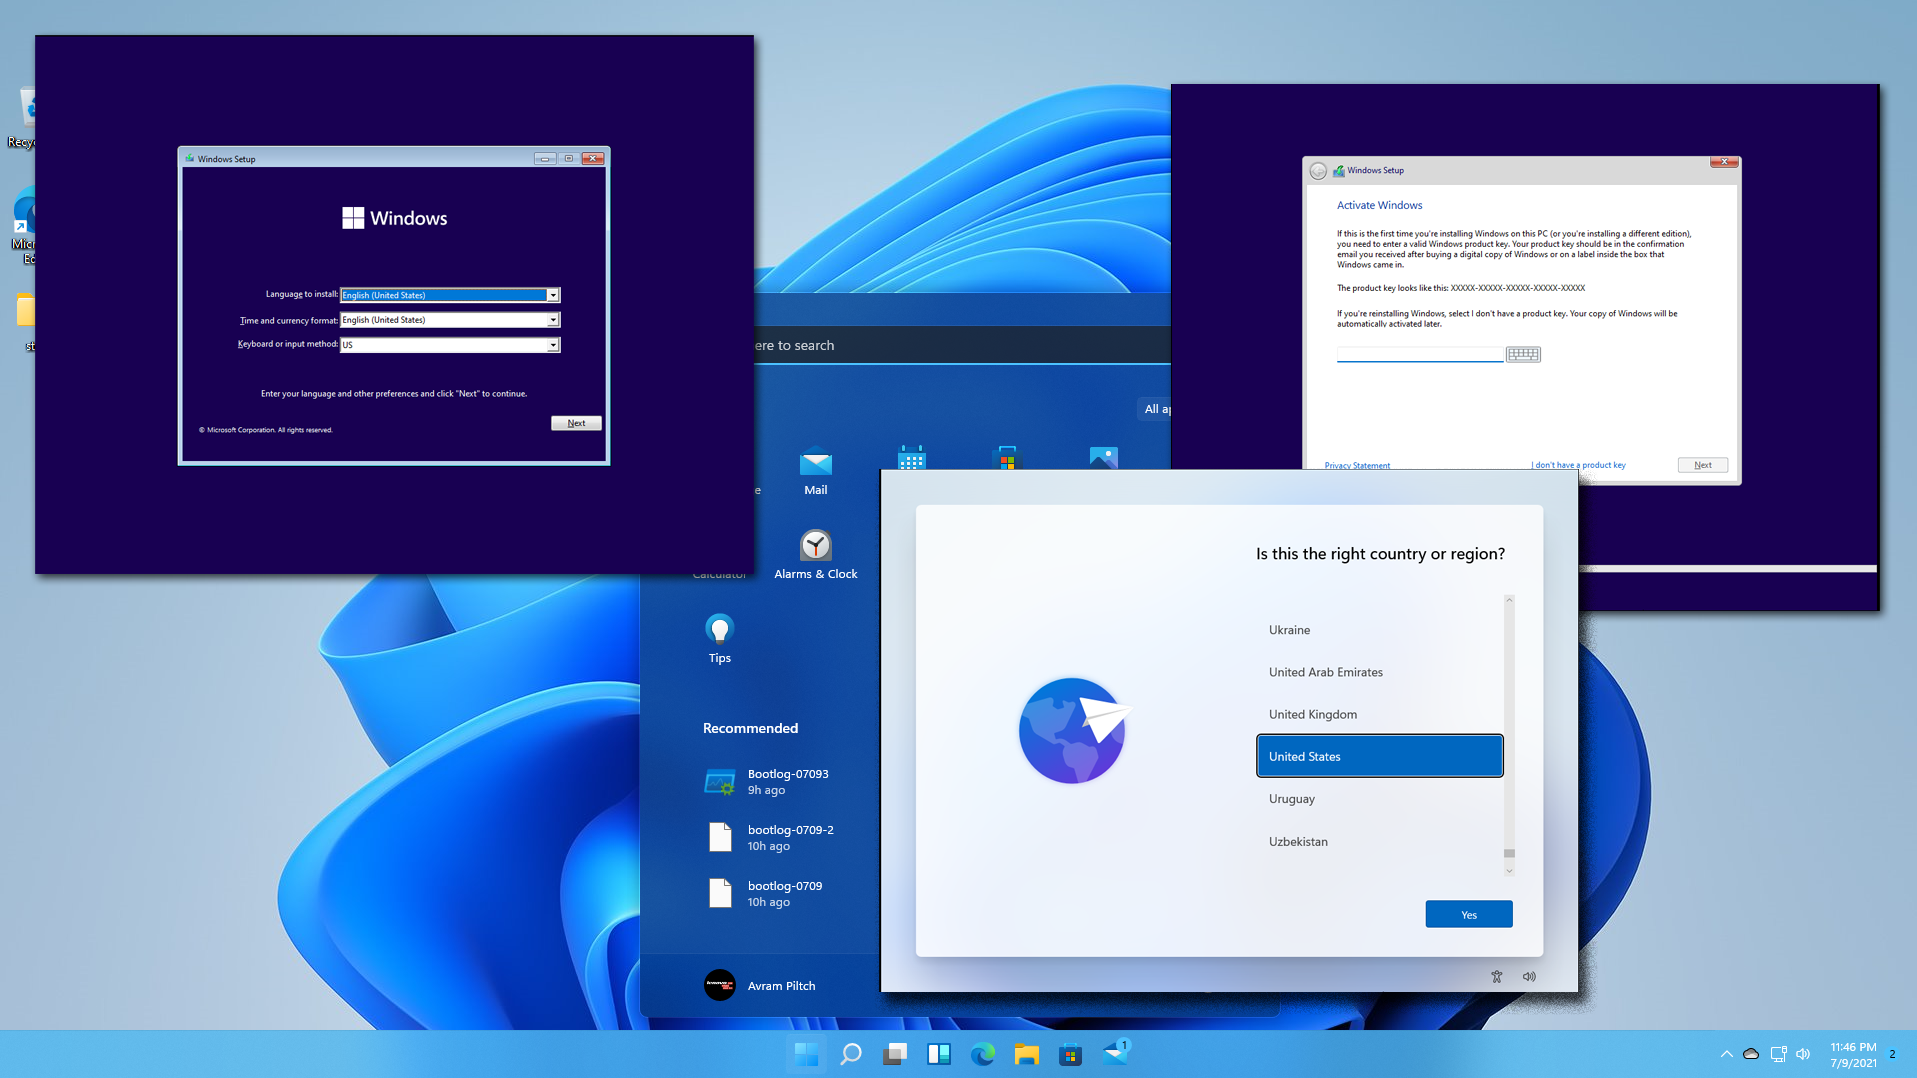
- Initiate Boot: As your system powers on, it should automatically detect and boot from your USB drive. You might see a “Press any key to boot from USB” message – if so, follow it promptly.
- Windows Setup: The Windows 11 setup wizard will load. You’ll first be prompted to choose your language, time and currency format, and keyboard layout. Make your selections and click “Next.”
Navigating the Windows Setup Wizard
The initial setup screens are straightforward, guiding you through the prerequisites for installation.
- “Install now”: Click this button to proceed.
- Product Key: If prompted, enter your Windows 11 product key. If you have a digital license linked to your Microsoft account, you can often select “I don’t have a product key” and activate later by signing into your account.
- Operating System Selection: If your installation media contains multiple versions of Windows 11 (e.g., Home, Pro), choose the edition you have a license for.
- License Terms: Read and accept the Microsoft Software License Terms. This is a standard procedure for any operating system installation.
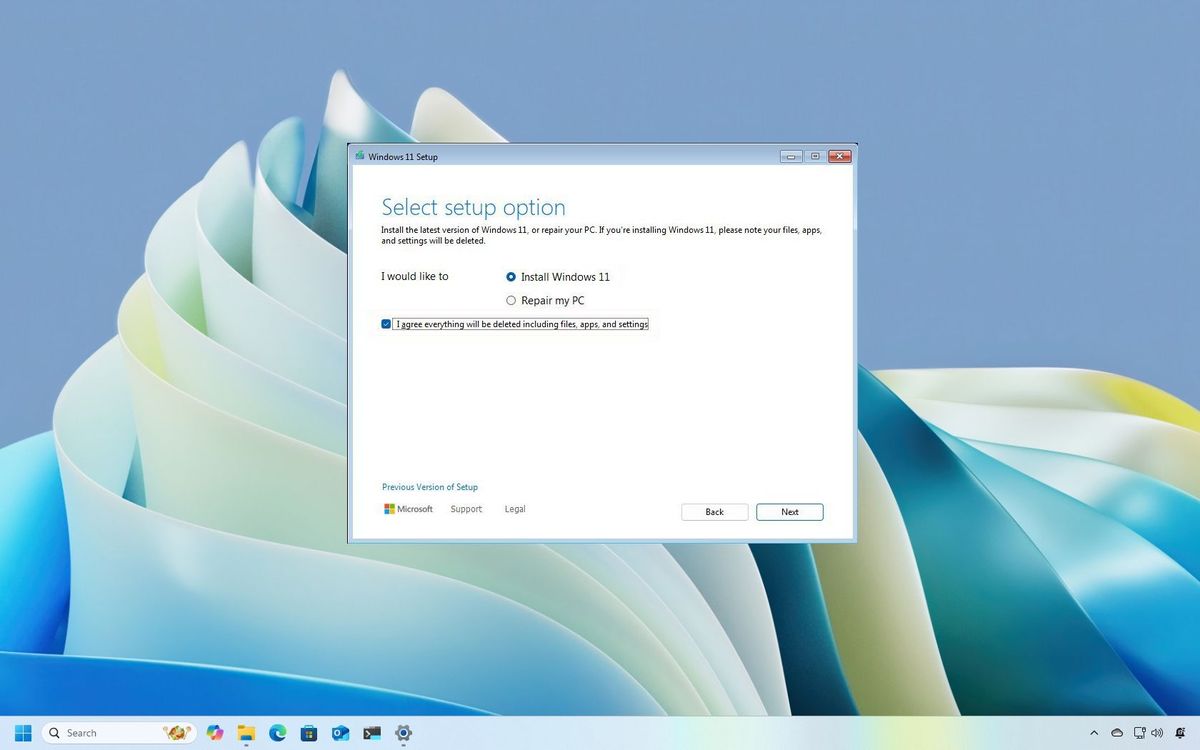
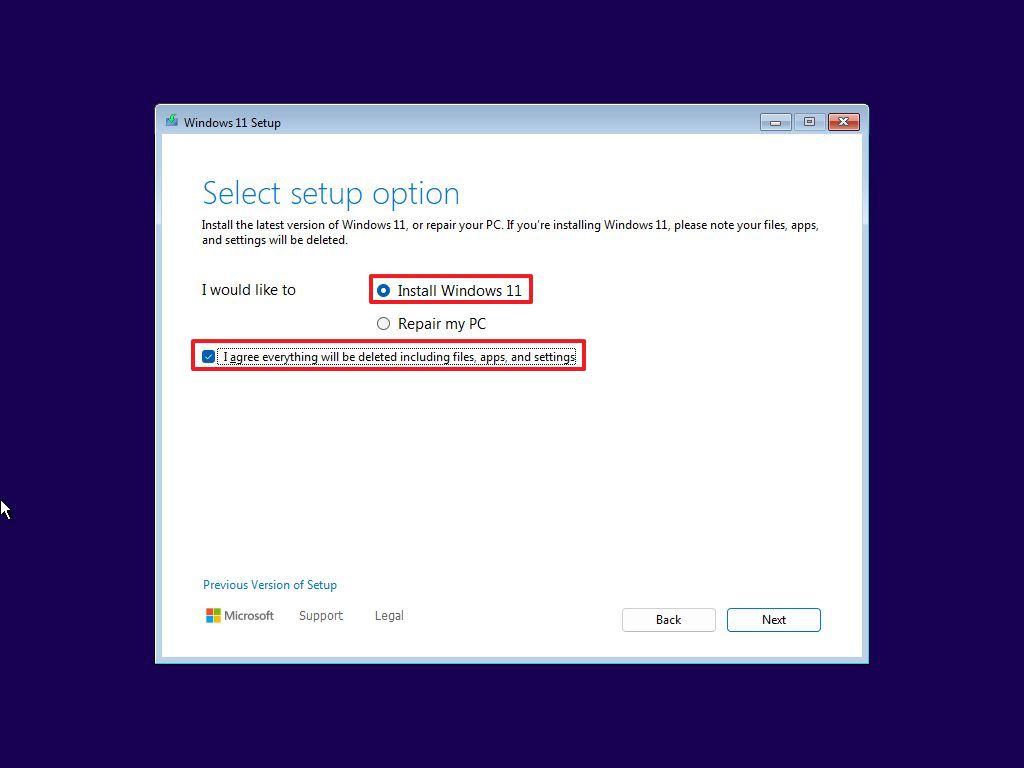
- Installation Type: This is a crucial step for a clean install. Select “Custom: Install Windows only (advanced).” Do NOT choose “Upgrade: Install Windows and keep files, settings, and applications,” as this defeats the purpose of a clean install.
Disk Partitioning and Formatting: The Crucial Choices
This is where you manage your storage drives and prepare them for the new operating system. Exercise extreme caution here, as incorrect choices can lead to permanent data loss.
- Identify Your Primary Drive: You will see a list of drives and partitions. Your primary drive (where Windows was previously installed) will usually have multiple partitions (e.g., “Drive 0 Partition 1,” “Drive 0 Partition 2,” etc.).
- Delete Existing Partitions: For a truly clean install, select each partition associated with your primary drive (e.g., System Reserved, Primary, Recovery partitions) and click “Delete.” Confirm when prompted. Continue until your primary drive shows as “Drive 0 Unallocated Space.” This ensures all old data and configurations are erased.
- Important Note: If you have multiple physical drives and want to preserve data on a secondary drive, ensure you only delete partitions on the drive where you intend to install Windows.
- Create New Partition: Select the “Unallocated Space” and click “New.” The setup wizard will typically suggest the maximum available size. Apply this to create a single, large partition for Windows. It might also create small system partitions automatically.
- Format: Select the newly created main partition (e.g., “Drive 0 Partition 2” or similar) and click “Format.” This prepares the partition for the Windows file system.
- Select Installation Destination: With your main partition formatted, select it and click “Next” to begin the file copying process.
Initial Windows 11 Configuration
Windows will now copy files and install components, restarting multiple times. Once this phase is complete, you’ll be guided through the initial setup screens:
- Region and Keyboard Layout: Confirm your region and primary keyboard layout.
- Network Connection: Connect to a Wi-Fi or Ethernet network. This is usually required for Windows 11 setup to proceed and check for updates.
- Microsoft Account: Sign in with your Microsoft account (Outlook, Hotmail, Live). This links your digital license and syncs settings. You can create a local account during setup if you prefer, but it might limit some features.
- PIN Creation: Set up a PIN for faster login.
- Privacy Settings: Review and customize your privacy settings (location, diagnostic data, tailored experiences, etc.).
- Device Usage (Optional): Tell Windows how you intend to use your device for personalized suggestions.
- OneDrive Setup: Choose whether to back up your files to OneDrive.
- Windows Hello: Set up facial recognition or fingerprint scanning if your device supports it.
After these steps, Windows 11 will finalize its setup, and you’ll be greeted by the fresh, clean desktop. Congratulations – the hardest part is over!
Post-Installation: Optimizing Your Fresh Windows 11 Environment
Your PC is now running on a clean slate, but the journey to peak performance and productivity isn’t quite finished. These final steps are crucial for ensuring system stability, security, and a seamless user experience.
Installing Essential Drivers and System Updates
While Windows 11 might be functional, installing the specific drivers you gathered earlier is vital.
- Install Chipset Drivers First: These are the foundational drivers for your motherboard. Install them before anything else.
- Install Graphics Drivers: Whether you have an NVIDIA, AMD, or Intel integrated GPU, installing the latest drivers from the manufacturer’s website will unlock full display capabilities, improve gaming performance, and ensure smooth graphics.
- Install Audio and Network Drivers: If you don’t have internet access or sound, these are your next priority.
- Other Peripheral Drivers: Install drivers for printers, webcams, or other specialized devices.
- Run Windows Update: Go to
Settings > Windows Updateand repeatedly check for updates. Install all critical, recommended, and optional updates. This ensures your system has the latest security patches, feature enhancements, and any drivers Windows Update might provide. Keep checking until no more updates are found.
Restoring Your Data and Applications
Now is the time to bring your digital life back into your new environment.
- Transfer Your Backed-Up Data: Copy your documents, photos, videos, and other personal files from your external backup drive or cloud storage back to their appropriate folders on your C: drive (or other designated data drives).
- Reinstall Your Applications: Systematically reinstall the software you use daily. Start with essential productivity tools (web browser, office suite, communication apps) and then move to more specialized software. Download official installers from trusted sources to avoid bloatware or malware.
- Configure Settings: Reconfigure your personalized settings for applications, browsers, and Windows itself (e.g., desktop background, notification settings, power options).
Enhancing Security and Privacy Settings
A clean install provides an excellent opportunity to reinforce your digital defenses.
- Antivirus/Antimalware: While Windows Security (Microsoft Defender) is robust, consider adding a reputable third-party antivirus solution if you prefer. Ensure real-time protection is active.
- Firewall: Verify Windows Defender Firewall is enabled and configured correctly to protect against unauthorized network access.
- Privacy Settings Review: Revisit
Settings > Privacy & securityand fine-tune your preferences for app permissions, diagnostic data, activity history, and advertising ID. This protects your personal data and helps maintain your digital footprint according to your brand’s privacy values. - Strong Passwords & Two-Factor Authentication (2FA): As you set up accounts for new applications, always use strong, unique passwords and enable 2FA whenever available. Consider a password manager to securely store them.
Fine-Tuning for Peak Performance and Productivity
With everything in place, a few final adjustments can squeeze out every drop of performance and tailor your system for maximum efficiency.
- Power Plan Optimization: In
Control Panel > Power Options, select a “High performance” or “Balanced” power plan to ensure your CPU isn’t throttled unnecessarily. For laptops, consider a balanced plan for battery life. - Startup Programs Management: Use Task Manager (
Ctrl+Shift+Esc) to disable unnecessary startup programs. Fewer programs launching with Windows mean faster boot times and more available RAM. - Disk Cleanup and Defragmentation: Periodically run Disk Cleanup to remove temporary files and system junk. For traditional HDDs, defragmentation can improve performance, but for SSDs, it’s unnecessary and can reduce drive lifespan.
- Driver Updates (Ongoing): Make it a habit to check for updated drivers periodically, especially for your graphics card, as these often bring significant performance improvements and bug fixes.
- Personalization: Customize your desktop, themes, and accessibility settings to create a workspace that enhances your comfort and workflow. A personalized workspace is often a more productive one.
By undertaking a clean install of Windows 11 and following these optimization steps, you’re not just performing maintenance; you’re investing in the longevity, security, and performance of your most vital digital tool. This translates directly into greater productivity, enhanced digital security, and ultimately, a more efficient and impactful presence in both your personal and professional endeavors – a true win for your tech, your brand, and your wallet. Enjoy your revitalized, blazing-fast Windows 11 experience!
aViewFromTheCave is a participant in the Amazon Services LLC Associates Program, an affiliate advertising program designed to provide a means for sites to earn advertising fees by advertising and linking to Amazon.com. Amazon, the Amazon logo, AmazonSupply, and the AmazonSupply logo are trademarks of Amazon.com, Inc. or its affiliates. As an Amazon Associate we earn affiliate commissions from qualifying purchases.