In today’s visually driven world, the fonts we choose play a surprisingly significant role. From crafting a compelling brand identity to personalizing your digital documents, typography is more than just letters on a screen; it’s a powerful communication tool. But what happens when you encounter a font that perfectly captures the essence of your message, only to realize it’s not readily available on your system? The answer lies in understanding how to install fonts. This seemingly simple technical task unlocks a universe of creative possibilities, impacting everything from your professional brand to your personal productivity.

The ability to install new fonts is a cornerstone of digital customization. Whether you’re a graphic designer seeking that perfect typeface for a client’s logo, a blogger aiming for a unique visual voice, a student organizing research papers, or simply someone who wants to spice up their everyday documents, knowing how to install fonts is an essential skill. It empowers you to break free from the default options and inject personality, professionalism, and aesthetic appeal into your digital creations. This comprehensive guide will walk you through the process, ensuring you can seamlessly integrate new fonts into your workflow, enhancing both your brand and your creative output.
Mastering Font Installation: A Technical Dive into Personalization
The process of installing fonts might seem daunting at first, but it’s a straightforward procedure once you understand the underlying mechanics. At its core, installing a font involves making a new typeface accessible to your operating system and, consequently, to all the applications that rely on it for text rendering. This allows your word processors, design software, presentation tools, and even web browsers to recognize and utilize your newly acquired font.
Understanding Font File Types
Before we delve into the installation process, it’s crucial to understand the different types of font files you’ll encounter. The two most common formats are:
-
TrueType Fonts (.ttf): This is one of the oldest and most widely supported font formats. TrueType fonts offer good scalability and are compatible with a vast range of operating systems and applications. They are often favored for their simplicity and broad compatibility.
-
OpenType Fonts (.otf): A more modern and advanced format, OpenType fonts build upon the strengths of TrueType and PostScript. They offer greater flexibility, including support for advanced typographic features like ligatures, stylistic alternates, and contextual substitutions. OpenType fonts are generally preferred for professional design work due to their richer feature set.
While other font formats exist (like Web Open Font Format – .woff for web usage), .ttf and .otf are the most common for desktop installations. The installation process for both is largely similar.
Installing Fonts on Windows
Windows offers a remarkably user-friendly approach to font installation, making it accessible even to novice users. Here’s how you can add new fonts to your system:
Method 1: The Drag-and-Drop Technique (Quickest)
- Locate Your Font Files: Download your desired font files (usually in .ttf or .otf format) and save them in a location you can easily access, such as your Downloads folder or a dedicated “Fonts” folder.
- Open the Fonts Folder: Navigate to
C:WindowsFonts. You can do this by typing “Fonts” into the Windows search bar and selecting “Fonts” from the results, or by directly pasting the path into the File Explorer address bar. - Drag and Drop: Simply drag the font file(s) from their original location and drop them directly into the Windows Fonts folder.
- Automatic Installation: Windows will automatically detect the new font files and begin the installation process. You’ll typically see a progress window briefly appear. Once it closes, your font is installed and ready to use.
Method 2: Using the Font Settings (More Control)
- Locate Your Font Files: As with the drag-and-drop method, ensure your font files are easily accessible.
- Open Font Settings: Click on the Start Menu, then select Settings (the gear icon). From the Settings menu, choose Personalization. In the Personalization sidebar, click on Fonts.
- Drag and Drop into Settings: Within the Fonts settings window, you’ll see a section with a dotted box labeled “Drag and drop to install.” Drag your font file(s) from their location and drop them into this designated area.
- Installation Confirmation: The system will then process and install the fonts. You can see your newly installed fonts listed alphabetically in the “Available fonts” section.
Method 3: Right-Click Installation (Individual Fonts)
- Locate Your Font File: Find the specific .ttf or .otf font file you want to install.
- Right-Click: Right-click on the font file.
- Select “Install”: From the context menu that appears, select the “Install” option. If you have administrative privileges, it will install for all users. If not, it will install for your user account.
- Administrator Prompt (if applicable): You might be prompted to confirm the installation by your User Account Control (UAC). Click “Yes” to proceed.
Once installed, your new fonts will appear in the font selection menus of applications like Microsoft Word, PowerPoint, Adobe Photoshop, and others. To verify, open one of these applications and look for your new font in the font dropdown list.
Installing Fonts on macOS

macOS also provides a straightforward and intuitive method for installing fonts, primarily through the Font Book application.
Method 1: Using Font Book (Recommended)
- Locate Your Font Files: Download your font files (.ttf or .otf) and place them in an easily accessible folder.
- Open Font Book: You can find Font Book in your Applications folder, or by using Spotlight search (Command + Spacebar and type “Font Book”).
- Add Fonts to Font Book:
- Drag and Drop: Drag your font file(s) directly into the Font Book window.
- File Menu: Within Font Book, go to File > Add Fonts… and navigate to the location of your font files, then select them and click “Open.”
- Automatic Validation: Font Book will automatically validate the fonts for any potential issues. If a font is valid, it will appear in your font list.
- Install for User or All Users: By default, fonts are installed for your current user account. If you wish to make them available to all users on the Mac, you can change this preference in Font Book’s settings (Font Book > Preferences > Default Install Location and choose “All Users”).
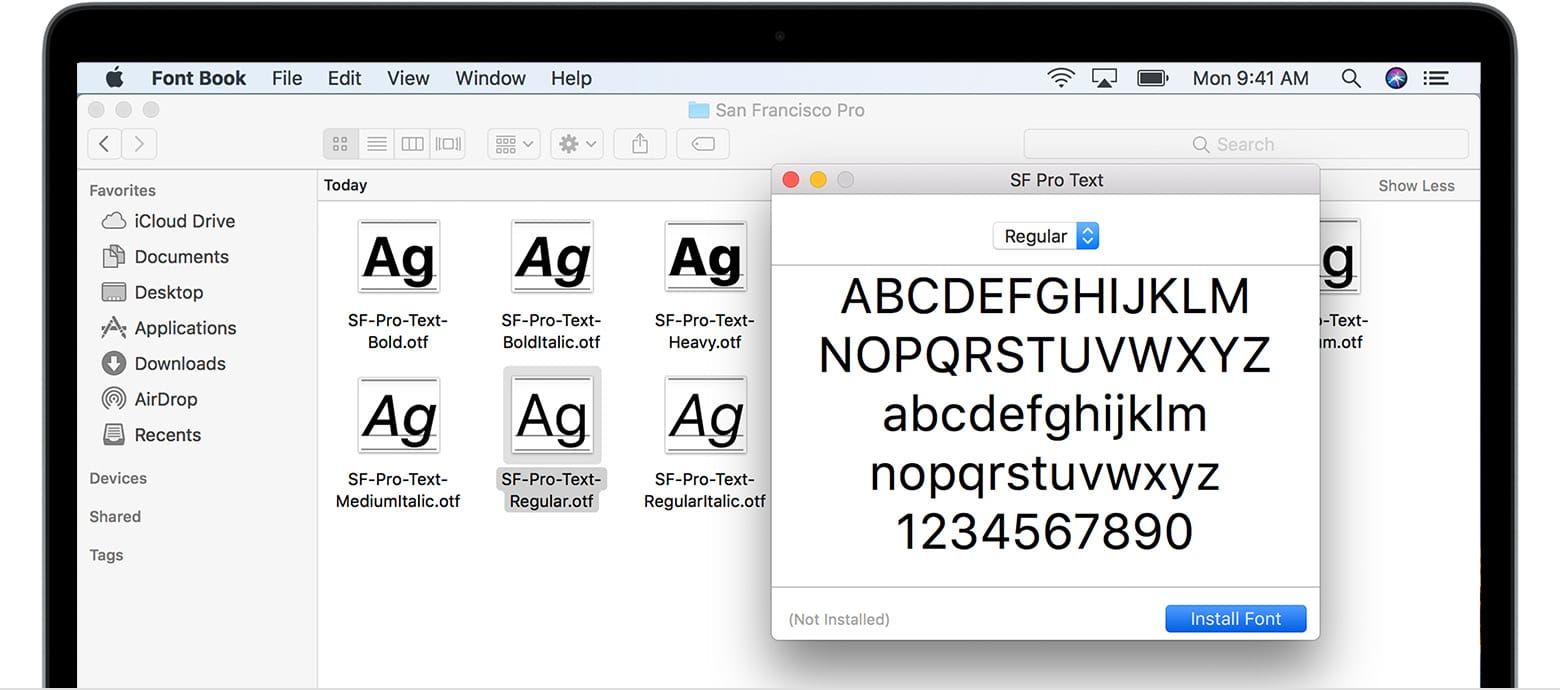
Method 2: Double-Click Installation
- Locate Your Font File: Find the specific .ttf or .otf font file.
- Double-Click: Double-click the font file. This will automatically open Font Book and present you with a preview of the font.
- Click “Install Font”: In the Font Book preview window, click the “Install Font” button.
After installation, your new fonts will be available in the font menus of applications like Pages, Keynote, Microsoft Office, and Adobe Creative Suite. To confirm, open any of these applications and check the font dropdown list.
Integrating Fonts for Enhanced Branding and Personalization
The ability to install fonts is not just a technical capability; it’s a strategic advantage that can significantly impact your brand identity and personal expression.
Elevating Your Brand Identity with Typography
For businesses and individuals alike, a consistent and well-chosen set of fonts is a cornerstone of a strong brand. Typography communicates personality, tone, and professionalism.
- Corporate Identity: For businesses, selecting unique fonts for logos, headlines, and body text helps create a memorable and recognizable visual identity. When you can install custom fonts, you’re not limited to generic system fonts that competitors might also be using. This allows for greater differentiation and a more distinct brand presence. Imagine a luxury brand opting for an elegant serif font, or a tech startup choosing a clean, modern sans-serif. The choice of font directly influences how your brand is perceived.
- Marketing Materials: From brochures and flyers to social media graphics and website banners, the fonts used in marketing materials are crucial for conveying the brand’s message effectively. Installing specific fonts allows for consistent application across all touchpoints, reinforcing brand recognition.
- Personal Branding: For freelancers, influencers, and professionals building their personal brand, typography is a key element in showcasing their unique style and expertise. A distinctive font in your resume, portfolio, or online profiles can make you stand out from the crowd.
By carefully curating and installing fonts that align with your brand’s values and target audience, you can create a more cohesive, professional, and impactful visual communication strategy.
Boosting Productivity and Personalization
Beyond branding, installing fonts can also enhance your personal productivity and the way you interact with digital content.
- Document Readability: Different fonts are optimized for different purposes. For lengthy reports or academic papers, you might choose a highly readable serif font. For presentations or digital documents where visual impact is key, a bold sans-serif might be more appropriate. Having a wider selection allows you to tailor your documents for optimal readability and aesthetic appeal.
- Creative Projects: For anyone involved in creative pursuits – be it writing, designing, or even coding – having a diverse font library is essential. New fonts can inspire new ideas, allow for greater stylistic expression, and enable you to achieve specific visual outcomes in your projects.
- Customization: Ultimately, installing fonts is about personalization. It allows you to tailor your digital environment to your preferences, making your computer and applications feel more like your own. This can range from making your everyday documents more visually appealing to creating unique invitations or holiday cards.
Troubleshooting Common Font Installation Issues
While font installation is generally smooth, occasional glitches can occur. Here are a few common issues and their solutions:
- Font Not Appearing in Applications: After installation, some applications might need to be restarted before they recognize the new font. Close and reopen the application, and then check the font list again. If it still doesn’t appear, try restarting your computer.
- Corrupted Font Files: If a font fails to install or causes errors, the font file itself might be corrupted. Try downloading the font again from a reputable source.
- Font Licensing: Be mindful of font licenses. Many free fonts are available for personal use, but commercial use often requires purchasing a license. Always check the licensing terms before using a font in a commercial project.
- System Conflicts: In rare cases, a newly installed font might conflict with existing system fonts or other installed fonts. If you suspect this is the case, you can try removing recently installed fonts one by one to identify the culprit. Font Book on macOS and the Fonts folder on Windows allow you to disable or remove fonts.
By understanding these troubleshooting steps, you can ensure a seamless experience when expanding your font library.
Conclusion: Unleashing Your Creative Potential with Fonts
In conclusion, the question “how do you install fonts” opens the door to a world of enhanced digital expression and professional polish. Whether you’re aiming to refine your brand’s visual identity, boost your productivity with more readable documents, or simply inject a personal touch into your digital life, the ability to install and utilize a diverse range of fonts is an invaluable skill. From the simple drag-and-drop methods on Windows to the intuitive Font Book on macOS, the process is designed to be accessible. By mastering font installation, you empower yourself to communicate more effectively, design more compellingly, and ultimately, present yourself and your work in a way that truly stands out. So, go forth, explore the vast landscape of typography, and let your chosen fonts tell your unique story.
aViewFromTheCave is a participant in the Amazon Services LLC Associates Program, an affiliate advertising program designed to provide a means for sites to earn advertising fees by advertising and linking to Amazon.com. Amazon, the Amazon logo, AmazonSupply, and the AmazonSupply logo are trademarks of Amazon.com, Inc. or its affiliates. As an Amazon Associate we earn affiliate commissions from qualifying purchases.